
Delivery Rules - Manage Incoming Email
Manage Your Incoming Email Rules
Email rules help you stay organized by automatically processing messages before they even hit your inbox. You can use these rules to sort newsletters into specific folders, redirect important updates to a colleague, or delete unwanted clutter.
Rules apply only to clean messages (messages not marked as spam) and are processed in the order they were created.
Create a New Rule
Note: New rules are created in a DISABLED state by default. A rule will not process any email until you manually change its status to ENABLED. Whenever you create or modify a rule, you must click the status button to push your changes live.
-
Log in to your User Panel. Use your full email address and password to sign in.
-
Click the Delivery Rules icon on your dashboard.
-
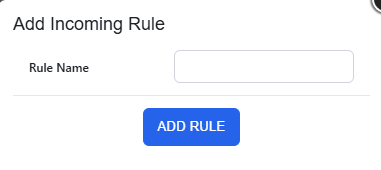
Click the New Rule button.
-
Name your rule. Enter a unique name (use underscores or hyphens instead of spaces) and click Add Rule.

-
Edit your rule. Click the pencil icon next to your new rule to define what it does.
A rule consists of two parts:-
Conditions (what to look for) and
-
Actions (what to do with the message).
-
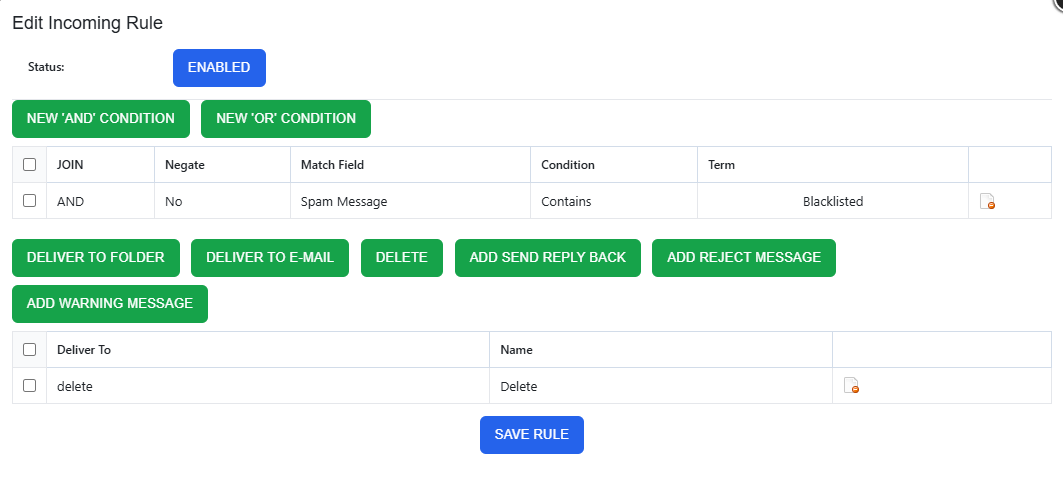
1. Define the Condition
Conditions tell the system which emails to pick up. You can filter by sender, recipient, subject, message size, or List-ID.
-
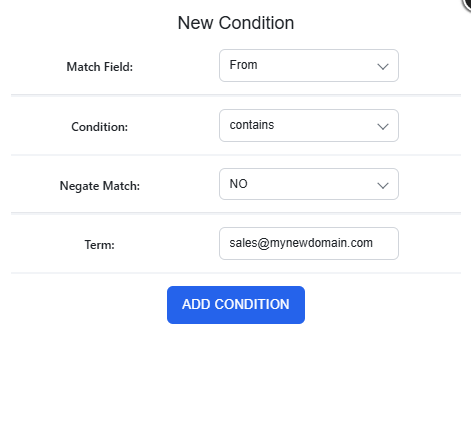
Click New 'AND' Condition (if all criteria must be met) or New 'OR' Condition (if only one of several criteria must be met).
-
Match Field: Select the part of the email to scan (e.g., Subject, From, To).
-
Condition: Choose how to match the text (contains, equals, starts with, ends with).
- Negate Match: Select YES to target emails that do not match your term (perfect for external email warnings).
-
Enter your Term (the specific email address, domain, word or phrase you are looking for).
-
Click Add Condition.

2. Choose Your Actions
Once an email matches your condition, decide what happens next by clicking one of the action buttons
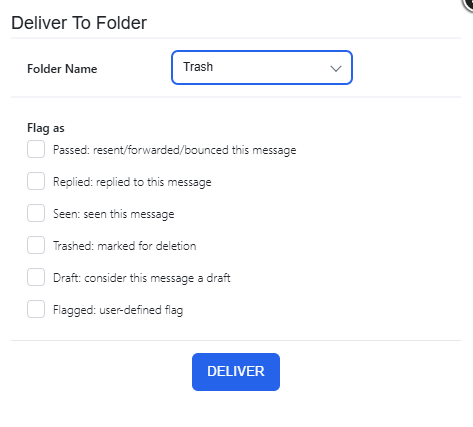
- Deliver to Folder: Move the email to a specific folder. Optionally "Flag" it as Seen, Answered, or Trashed.
For example:

- Deliver to E-mail: Redirect or forward the message to another address.
- Delete: Automatically discard the message.
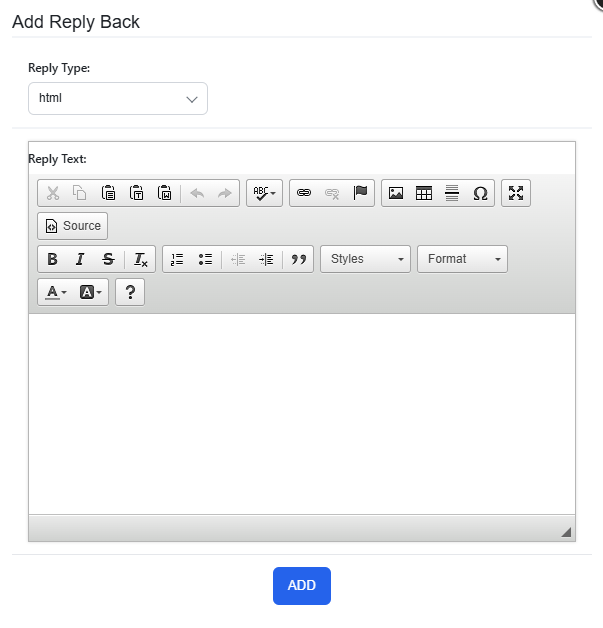
- Add Send Reply Back: Set up an automated response (Autoresponder) using the built-in HTML editor.
For example:
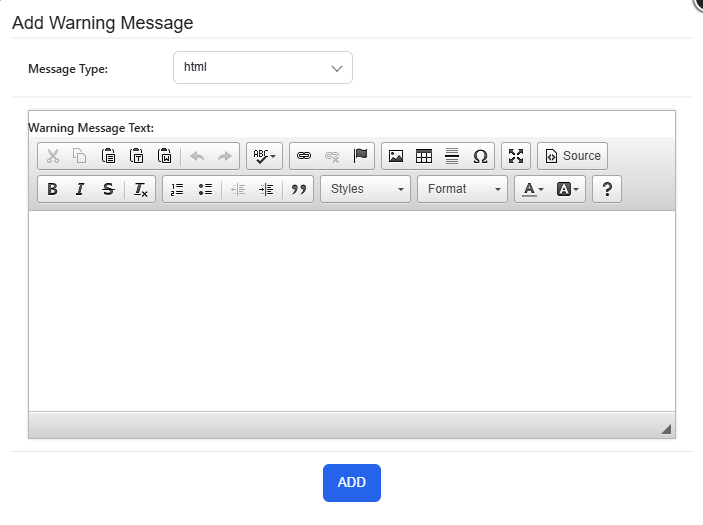
- Add Warning Message: Insert a security banner or custom notification at the very top of the email.
For example:


Pro Tip: If you want to forward a message but also keep a copy in your own Inbox, add two actions: one to "Deliver to Email" and a second one to "Deliver to Folder" (selecting your Inbox).
3. Enable and Activate Your Rule
To prevent unfinished rules from running, new rules are created in a Disabled state.
To make your rule active, you must update its status within the editor:
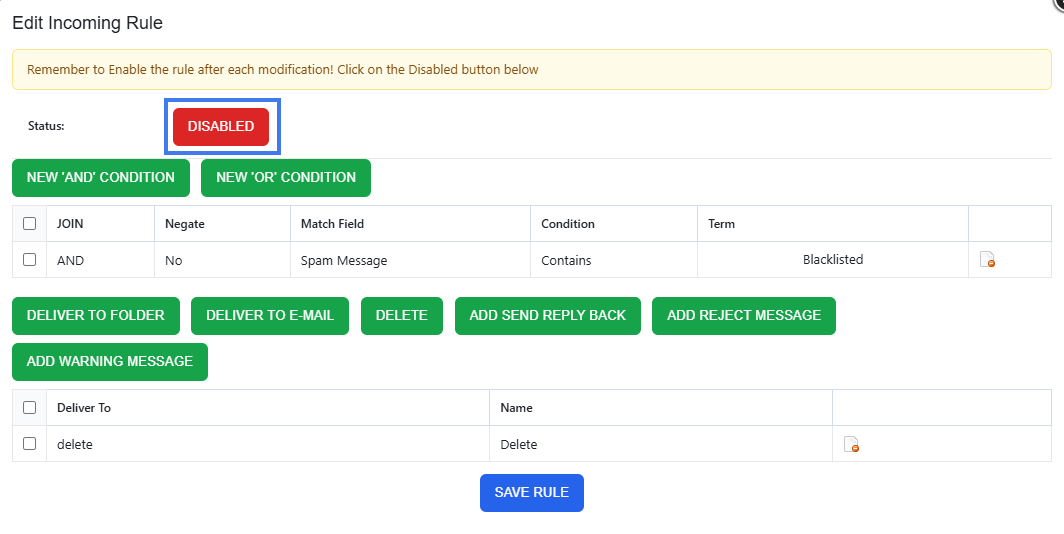
- Check the Status: Look for the Status indicator at the top of the "Edit Incoming Rule" screen.
- Toggle to Enabled: If the button shows a red DISABLED label, click it.
- The button will switch to a green ENABLED state. Click Save Rule at the bottom of the page to finalize your settings.
Remove a Rule
- Go to the User Panel
- Log in using your full email address ( user@domain.com ) and password.
- Click on the Delivery Rules icon
- Click on the delete icon next to the rule you want to remove


Common automation examples
Use delivery rules to build powerful sequences and manage your daily communications.
Smart Organization
- Departmental Routing: Route emails sent to specific aliases like sales@ or support@ into dedicated folders to keep your main inbox clear.
- Project Tagging: Automatically move messages containing specific project codes in the Subject line to project-specific folders.
- Newsletter Management: Identify newsletter emails using the From field and move them to a "Read Later" folder to reduce daily distractions.
- VIP Filtering: Ensure emails from your most important clients are always delivered to the top of your Inbox or a "High Priority" folder.
Security & Compliance
- External Sender Alerts: Use a Negate Match on your own domain to prepend a "Caution: External Sender" warning to any email originating from outside your company.
- Sensitive Data Reminders: Search for keywords like "Invoice" or "Payment" to insert a header reminding users to verify wire instructions before proceeding.
- Attachment Quarantine: Route messages over a specific Message size to a "Large Attachments" folder to review them for security before opening.
Enhanced Responsiveness
- Instant Lead Acknowledgment: Combine a Deliver to Folder action with an Autoresponder to immediately thank new leads for their inquiry while sorting their request for the sales team.
- Hybrid Forwarding: Use multiple delivery actions to send a copy of a message to your CRM via email while keeping the original in your local Inbox for your records.
Maintenance & Cleanup
- Automated Deletion: Set rules to automatically Delete known automated notifications or "Out of Office" replies that don't require your attention.