
Using Chat and Meetings on Other Apps (XMPP)
You can also connect your Webmail chat and meeting account to other desktop or mobile applications that support the XMPP protocol (e.g., Thunderbird, eM Client).
Login Details for XMPP Apps:
- Username/JID: Your full Webmail email address
- Password: Your Webmail password
- Server Host name: xmpp.emailarray.com
Connecting Your Chat Account to eM Client (XMPP)
You can integrate your Webmail chat directly into the eM Client application. Follow these steps to set it up:
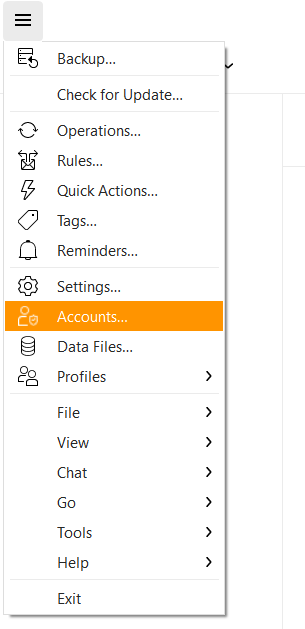
1. Open eM Client Account Settings:
- In eM Client, click on the Menu icon (usually three horizontal lines) in the top-left corner.
- Select "Accounts..." from the dropdown menu.
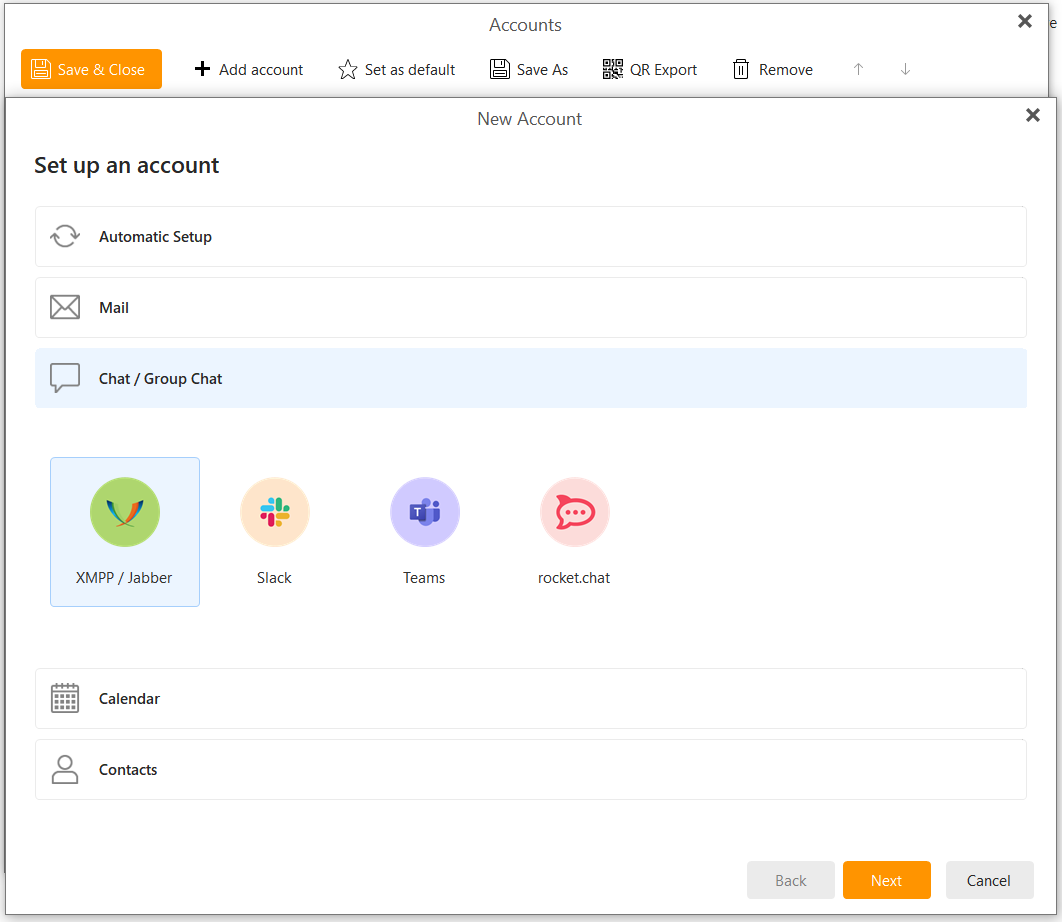
2. Add a New Chat Account:
- In the "Accounts" window, click on the "+ Add account" button.
- Under "Set up an account," choose "Chat / Group Chat."
- From the options provided, select "XMPP / Jabber."
- Click the "Next" button.
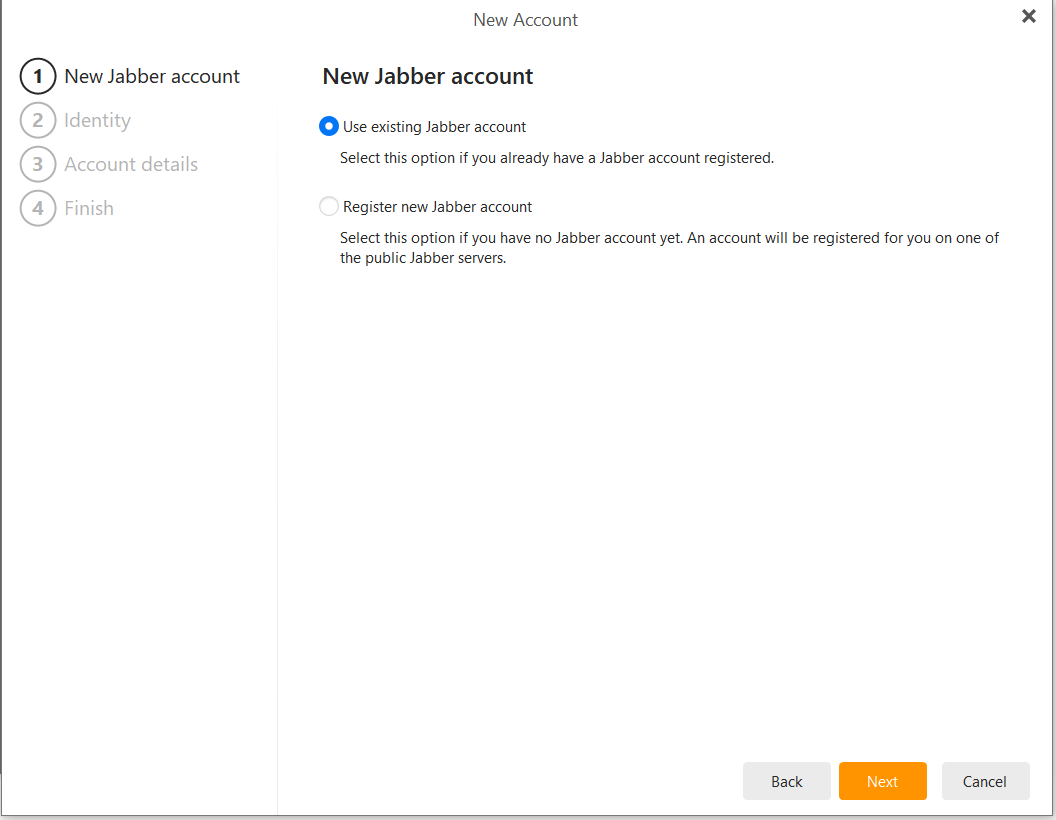
3. Specify New Jabber Account:
- On the "New Jabber account" screen, ensure the option "Use existing Jabber account" is selected. This indicates you already have a chat account through Webmail.
- Click the "Next" button
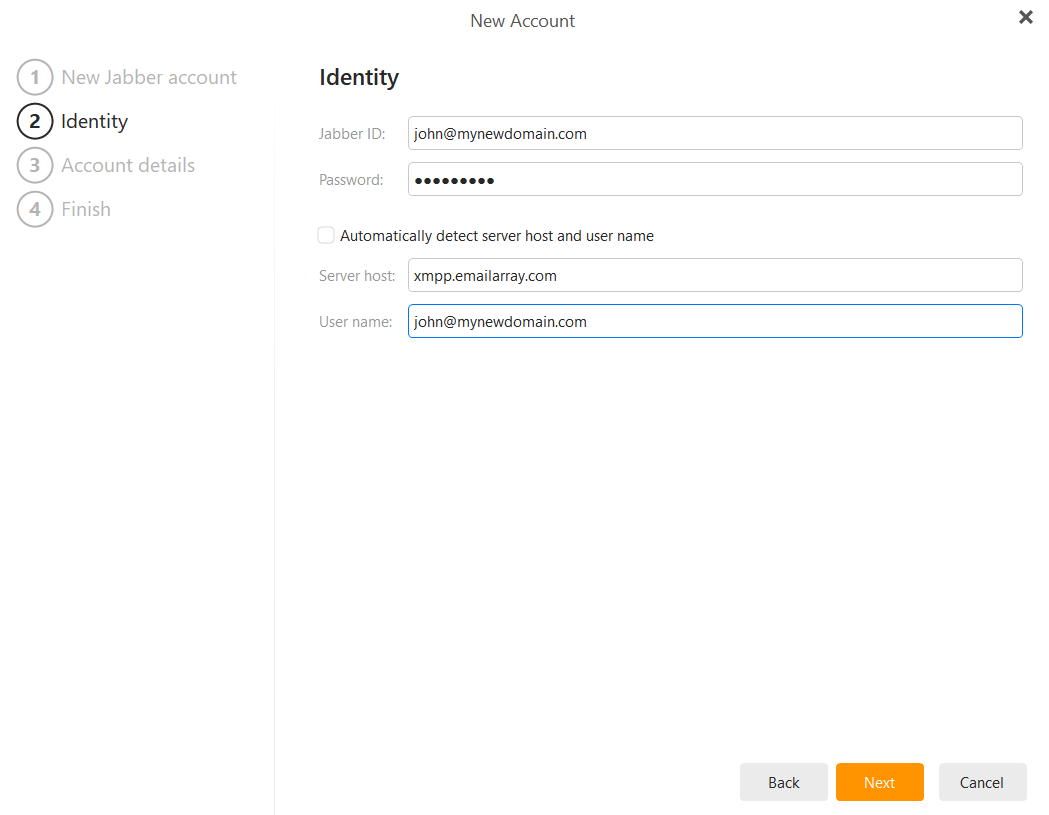
4. Enter Your Account Credentials (Identity):
You will now be on the "Identity" screen. Fill in the following details:
- Jabber ID: Enter your full Webmail email address (e.g.,
john@mynewdomain.com). - Password: Enter your Webmail password.
- Server host:
- Uncheck the box for "Automatically detect server host and user name" if it is checked. This will allow you to enter the server information manually.
- Enter the XMPP server address:
xmpp.emailarray.com. - User name: Enter your full Webmail email address (e.g.,
john@mynewdomain.com).
5. Finalize Setup:
- After entering all the identity and server details, click the "Next" button.
- Review the summary if provided, and then click the "Finish" button to complete the setup.
Your Webmail chat account should now be configured in eM Client. You will be able to send and receive messages, see your contacts directly within the application and add new ones.
Connecting Your Chat Account to Mozilla Thunderbird (XMPP)
You can use your Webmail chat directly within Mozilla Thunderbird. Follow these steps to configure it:
1. Access the Chat Feature:
- In Thunderbird, locate and click on the "Chat" icon or tab. This is typically found in the main toolbar area or alongside your Inbox and Calendar tabs.

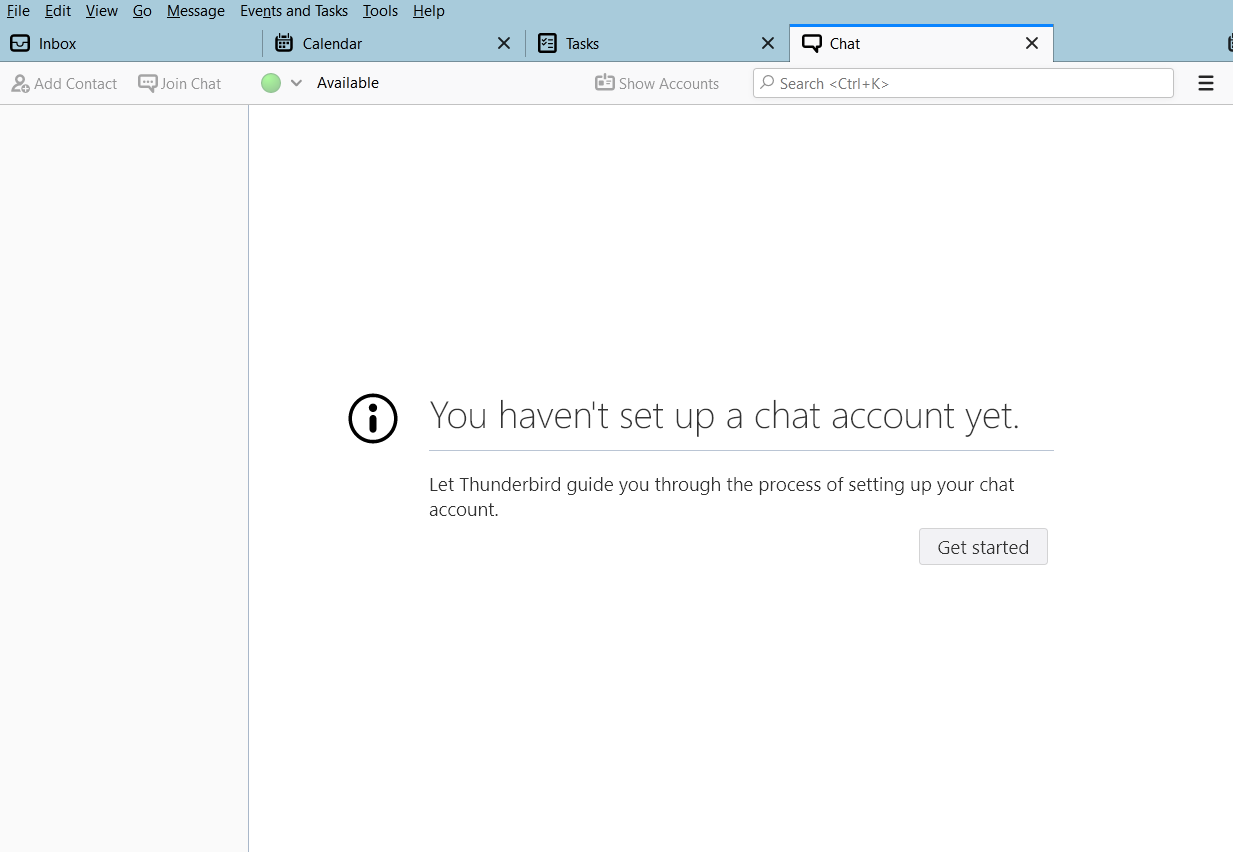
2. Begin Chat Account Setup:
- If you haven't set up a chat account in Thunderbird before, you'll see a message saying, "You haven't set up a chat account yet."
- Click the "Get started" button to open the Chat Account Wizard.
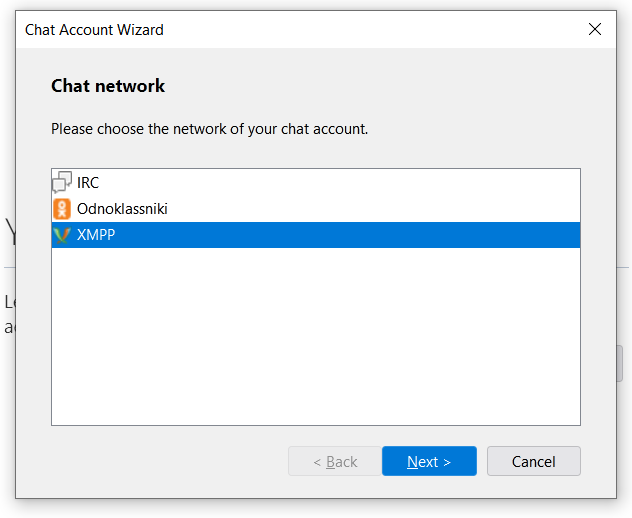
3. Choose the Chat Network:
- In the "Chat Account Wizard" window, under "Chat network," select "XMPP" from the list of available networks.
- Click the "Next >" button.
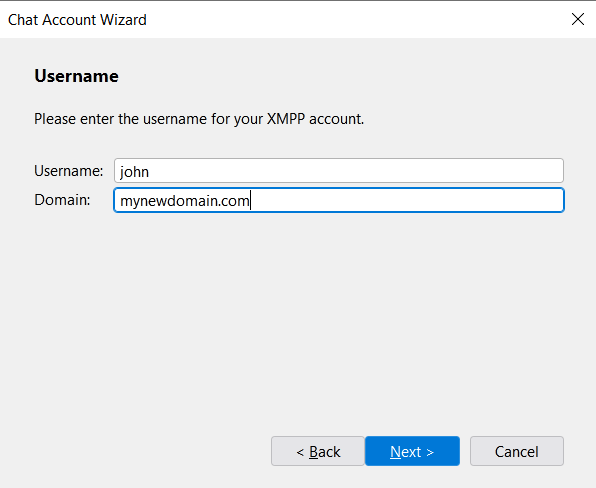
4. Enter Your Username Details:
- On the "Username" screen, you need to provide your Webmail email address, split into two parts:
- Username: Enter the part of your Webmail email address before the "@" symbol (e.g., if your email is
john@mynewdomain.com, enterjohn). - Domain: Enter the part of your Webmail email address after the "@" symbol (e.g.,
mynewdomain.com).
- Username: Enter the part of your Webmail email address before the "@" symbol (e.g., if your email is
- Click the "Next >" button.
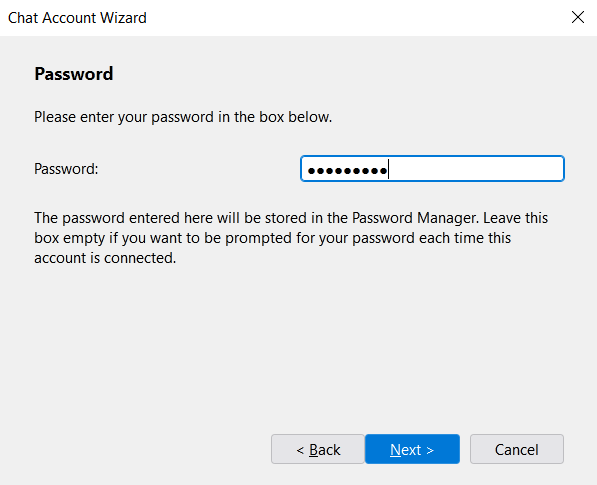
5. Enter Your Password:
- On the "Password" screen, enter your Webmail password in the "Password" field.
- Thunderbird notes that the password will be stored in its Password Manager. If you leave this box empty, you'll be prompted for your password each time the account connects.
- Click the "Next >" button.
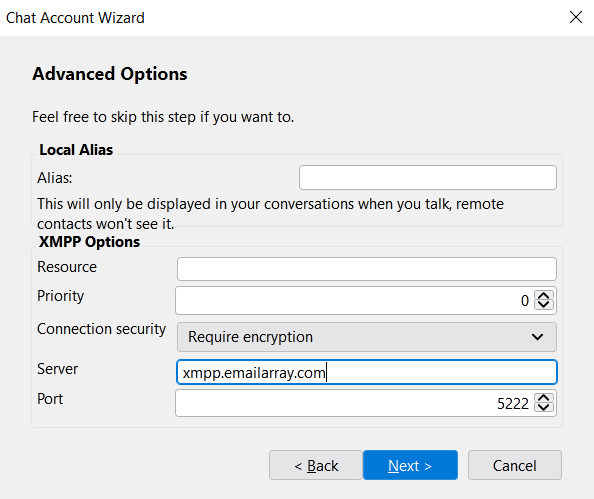
6. Configure Advanced Options (XMPP Options):
- This screen allows you to set advanced XMPP options. While Thunderbird says, "Feel free to skip this step if you want to," providing these details is often necessary for a successful connection:
- Alias: (Optional) You can set a local alias that will be displayed in your conversations.
- XMPP Options:
- Resource: (Optional) You can leave this blank.
- Priority: (Optional) You can leave this as the default.
- Connection security: It's recommended to use encryption. Select an option like "Require encryption" if available and appropriate for your server.
- Server: Enter the XMPP server address for your Webmail:
xmpp.emailarray.com. - Port: Enter the port number for the XMPP server:
5222.
- Click the "Next >" button.
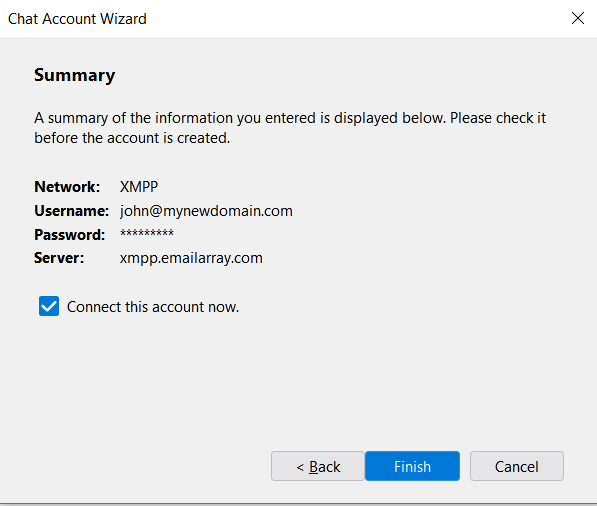
7. Review Summary and Finish:
- The "Summary" screen will display the information you've entered (Network, Username, Password (masked), Server).
- Please check these details carefully to ensure they are correct. Your full username should appear here (e.g.,
john@mynewdomain.com). - Make sure the checkbox for "Connect this account now." is checked if you want Thunderbird to log into your chat account immediately.
- Click the "Finish" button.
Your Webmail chat account should now be configured in Thunderbird. You'll be able to manage your contacts, send and receive messages, and see your online status directly within the Thunderbird interface.