
Working with Tables
OfficeDocs lets you use tables to organize information into rows and columns. This guide explains how to insert a table, manage its structure, format its appearance, and work with common table tools in the document editor.
Inserting a table
You can insert a table directly from the Insert tab, then choose the number of rows and columns you need. In the document editor, tables can also be customized further after insertion using the table settings menu.
- Place the cursor where you want the table to appear.
- Open the Insert tab.
- Click Table.
- Select the number of rows and columns from the grid.
- Insert the table into the document.
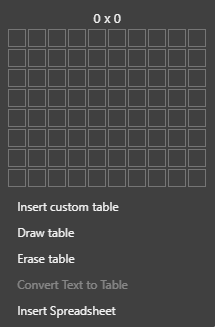
Adding rows and columns
After inserting a table, you can expand it by adding rows or columns where needed. To do this, right-click inside the table to open the table options menu.
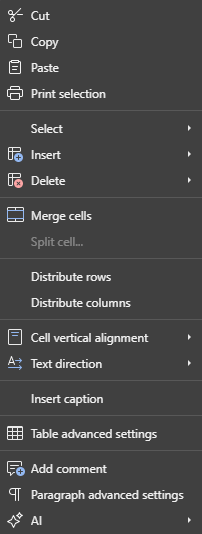
- Insert a row above or below the current row
- Insert a column to the left or right of the current column
- Add several rows or columns at once when needed
Deleting rows and columns
You can remove individual parts of a table or delete the table entirely.
- Delete a selected row
- Delete a selected column
- Delete selected cells
- Delete the entire table
Merging and splitting cells
OfficeDocs includes tools for combining cells or splitting them into smaller sections.
Merge cells
- Select two or more adjacent cells
- Use Merge Cells to combine them into one cell
Split cells
- Select the cell you want to divide
- Choose Split Cell
- Enter the number of rows and columns you want to create
Table formatting
You can change both the appearance of individual cells and the layout of the entire table.
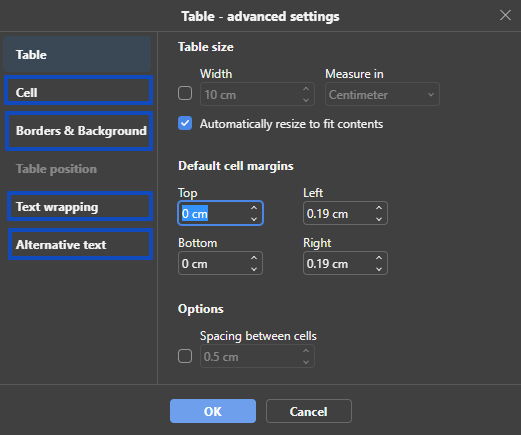
Cell properties
Available cell formatting options include:
- Background color
- Border style, width, and color
- Vertical alignment
- Text wrapping inside cells
- Cell margins
Table properties
You can also adjust broader table settings such as:
- Table width and height
- Table alignment
- Spacing between cells
Resizing tables
Tables can be resized manually to better fit your content.
- Drag column borders to change column width
- Drag row borders to change row height
- Resize the full table from its handles
- Distribute rows or columns evenly when needed
Table styles
Predefined table styles help you create a cleaner and more consistent layout.
- Apply built-in table templates
- Highlight header rows or total rows
- Emphasize the first or last column
- Enable banded rows or banded columns for readability
Converting table content
OfficeDocs supports converting a table into plain text in the document editor.
Convert table to text
- Select the table
- Choose Convert Table to Text
- Select a delimiter such as tabs, paragraph marks, semicolons, or another separator
- Confirm the conversion
Accessibility
You can also add alternative text to a table to make its contents easier to understand for users who rely on assistive technologies.
Note
Table support also exists in the presentation editor, including insertion, formatting, row and column operations, merge and split actions, templates, and alternative text. However, some options are editor-specific, so this page is safest when used for the document editor workflow.