email | client that offers excellent support for IMAP and advanced groupware features. Follow the steps below to connect your mailbox.
Large Mailboxes: Depending on your internet speed and the size of your mailbox (up to 200GB per account), the initial synchronization can take anywhere from a few hours to a few days to fully build your local data file.
You can asksetup your sysadmin to setup Autoconfig in your DNS DNS to make the process of setting up Thunderbird much easier.
Recommended Settings
We recommend using IMAP with SSL/TLS to ensure your data remains private and your folders stay synchronized across all devices.
| Service |
Server Address |
Port (SSL/TLS) |
| Incoming (IMAP) |
imap.emailarray.com |
993 |
| Outgoing (SMTP) |
smtp.emailarray.com |
465 |
StepGetting 1Started
To open the setup window for a new email account, you have multiple options:account:
-
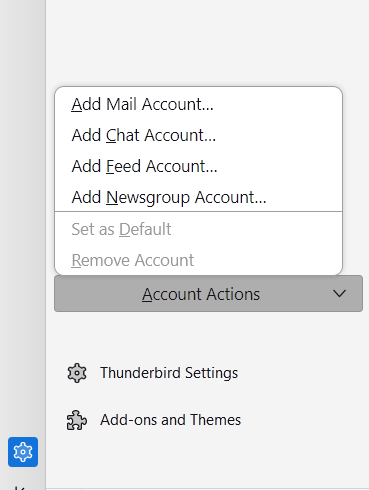
Click on on Tools -> Account Settings -> Account Actions -> in the bottom left of the account pane.
-
Select Add Mail Account... from the menu.
Option 1: Automatic Configuration (Recommended)
If you have Autoconfig set up in your DNS, Thunderbird will handle the heavy lifting for you.
-
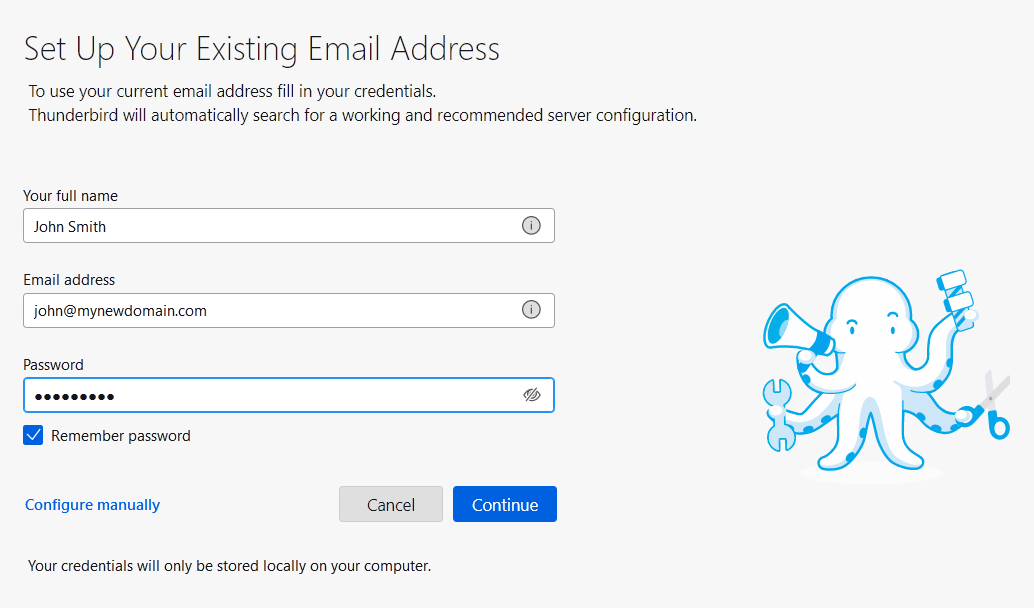
Enter Your Details: Fill in your full name, email address, and password. Keep Remember password checked.

If
yourSearch menusfor onSettings: the top are hidden, click on the ALT key to show them, or access Account Settings by clicking on the radiator icon, on the top right of the interface, then Options -> Account Setting -> Account Actions -> Add Mail Account.
- Click
the menu icon → New → Existing Mail AccountContinue.
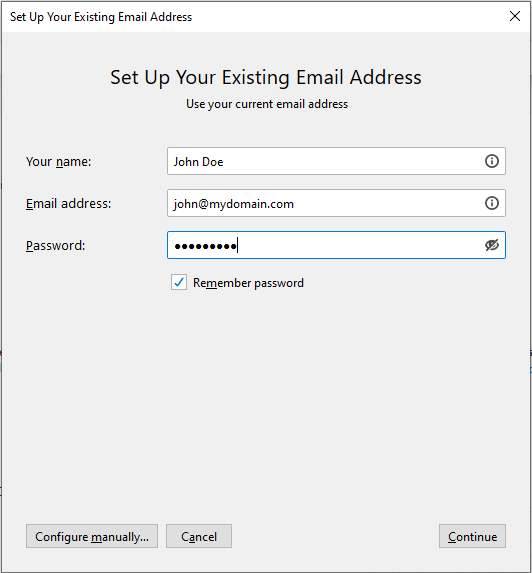
The Set Up Your Existing Email Address window will show.
Step 2
Enter the user's display name, full e-mail address and password:
Step 3
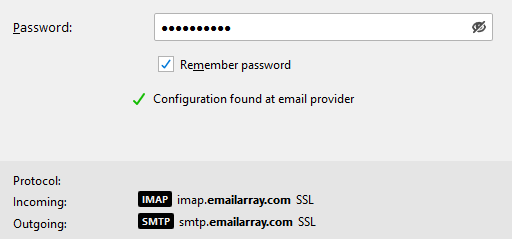
Click on Continue. Thunderbird will automatically findsearch for the properrecommended server namesconfiguration.
if
you
haveConfirm setConfiguration: Once the Autoconfiggreen record"Configuration infound" yourmessage DNS.appears, verify that IMAP is selected.
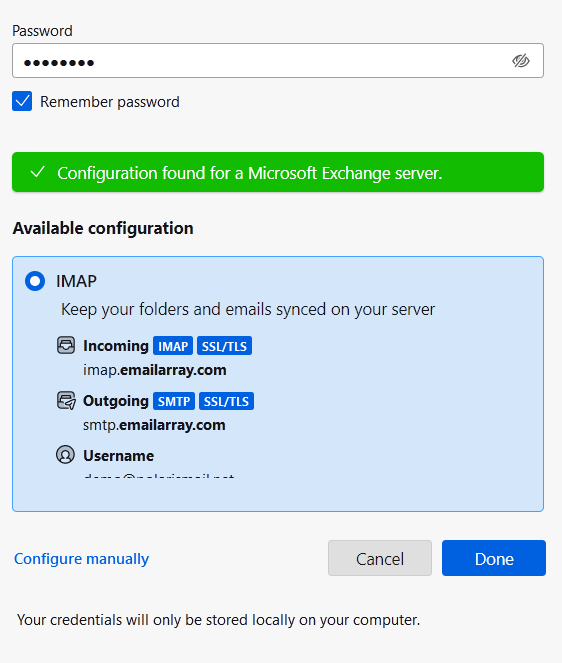

Option 2: Manual Configuration
If ThunderbirdAutoconfig doesn'tis automaticallynot findavailable or you need to specify custom ports, follow these steps.
-
Enter Your Details: Input your name, email, and password, then click Configure manually at the serverbottom names, please useof the detailswindow.
from
the -
Enter Server &Details: PortsWe page .recommend 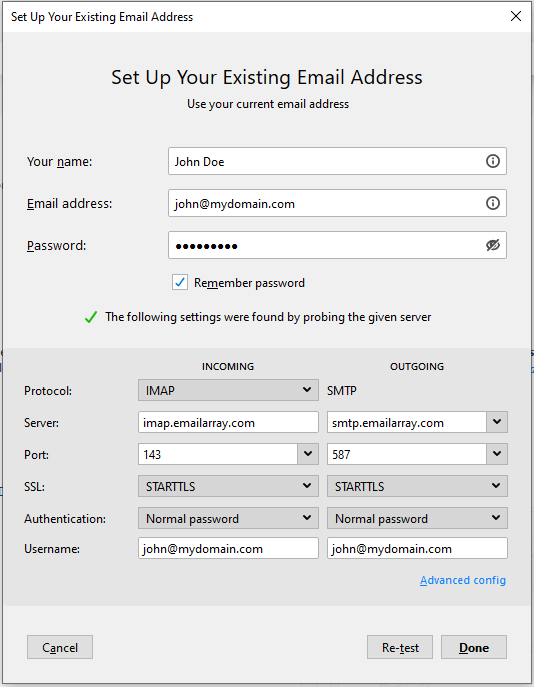
using
IMAP Stepwith 4
Click on Done SSL/TLS
to finish the account setup. Wait for Thunderbird to synchronizeensure theyour data.data remains private and your folders stay synchronized across all devices.
-
Incoming NoteServer
that
-
Protocol: IMAP
-
Hostname: imap.emailarray.com
-
Port: 993
-
Connection Security: SSL/TLS
-
Authentication Method: Normal password
-
Username: Your full email address (e.g., name@yourdomain.com)
-
Outgoing Server
-
Protocol: SMTP
-
Hostname: smtp.emailarray.com
-
Port: 465
-
Connection Security: SSL/TLS
-
Authentication Method: Normal password
-
Username: Your full email address (e.g., name@yourdomain.com)

-
Test and Verify: Click Re-test. Thunderbird will automatically setupverify the connection.
-
Finalize: Once the green success bar appears ("The following settings were found by probing the given server"), click Done.
Success!
Your account asis IMAP.now Ifready to use.
On the final screen, you wantcan also:
-
Add a custom signature.
-
Connect a CardDAV address book or a remote calendar (CalDAV) to setkeep upyour thecontacts accountand asschedule POP,in yousync.
have
-
Enable end-to-end encryption for extra security.
Click Finish to setup the account manually. IMAP is recommended, as it´s a protocol madehead to supportyour severalinbox. devices accessing one same account, with all folders synced at our server, which also guarantees that our backupsThunderbird will benow executed. | begin synchronizing your
folders.
|