Configure your favorite email app
Step-by-step guides for IMAP and SMTP setup.
Whether you prefer the desktop power of Outlook and Thunderbird or the mobility of your smartphone, we’ve got you covered. Pick your platform below for a tailored, step-by-step guide.
Quick Server Settings: If you’re an advanced user and just need the "cheat sheet," use these secure settings:
Protocol Server Address Ports
IMAP (Incoming) imap.emailarray.com 993
SMTP (Outgoing) smtp.emailarray.com 465
POP3 (Incoming) pop.emailarray.com 995
Important: When setting up your outgoing server (SMTP), always ensure "Authentication Required" is enabled using your full email address and password.
Pro Tip: Use IMAP. We strongly recommend IMAP over POP3. It keeps all your folders in sync across every device and ensures your data is protected by our 30-day (Basic) or 365-day (Enhanced) backups.
- Setup Email on Thunderbird (IMAP)
- Setup Email on Outlook (IMAP)
- Setup Email on iOS
- Setup Email on Android (IMAP)
- Setup Email on eM Client (IMAP)
- ActiveSync / EAS - Sync Email, Calendars and Contacts
- Creating a New Outlook Profile
Setup Email on Thunderbird (IMAP)
Thunderbird is a free, open-source email client that offers excellent support for IMAP and advanced groupware features. Follow the steps below to connect your mailbox.
Large Mailboxes: Depending on your internet speed and the size of your mailbox (up to 200GB per account), the initial synchronization can take anywhere from a few hours to a few days to fully build your local data file.
You can setup Autoconfig in your DNS to make the process of setting up Thunderbird much easier.
Enhanced mailbox? Connect a CardDAV address book or a remote calendar (CalDAV) to keep your contacts and schedule in sync.
Getting Started
To open the setup window for a new email account:
-
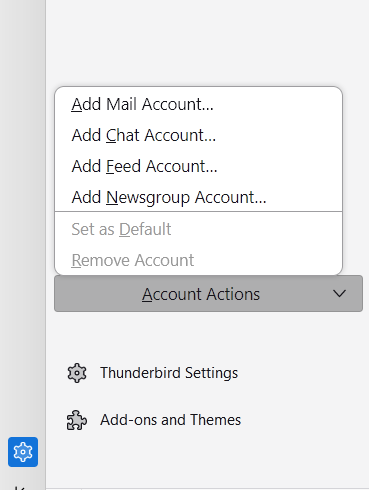
Click on Account Actions in the bottom left of the account pane.
-
Select Add Mail Account... from the menu.

Option 1: Automatic Configuration (Recommended)
If you have Autoconfig set up in your DNS, Thunderbird will handle the heavy lifting for you.
-
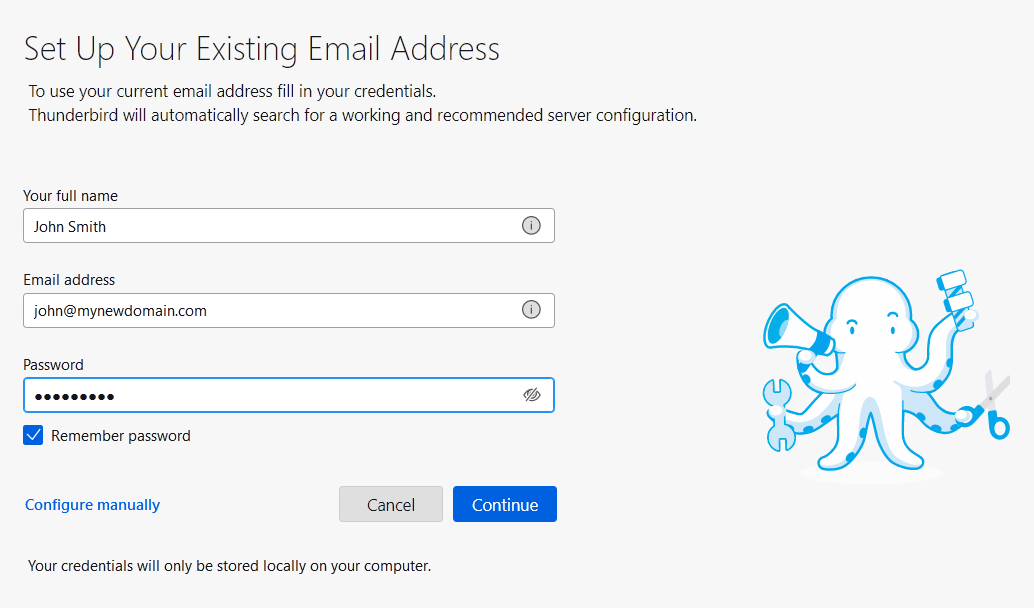
Enter Your Details: Fill in your full name, email address, and password. Keep Remember password checked.

-
Search for Settings: Click Continue. Thunderbird will automatically search for the recommended server configuration.
-
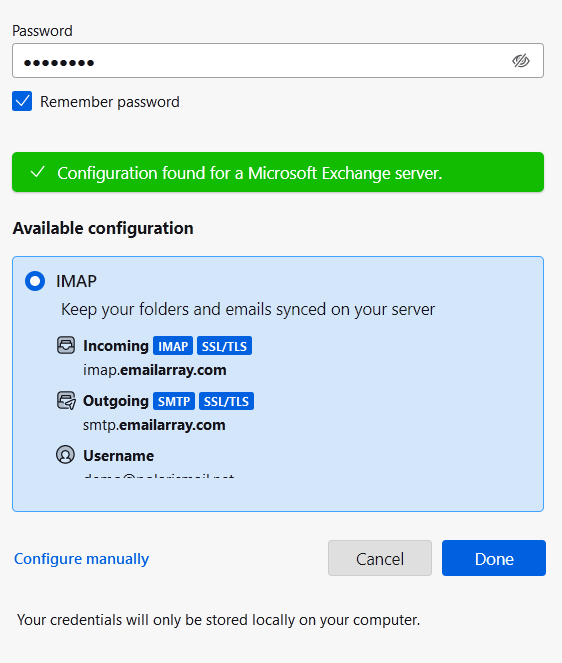
Confirm Configuration: Once the green "Configuration found" message appears, verify that IMAP is selected.

-
Finish Setup: Click Done.
Option 2: Manual Configuration
If Autoconfig is not available or you need to specify custom ports, follow these steps.
-
Enter Your Details: Input your name, email, and password, then click Configure manually at the bottom of the window.
-
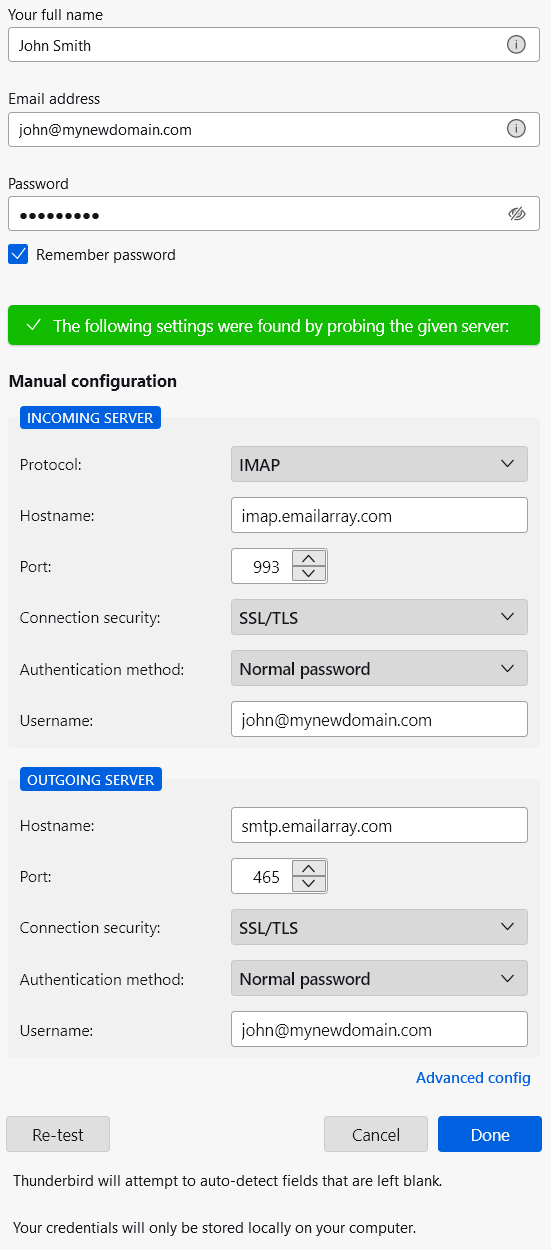
Enter Server Details: We recommend using IMAP with SSL/TLS to ensure your data remains private and your folders stay synchronized across all devices.
-
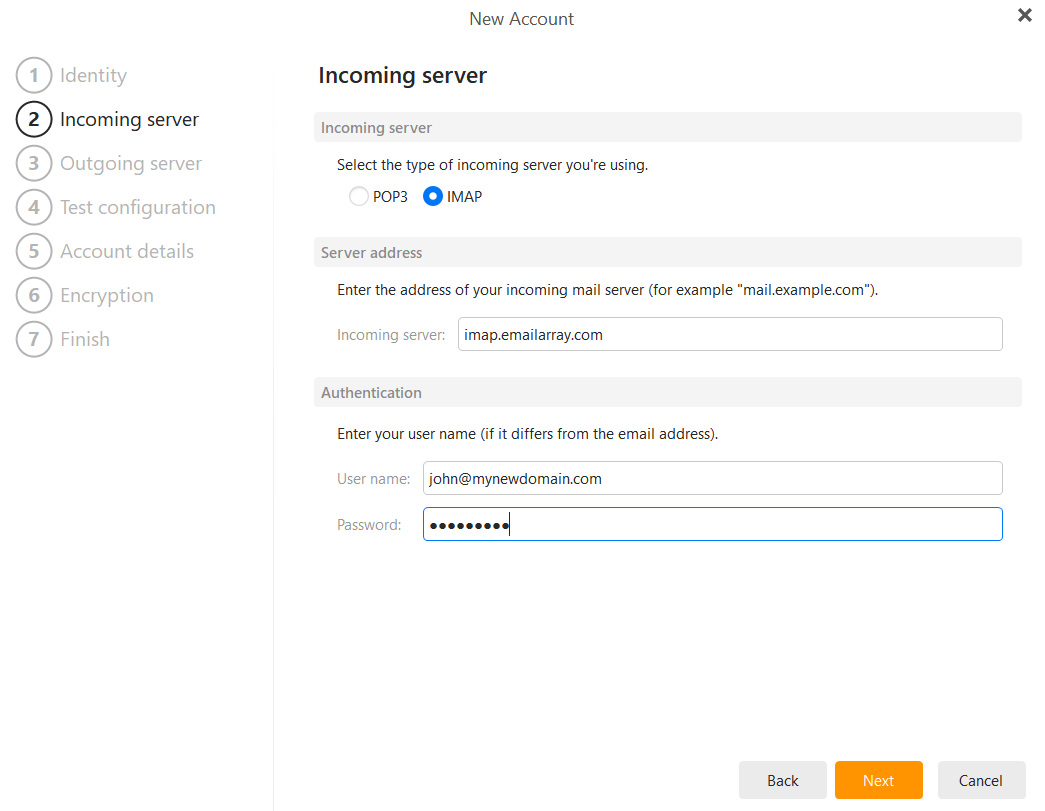
Incoming Server
-
Protocol: IMAP
-
Hostname: imap.emailarray.com
-
Port: 993
-
Connection Security: SSL/TLS
-
Authentication Method: Normal password
-
Username: Your full email address (e.g., name@yourdomain.com)
-
-
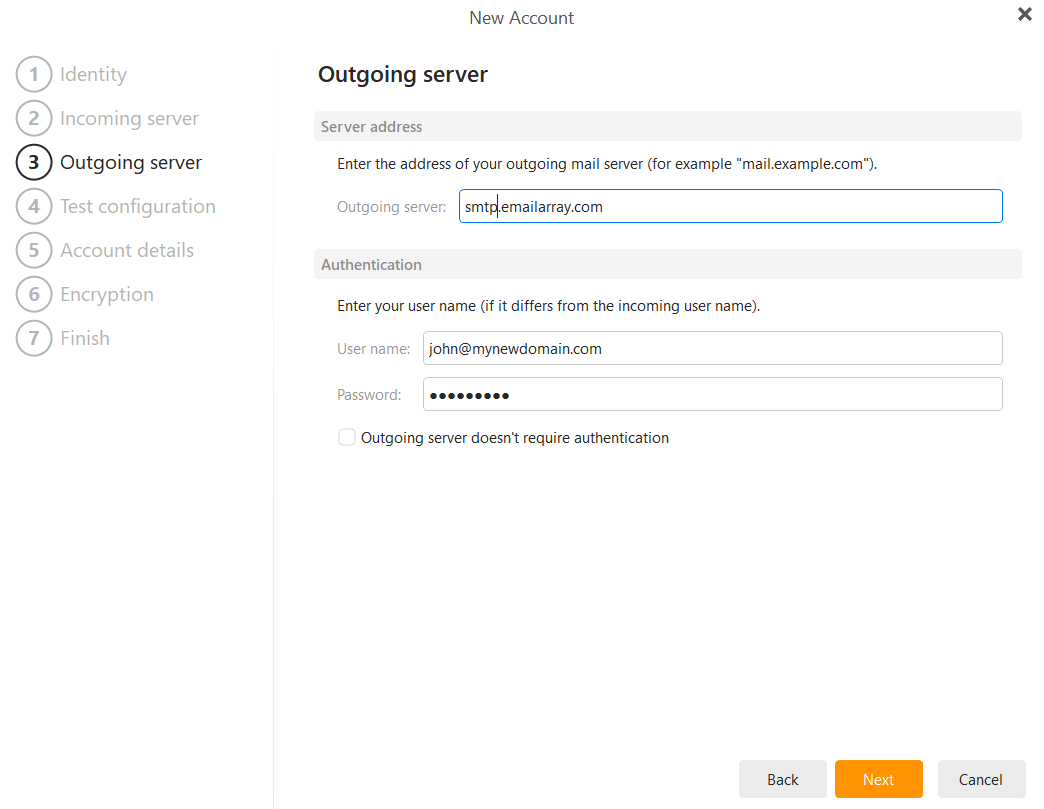
Outgoing Server
-
Protocol: SMTP
-
Hostname: smtp.emailarray.com
-
Port: 465
-
Connection Security: SSL/TLS
-
Authentication Method: Normal password
-
Username: Your full email address (e.g., name@yourdomain.com)
-
-
-
Test and Verify: Click Re-test. Thunderbird will verify the connection.
-
Finalize: Once the green success bar appears ("The following settings were found by probing the given server"), click Done.
Success!
Your account is now ready to use.
On the final screen, you can also:
-
Add a custom signature.
-
Enhanced mailbox? Connect a CardDAV address book or a remote calendar (CalDAV) to keep your contacts and schedule in sync.
-
Enable end-to-end encryption for extra security.
Click Finish to head to your inbox. Thunderbird will now begin synchronizing your folders.
Setup Email on Outlook (IMAP)
Find the step-by-step tutorial for your specific version of Outlook below. If you aren't sure which version you have, you can usually find this info under the Help menu or the About section within the app.
Large Mailboxes: Depending on your internet speed and the size of your mailbox (we support up to 200GB per account), the initial synchronization can take anywhere from a few hours to a few days to fully build your local data file.
Enhanced mailbox? Connect a CardDAV address book or a remote calendar (CalDAV) to keep your contacts and schedule in sync in Outlook.
Use the following settings or follow the Outlook 365 or Outlook 2013/2010 instructions below.
| Service | Server Address | Port (SSL/TLS) |
| Incoming (IMAP) | imap.emailarray.com | 993 |
| Outgoing (SMTP) | smtp.emailarray.com | 465 |
We recommend using IMAP with SSL/TLS to ensure your data remains private and your folders stay synchronized across all devices.
The New Outlook for Windows
Microsoft has recently introduced a "New Outlook" for Windows. Based on our testing and official Microsoft documentation, this version handles IMAP accounts differently than previous versions.
What you need to know
- Forced Cloud Sync: Unlike "Classic" Outlook, the "New Outlook" requires all IMAP accounts to sync through the Microsoft Cloud.
- Data Privacy: This means your emails, even though hosted securely with us, will be stored on Microsoft’s servers to enable this sync.
- Setup Failures: Because Microsoft forces this intermediary sync, many IMAP setups fail during the "Syncing to Microsoft" phase, even if your credentials and server settings are 100% correct.
Our Recommendation: Use "Classic" Outlook
To maintain a direct, private connection between your device and our servers, and to avoid setup errors, we recommend staying with Classic Outlook.
-
Open Outlook.
-
Locate the "Try the new Outlook" toggle in the upper-right corner.
-
Switch the toggle Off.
-
Restart Outlook and follow the Outlook 365 or Outlook 2013/2010 instructions below.
For a deeper dive into why Microsoft implemented this change, you can read the full discussion on the Microsoft Community page.
Outlook 365
Unfortunately, this version of Outlook doesn't support Autodiscover for IMAP accounts anymore.
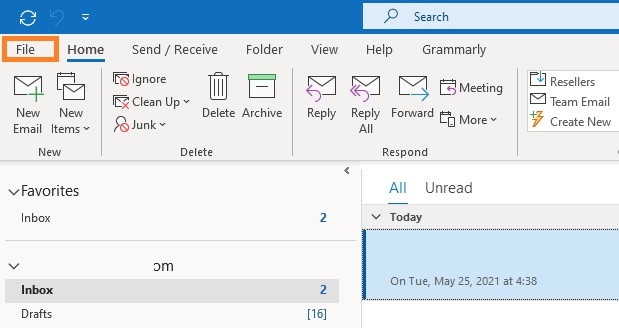
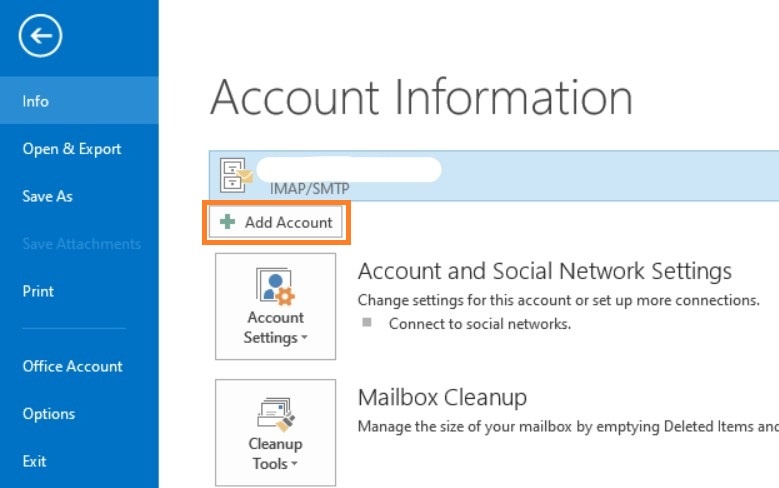
- Click on the File menu
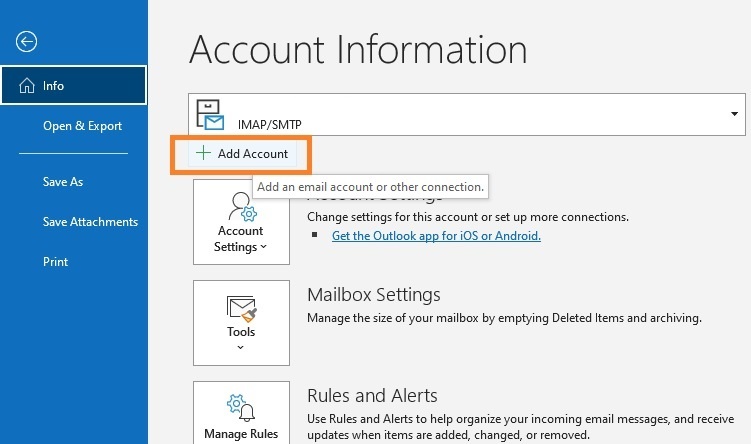
- Click on + Add Account
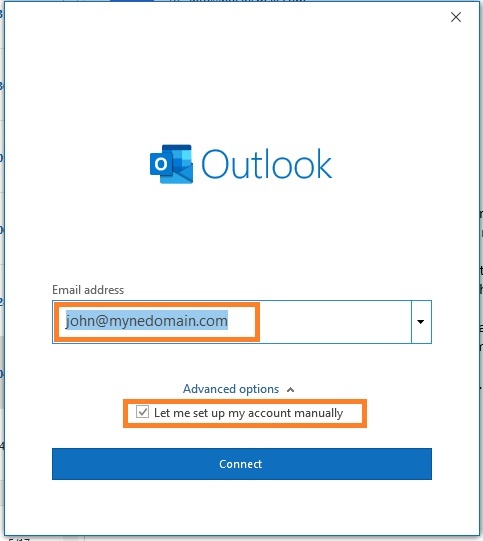
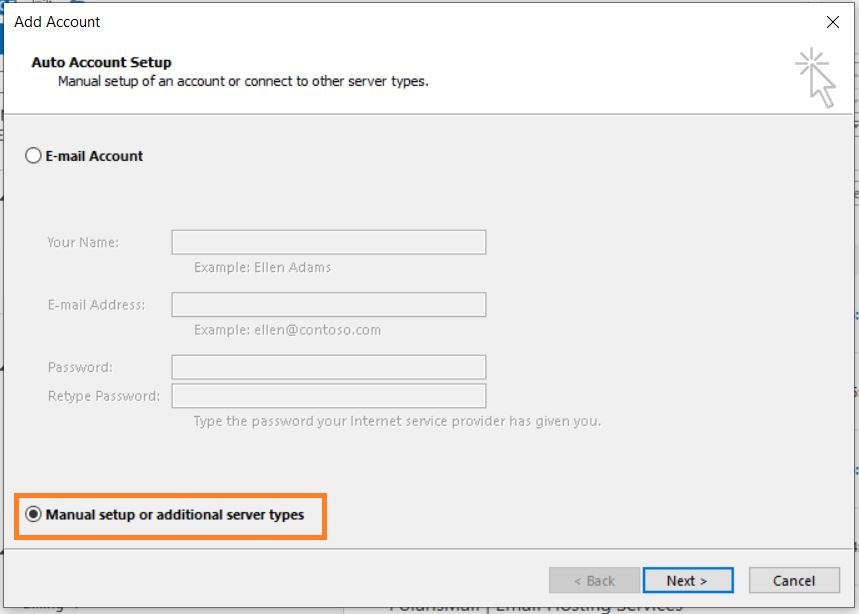
- Fill in your full email address and select the option Let me set up my account manually.
- Click on Next.
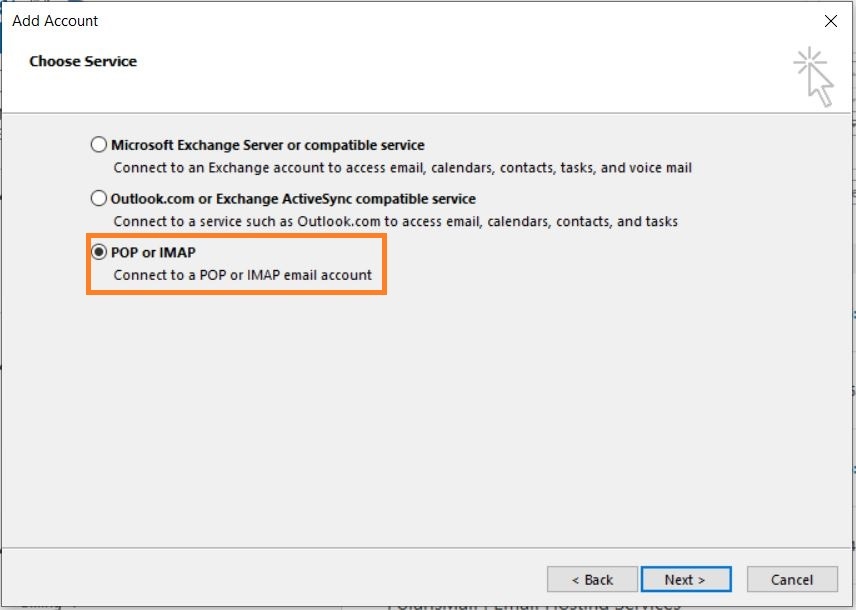
- Select IMAP from the list of account types.
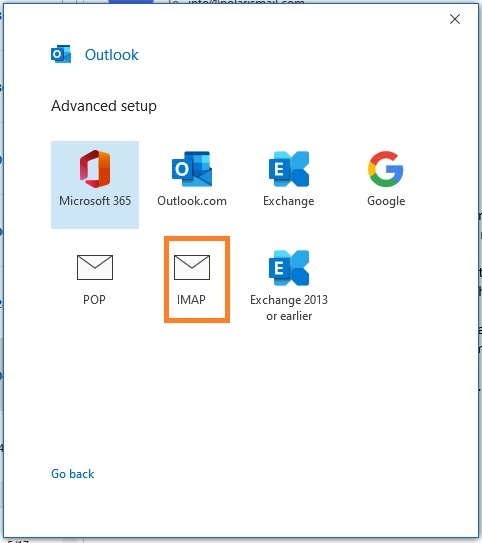
- Fill in server information from the Server & Ports page
- Click on Next
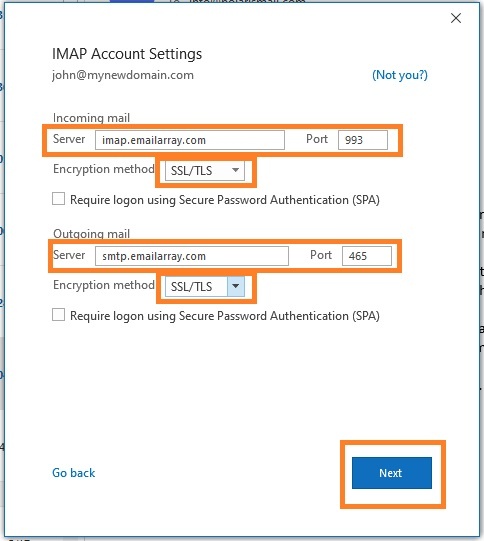
- Fill in your existing password for your email address and click on Connect
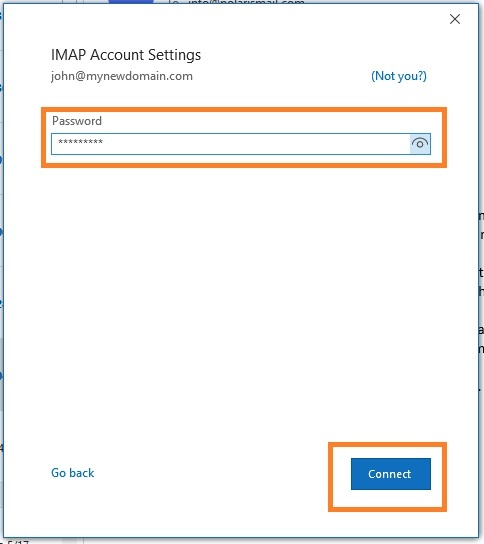
- The setup is completed. The message Account successfully added will show and Outlook will begin synchronizing the account.
Depending on the size of your mailbox and your Internet speed, Outlook might take from a few hours to a few days to synchronize the mailbox and build the local PST file.
Outlook 2013/2010:
- Click on the File menu
- Click on + Add Account
- Select POP or IMAP
- Option 1: this version of Outlook supports Autodiscover for IMAP accounts if you have setup Autodicover in your DNS.
- Type in your full name, e-mail address, and password and click on Next
- Click on Allow when asked about autodiscover.xml
- Click on Finish
- Option 2: If you don't have Autodicover
- select Manual setup and click on Next.
-
- Type in your full name, e-mail address, and password
- Fill in server information from the Server & Ports page

-
- Click on More Settings.
- Select My outgoing server (SMTP) requires authentication and Use same settings as my incoming mail server.

-
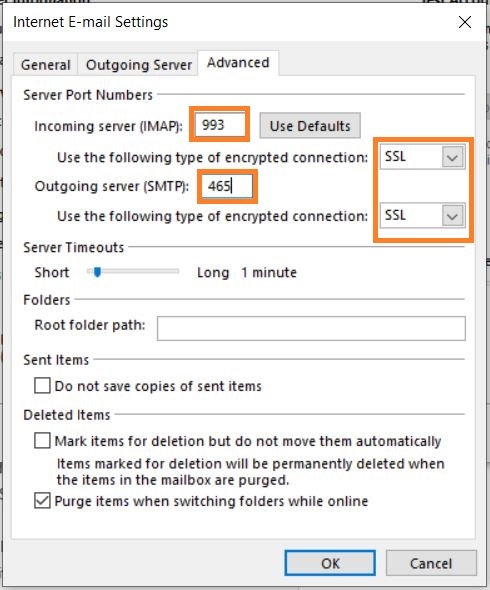
- Click on the Advanced tab
- Verify the ports are correct and SSL is selected.
-
- Click on OK. Click on Next to finish the setup.
Depending on the size of your mailbox and your Internet speed, Outlook might take from a few hours to a few days to synchronize the mailbox and build the local PST file.
Setup Email on iOS
If you have an Enhanced mailbox, you can use ActiveSync, to not only sync emails, but also contacts and calendars.
Automatic Email Setup for iOS
The easiest way to setup your mailbox on iOS is by downloading your iOS profile from the Webmail. The profile will include email, calendars and contacts if you have an Enhanced mailbox, or just the email if you have a Basic mailbox. Alternatively, you can use the steps for manual setup.
Here are the steps for automatic email setup on your iOS device:
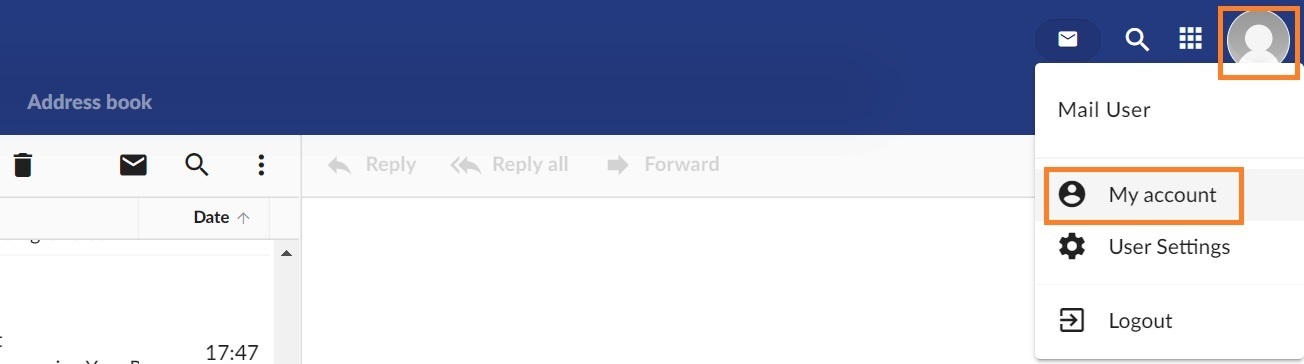
- From your iOS device login to your Webmail.
- Click on your profile image and click on Download iOS Profile from the dropdown menu. This option will only appear if you are logged in from an iOS device.

- A pop-up message will appear with the message Configuration profile available - Continue downloading? Click on the Continue button or confirm the download.
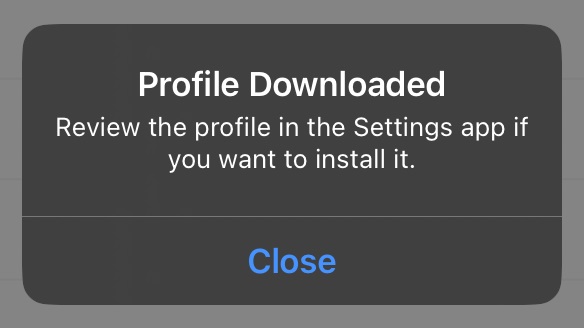
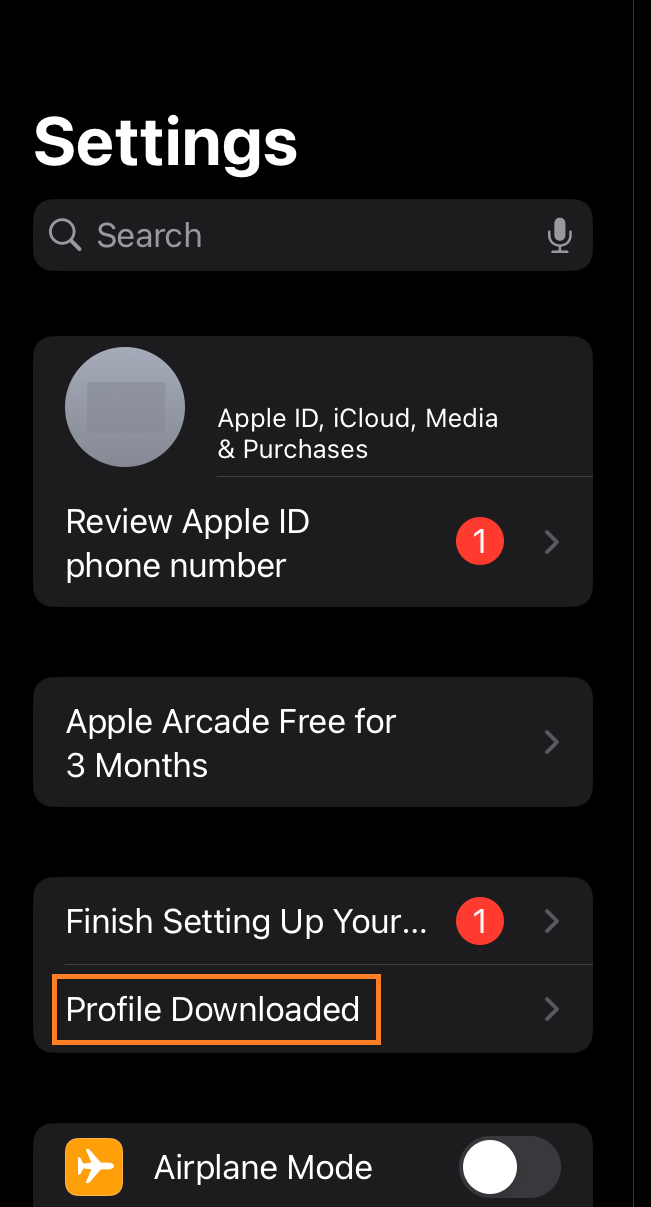
- After the profile is downloaded, a confirmation pop-up will show with the message Profile Downloaded - Review the profile in the Settings app if you want to install it.

- Go to your iOS device Settings and you should see a new menu item on the left hand with the text Profile Downloaded. Click on it.

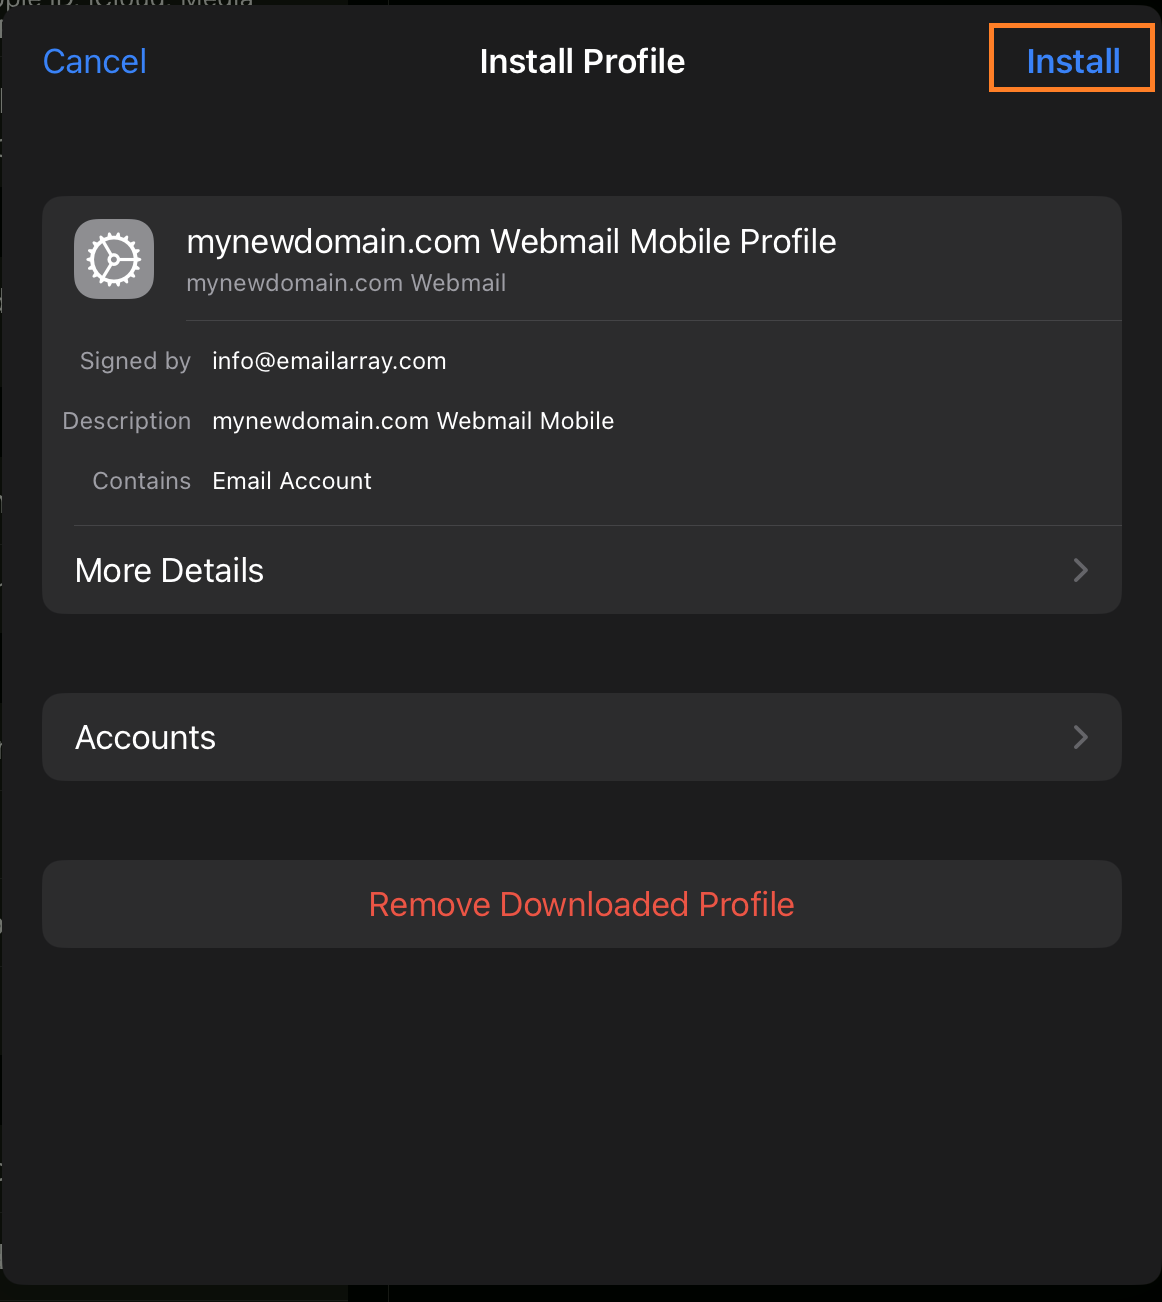
- A new window with Install Profile will show. Click on the Install button.

- Next, depending on your mailbox type, it will ask you to enter your mailbox password for Incoming Mail Server. Enter your mailbox password.
- And you're all done! The mailbox has been added to your iOS device and you can check the emails using the email app.
Manual IMAP Setup for iOS
Here's the step by step for setting up an IMAP account on iOS.
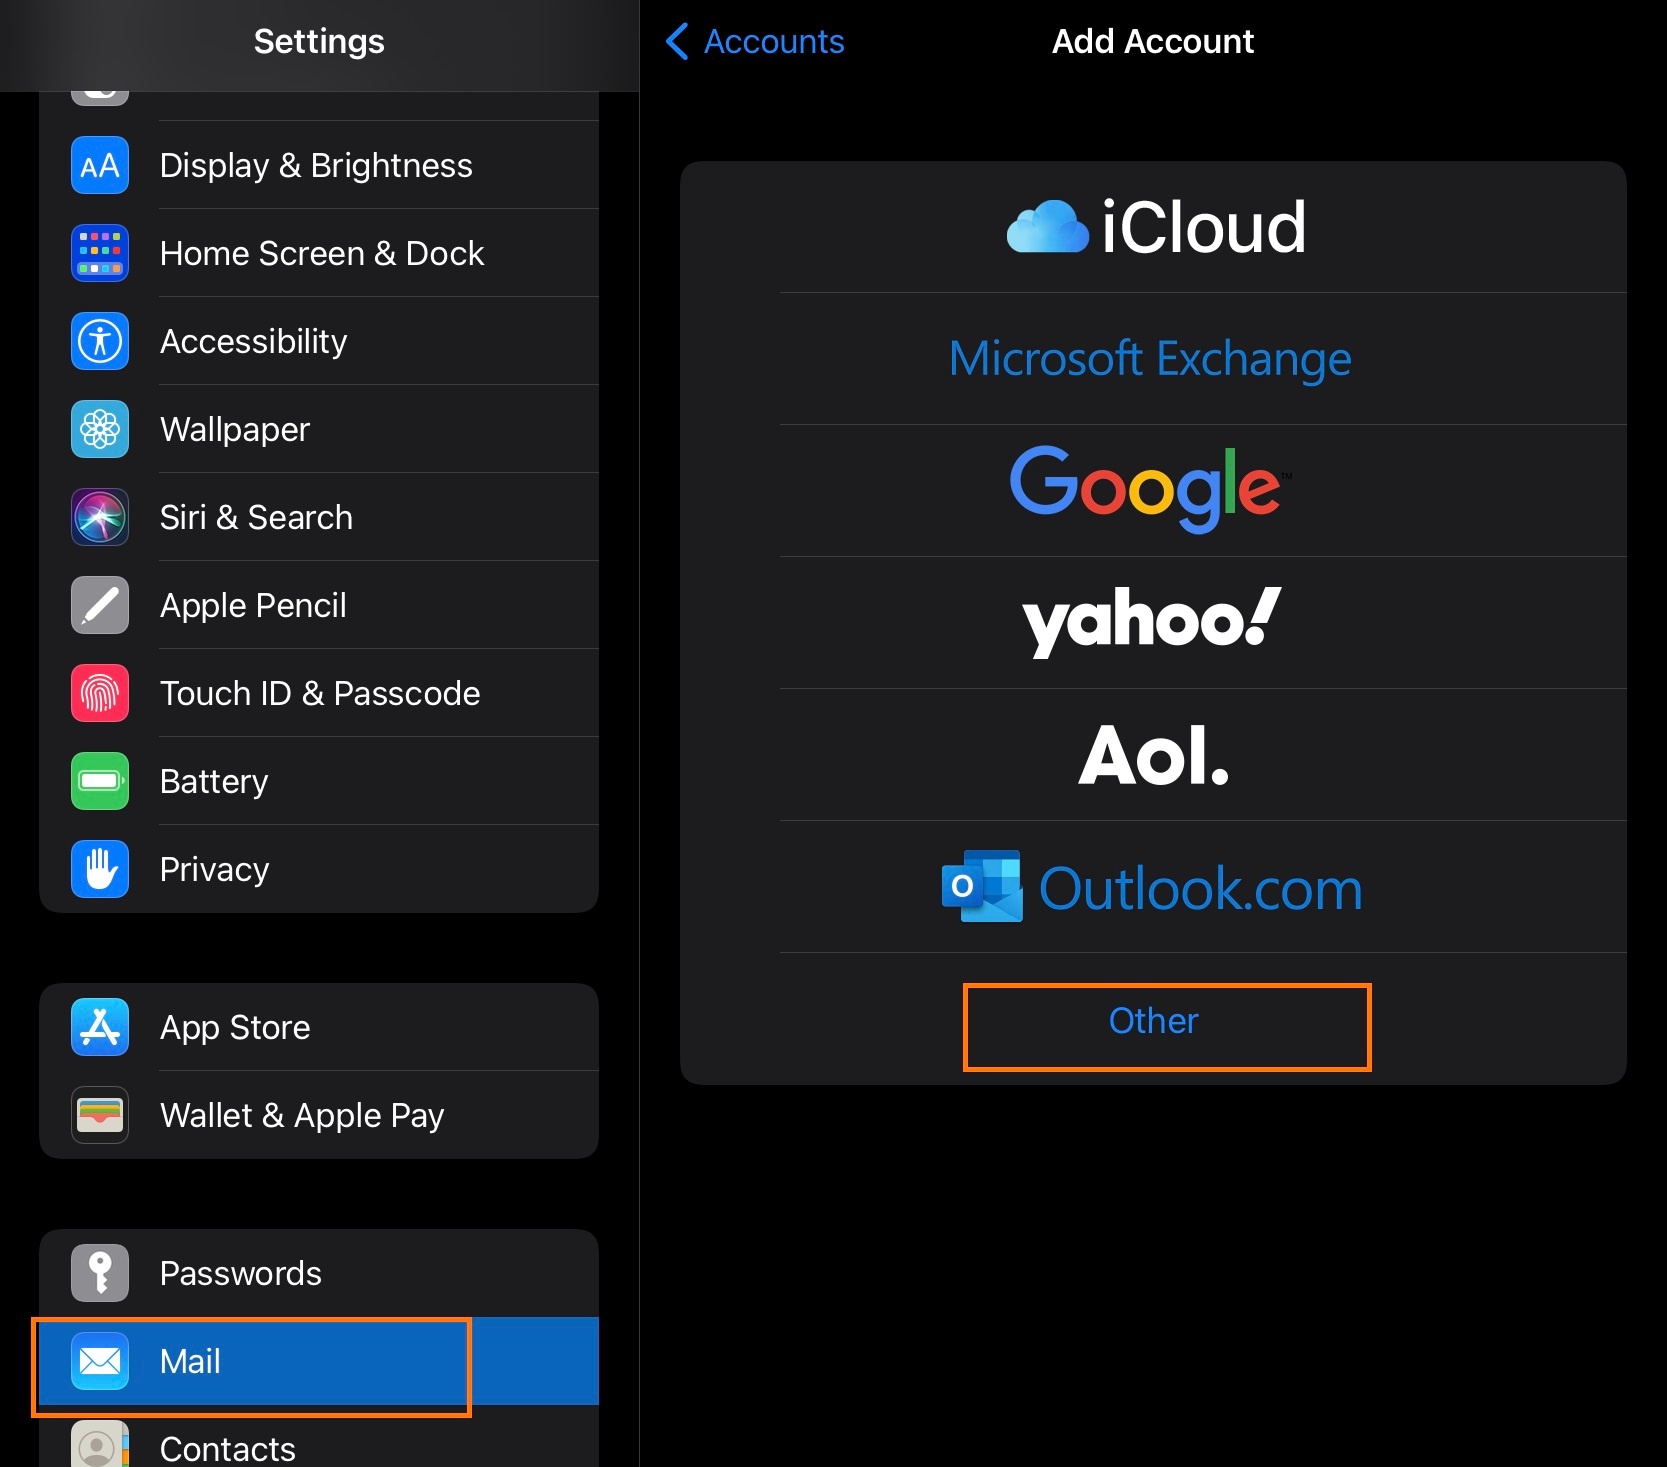
- Click on Settings
- Click on Mail, Contacts, Calendars
- Click on Add Account
- Click on Other
- Click on Add Mail Account
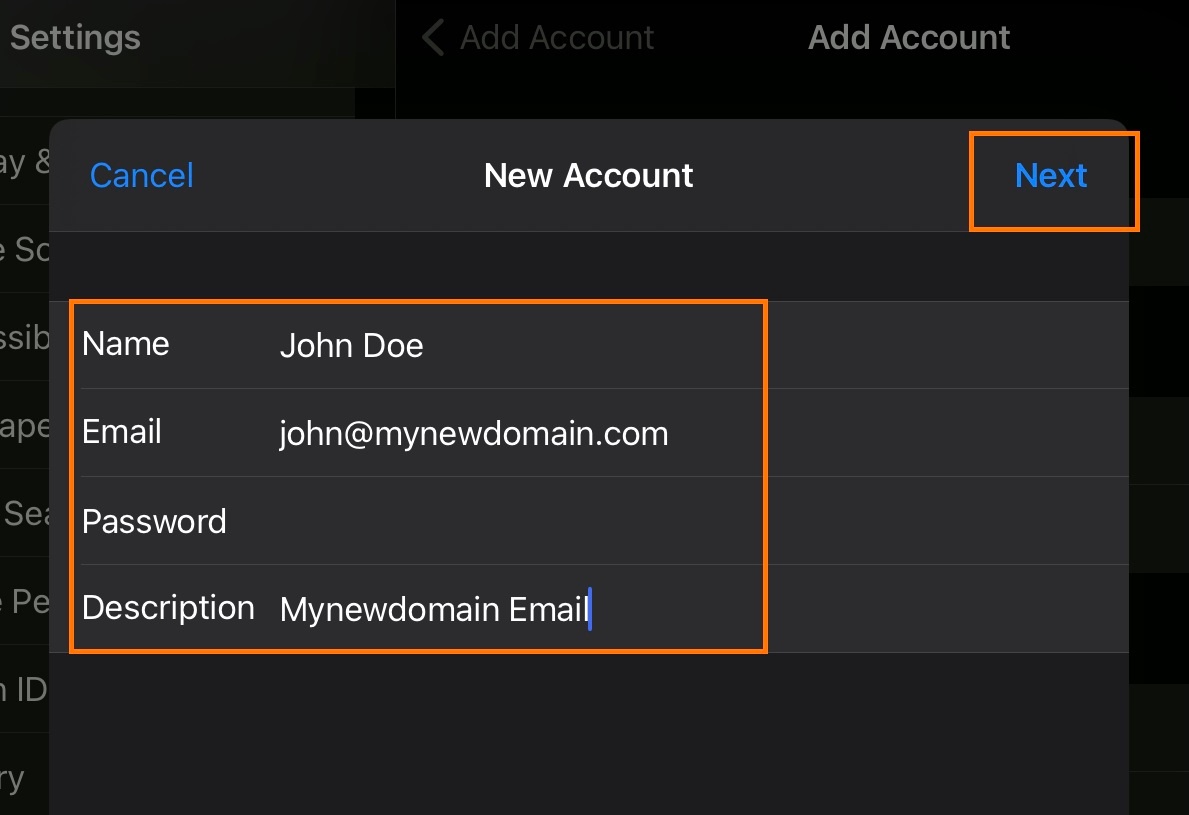
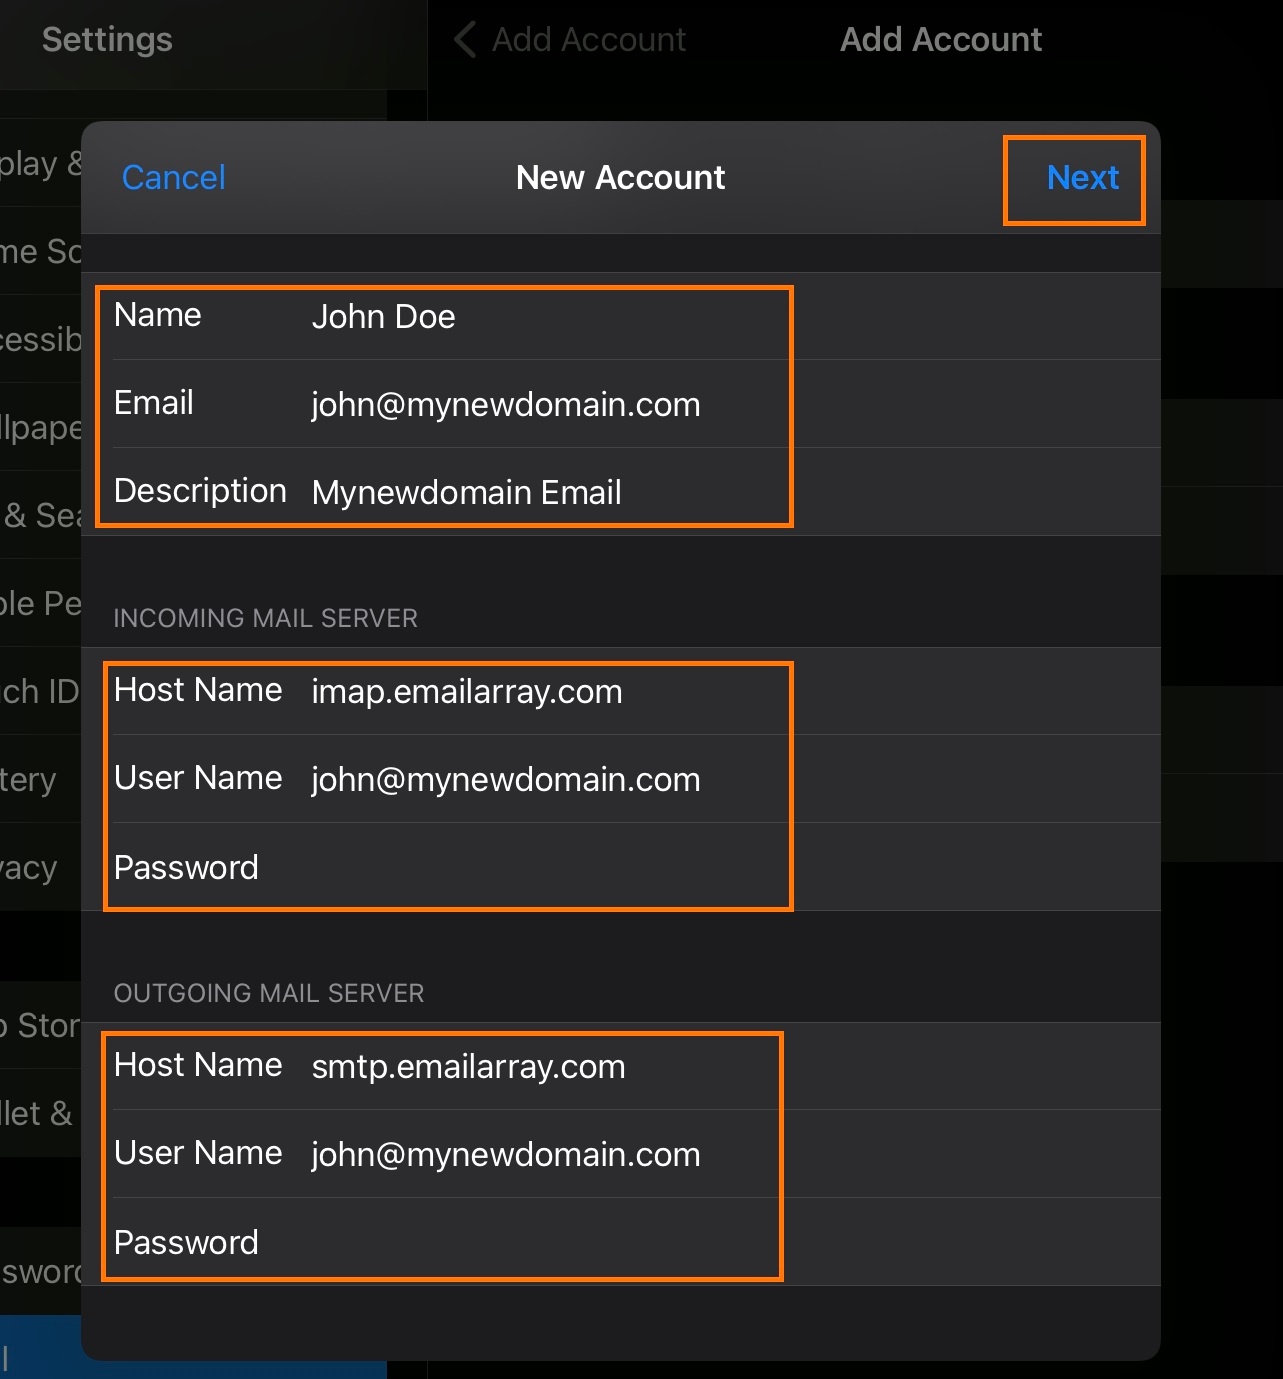
- Inform the following
- Name - The display name you want on your outgoing email
- Email - Your full email address
- Password - Your email password
- Description - A description for your account
- Click on Next
- IMAP is selected by default
- Under Incoming Mail Server, enter as below:
- Host Name -
imap.emailarray.com - User Name - Your full e-mail address
- Password - Your password
- Host Name -
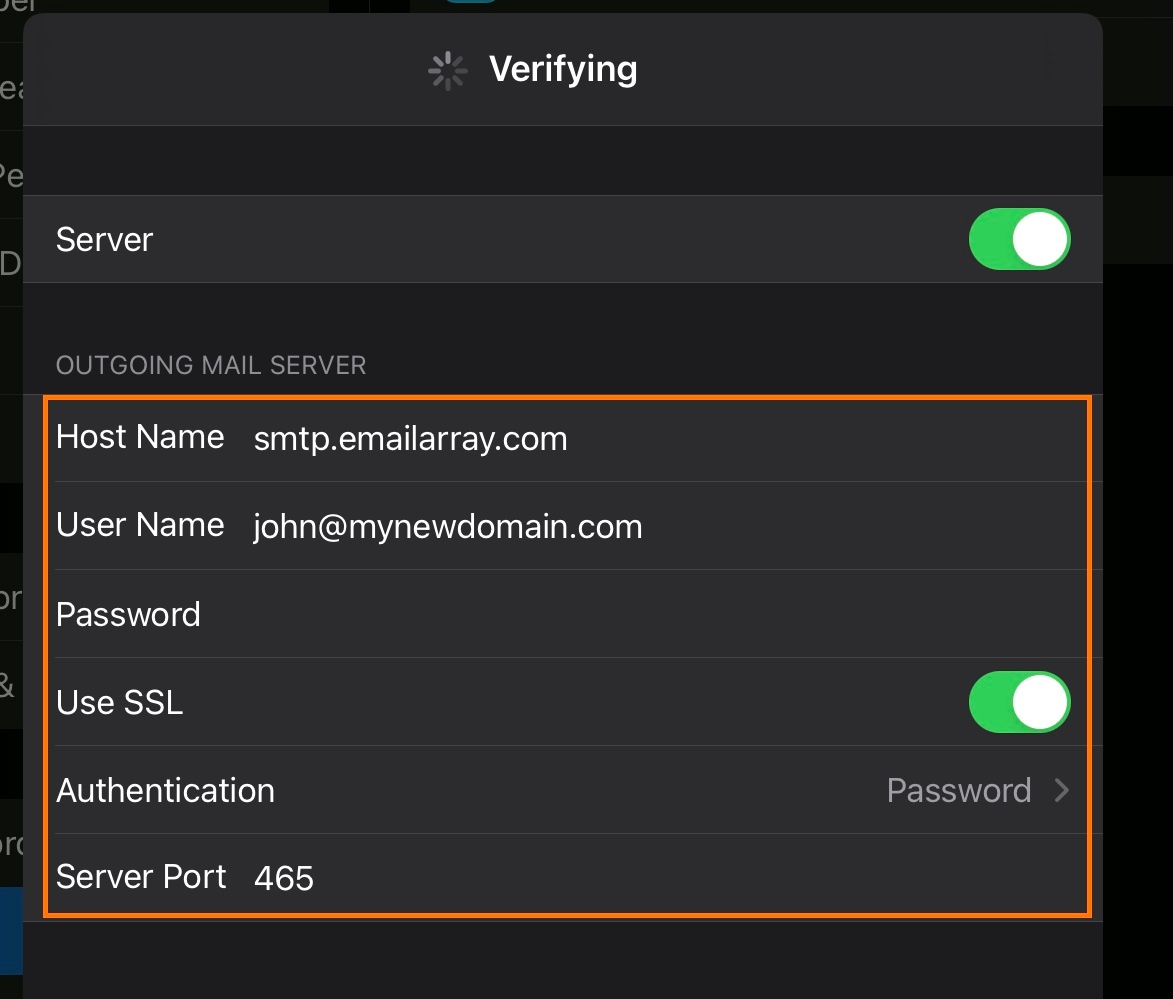
- Under Outgoing Mail Server, enter as below:
- Host Name -
smtp.emailarray.com - User Name - Your full e-mail address
- Password - Your password
- Host Name -
- Click on Next
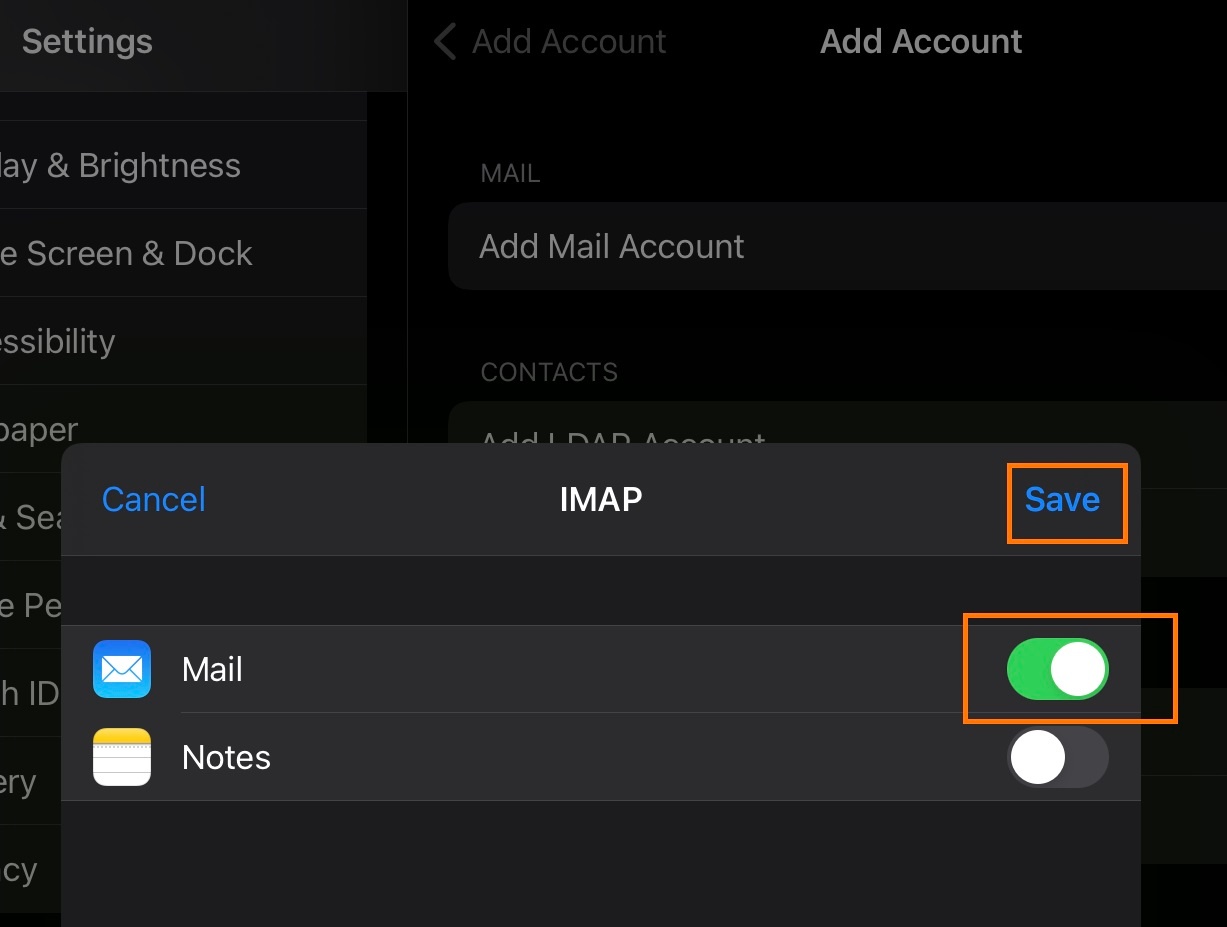
- Click on Save
Note that IMAP is preferred over POP. If you want to set up the account as POP, you have to set it up manually. IMAP is a protocol made to support several devices accessing one same account, with all folders synced at our server, which also guarantees that our backups will be executed.
Example setup for iOS:
 |
 |
 |
 |
 |
 |
Setup Email on Android (IMAP)
Remember that, if you have an Enhanced account, you can use ActiveSync, to not only sync e-mails, but also contacts and events.
How to set up your email on an Android device
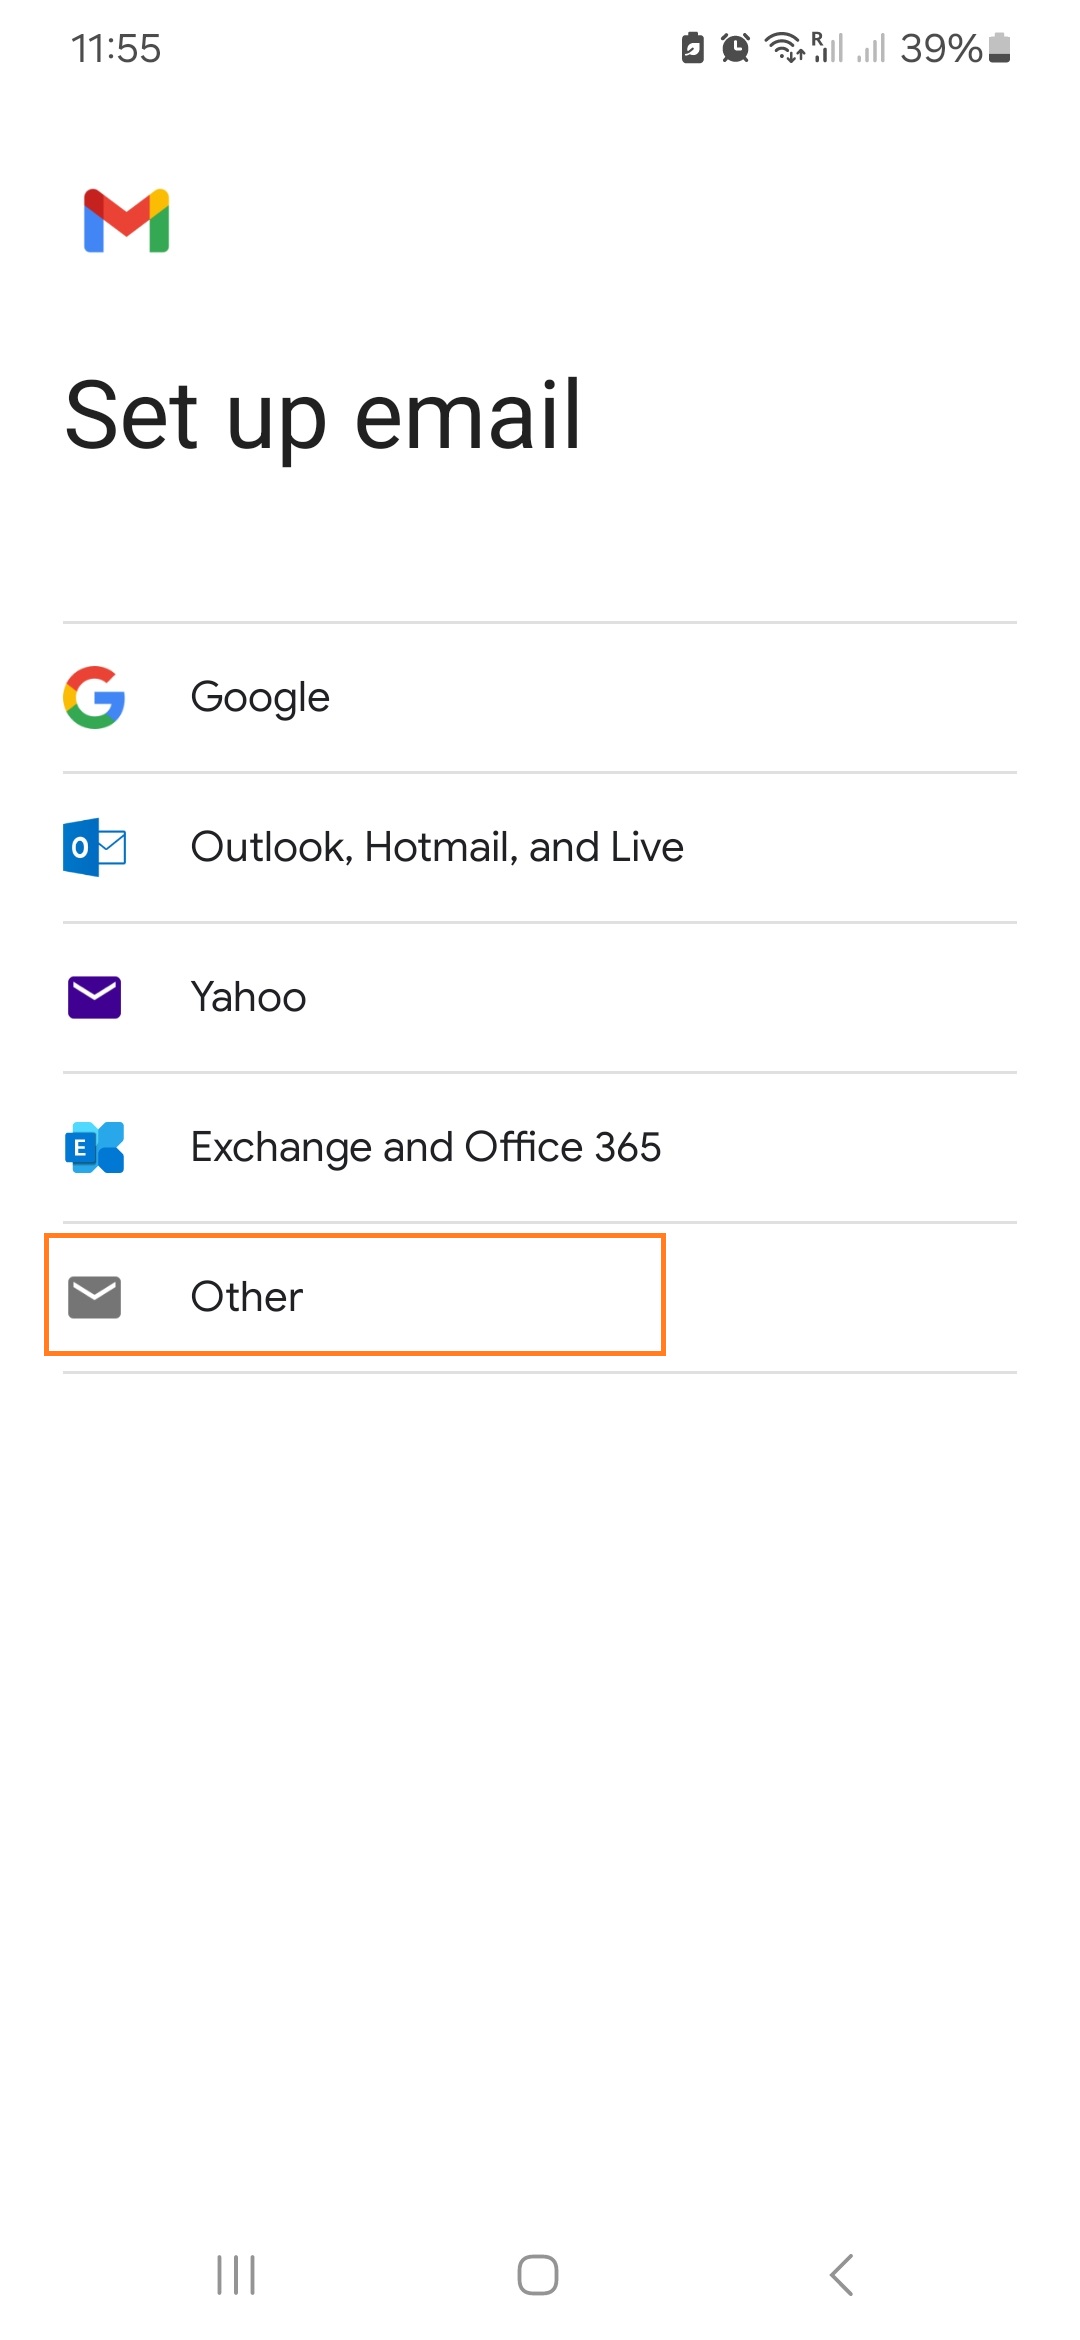
Here's the step by step for setting up an IMAP account on Android's native mail app.
- Press the device's Menu button.
- Tap Settings.
- Go to Manage Accounts
- Click on Add account.
- Click on Email / Personal (IMAP)
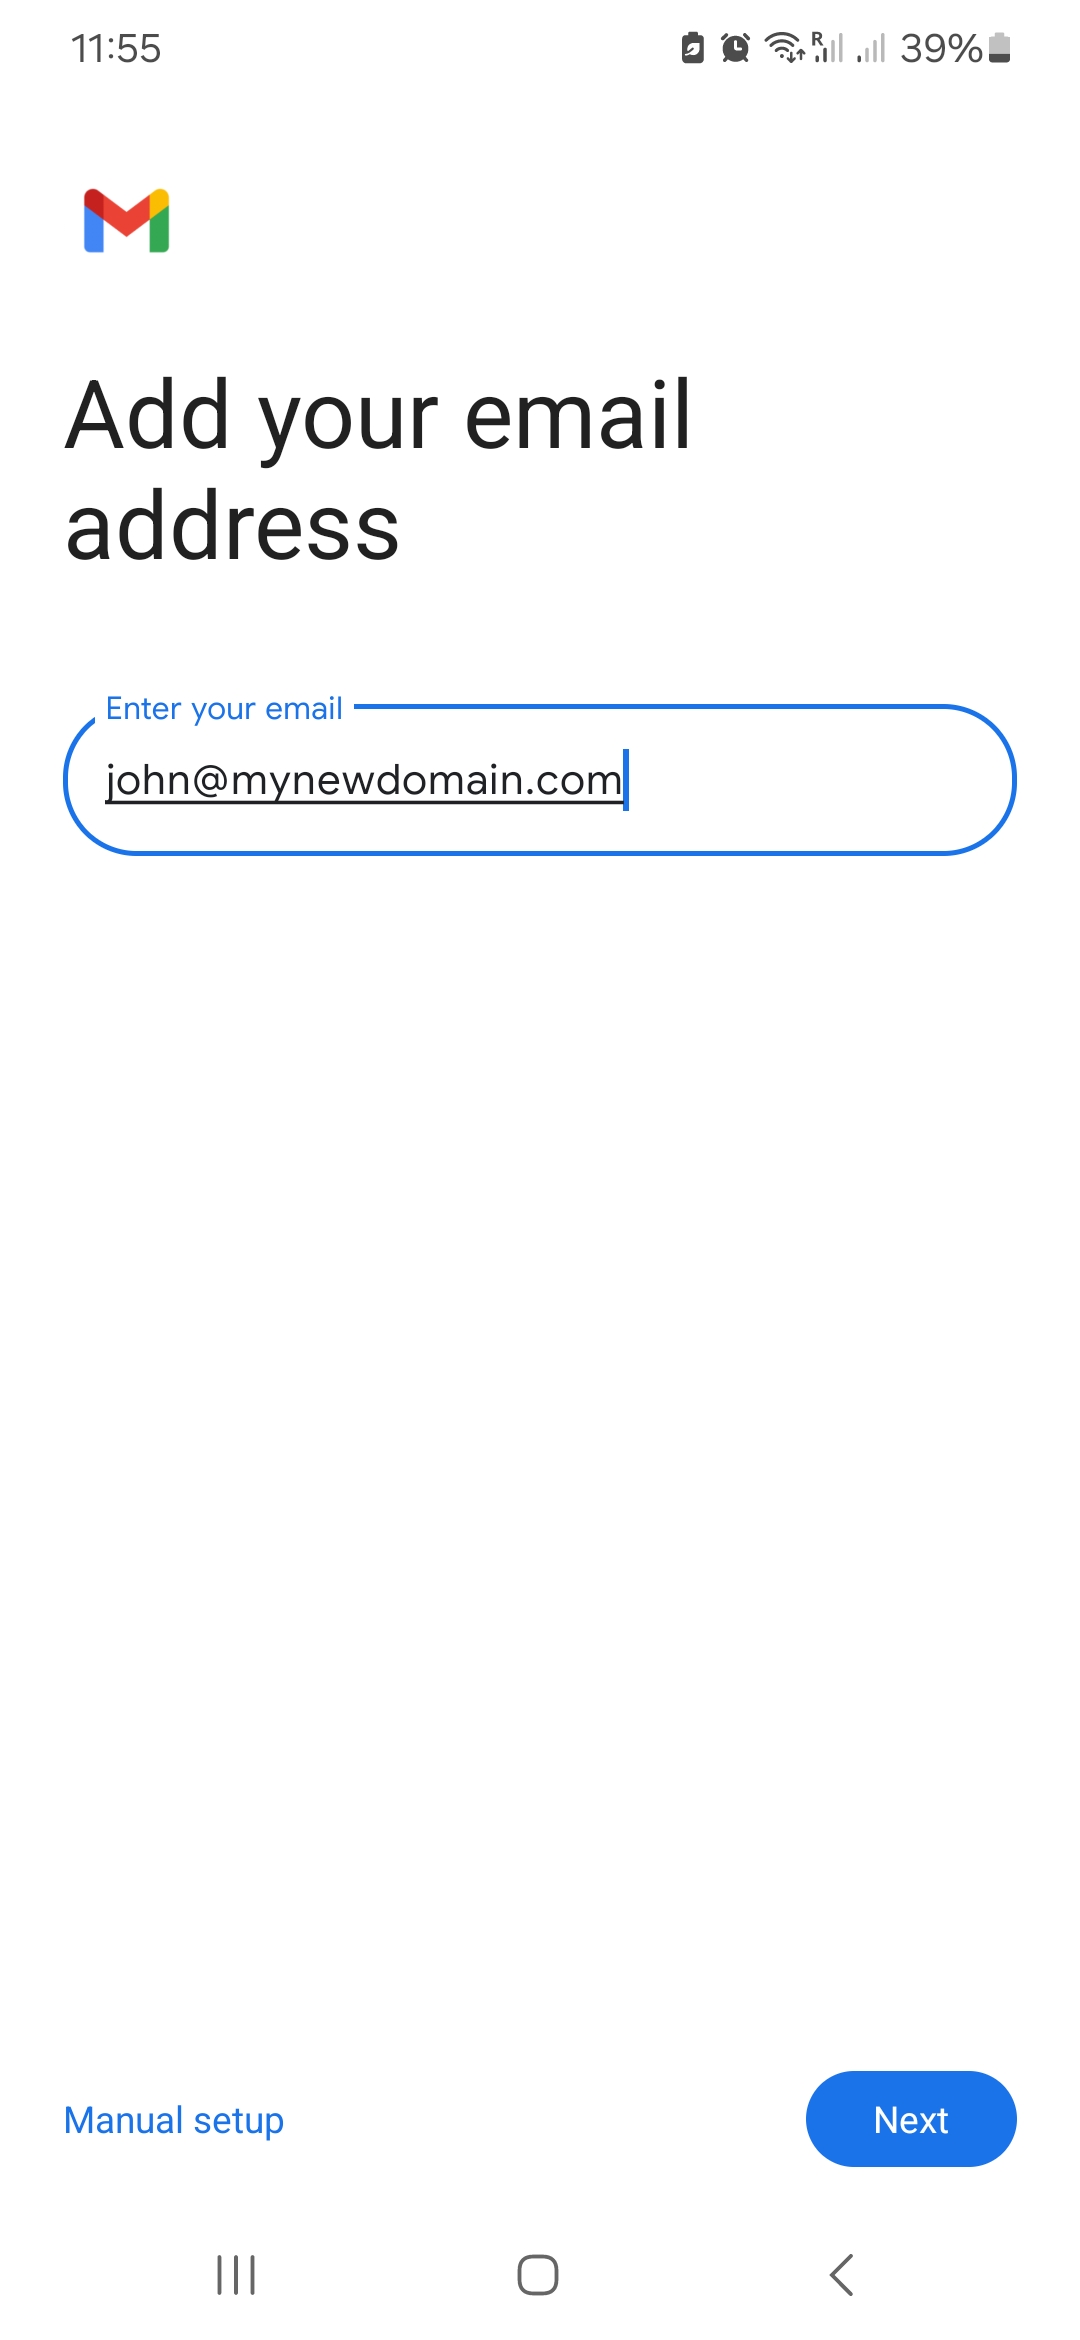
- Username: enter your full e-mail address
- If an account type is asked, choose IMAP account.
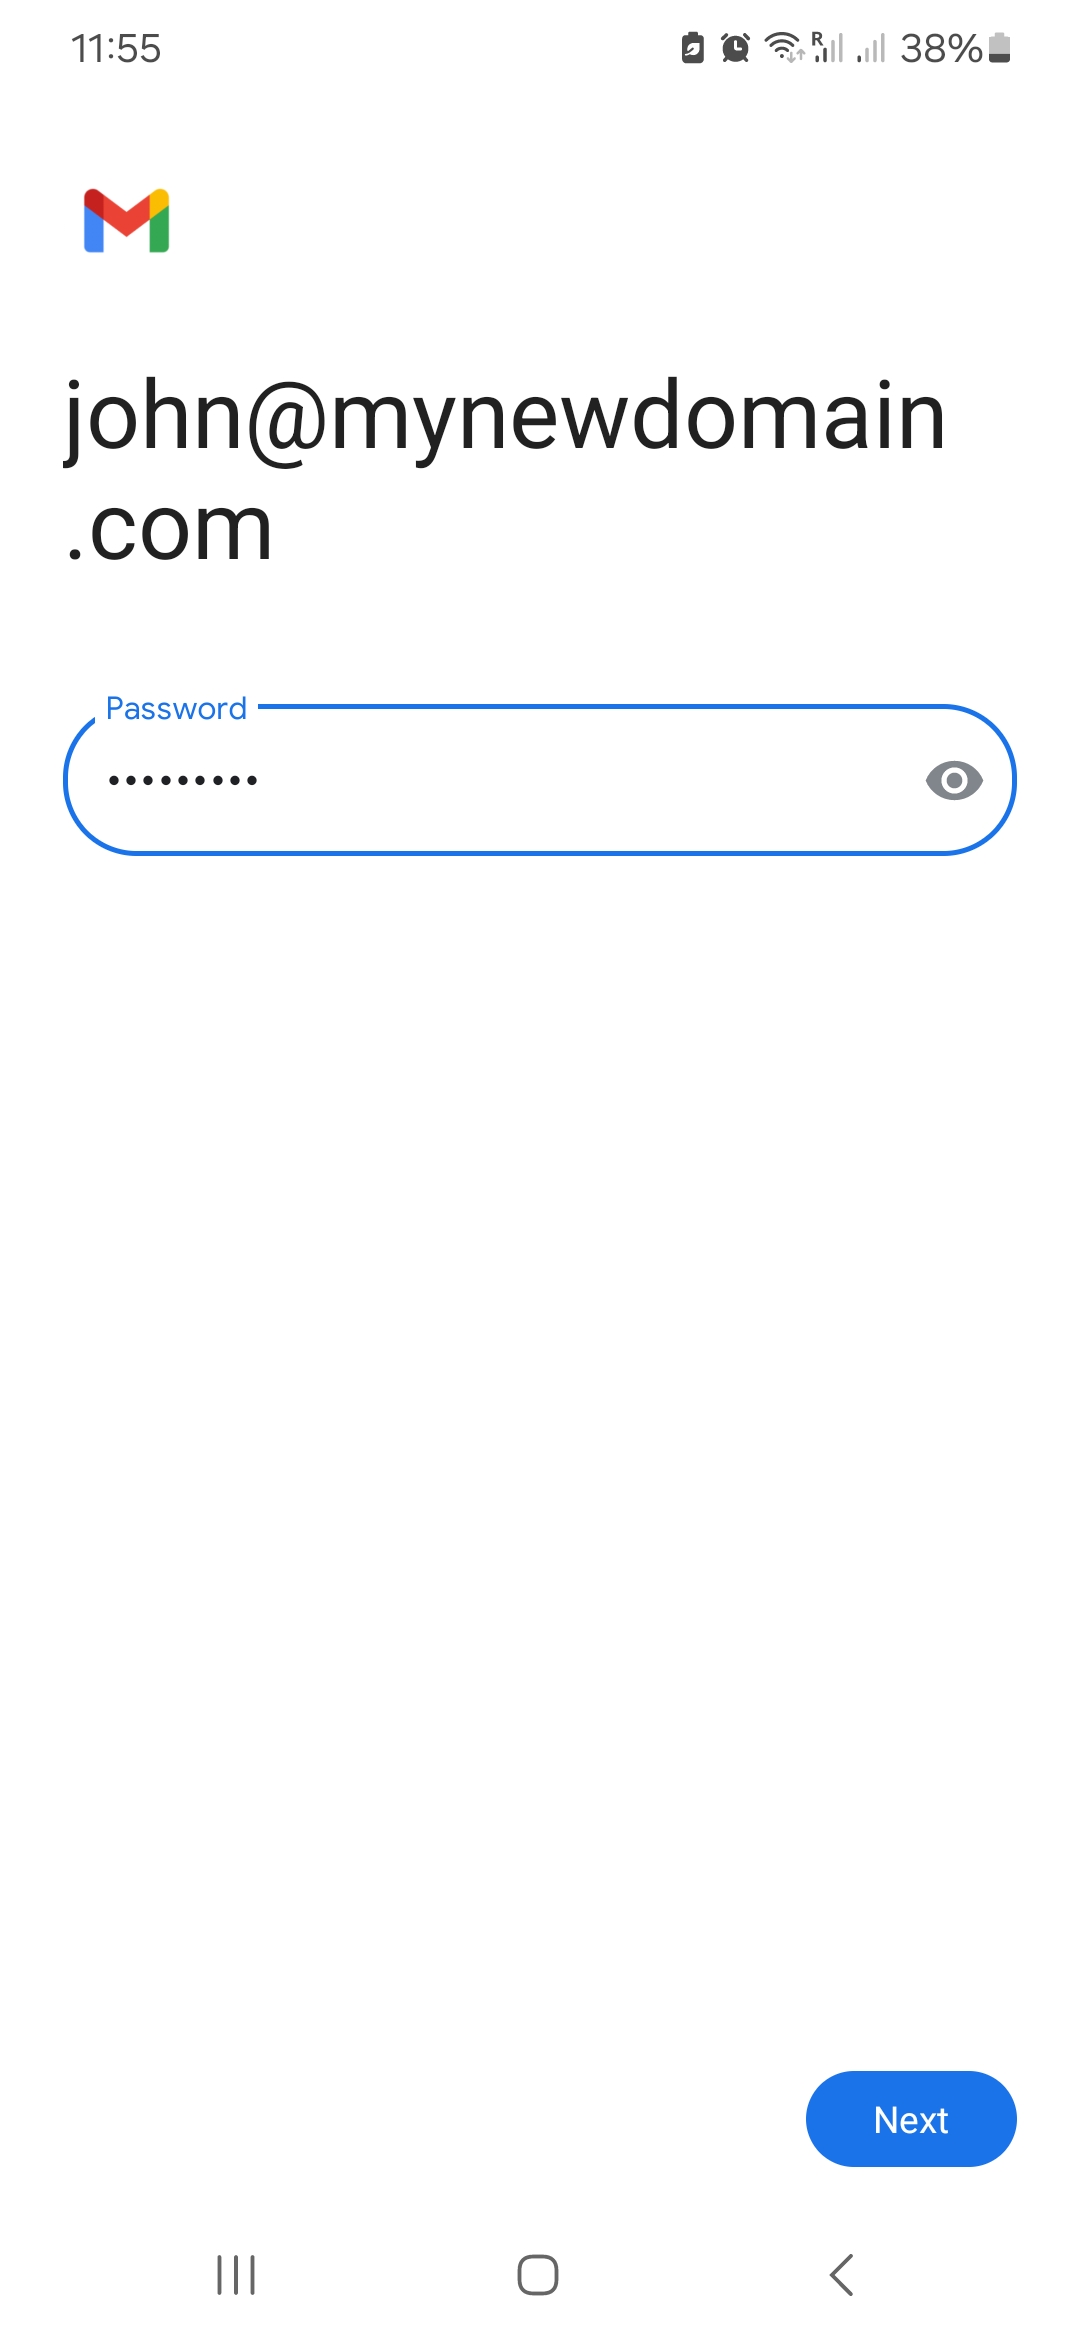
- Password: enter your email's password.
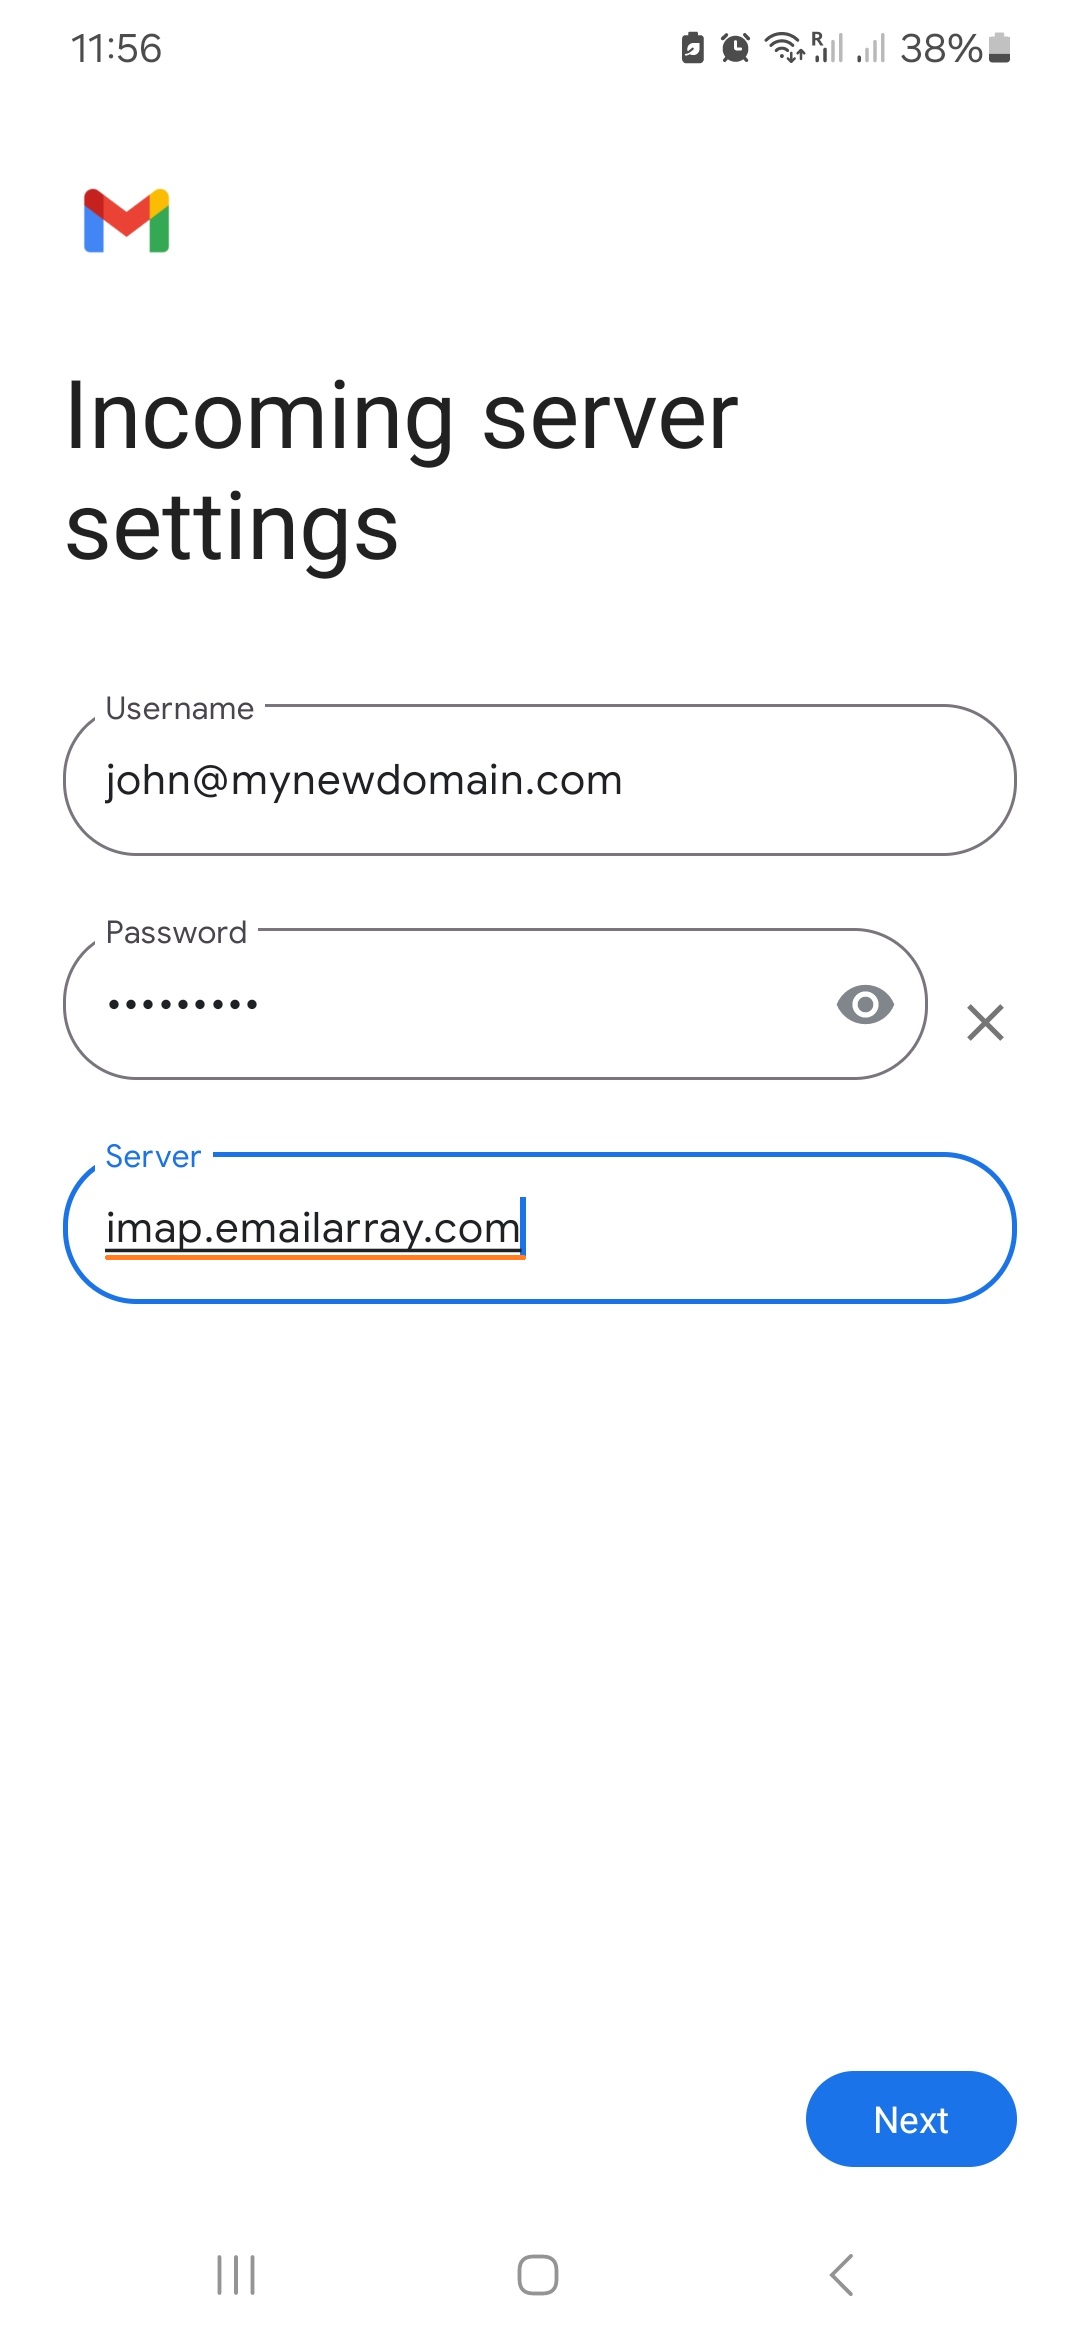
- Incoming server settings
- Username: your full email address
- Password: your email's password
- Server:
imap.emailarray.com. Android will automatically use yourdomain.com as host and you need to change it.
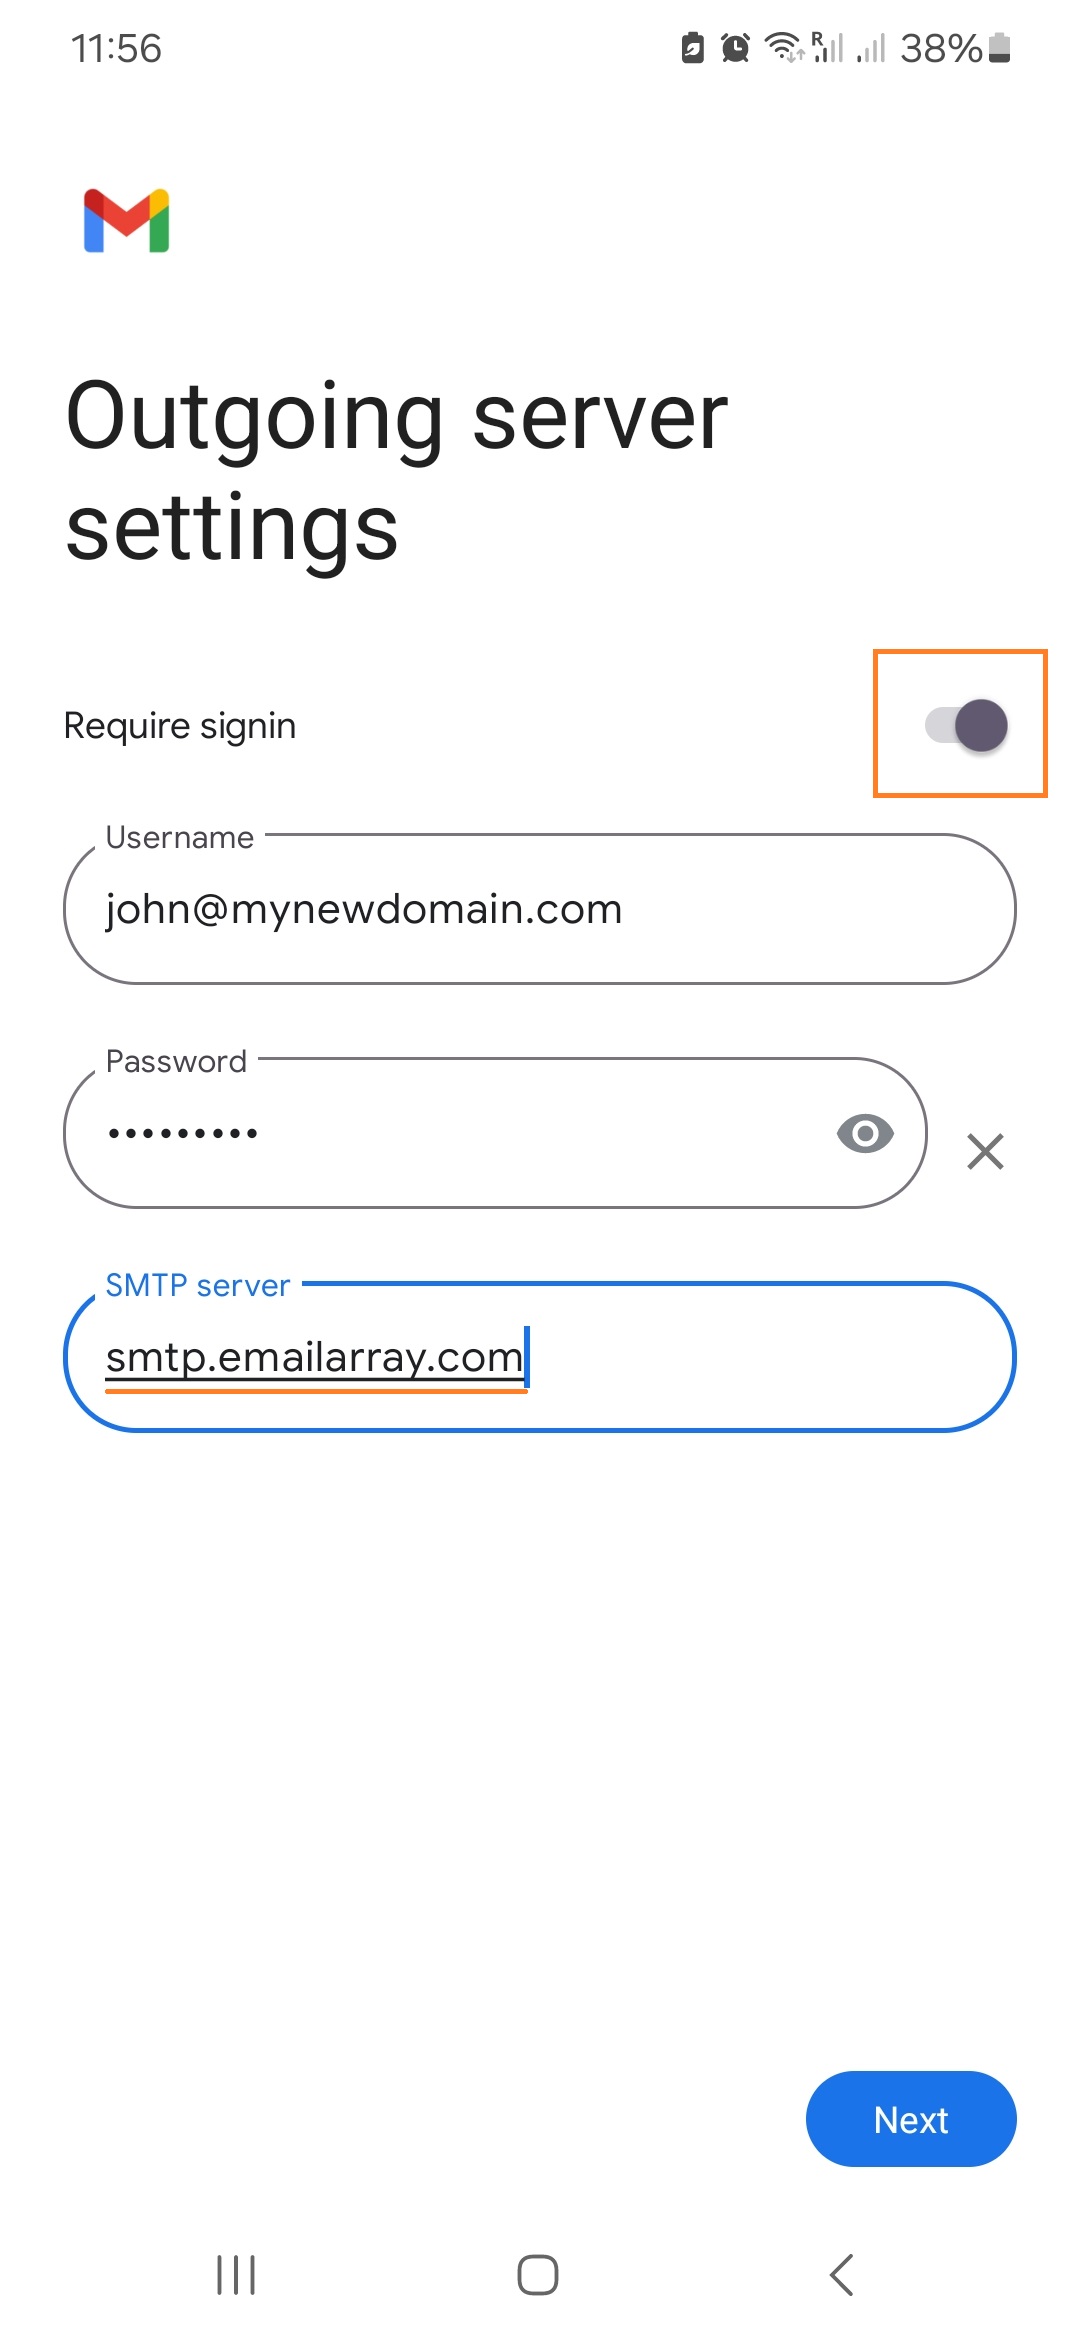
- Outgoing server settings
- Require signin: YES
- Username: your full email address
- Password: your email's password
- SMTP server:
smtp.emailarray.com. Android will automatically use yourdomain.com as host and you need to change it.
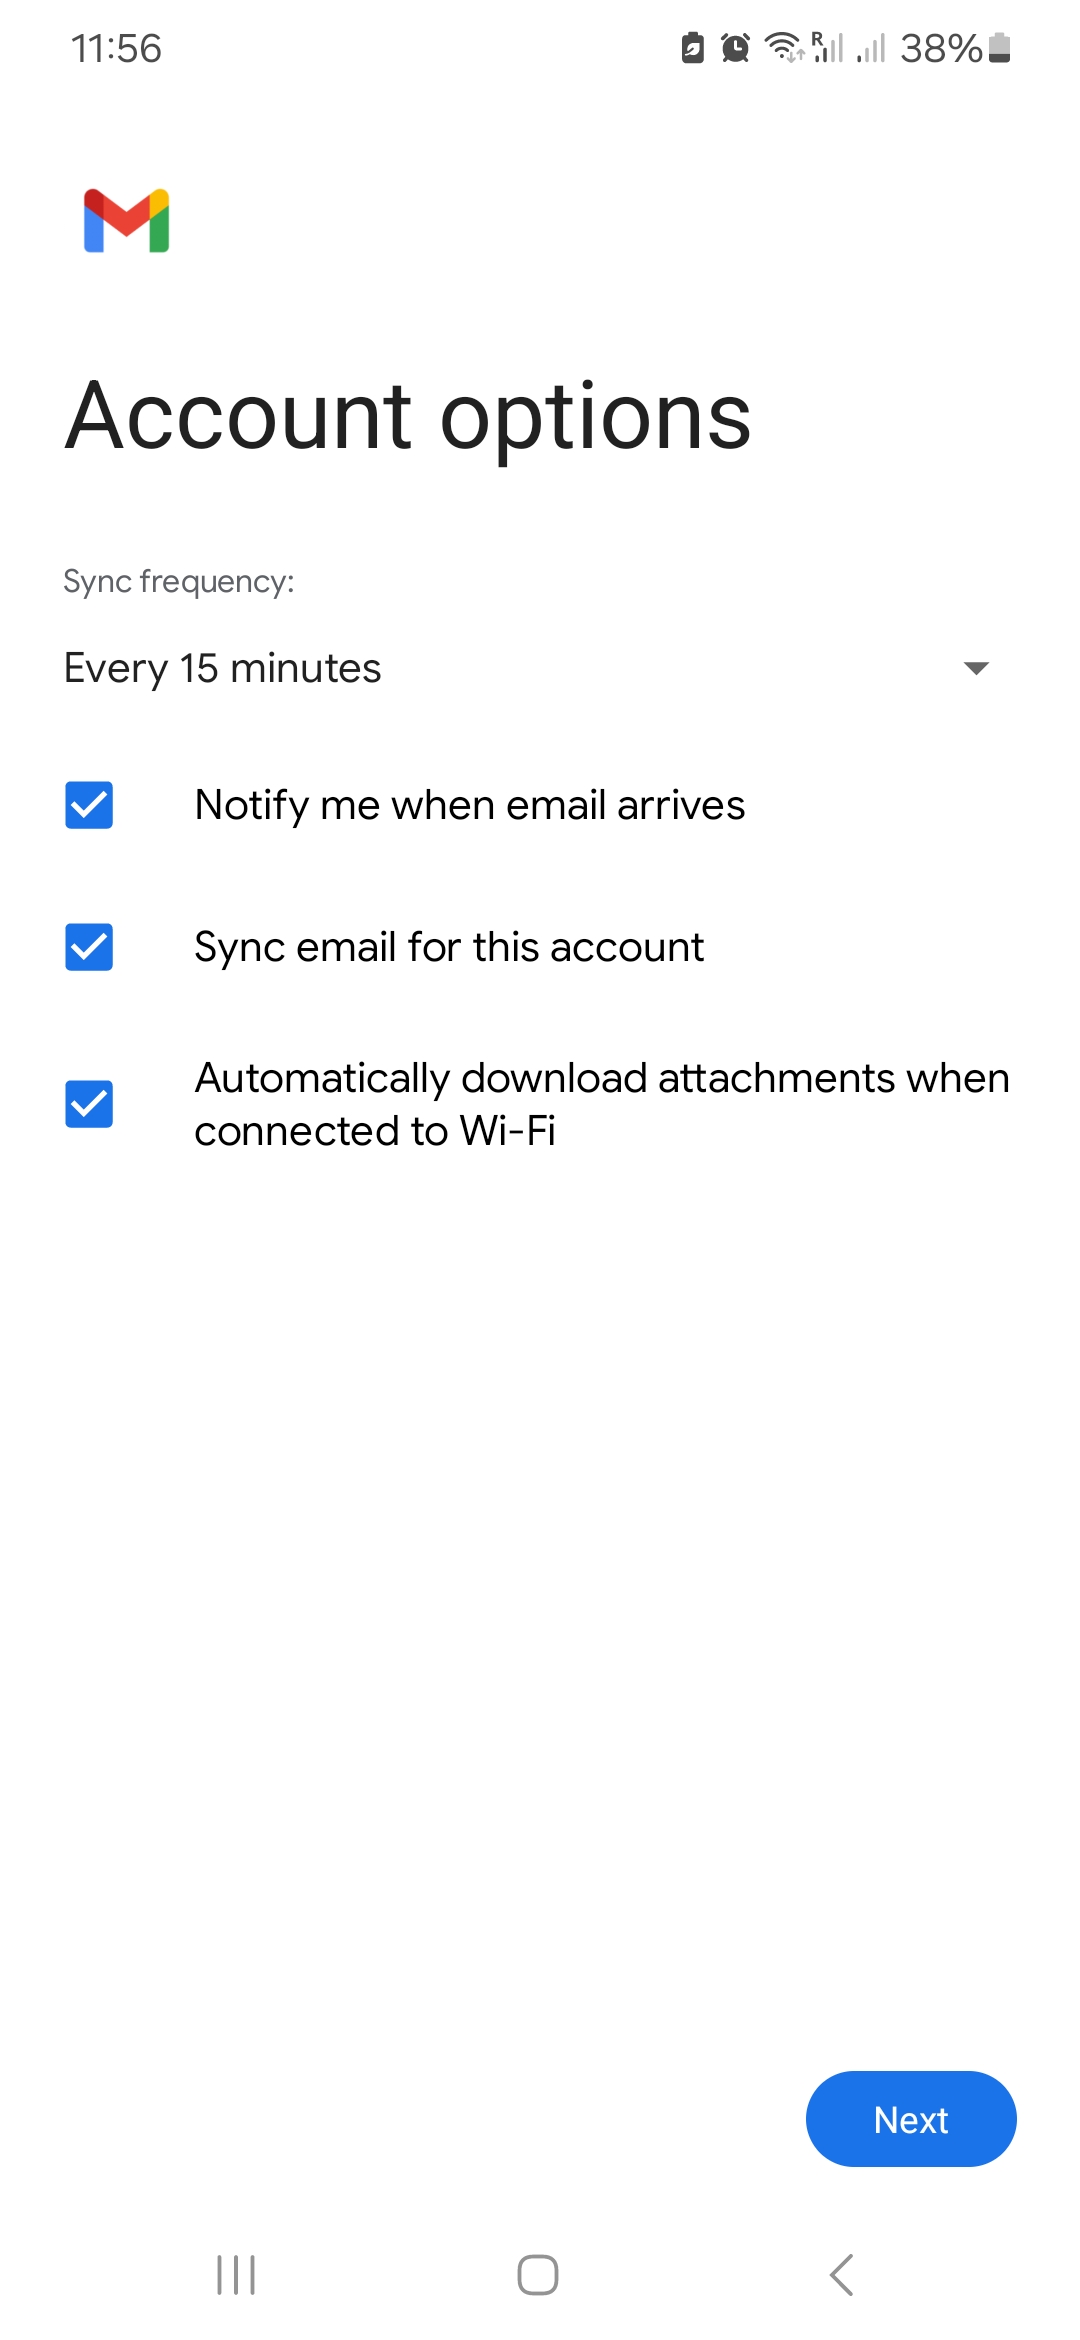
- Account options: Optionally, you can set up specific details such as interval for checking mail, if you want to be notified, etc.
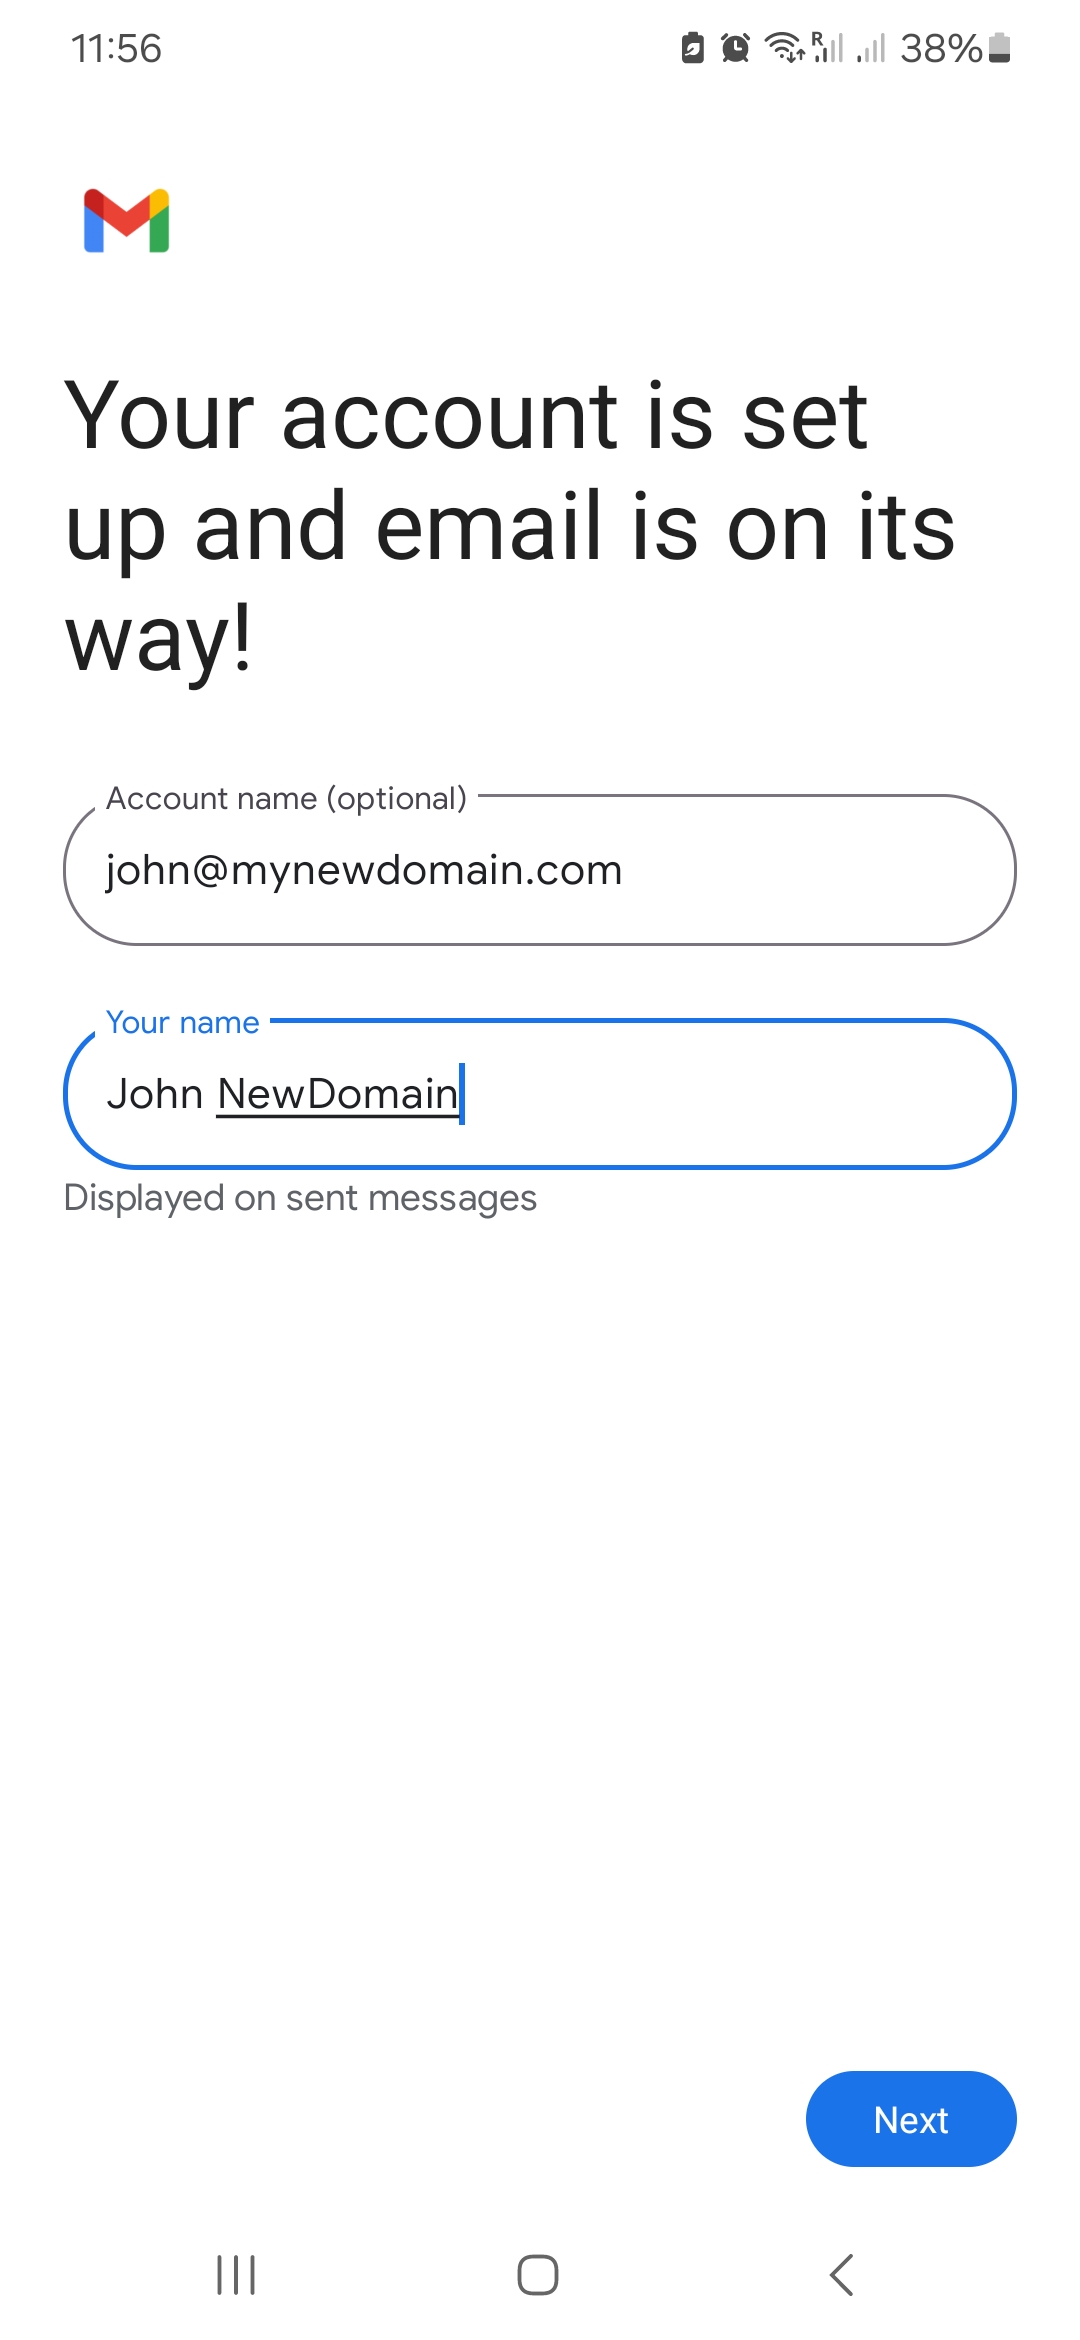
- On the last page, Android gives you the option to change the Account name (will appear in your list) and Your name (will appear to recipients).
- Click on Next to finalize the procedure.
| Note that IMAP is preferred over POP. If you want to set up the account as POP, you have to set it up manually. IMAP is a protocol made to support several devices accessing one same account, with all folders synced at our server, which also guarantees that our backups will be executed. |
Example Setup on Android Mail App

Setup Email on eM Client (IMAP)
eM Client provides a modern, intuitive interface for managing your communications. This guide will walk you through setting up your mailbox using Automatic Setup (recommended) or manual configuration.
As with our other desktop guides, we recommend using IMAP with SSL/TLS to ensure your data stays synchronized across all your devices and is protected by our professional backups.
Syncing Other Services: eM Client is a full groupware suite. If you have an Enhanced mailbox, you can also add your Calendar (CalDAV) and Contacts (CardDAV) directly through the setup wizard to keep your professional life in sync.
Option 1: Automatic Setup (Recommended)
If your DNS is configured with Autodiscover, eM Client can automatically detect your server settings in seconds.
-
Start the Wizard: Open eM Client and go to Menu > Accounts. Click on Add Account.
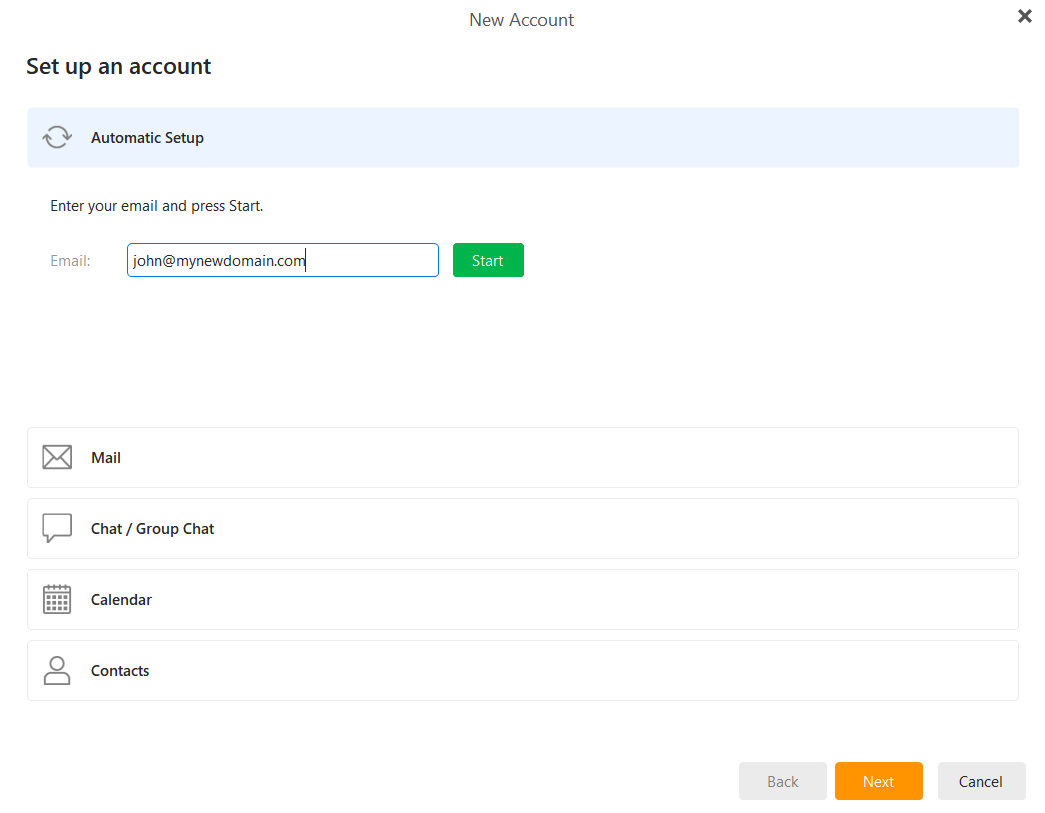
-
Enter Email: In the Automatic Setup section, enter your full email address and click Start.

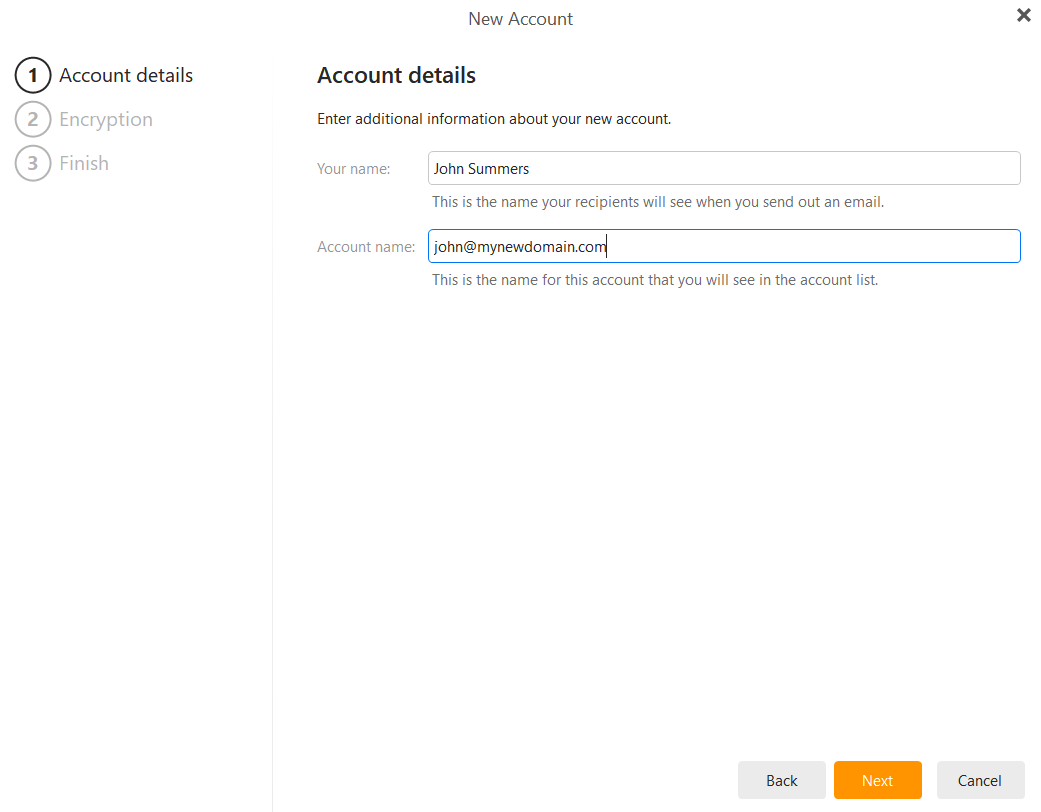
- Account Details: Enter the name you want recipients to see when you send an email (e.g., "John Smith") and an account name for your internal list. Click Next.

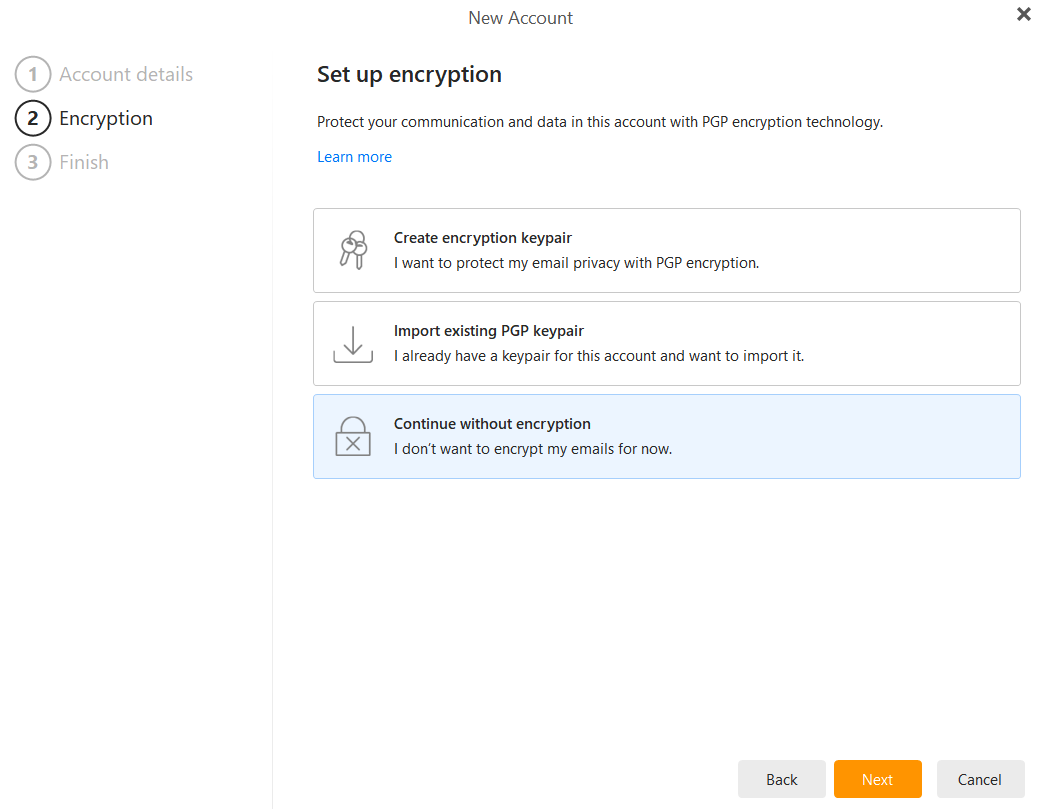
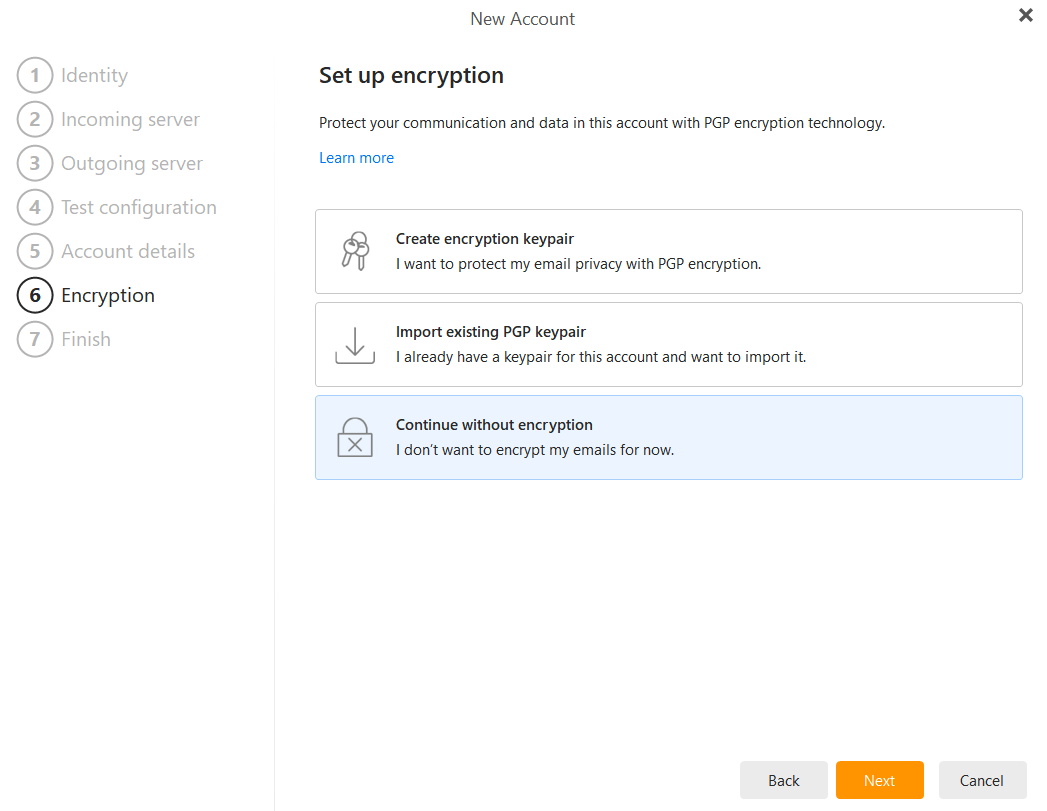
- Encryption: You will be asked about PGP encryption. For most users, we recommend selecting Continue without encryption unless you specifically require PGP technology. Click Next.

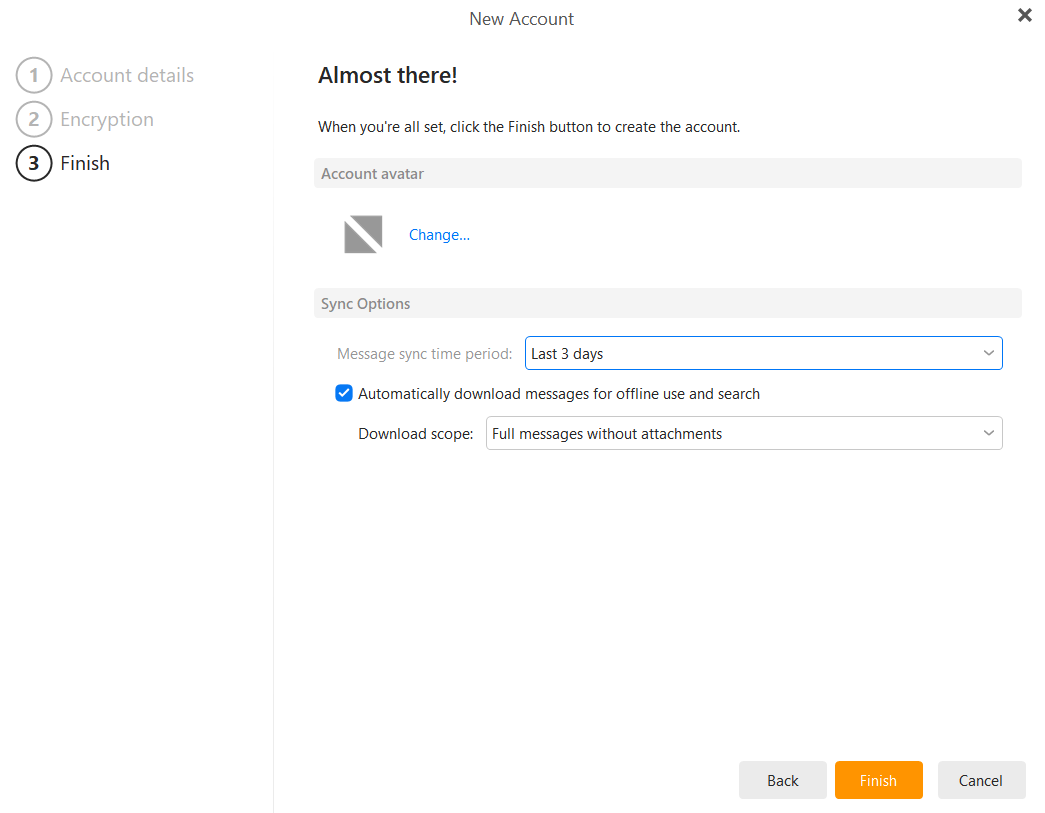
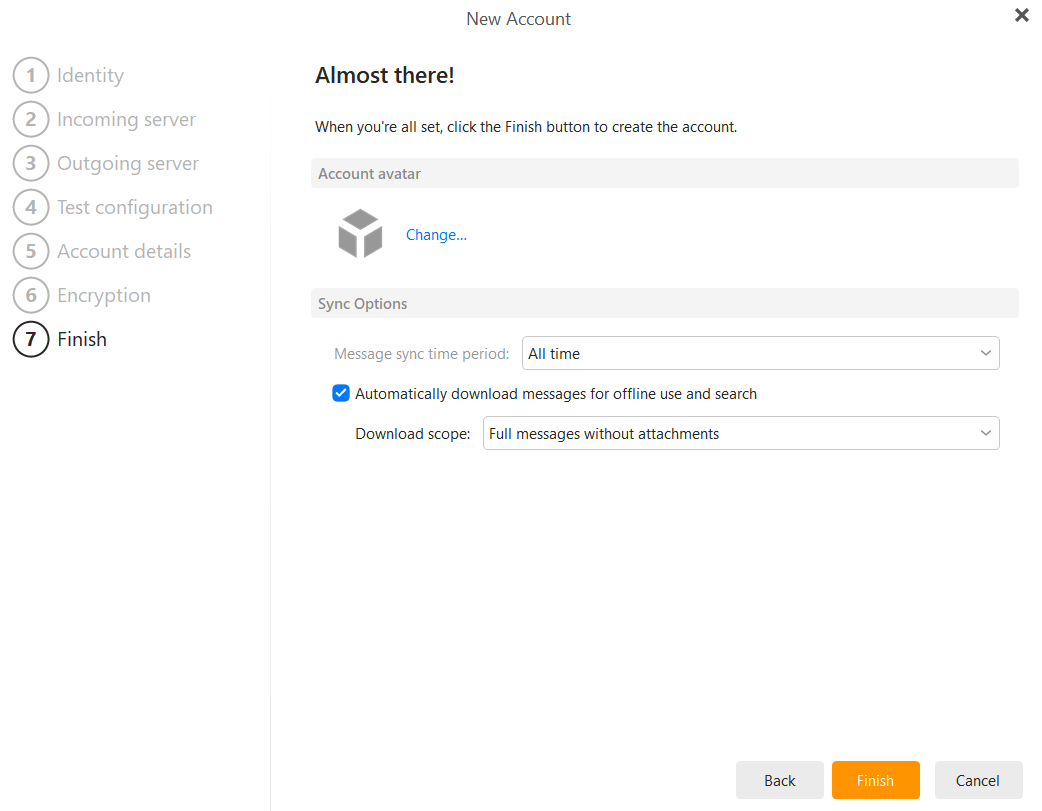
- Choose your synchronization options (e.g., "Last 3 days" for faster initial setup) and click Finish.

-
Authentication: A window will appear asking for your credentials. Enter your email password and click OK. Ensure "Save password" is checked to avoid repeated prompts.
Option 2: Manual Configuration
If you need to enter settings manually or want to use specific ports, follow these steps:
-
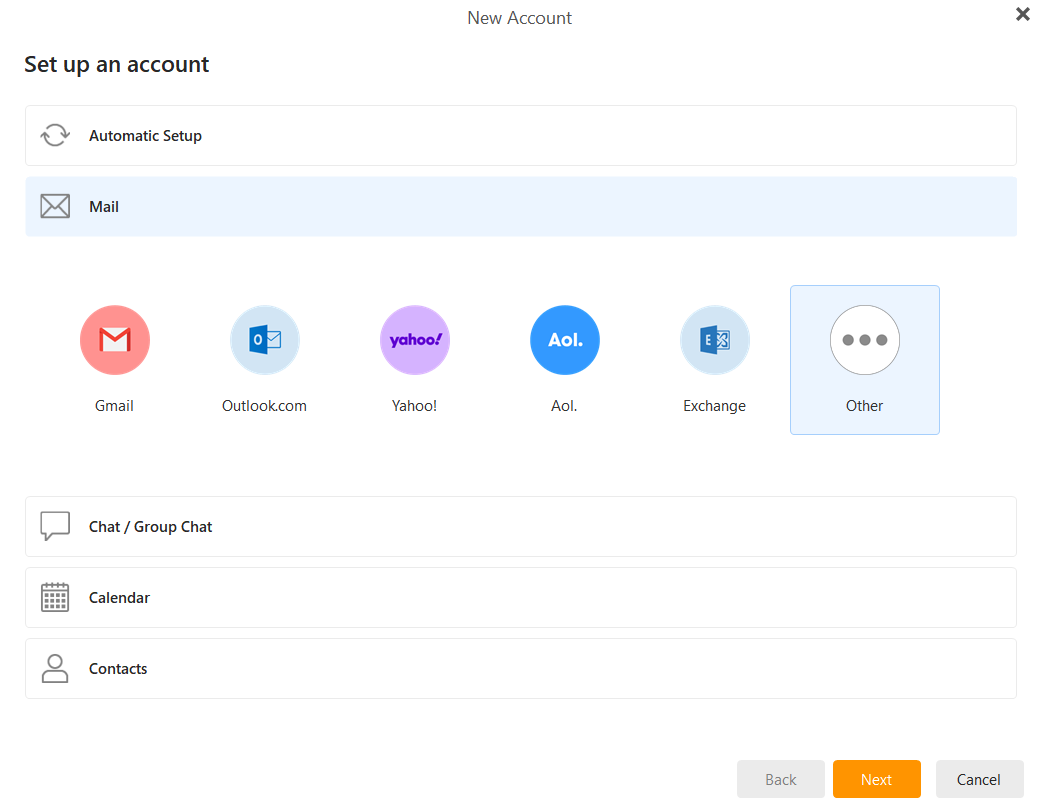
Select Mail: In the New Account window, instead of Automatic Setup, click the Mail tab and select Other. Click Next.

-
Incoming Server: Select IMAP
-
Hostname:
imap.emailarray.com -
User name: Your full email address.
-
Password: Your email account password.
-
Port: 993
-
Security: SSL/TLS

-
-
Outgoing Server:
-
Hostname:
smtp.emailarray.com -
User name: Your full email address.
-
Password: Your email account password.
-
Port: 465
-
Security: SSL/TLS

-
-
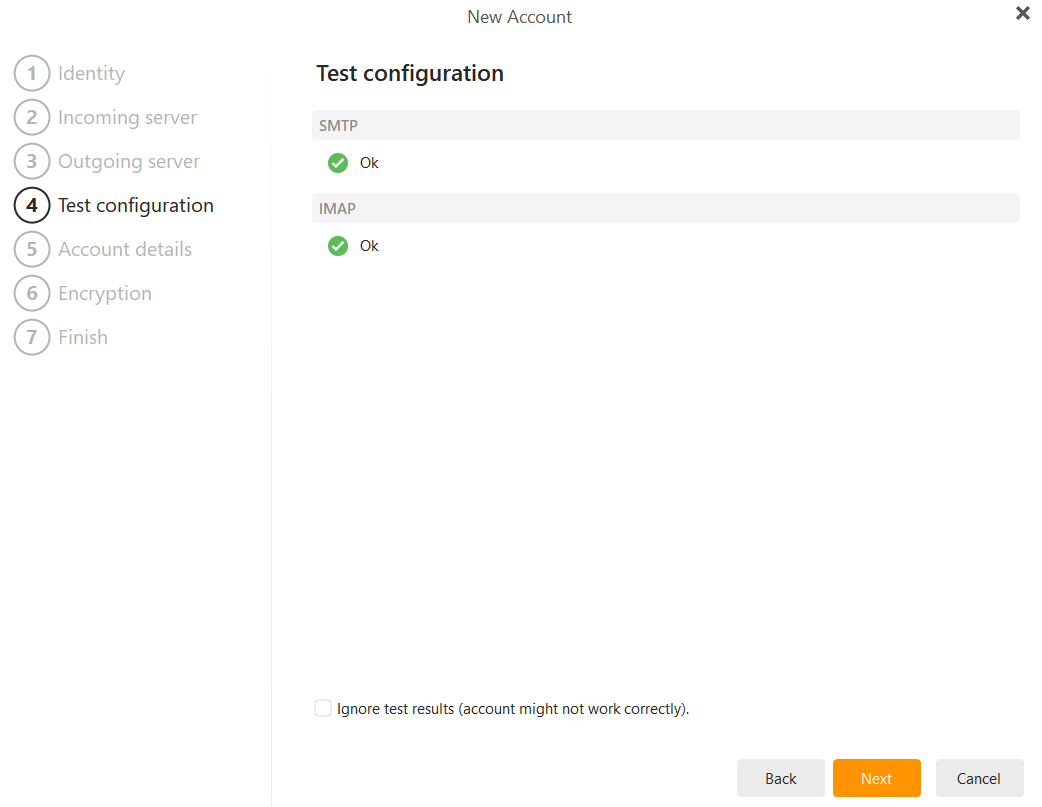
Test Configuration: eM Client will verify both the SMTP and IMAP connections. Once you see the green "Ok" status for both, click Next.

-
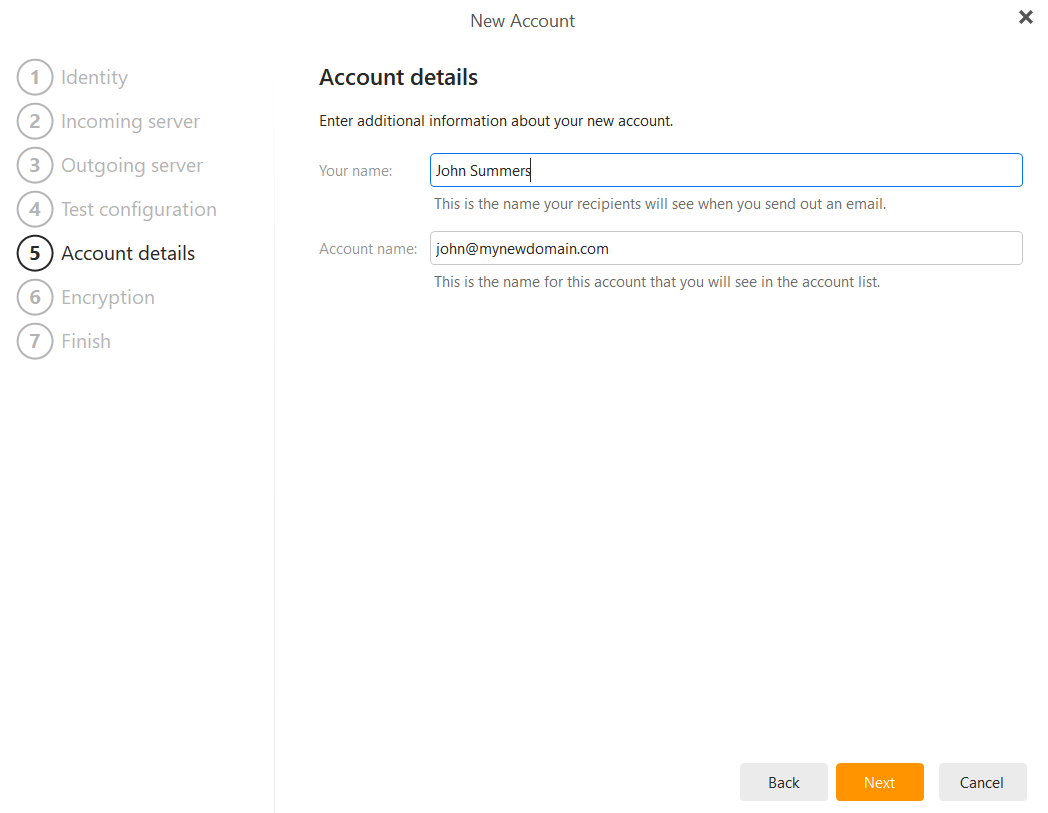
Account Details: Enter your name (as it should appear on sent mail) and an internal account name. Click Next.

-
Encryption: Select Continue without encryption and click Next.

-
Finish: Choose your message sync time period (e.g., "All time") and click Finish.

ActiveSync / EAS - Sync Email, Calendars and Contacts
Sync your email, calendar, and contacts in real-time.
ActiveSync is the most powerful way to connect your mailbox to your mobile devices and desktop apps. Unlike standard email setups, ActiveSync provides a "push" connection that synchronizes your email, calendar, contacts, and notes instantly across all your devices. When you delete an email on your phone, it’s gone from your computer; when you add a meeting to your calendar, it appears everywhere.
Note: ActiveSync is a premium feature available for Enhanced mailboxes.
Pro Tip: If your configured Autodiscover in your domain’s DNS settings, you can often skip the manual server entry. Simply enter your email and password, and the device will find the correct server settings automatically.
Pre-requisites
Before starting, ensure you have the following details ready:
-
Your Full Email Address: (e.g., john@mydomain.com).
-
Your Password: The same password you use for webmail.
- You have added the Autodiscover DNS record for your domain to simplify the configuration. Otherwise, you can use the manual setup.
Step 1: Add a New Account
-
Open the Settings app on your smartphone or tablet.
-
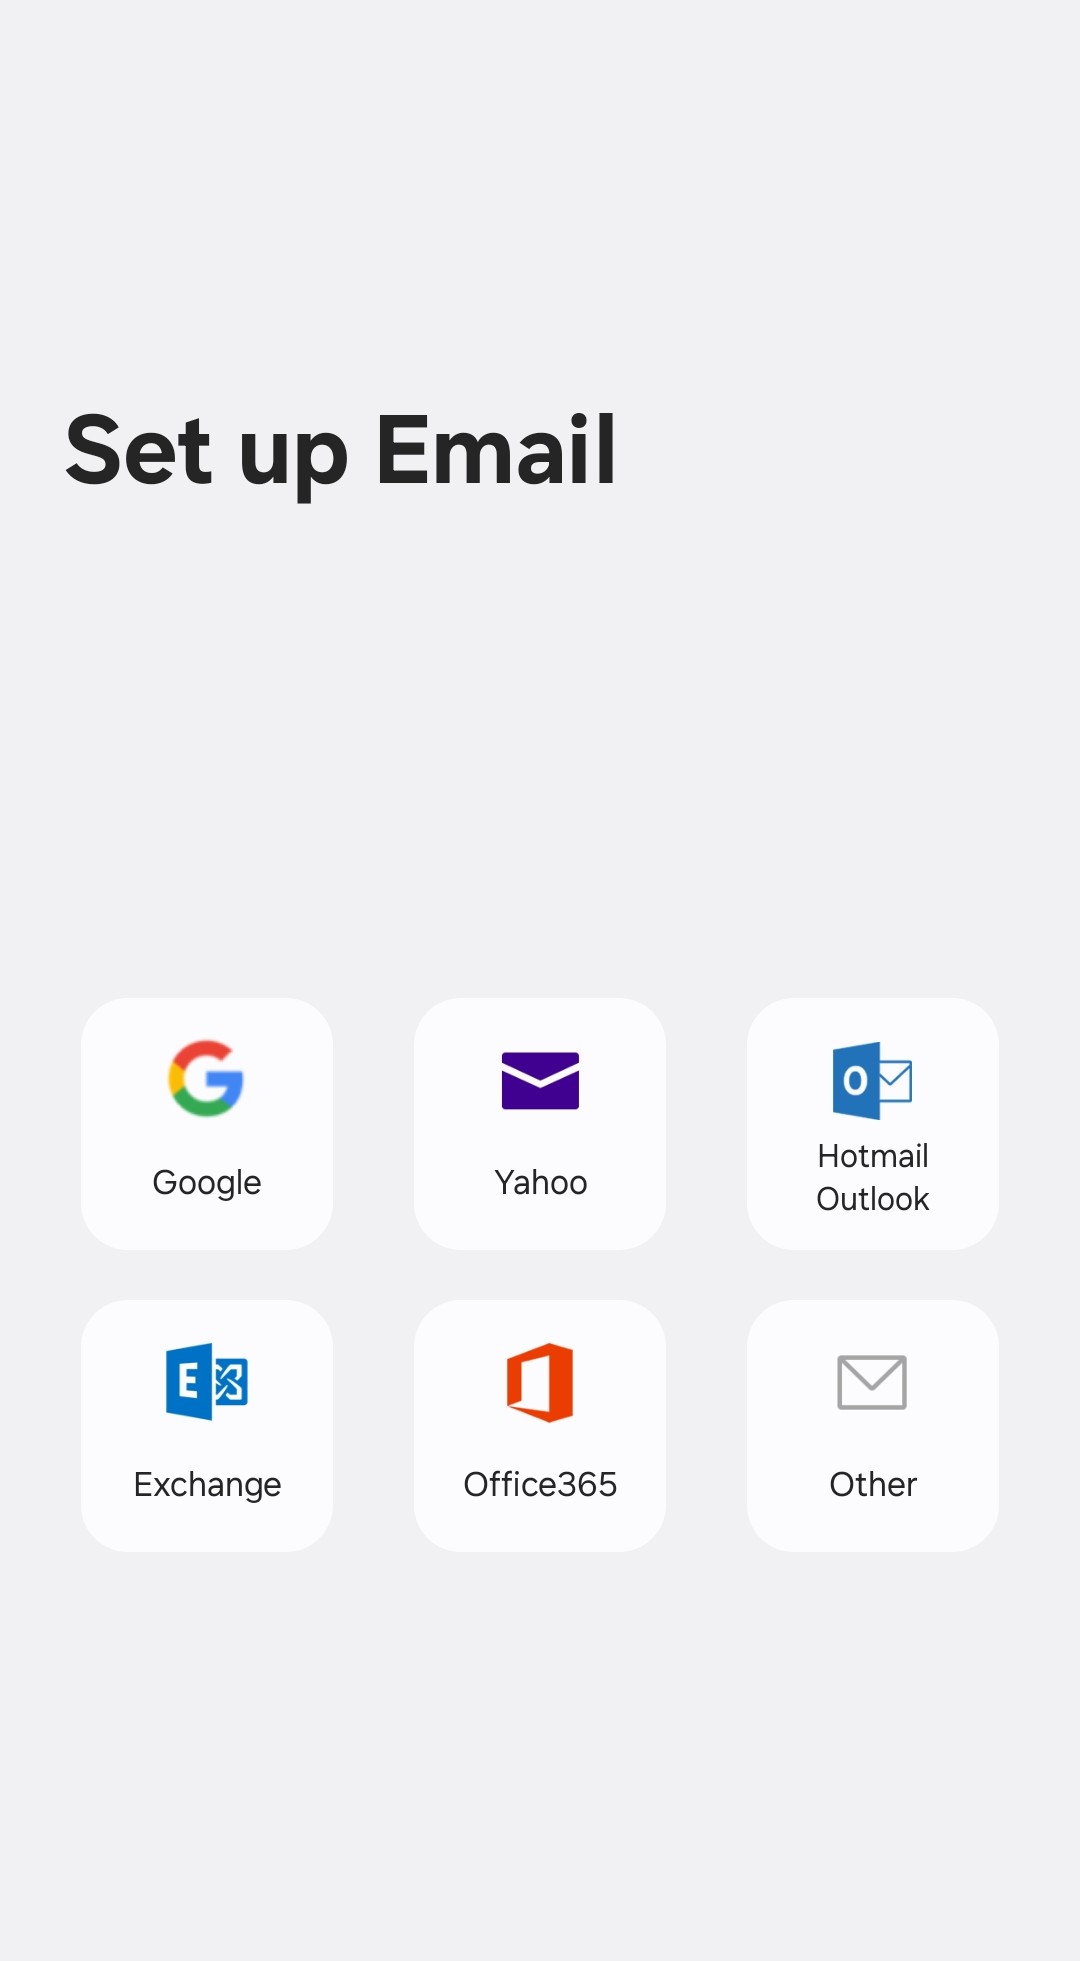
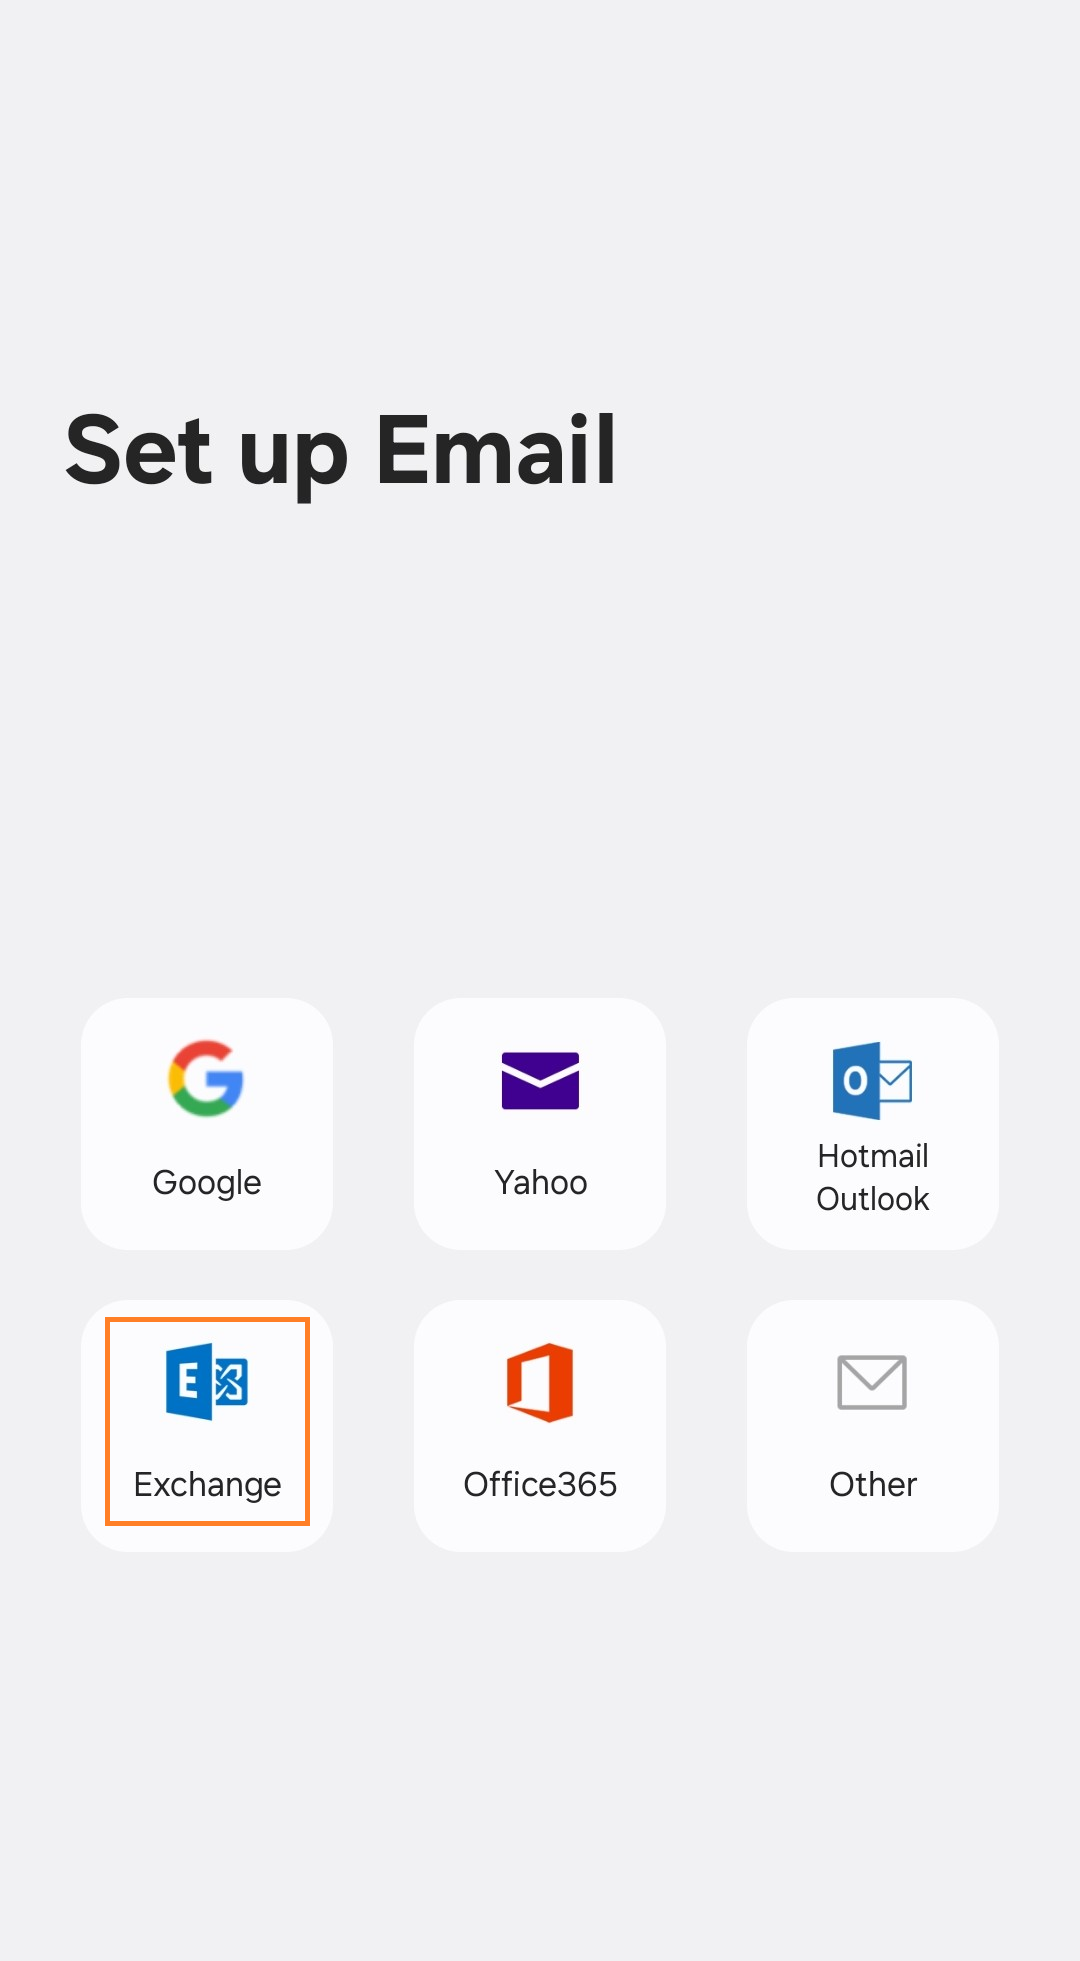
Navigate to Mail or Accounts and select Add Account.
-
From the list of account types, select Exchange, Microsoft Exchange, or ActiveSync.
Step 2: Enter Account Details
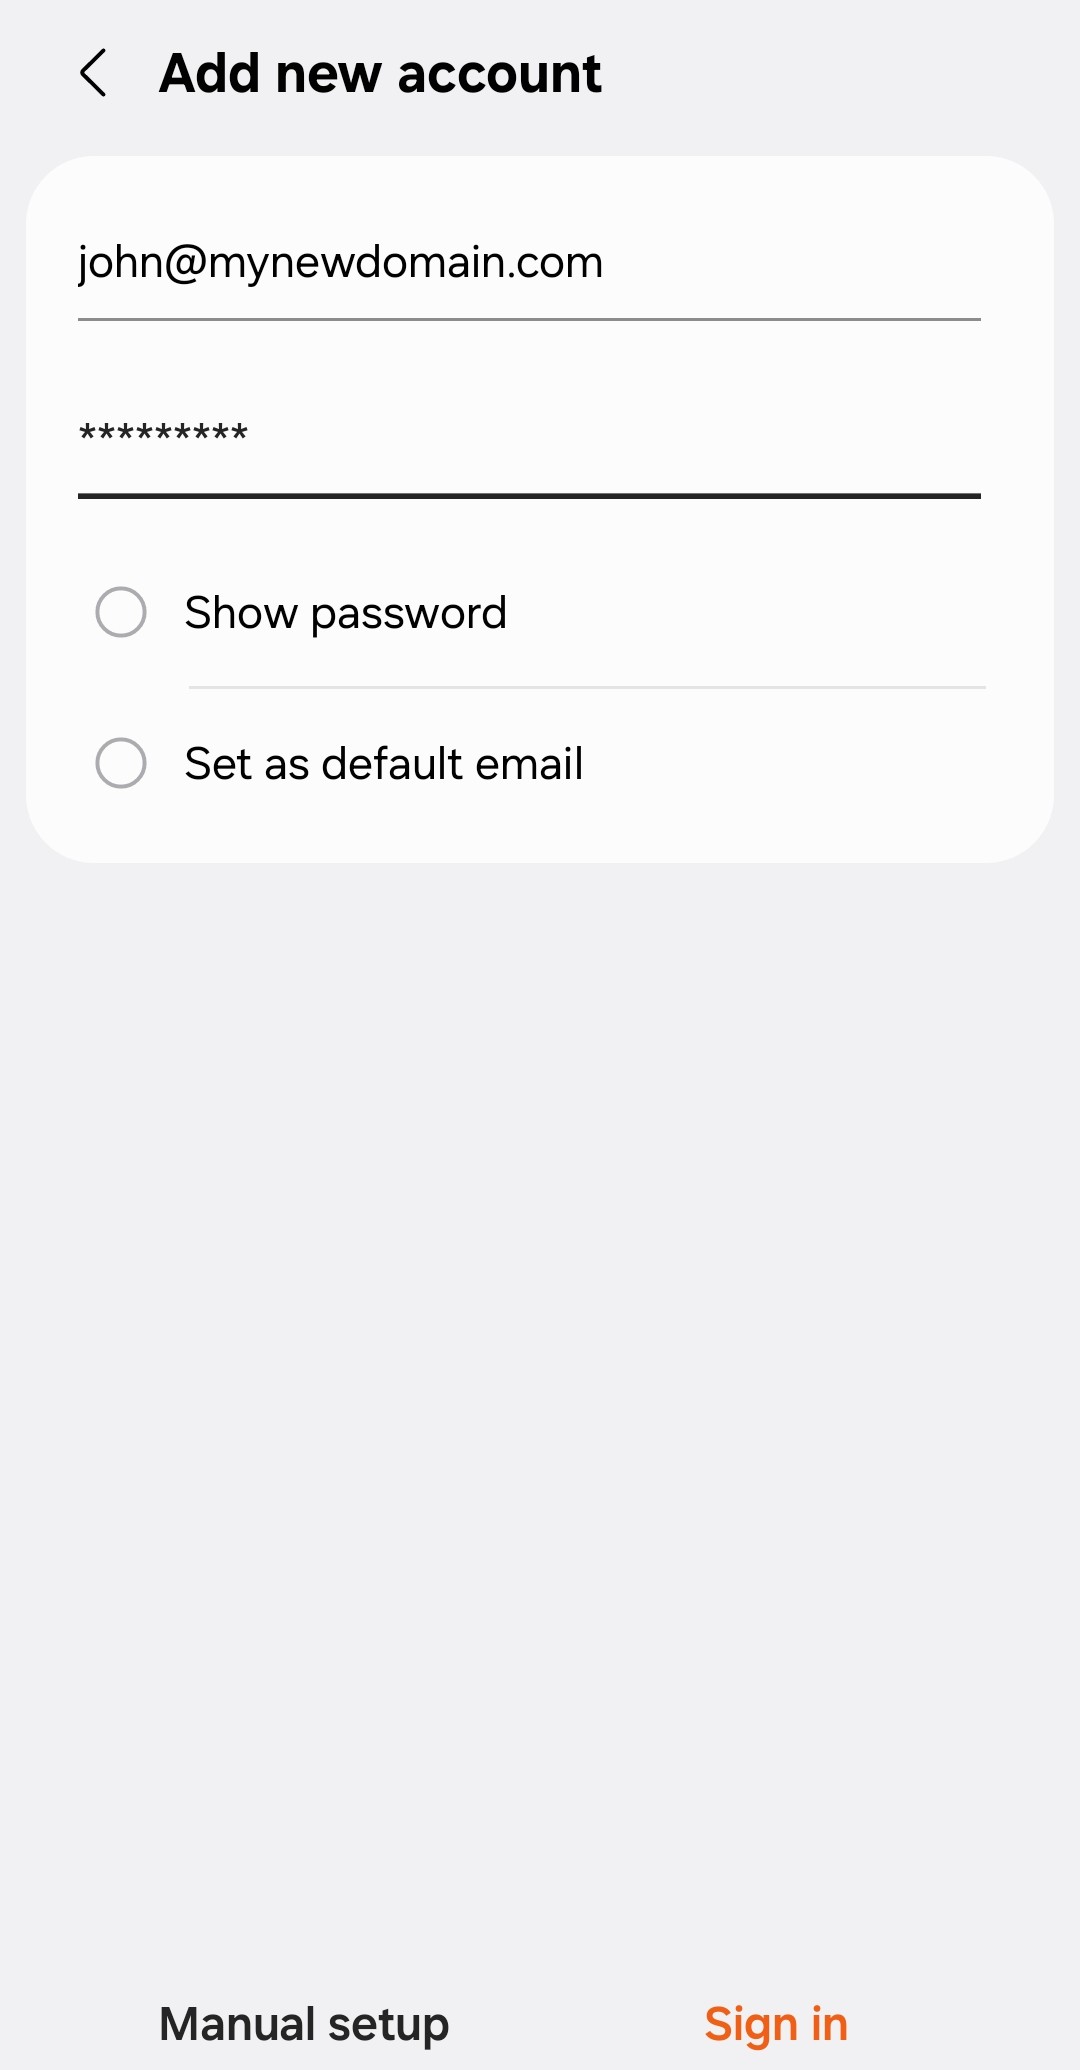
Simply enter your email and password, and the device will find the correct server settings automatically. Click on Sign In or Finish.
Example setup on Android with Autodiscover:
 |
 |
Manual Setup
Step 1: Add a New Account
-
Open the Settings app on your smartphone or tablet.
-
Navigate to Mail or Accounts and select Add Account.
-
From the list of account types, select Exchange, Microsoft Exchange, or ActiveSync.
Step 2: Enter Account Details
Enter your email and password. Click on Manual Setup.
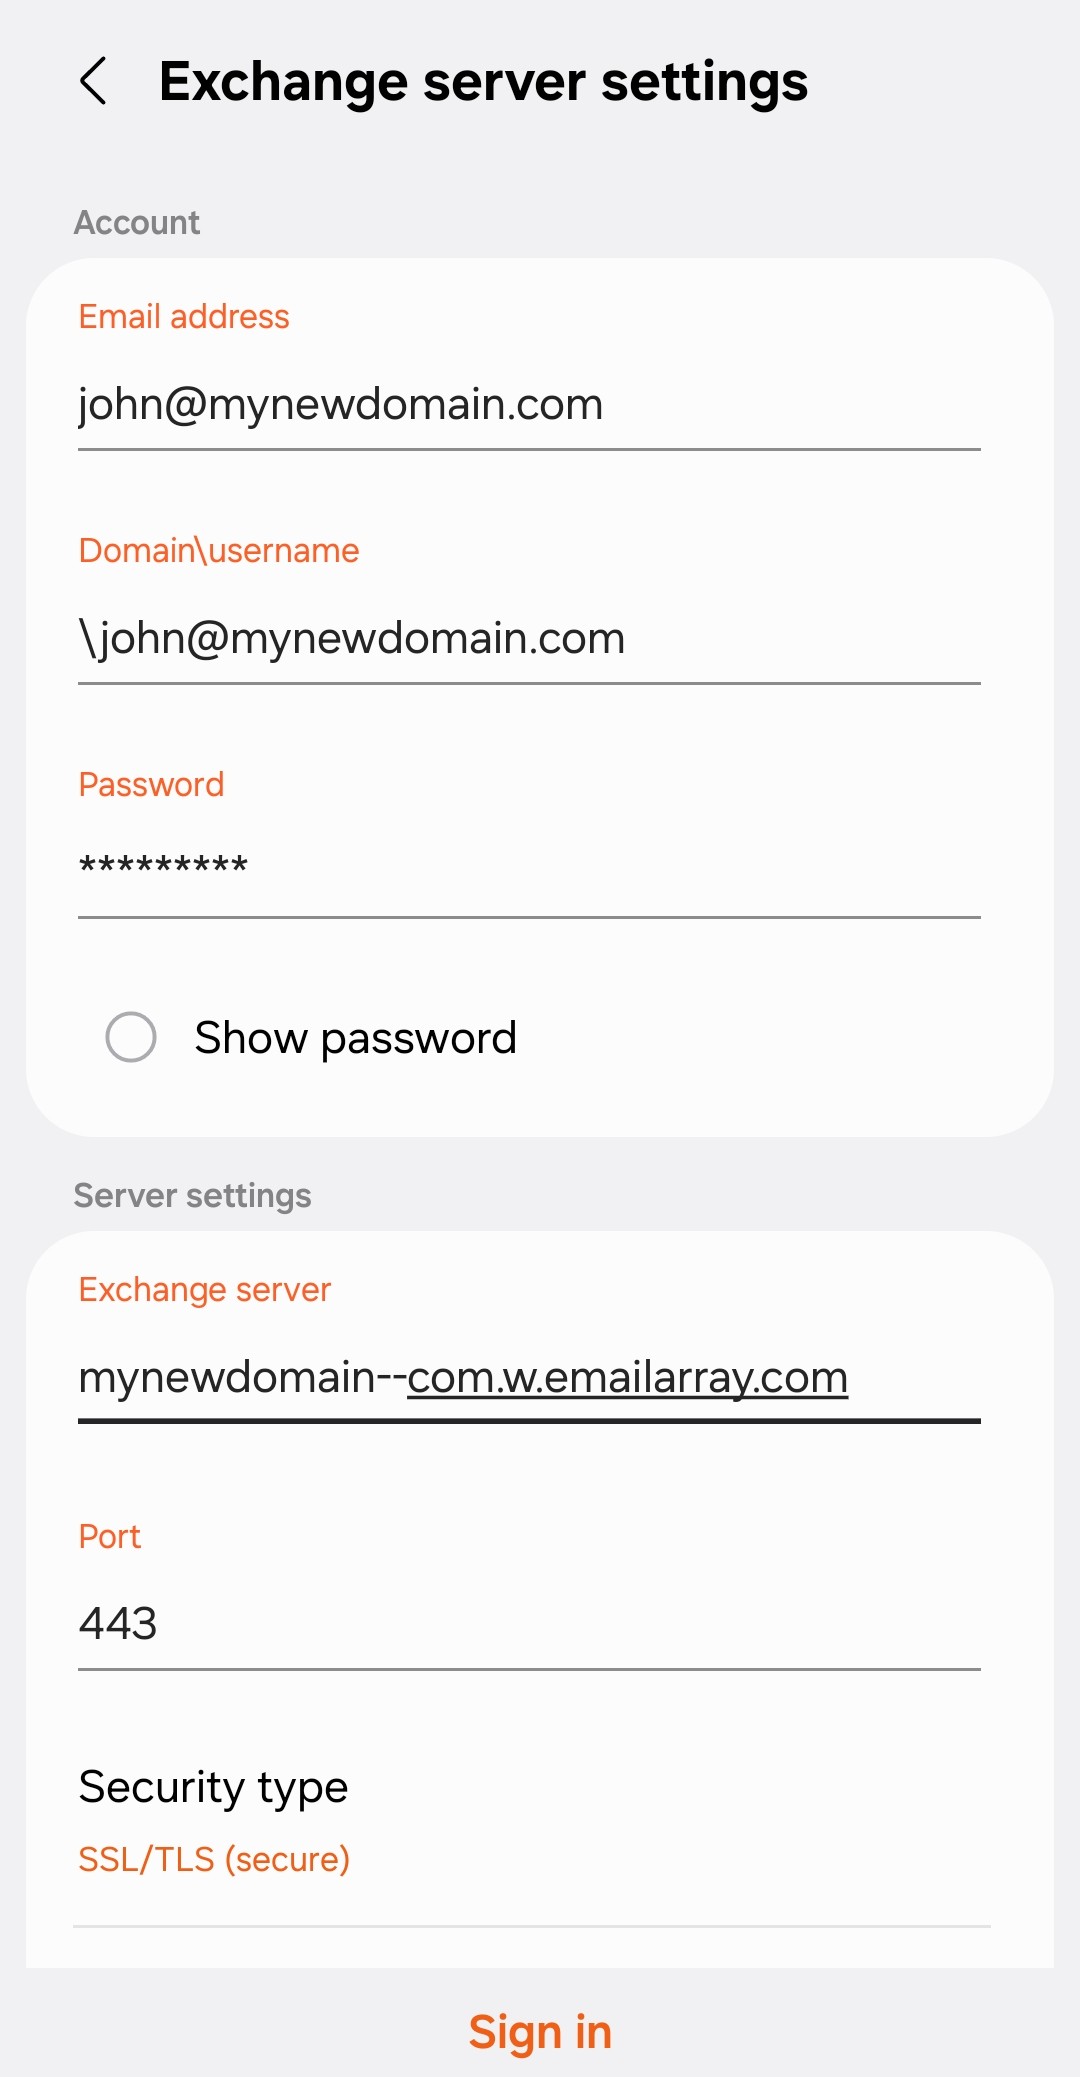
Step 3: Enter Server Settings
- Server: Use your domain name in this format:
yourdomain--com.w.emailarray.com.
Server Address Formula To create your server address, take your domain name and:-
Replace any dots (.) with two dashes (--).
-
Add .w.emailarray.com to the end.
Example: If your email is
john@my-company.com, your server is:my-company--com.w.emailarray.com. -
-
Domain: Leave this blank (unless your specific device requires it).
-
Username: Your full email address.
-
Password: Your email account password.
-
SSL: Ensure "Use SSL" is turned ON.
Click on Sign In, Continue or Finish.
Example Setup on Android for Manual Setup:
 |
|
 |
Creating a New Outlook Profile
When you switch email providers, it’s tempting to take the shortcut: simply going into your existing account settings and swapping out the IMAP server addresses. While this is technically faster, it’s a strategy that often leads to significant technical headaches.
The Risk of the "Quick Change"
Modifying the server records on an existing account frequently leads to .PST or .OST file corruption. Because Outlook is trying to map a new server structure onto an old data file, you might encounter missing emails, broken search functionality, or a complete "Send/Receive" failure.
In fact, Microsoft officially recommends against modifying existing account settings when moving to a new service. To ensure your data stays intact and your software remains stable, the best practice is to create a New Outlook Profile.
Step 1: Accessing the Mail Setup
Before opening Outlook, we need to go through the Windows Control Panel to manage your profiles.
-
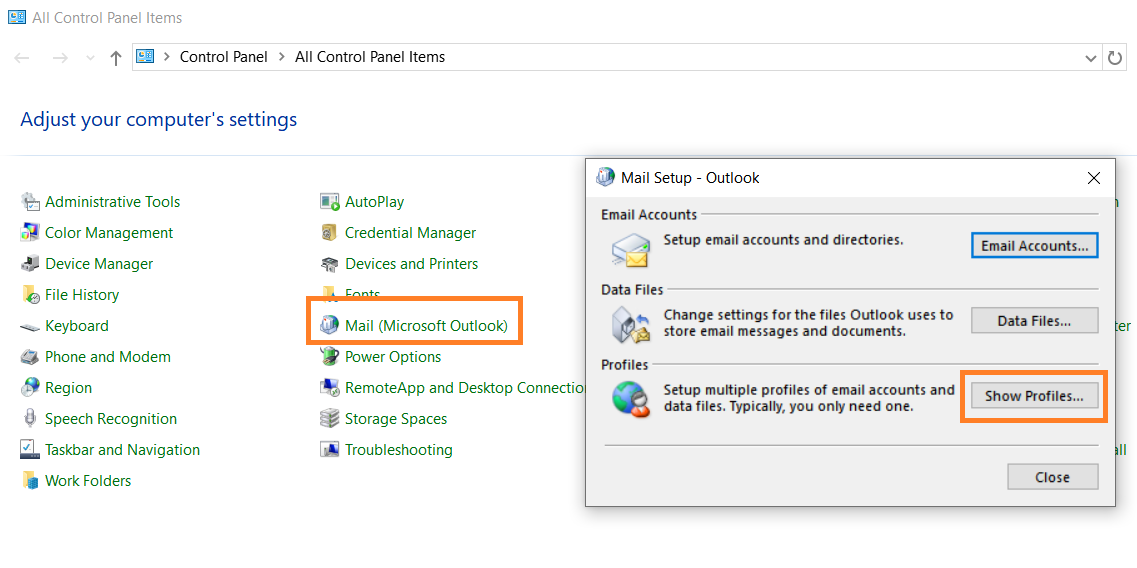
Open the Control Panel on your Windows machine.
-
Search for and click on Mail (Microsoft Outlook).
-
In the window that appears, click the Show Profiles... button.
-
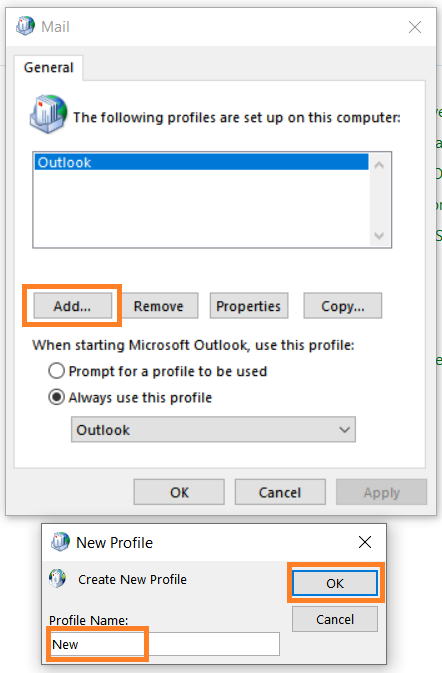
Click Add..., give your new profile a name (e.g., "Work Fresh"), and click OK.


Step 2: Adding Your Email Account
Once you’ve named your profile, Outlook will ask you how you want to connect your email. You have two main paths: Automatic and Manual.
Option A: Automatic Setup (Recommended)
This is the fastest method if you have set the Autodiscover DNS record. Outlook will try to "autodiscover" your server settings for you.
-
Enter your Name, Email Address, and Password.
-
Click Next.
-
Outlook will cycle through its configuration steps. Once you see three green checkmarks, you're all set!


Option B: Manual Setup (IMAP)
If the automatic setup fails, or if you have specific server requirements from your provider, use the Manual path.
-
Select Manual setup or additional server types and click Next.
-
Choose POP or IMAP.
-
Enter your Server Information:
-
Account Type: IMAP
-
Incoming mail server: (Provided by your host)
-
Outgoing mail server (SMTP): (Provided by your host)
-
-
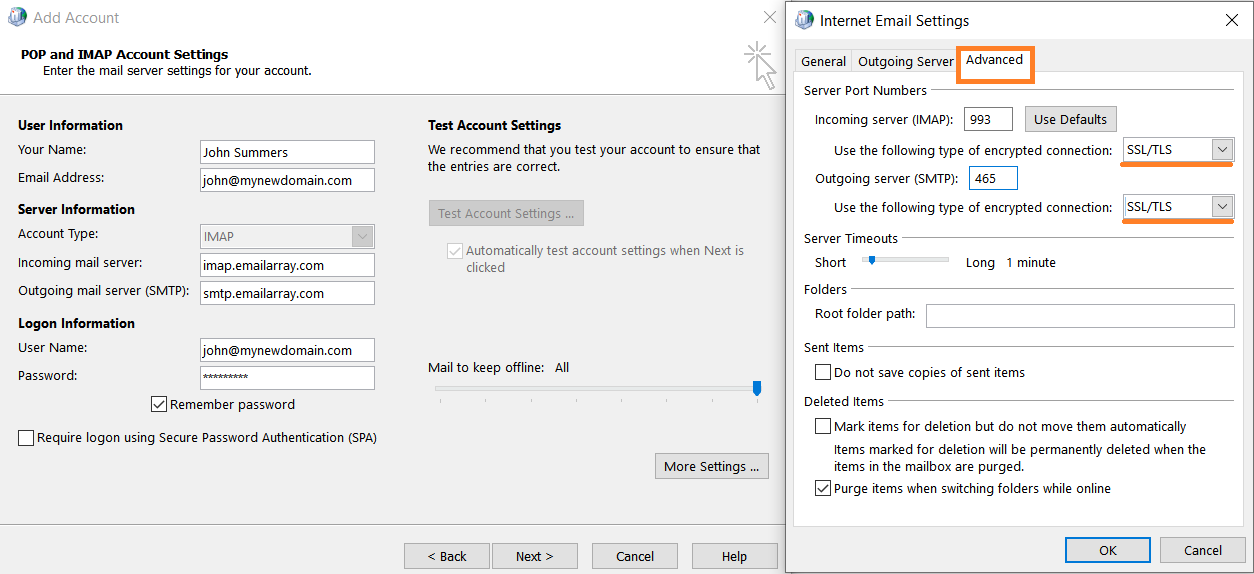
More Settings (Crucial Step): * Click the More Settings button.
-
Under the Outgoing Server tab, check the box: "My outgoing server (SMTP) requires authentication."
-
Under the Advanced tab, ensure you are using the correct port numbers (usually 993 for IMAP and 465 or 587 for SMTP) and select SSL/TLS for the encrypted connection.
-
-
Click OK, then Next to test the settings.


Step 3: Launching Your New Profile
Now that the profile is created, you need to tell Outlook to use it.
-
Back in the Mail window (where you clicked "Show Profiles"), look at the bottom section.
-
Select "Prompt for a profile to be used" if you want to choose between your old and new profile every time you open Outlook.
-
Alternatively, select "Always use this profile" and choose your new one from the dropdown to make it the default.
-
Click Apply and open Outlook.
Enjoy your clean, fresh inbox!