| [](https://wikidev.emailarray.com/uploads/images/gallery/2026-01/webmail-customization.png) | [](https://wikidev.emailarray.com/uploads/images/gallery/2026-01/webmail-customization-2.png) |
**Pro Tip:** If you've moved things around and want to return to the original layout, use the **"Reset windows and grids"** button at the bottom of the page.
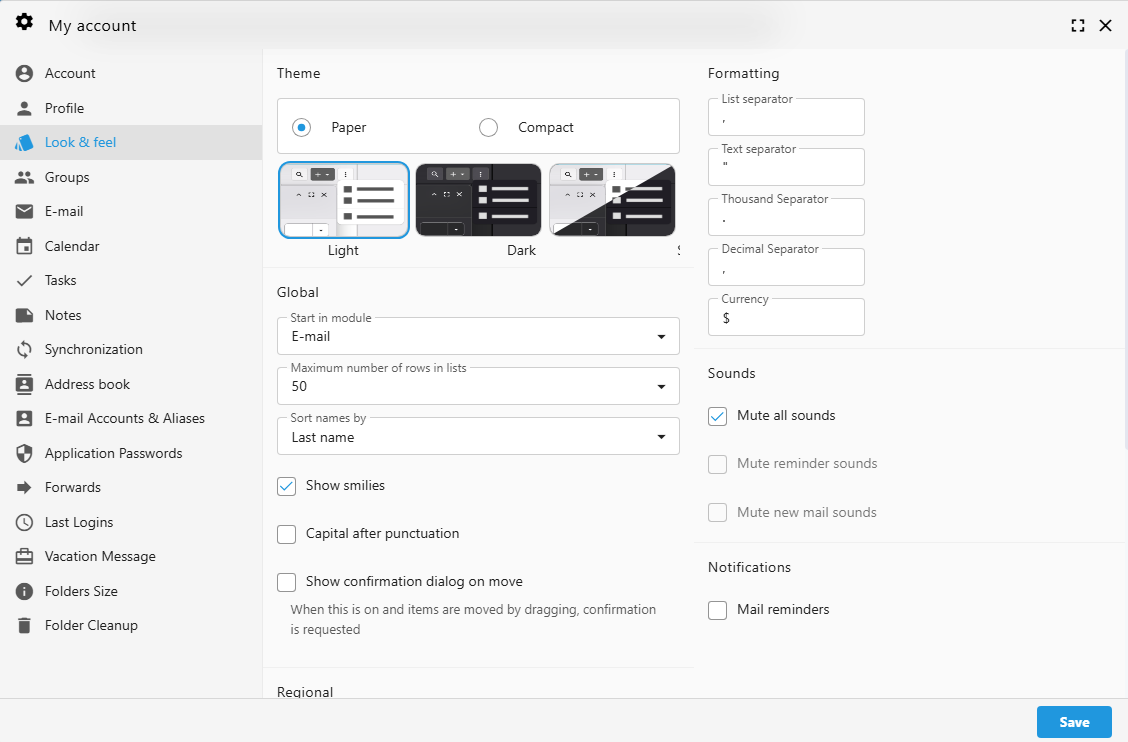
--- ### Notifications and Sounds Manage how your Webmail alerts you to new activity. - **Mute all sounds:** Silence all audio alerts with one click. - **Individual Toggles:** Specifically mute reminder sounds or new mail alerts. - **Mail Reminders:** Enable browser-based notifications to stay updated even when the tab isn't active. --- ### Formatting and Separators For users dealing with international data or specific spreadsheet needs, you can customize how numbers and lists are displayed: ## Other Webmail Personalization #### ### Customizing Your Message List [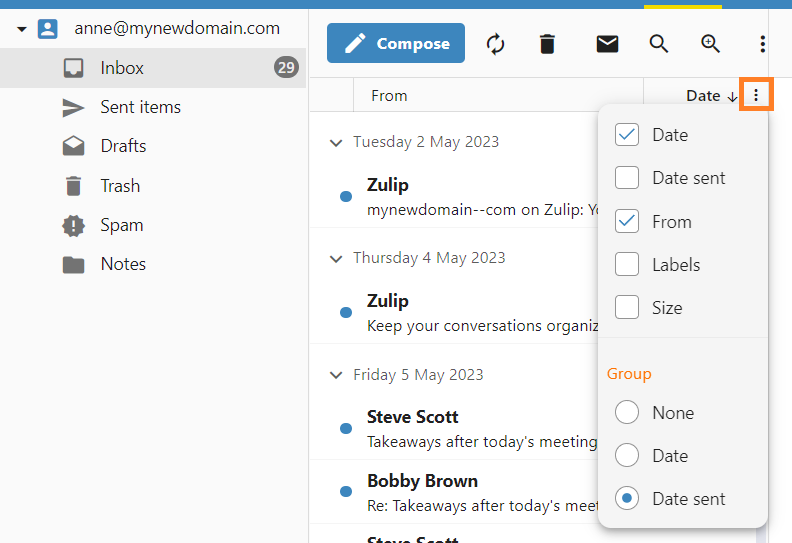](https://wikidev.emailarray.com/uploads/images/gallery/2026-03/webmail-message-list-visible-columns-and-group-by.png) #### Visible Columns The message list can be tailored to show only the information that matters most to you. You can add or remove columns to change how much detail is visible at a glance. - **Open the Options Menu:** Click the **three vertical dots** in the header of your message list, next to **Date** column. - **Toggle Information:** Check or uncheck the boxes next to the available fields, such as **Date**, **From**, **Labels**, or **Size**. - **Instant Update:** The list will refresh immediately, showing your selected columns and helping you manage your inbox more efficiently. #### Managing How Emails are Grouped By default, your messages are organized into chronological groups to help you navigate your inbox quickly. You can change this behavior or disable grouping entirely to see a continuous list of emails. **To change your grouping preferences:** - **Open the Options Menu:** Click the **three vertical dots** in the header of your message list, next to **Date** column. - **Select Your View:** - **None:** Select this to remove all separators for a single, continuous list of messages. - **Date:** Groups messages based on the day they were received. - **Date sent:** Groups messages based on when they were officially sent. # Webmail - Folders management Find out how to subscribe to a Folder to make it show in your e-mail folder list, how to unsubscribe from a Folder and hide it or how to create a new folder. ### Step-by-step guide #### Subscribe to a Folder Subscribing to a folder will make it show in your e-mail folder list (usually on the left side of your Webmail or e-mail client). Some e-mail clients will show by default all folders, even the unsubscribed ones. To **subscribe to a folder**, log in to your Webmail and - Go to the **E-mail** tab. - Right-click on the folders list on the left side of your panel - Click on the **Subscribe to folders** option to access the Folder settings [](https://wikidev.emailarray.com/uploads/images/gallery/2024-08/webmail-email-tab-folders-advanced-menu.jpg) - Find the folder in the list - Select the checkmark next to the desired folder (if a folder is checked, you are subscribed to that folder). [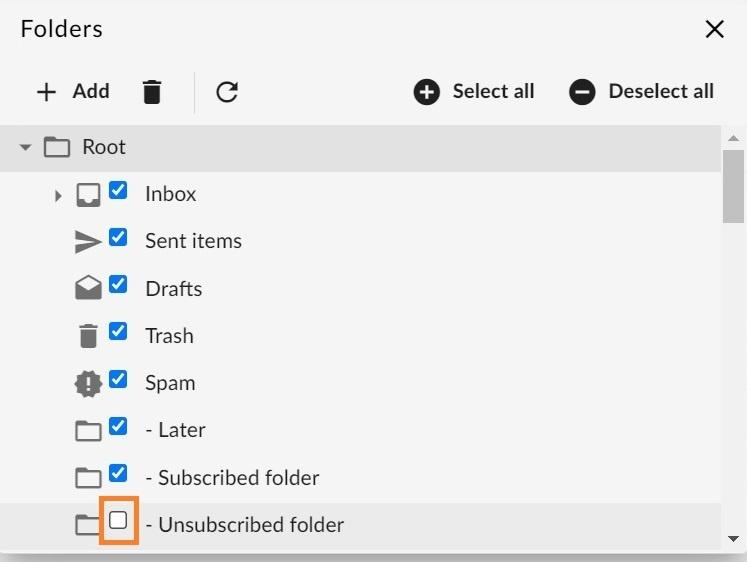](https://wikidev.emailarray.com/uploads/images/gallery/2024-08/webmail-email-tab-subscribe-to-folder.jpg) #### Unsubscribe from a Folder Unsubscribing from a folder will hide it from your e-mail folder list (usually on the left side of your Webmail or e-mail client). Some e-mail clients will show by default all folders, even the unsubscribed ones. To **unsubscribe to a folder**, log in to your Webmail and - Go to the **E-mail** tab. - Right-click on the folders list on the left side of your panel - Click on the **Subscribe to folders** option to access the Folder settings [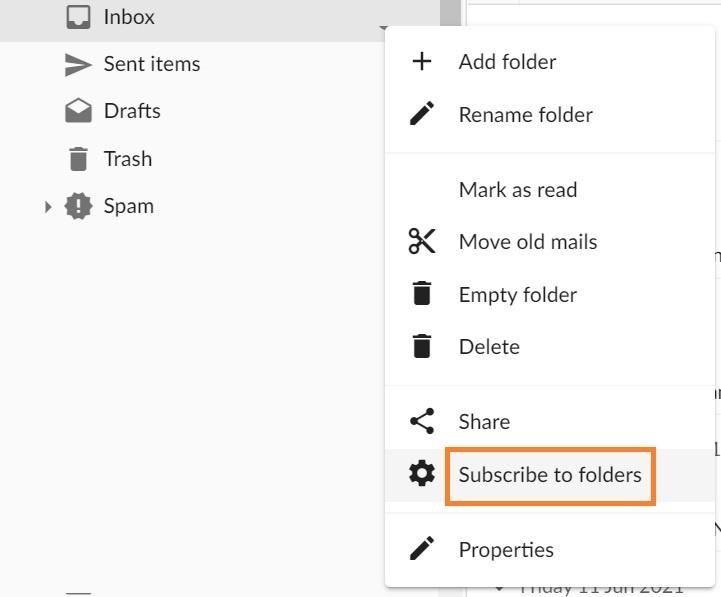](https://wikidev.emailarray.com/uploads/images/gallery/2024-08/webmail-email-tab-folders-advanced-menu-3.jpg) - Find the folder in the list - Select the checkmark next to the desired folder to unsubscribe (if a folder is unchecked, you are unsubscribed from that folder). #### Add a Folder The easiest way to **add a new folder** to your mailbox is from the E-mail tab. Log in to your Webmail and - Go to the **E-mail** tab. - Right-click on the folders list on the left side of the panel - Click on the **Add folder** option from the menu - Enter the folder name and click on the **OK** button. [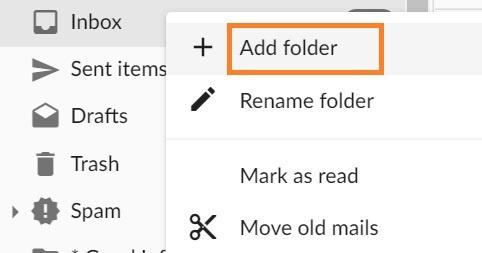](https://wikidev.emailarray.com/uploads/images/gallery/2024-08/webmail-email-tab-add-folder.jpg) Another option to **add a new folder** is from the **Folders** advanced menu. To access it, log in to your Webmail and - Go to the **E-mail** tab. - Click on the **three dots** button on the right of the email panel and then click on **Accounts.** **[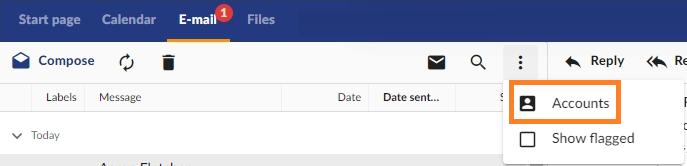](https://wikidev.emailarray.com/uploads/images/gallery/2024-08/webmail-email-tab-email-account-settings.png)** - **Double click** the desired email account - Click on the **Folders** button - Click on the **Add** button [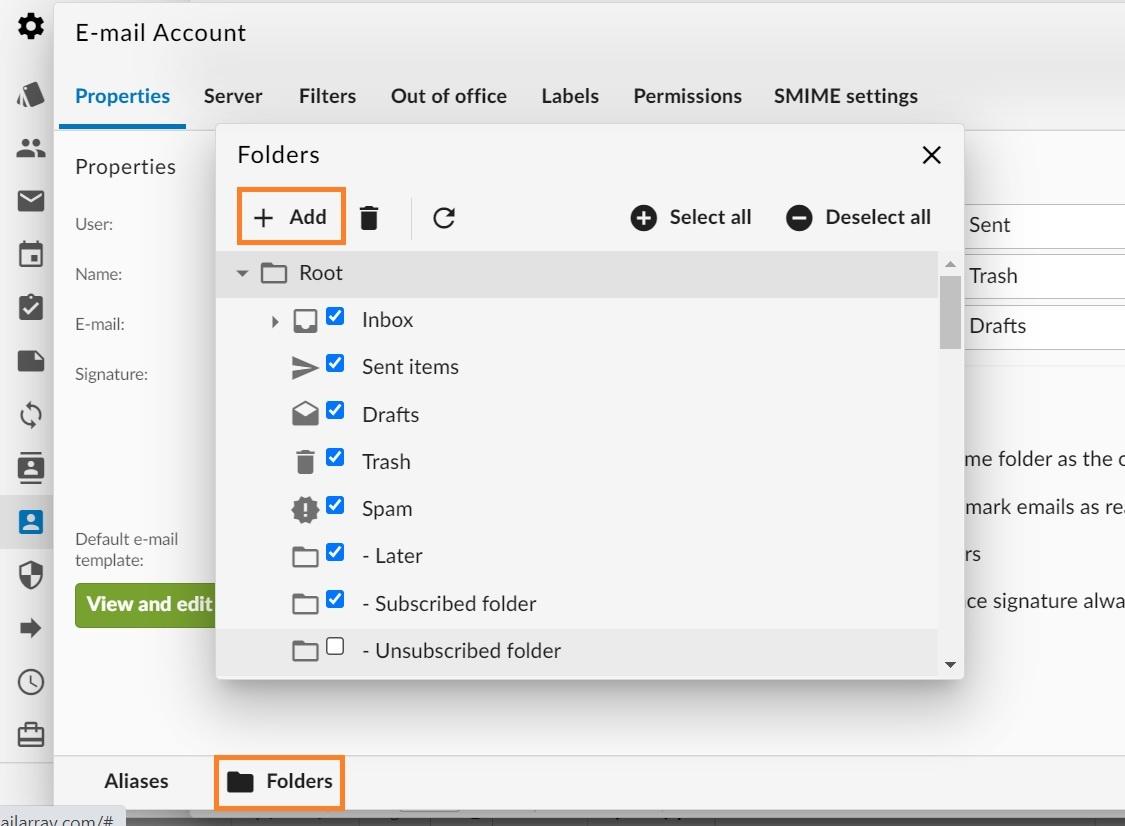](https://wikidev.emailarray.com/uploads/images/gallery/2024-08/webmail-email-tab-email-account-properties-folders-add-folder.jpg) - Enter the folder name and click on the **OK** button to create the folder. [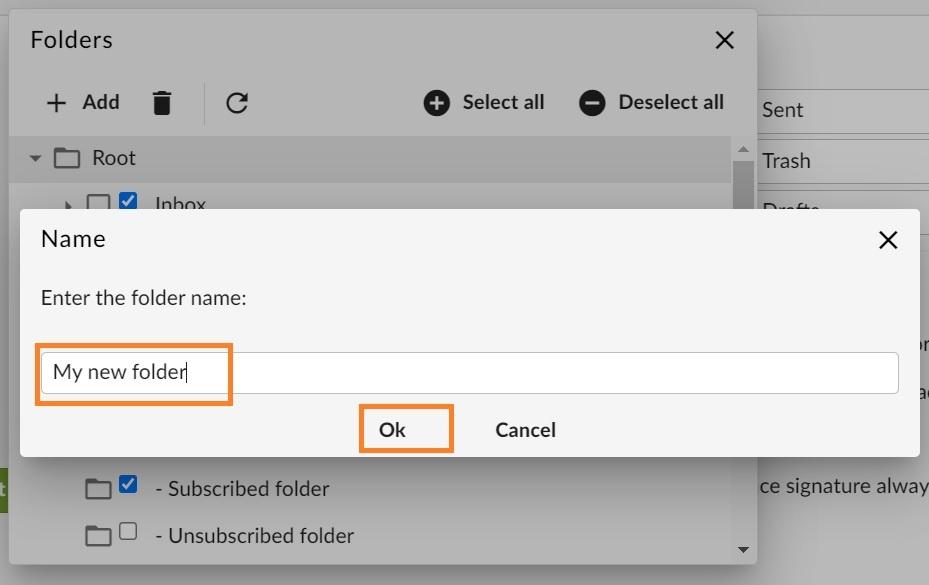](https://wikidev.emailarray.com/uploads/images/gallery/2024-08/webmail-email-tab-email-account-properties-folders-enter-the-folder-name.jpg) # Webmail - Send as Alias When you have one or more Aliases for your email address, you might want to be able to send from one of the Aliases. This is possible by adding the Alias to your Webmail. ### Step-by-step guide| The CalDAV / CardDAV features are available only for Enhanced mailboxes. |
| Because this option is disabled by default, you might now receive this error in your CalDAV / CardDAV client: **Deleting is disabled by user sync settings** |
The other user must accept the invitation before you can chat with each other.
**Important Note:** If a user's name (from within our organization) appears in **red** during your search, it means they have not yet logged into their Webmail account, and their Chat account hasn't been enabled. You won't be able to add them as a contact until they log in for the first time. This does not apply to external domain users you are adding manually. [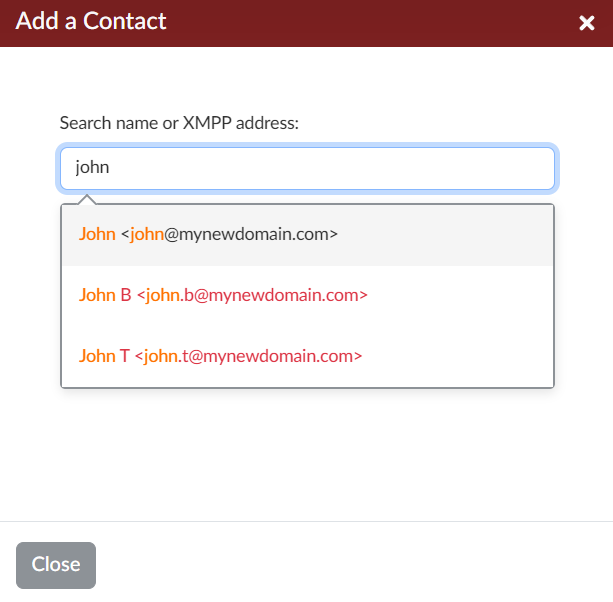](https://wikidev.emailarray.com/uploads/images/gallery/2025-06/chat-search-for-a-new-contact.PNG)
### Starting a Chat Once you have contacts in your list: 1. Click on a contact's name in your **CONTACTS** list. 2. A chat window will open, and you can start typing your message. ### Starting a Video Meeting You can easily initiate a video meeting with anyone in your Contacts list or even invite external participants. **How to Start a Video Meeting:** 1. Click on a contact's name in your **CONTACTS** list. A chat window will open. 2. Click on the camera button. A new pop-up window will appear. - **Optional Room Name:** You can give your meeting room a specific name if desired. - Click the **Start Meeting** button 3. Starting a meeting will create a secure video room and the link to this meeting room will be shared with your contact. **Meeting Link & Joining Options:** - Upon starting a video meeting, a unique **meeting link** will be generated. - You can share this link with anyone you want to invite, **even if they are not in your contact list**. - **Flexible Timing:** You can start the meeting immediately or use the link to begin at a later time. - **Integrated Experience:** - Conduct the meeting directly **within the same Webmail window**. - Utilize the **minimize/maximize** options for the meeting pop-up window, allowing you to continue using Webmail simultaneously. - Alternatively, you can choose to **open the meeting in a new browser tab** for a more focused view. # Video Meetings Features Our video meetings are packed with useful features to enhance your collaboration: - **HD Video and Audio:** Experience clear and high-quality communication. - **Screen Sharing:** Easily share your entire screen or specific application windows with participants. - **Chat During Meeting:** Continue the conversation with text-based chat within the meeting interface. - **Recording:** Capture your meeting for later reference (if enabled). - **Security Features:** - **Password Protect:** Secure your meeting by setting a password. - **Lobby (Manual Approval):** Control who enters by enabling a lobby where participants wait for moderator approval. - **Moderator Controls:** Grant moderator rights to other participants to help manage the meeting. # Using Chat and Meetings on Other Apps (XMPP) You can also connect your Webmail chat and meeting account to other desktop or mobile applications that support the **XMPP protocol** (e.g., Thunderbird, eM Client). **Login Details for XMPP Apps:** - **Username/JID:** Your full Webmail email address - **Password:** Your Webmail password - Server Host name: xmpp.emailarray.com ### Connecting Your Chat Account to eM Client (XMPP) You can integrate your Webmail chat directly into the eM Client application. Follow these steps to set it up: **1. Open eM Client Account Settings:** - In eM Client, click on the **Menu** icon (usually three horizontal lines) in the top-left corner. - Select "**Accounts...**" from the dropdown menu. [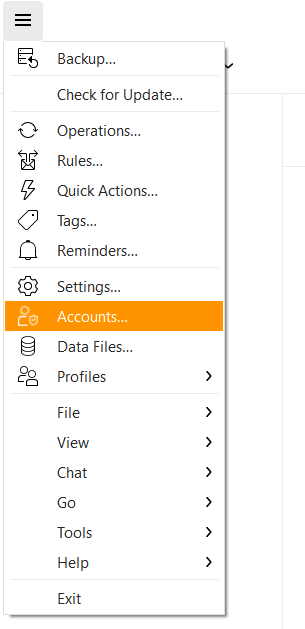](https://wikidev.emailarray.com/uploads/images/gallery/2025-06/em-client-go-to-accounts.PNG) **2. Add a New Chat Account:** - In the "Accounts" window, click on the "**+ Add account**" button. - Under "Set up an account," choose "**Chat / Group Chat**." - From the options provided, select "**XMPP / Jabber**." - Click the "**Next**" button. [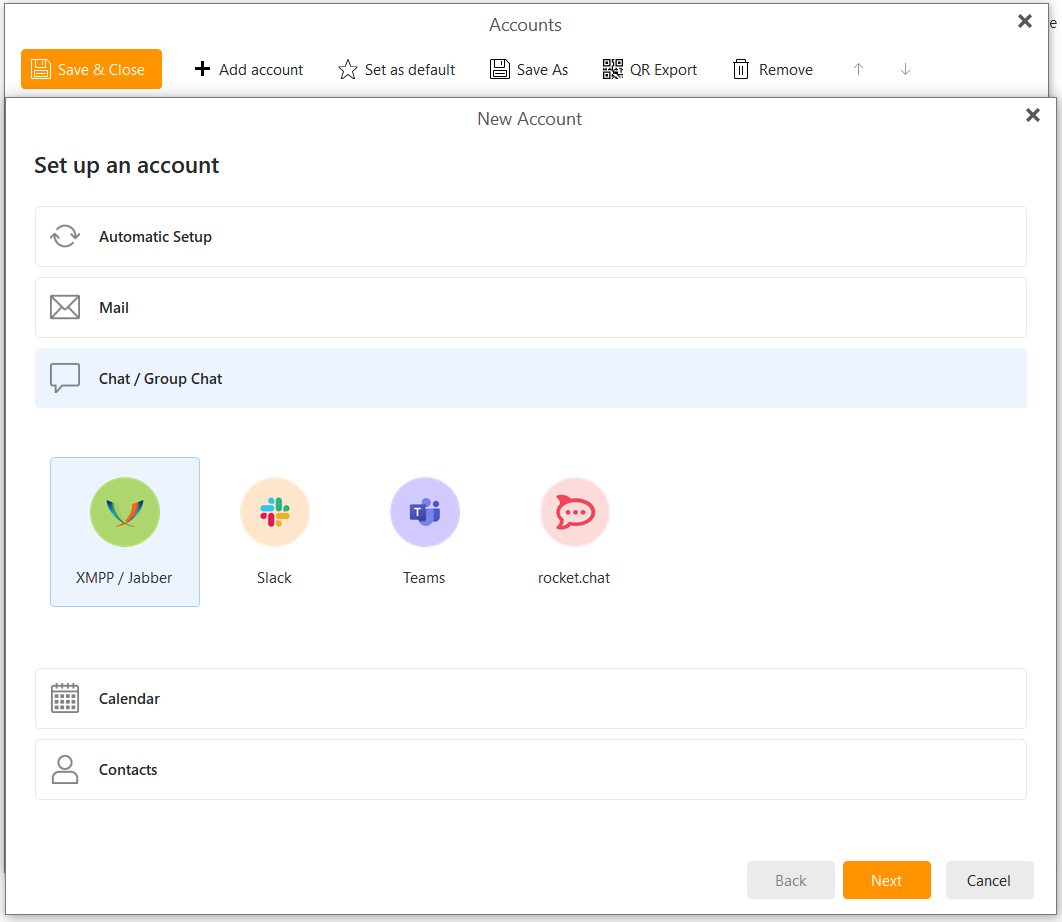](https://wikidev.emailarray.com/uploads/images/gallery/2025-06/em-client-go-to-add-account-and-select-new-chat-group-chat-new-xmpp-jabber-account.PNG) **3. Specify New Jabber Account:** - On the "New Jabber account" screen, ensure the option "**Use existing Jabber account**" is selected. This indicates you already have a chat account through Webmail. - Click the "**Next**" button [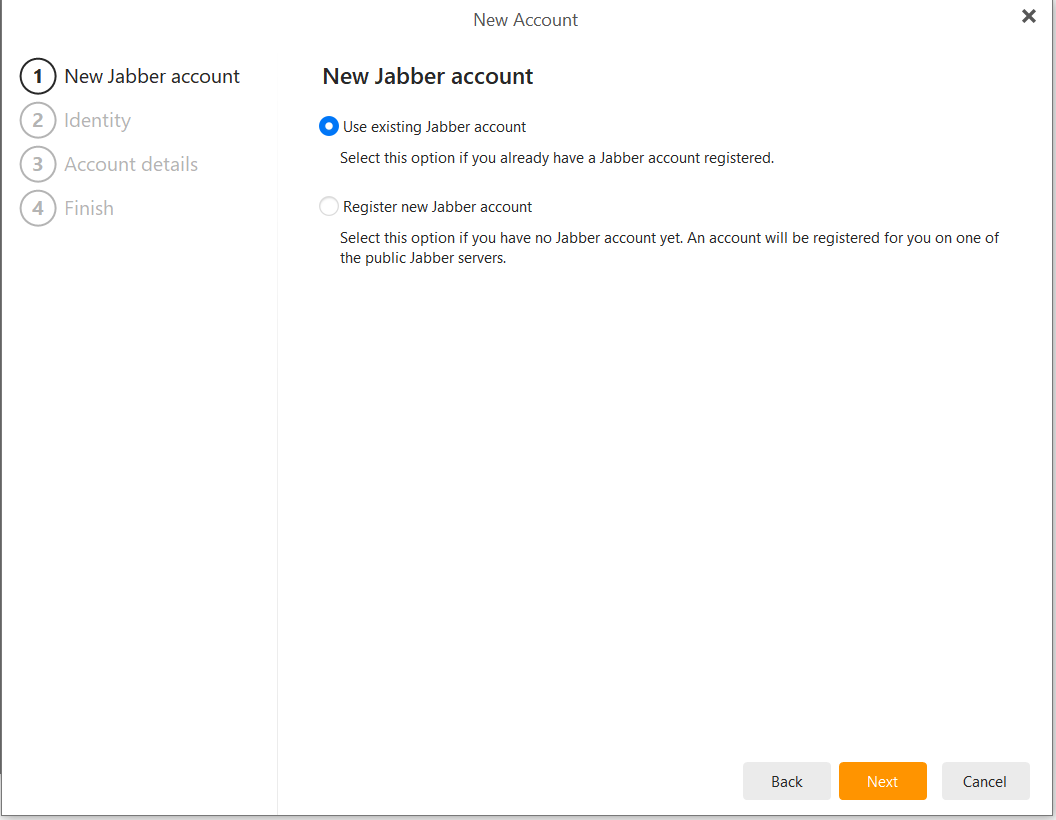](https://wikidev.emailarray.com/uploads/images/gallery/2025-06/em-client-xmpp-use-existing.PNG) **4. Enter Your Account Credentials (Identity):** You will now be on the "Identity" screen. Fill in the following details: - **Jabber ID:** Enter your **full Webmail email address** (e.g., `john@mynewdomain.com`). - **Password:** Enter your **Webmail password**. - **Server host:** - Uncheck the box for "Automatically detect server host and user name" if it is checked. This will allow you to enter the server information manually. - Enter the XMPP server address: `xmpp.emailarray.com`. - **User name:** Enter your **full Webmail email address** (e.g., `john@mynewdomain.com`). [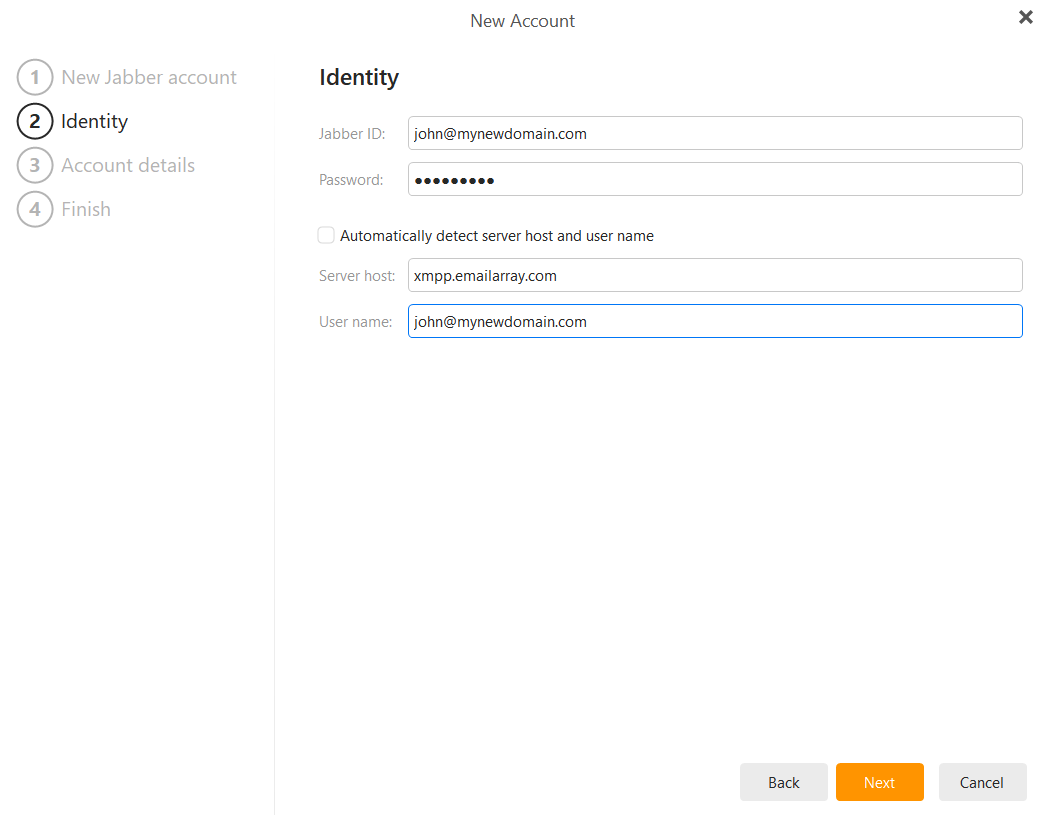](https://wikidev.emailarray.com/uploads/images/gallery/2025-06/em-client-xmpp-credentials-and-host.PNG) **5. Finalize Setup:** - After entering all the identity and server details, click the "**Next**" button. - Review the summary if provided, and then click the "**Finish**" button to complete the setup. Your Webmail chat account should now be configured in eM Client. You will be able to send and receive messages, see your contacts directly within the application and add new ones. ### Connecting Your Chat Account to Mozilla Thunderbird (XMPP) You can use your Webmail chat directly within Mozilla Thunderbird. Follow these steps to configure it: **1. Access the Chat Feature:** - In Thunderbird, locate and click on the "**Chat**" icon or tab. This is typically found in the main toolbar area or alongside your Inbox and Calendar tabs. [](https://wikidev.emailarray.com/uploads/images/gallery/2025-06/thunderbird-step-1-click-on-chat.PNG) **2. Begin Chat Account Setup:** - If you haven't set up a chat account in Thunderbird before, you'll see a message saying, "You haven't set up a chat account yet." - Click the "**Get started**" button to open the Chat Account Wizard. [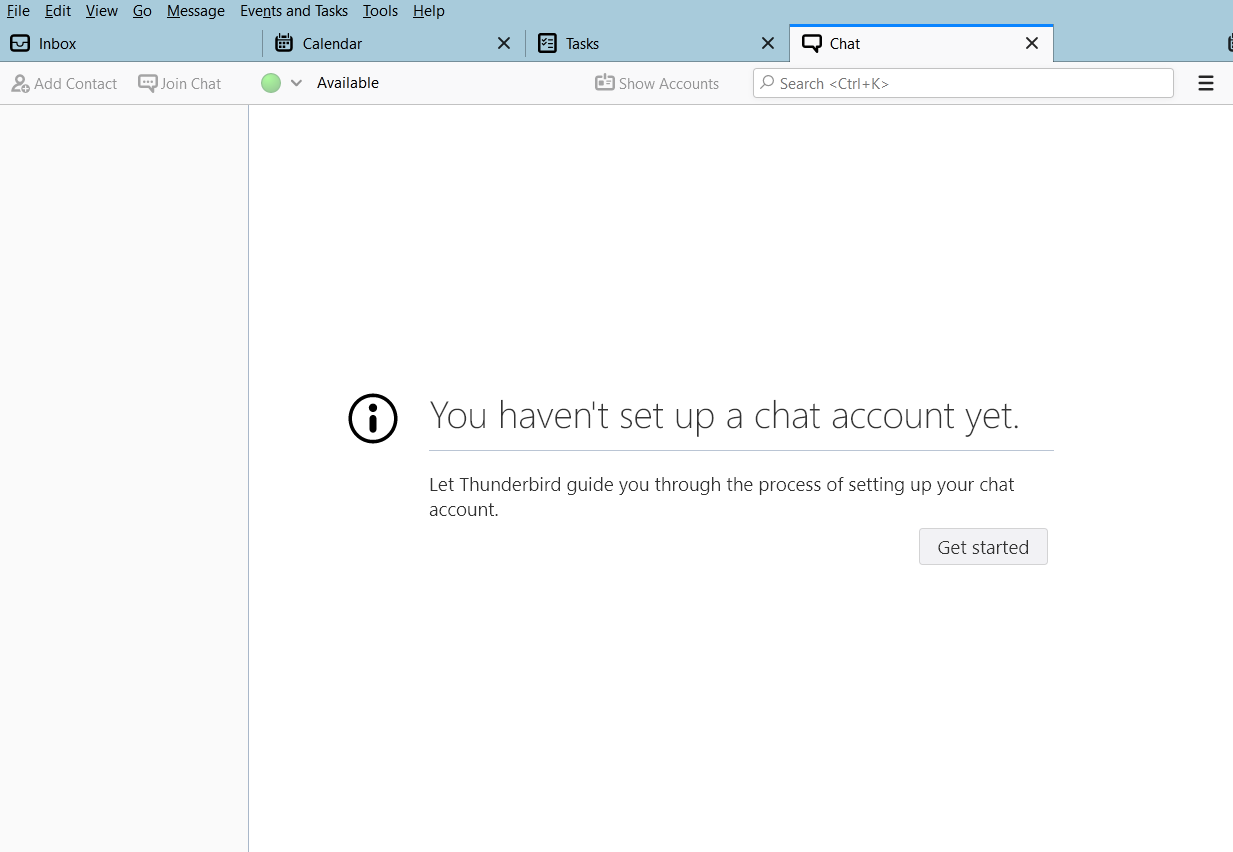](https://wikidev.emailarray.com/uploads/images/gallery/2025-06/thunderbird-step-2-click-on-get-started.PNG) **3. Choose the Chat Network:** - In the "Chat Account Wizard" window, under "Chat network," select "**XMPP**" from the list of available networks. - Click the "**Next >**" button. [](https://wikidev.emailarray.com/uploads/images/gallery/2025-06/thunderbird-step-3-choose-xmpp-as-the-network.PNG) **4. Enter Your Username Details:** - On the "Username" screen, you need to provide your Webmail email address, split into two parts: - **Username:** Enter the part of your Webmail email address **before** the "@" symbol (e.g., if your email is `john@mynewdomain.com`, enter `john`). - **Domain:** Enter the part of your Webmail email address **after** the "@" symbol (e.g., `mynewdomain.com`). - Click the "**Next >**" button. [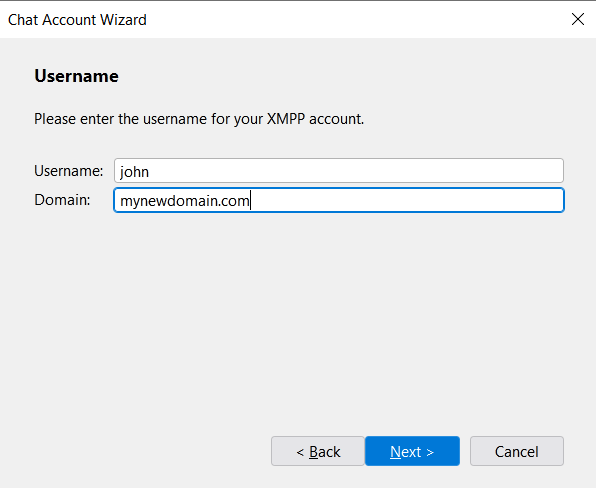](https://wikidev.emailarray.com/uploads/images/gallery/2025-06/thunderbird-step-4-username.PNG) **5. Enter Your Password:** - On the "Password" screen, enter your **Webmail password** in the "Password" field. - Thunderbird notes that the password will be stored in its Password Manager. If you leave this box empty, you'll be prompted for your password each time the account connects. - Click the "**Next >**" button. [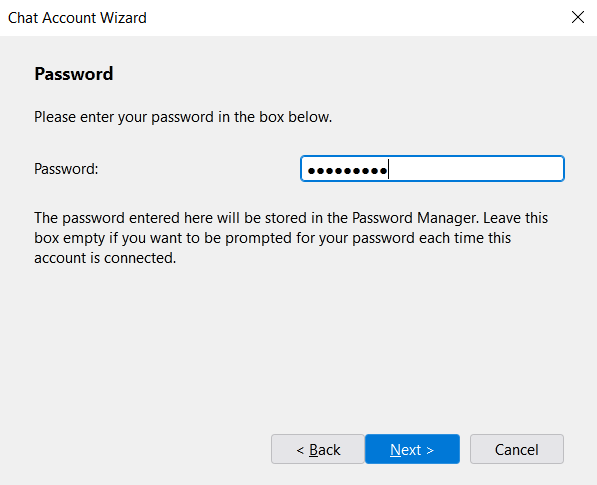](https://wikidev.emailarray.com/uploads/images/gallery/2025-06/thunderbird-step-5-optional-password-or-get-prompted-every-time.PNG) **6. Configure Advanced Options (XMPP Options):** - This screen allows you to set advanced XMPP options. While Thunderbird says, "Feel free to skip this step if you want to," providing these details is often necessary for a successful connection: - **Alias:** (Optional) You can set a local alias that will be displayed in your conversations. - **XMPP Options:** - **Resource:** (Optional) You can leave this blank. - **Priority:** (Optional) You can leave this as the default. - **Connection security:** It's recommended to use encryption. Select an option like "**Require encryption**" if available and appropriate for your server. - **Server:** Enter the XMPP server address for your Webmail: `xmpp.emailarray.com`. - **Port:** Enter the port number for the XMPP server: `5222`. - Click the "**Next >**" button. [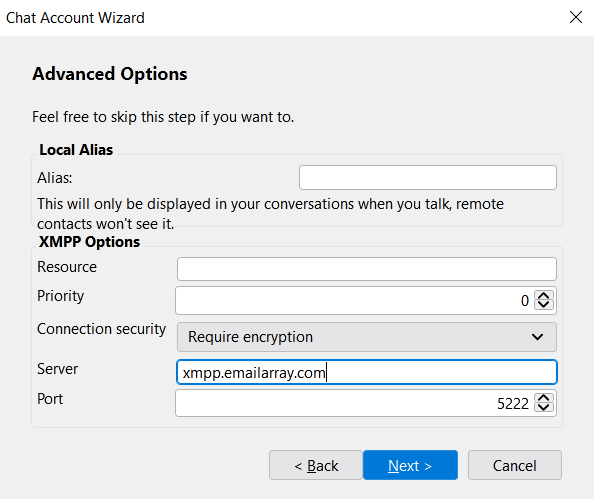](https://wikidev.emailarray.com/uploads/images/gallery/2025-06/thunderbird-step-6-server-host-name.PNG) **7. Review Summary and Finish:** - The "Summary" screen will display the information you've entered (Network, Username, Password (masked), Server). - **Please check these details carefully** to ensure they are correct. Your full username should appear here (e.g., `john@mynewdomain.com`). - Make sure the checkbox for "**Connect this account now.**" is checked if you want Thunderbird to log into your chat account immediately. - Click the "**Finish**" button. [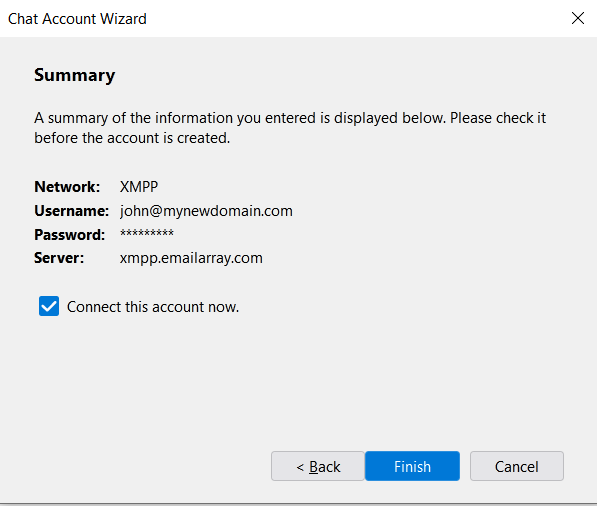](https://wikidev.emailarray.com/uploads/images/gallery/2025-06/thunderbird-step-7-summary.PNG) Your Webmail chat account should now be configured in Thunderbird. You'll be able to manage your contacts, send and receive messages, and see your online status directly within the Thunderbird interface. # Files # Webmail - Files and Folder Sharing Guide Whether you need to send a single document or collaborate on an entire project, sharing is simple and flexible. You have two main options: - **Share a single file:** Generate a secure URL to allow others to download or co-edit a specific document. - **Share multiple files:** Share a folder with your team so they can access and collaborate on multiple files at once. The Webmail allows you to share folders with other members of your organization, enabling seamless collaboration. With the latest updates, you have precise control over how you distribute your work, whether collaborating internally or sharing documents externally. ## Document Editing and Collaboration The ability to interact with documents depends on your active mailbox type.Please use caution when sharing the URL, as anyone with the link can access the file.
#### Creating a Secure Download Link To generate a link that allows others to download a specific file: 1. **Locate your file:** Navigate to the **Files** section in your Webmail. 2. **Open the sharing window:** Right-click on the file you wish to share and click on **Share Externally**. This will open the sharing menu. [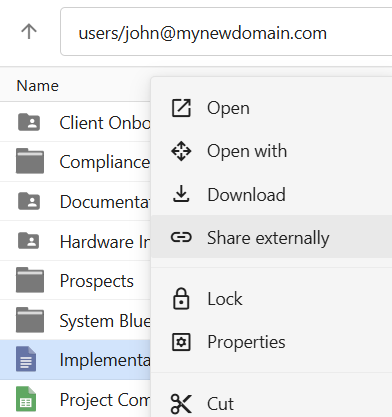](https://wikidev.emailarray.com/uploads/images/gallery/2026-06/webmail-enable-share-for-file-right-click-share-externally.png) 3. **Generate the link:** Click **Create Share** button from the new window. [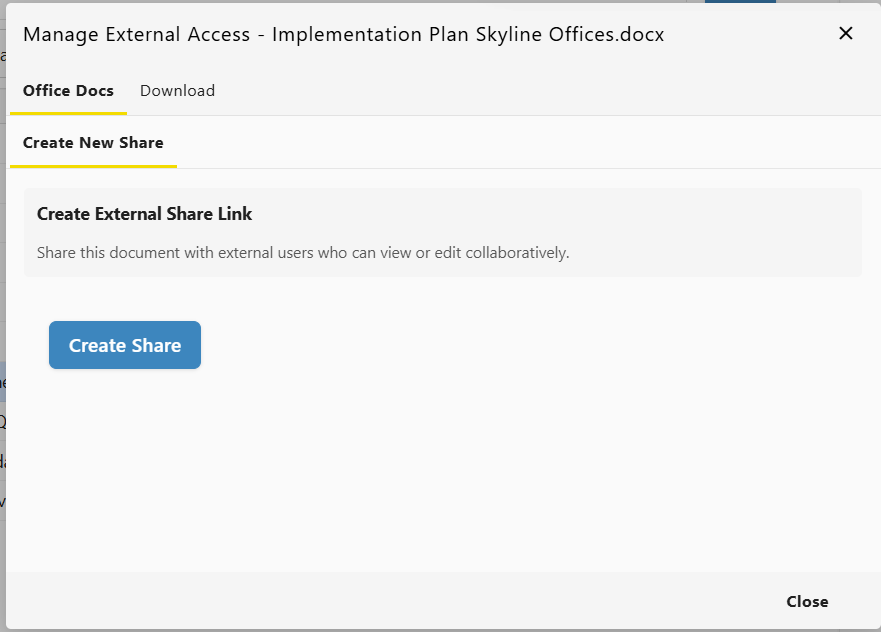](https://wikidev.emailarray.com/uploads/images/gallery/2026-06/webmail-enable-share-for-file.png) 4. **Configure Access:** Set your desired permissions and choose an expiration date for the link. **Download only**: Users will download the file to their device. **View in browser**: Users can view the document online (read-only). **View and edit collaboratively**: Multiple users can view and edit simultaneously. Each user verifies their email and appears with their name. [](https://wikidev.emailarray.com/uploads/images/gallery/2026-06/webmail-enable-share-for-file-set-permissions-and-expiration-date.png) 5. **Distribute the link:** Once generated, you can copy this link and send it via email or chat. [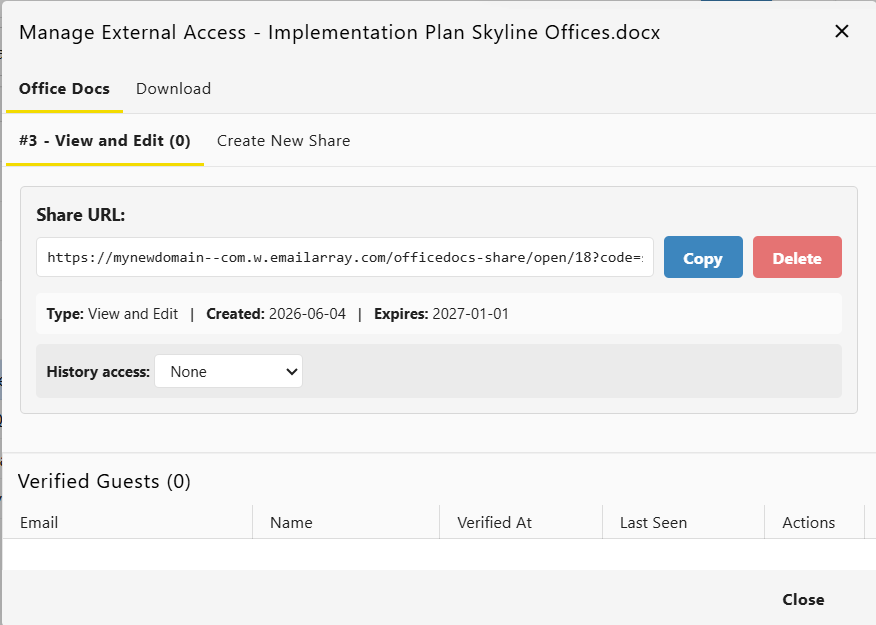](https://wikidev.emailarray.com/uploads/images/gallery/2026-06/webmail-check-status-for-share-for-file.png) 6. **Manage Links**: You can check the status of your active sharing links at any time #### Viewing File Details and Active Links You can review file information and manage active sharing links at any time, by: [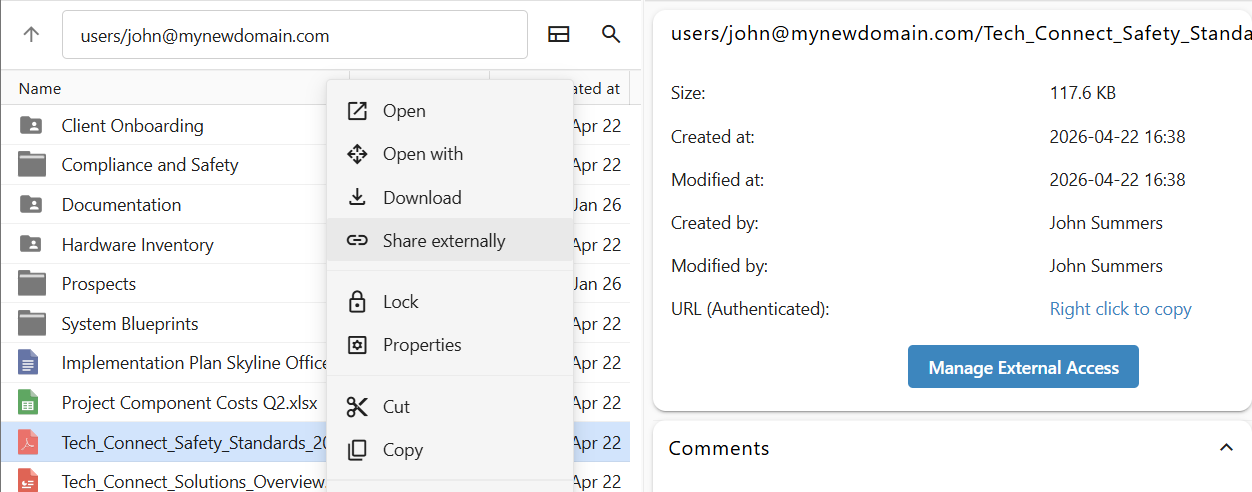](https://wikidev.emailarray.com/uploads/images/gallery/2026-06/webmail-check-status-for-share-for-file-manage-external-access.png) - Right-click on the file and click on **Share externally** to show the sharing stats window. - Click once on a file to open the details side-pane and click on **Manage External Access** to show the sharing stats window. [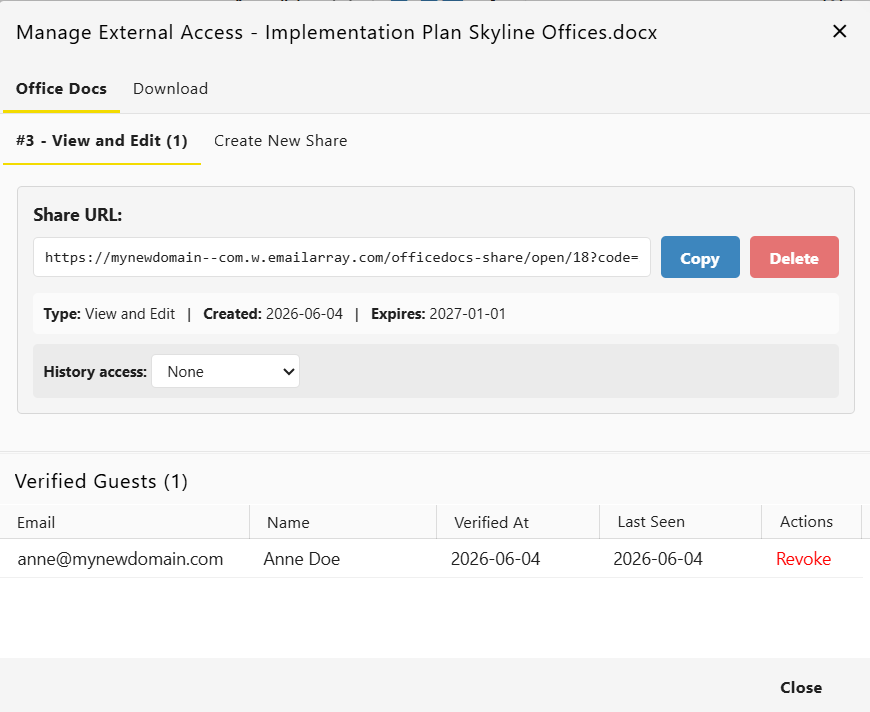](https://wikidev.emailarray.com/uploads/images/gallery/2026-06/webmail-check-file-sharing-status.png) #### Additional Sharing Options When you right-click a file, you also have access to: - **Email files:** Attach the file directly to a new email message. ## Bonus: Remote Editing Applications You do not need to be logged into the web interface to stay productive. You can use the free OnlyOffice application to edit documents from any device, including laptops, tablets and phones. Follow these simple steps to connect your account to the OnlyOffice app: 1. Add a cloud of type "OnlyOffice". [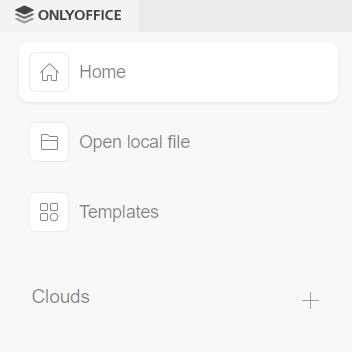](https://wikidev.emailarray.com/uploads/images/gallery/2026-06/onlyoffice-add-a-cloud.png)[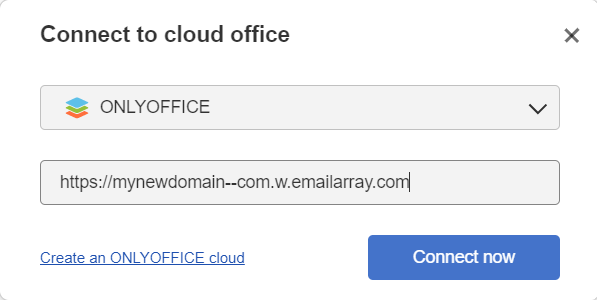](https://wikidev.emailarray.com/uploads/images/gallery/2026-06/onlyoffice-connect-to-an-existing-cloud-version-2.png) 2. Fill in your webmail URL (for example: [https://mynewdomain--com.w.emailarray.com](https://mynewdomain--com.w.emailarray.com)). 3. You will be redirected to a login page. Use your email address and password to connect. 4. The dashboard will display the files section from your webmail inside the OnlyOffice app, keeping everything in sync. # Connect to ONLYOFFICE to Manage Your Files ## Remote Editing Applications You do not need to be logged into the webmail interface to stay productive. You can use the free OnlyOffice application to manage and edit documents from any device, including laptops, tablets and phones.This feature is only available for Enhanced accounts.
Follow these simple steps to connect your account to the OnlyOffice app: 1. Add a cloud of type "OnlyOffice". [](https://wikidev.emailarray.com/uploads/images/gallery/2026-06/onlyoffice-add-a-cloud.png)[](https://wikidev.emailarray.com/uploads/images/gallery/2026-06/onlyoffice-connect-to-an-existing-cloud-version-2.png) 2. Fill in your webmail URL (for example: [https://mynewdomain--com.w.emailarray.com](https://mynewdomain--com.w.emailarray.com)). 3. You will be redirected to a login page. Use your email address and password to connect. 4. The dashboard will display the files section from your webmail inside the OnlyOffice app, keeping everything in sync. # Webmail - Account Consolidation for Enhanced Mailboxes Enhanced mailboxes offer the flexibility to manage multiple email accounts through a single Webmail interface. By consolidating your accounts, you can read and send messages from various internal or external addresses without needing to log in to separate profiles. #### Before You Begin This feature allows an **Enhanced mailbox** to add other accounts, whether they are **Basic** or **Enhanced**, into one view. Ensure you have the following details for the account you wish to add: - The full email address and password. - The IMAP (Incoming) and SMTP (Outgoing) server names. ### Step-by-Step Consolidation Guide 1. Log in to your **Webmail** account 2. Click the **User Icon (Settings)** in the top right navigation bar. 3. Select **My account** from the menu. 4. Navigate to the **E-mail Accounts & Aliases** tab in the left-hand sidebar. 5. Click the **Manage E-mail Accounts and Aliases** button. 6. **Add New Account**: In the Accounts window, click the **plus (+)** button in the top right corner. [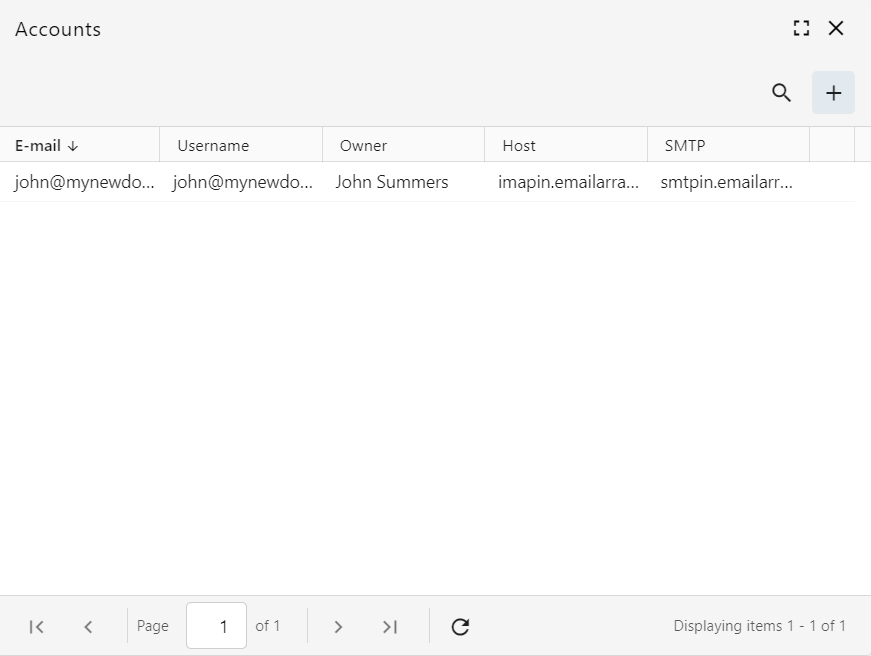](https://wikidev.emailarray.com/uploads/images/gallery/2026-03/webmail-add-a-new-email-account-click-on-plus-button.PNG) 7. **Configure the email account**: - On the **Properties** tab, fill in the "**Name**" (how you want to appear to recipients) and the full "**E-mail**" address. [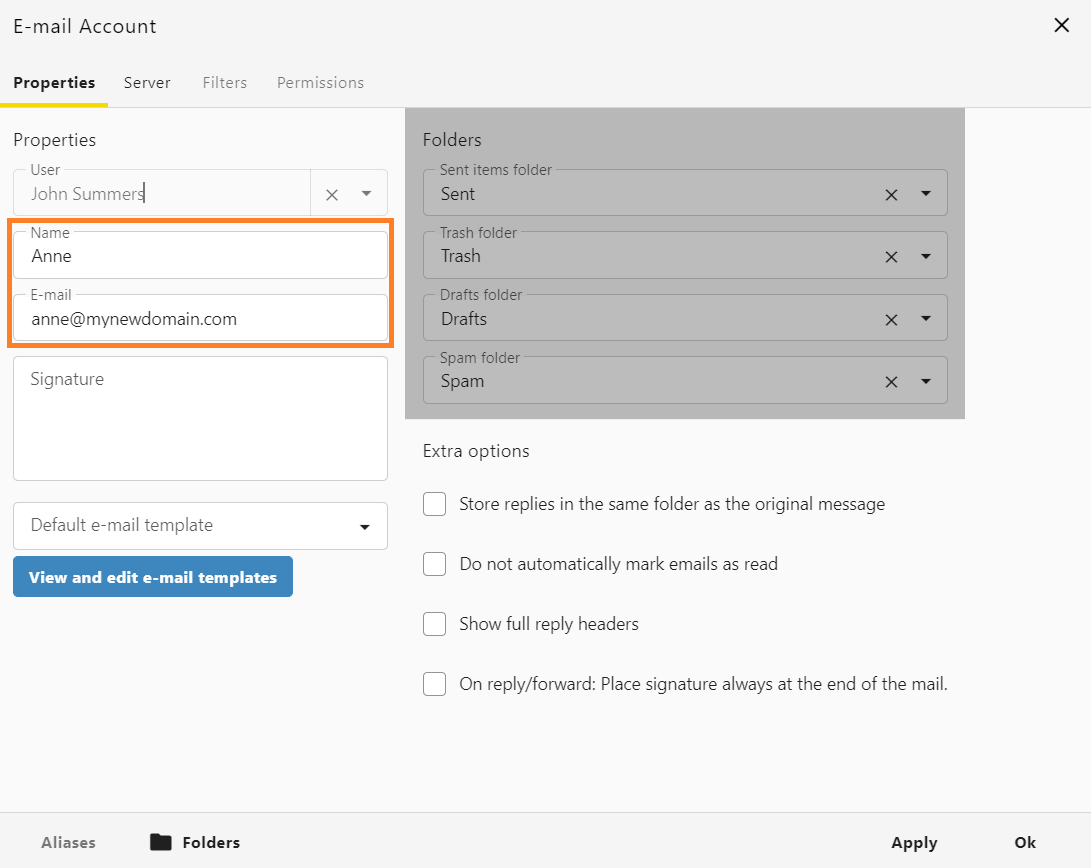](https://wikidev.emailarray.com/uploads/images/gallery/2026-03/webmail-add-a-new-email-account-properties-tab.PNG) - Click the **Server** tab to enter the connection information: [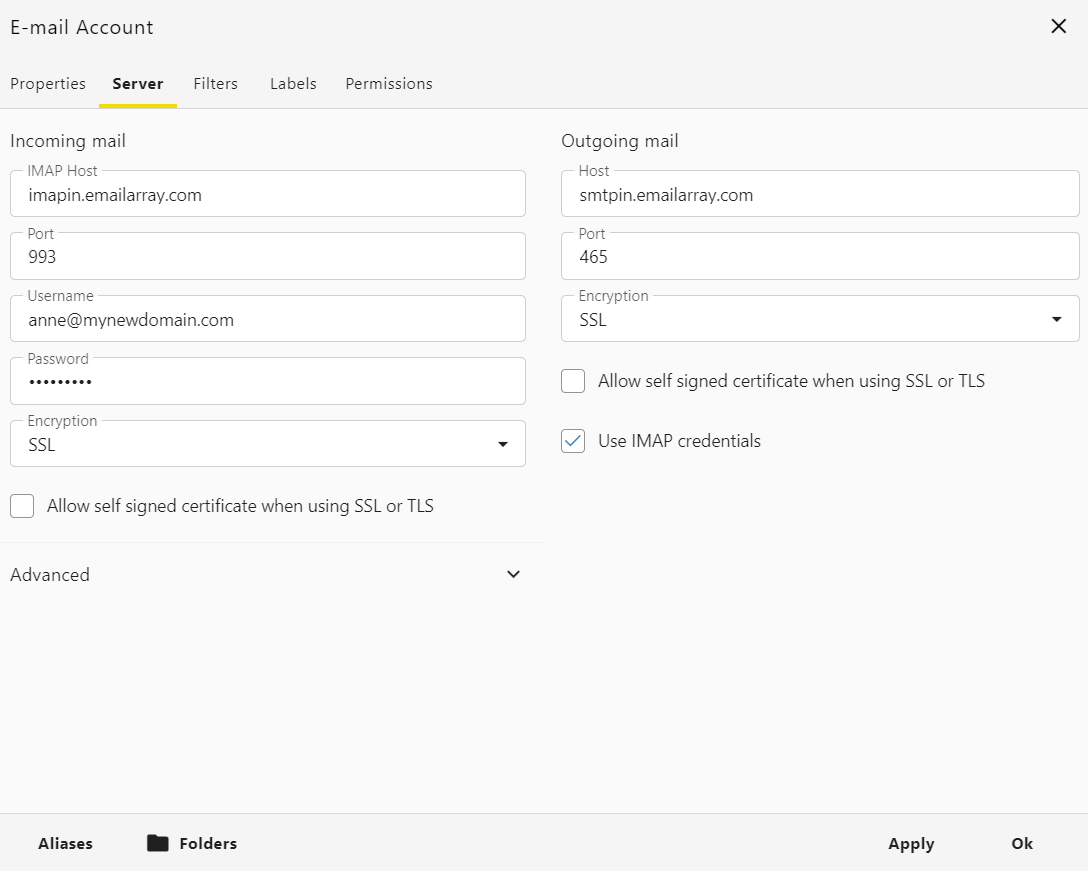](https://wikidev.emailarray.com/uploads/images/gallery/2026-03/webmail-add-a-new-email-account-server-tab-internal-mailboxes-with-ssl.PNG) - **Encryption**: choose **SSL** for *Incoming mail* and *Outgoing mail* - **Internal Accounts (Hosted with us)**: - `imapin.emailarray.com` for the IMAP Host - `smtpin.emailarray.com` for the SMTP Host - You may also use the standard `imap.emailarray.com` and `smtp.emailarray.com`. - **External Accounts**: Enter the specific IMAP and SMTP server names provided by your external email provider. - **Credentials**: Enter the **username** and **password** for the secondary account. - For *Outgoing mail* settings, please check **Use IMAP credentials**. 8. **Save Changes**: Click **Apply** and then **Ok** to finalize the setup. # EasyMeet Introducing EasyMeet - a professional appointment scheduling powered by Cal.com, built directly into your webmail. Just seamless online scheduling where you already work. Available for **Enhanced** mailboxes only. - No separate apps - No data sharing - Seamless Webmail integration - **Lives directly in your Webmail**, and syncs with all your calendars to prevent double-bookings - **Share your availability** with a single link - Your clients see your real-time calendar and **book a meeting in the slot that’s open for both of you** # Set Your Availability # EasyMeet - Online Appointment Scheduling **EasyMeet** is an integrated scheduling tool that eliminates the back and forth of finding the perfect meeting time. By sharing a public link, you allow clients and partners to view your availability and book appointments directly into your calendar. You can set your working hours, create event types, share a public booking link, and view bookings from the Webmail.**Note:** This feature is available exclusively for **Enhanced** accounts.
### Before you start Log in to the **Webmail** before following these steps. If you need help, see [How to log in to the Webmail](https://wikidev.emailarray.com/books/1-configure-a-new-e-mail-address-getting-started/page/webmail-access). ## Getting Started To begin using EasyMeet, log in to your Webmail and look for the **EasyMeet** tab in the top navigation bar. If you are using it for the first time, you will see an enablement screen. Click **Enable EasyMeet** to activate the feature for your mailbox. [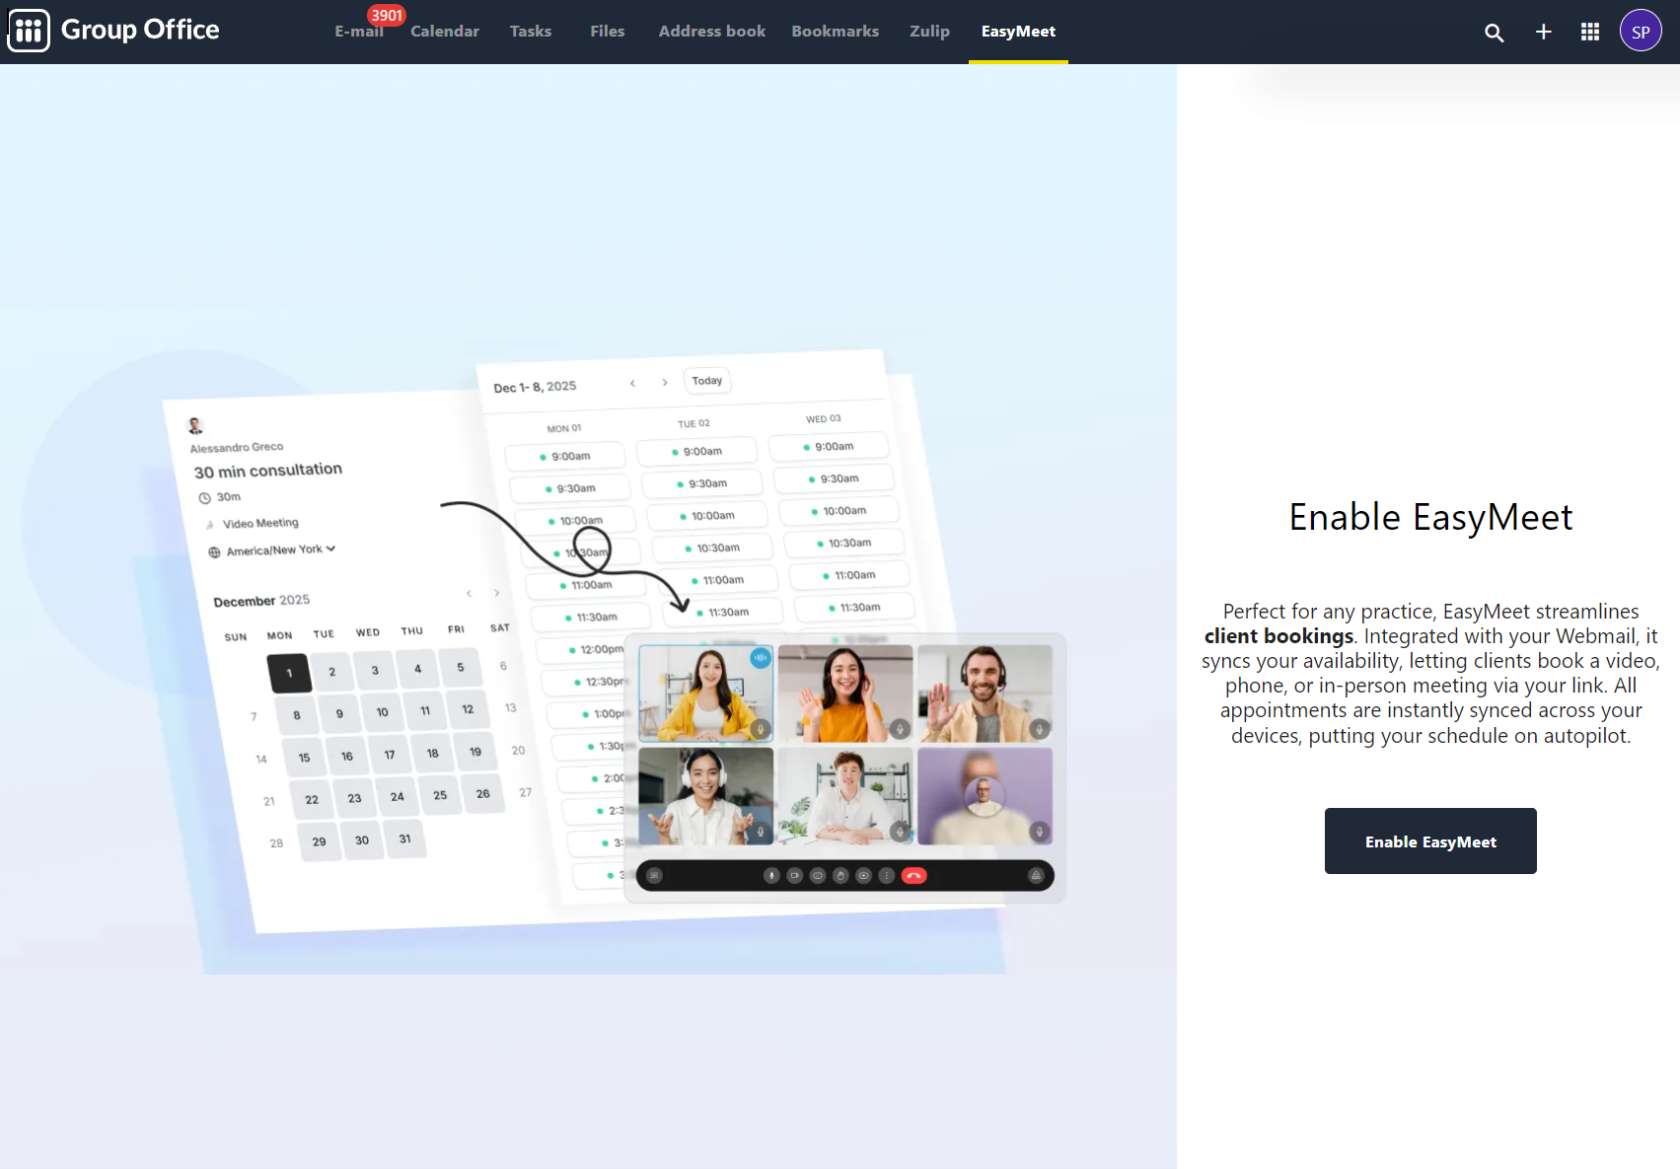](https://wikidev.emailarray.com/uploads/images/gallery/2026-05/easymeet-enable-from-the-webmail-if-you-have-an-enhanced-mailbox.PNG) ## Configuring Your Availability Your availability determines when guests can book time with you. You can manage this under the **Availability** section in the left sidebar. ### Setting Working Hours 1. Select the **Availability** tab. 2. Toggle the days of the week you are available. 3. Define your time slots for each day (e.g., 9:30 AM to 5:00 PM). 4. Select your correct **Timezone** from the dropdown menu to ensure appointments are synced accurately for both you and your guests. 5. Click **Save** to apply your schedule. [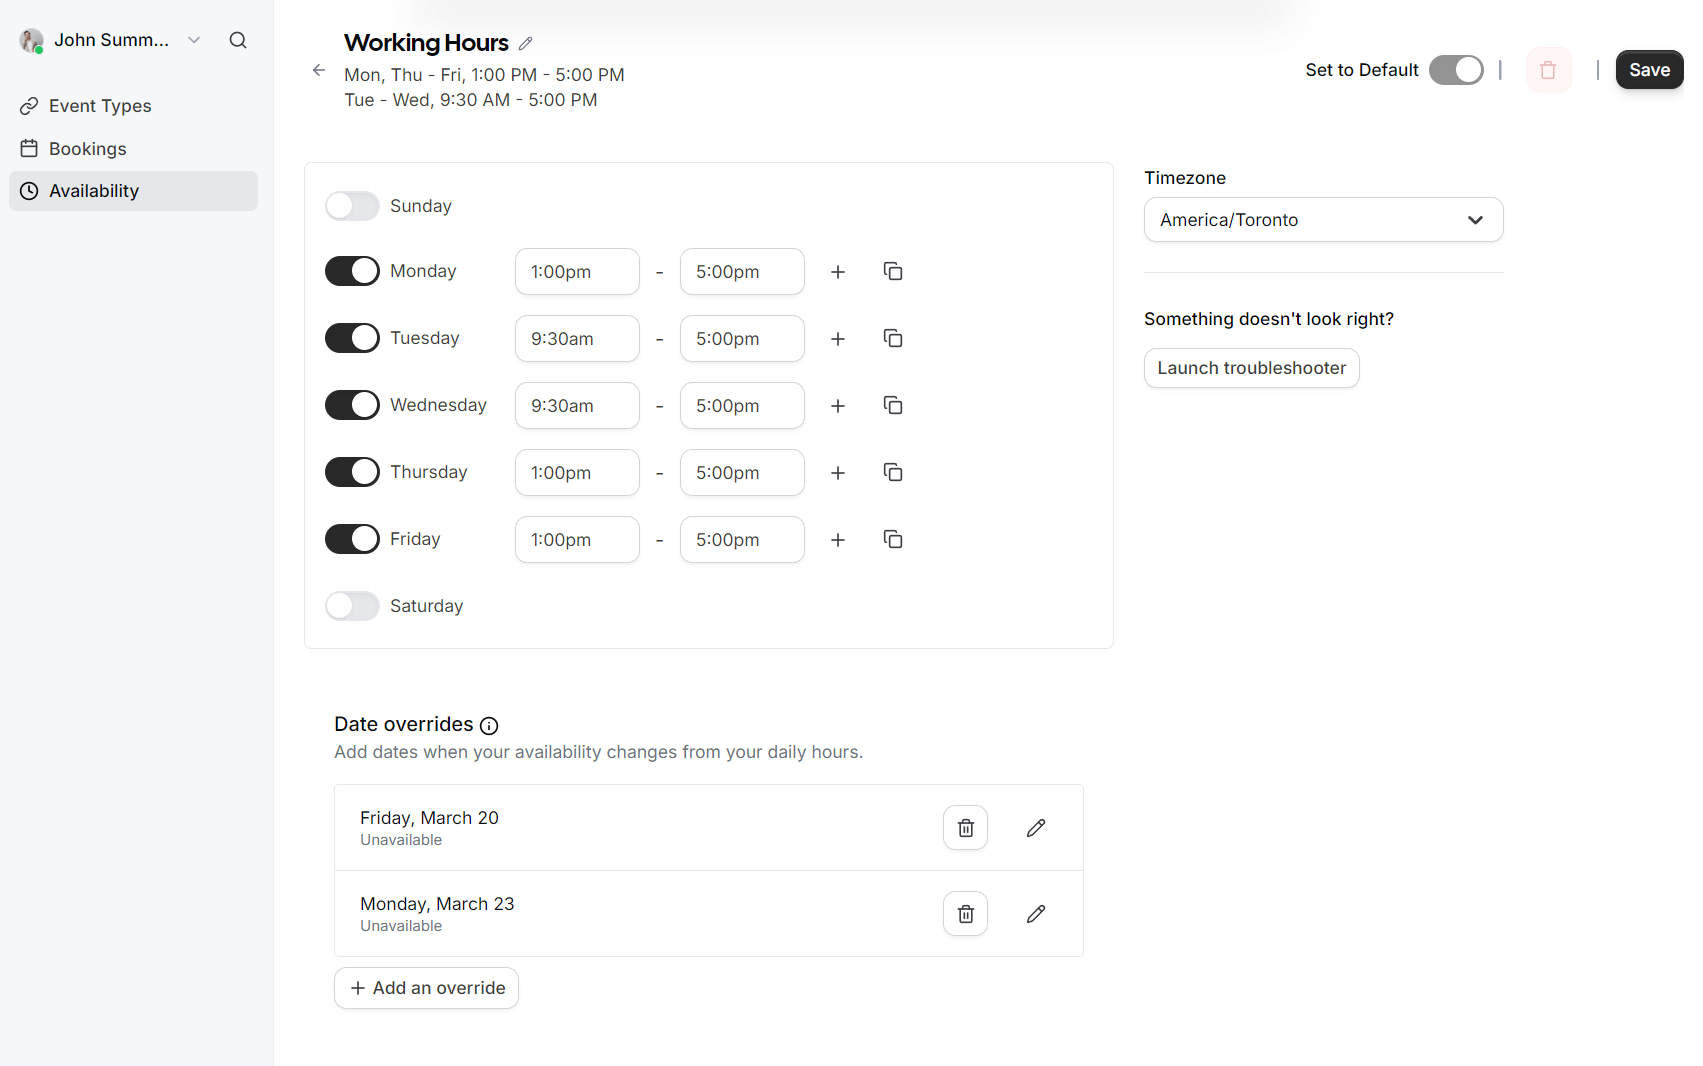](https://wikidev.emailarray.com/uploads/images/gallery/2026-05/easymeet-1-availability-schedule-with-date-overrides.PNG) ### Date Overrides If you have specific days where your schedule differs from your standard working hours (such as holidays or a one-off afternoon off), you can use **Date overrides**. - Click **Add an override**. - Select the specific date on the calendar. [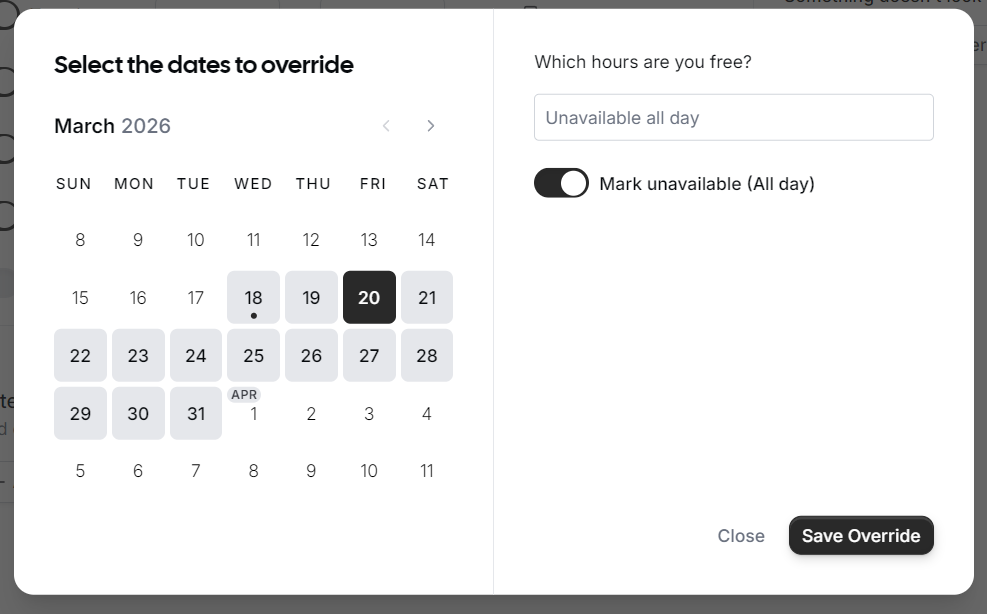](https://wikidev.emailarray.com/uploads/images/gallery/2026-05/easymeet-1-setup-your-working-hours-add-an-exception-to-override-the-existing-schedule.PNG) - Choose to either mark yourself as **Unavailable (All day)** or set specific custom hours for that date only. - Click **Save Override**. ## Managing Event Types Event Types allow you to define different kinds of meetings, such as a 15-minute "Quick Chat" or a 60-minute "Consultation." [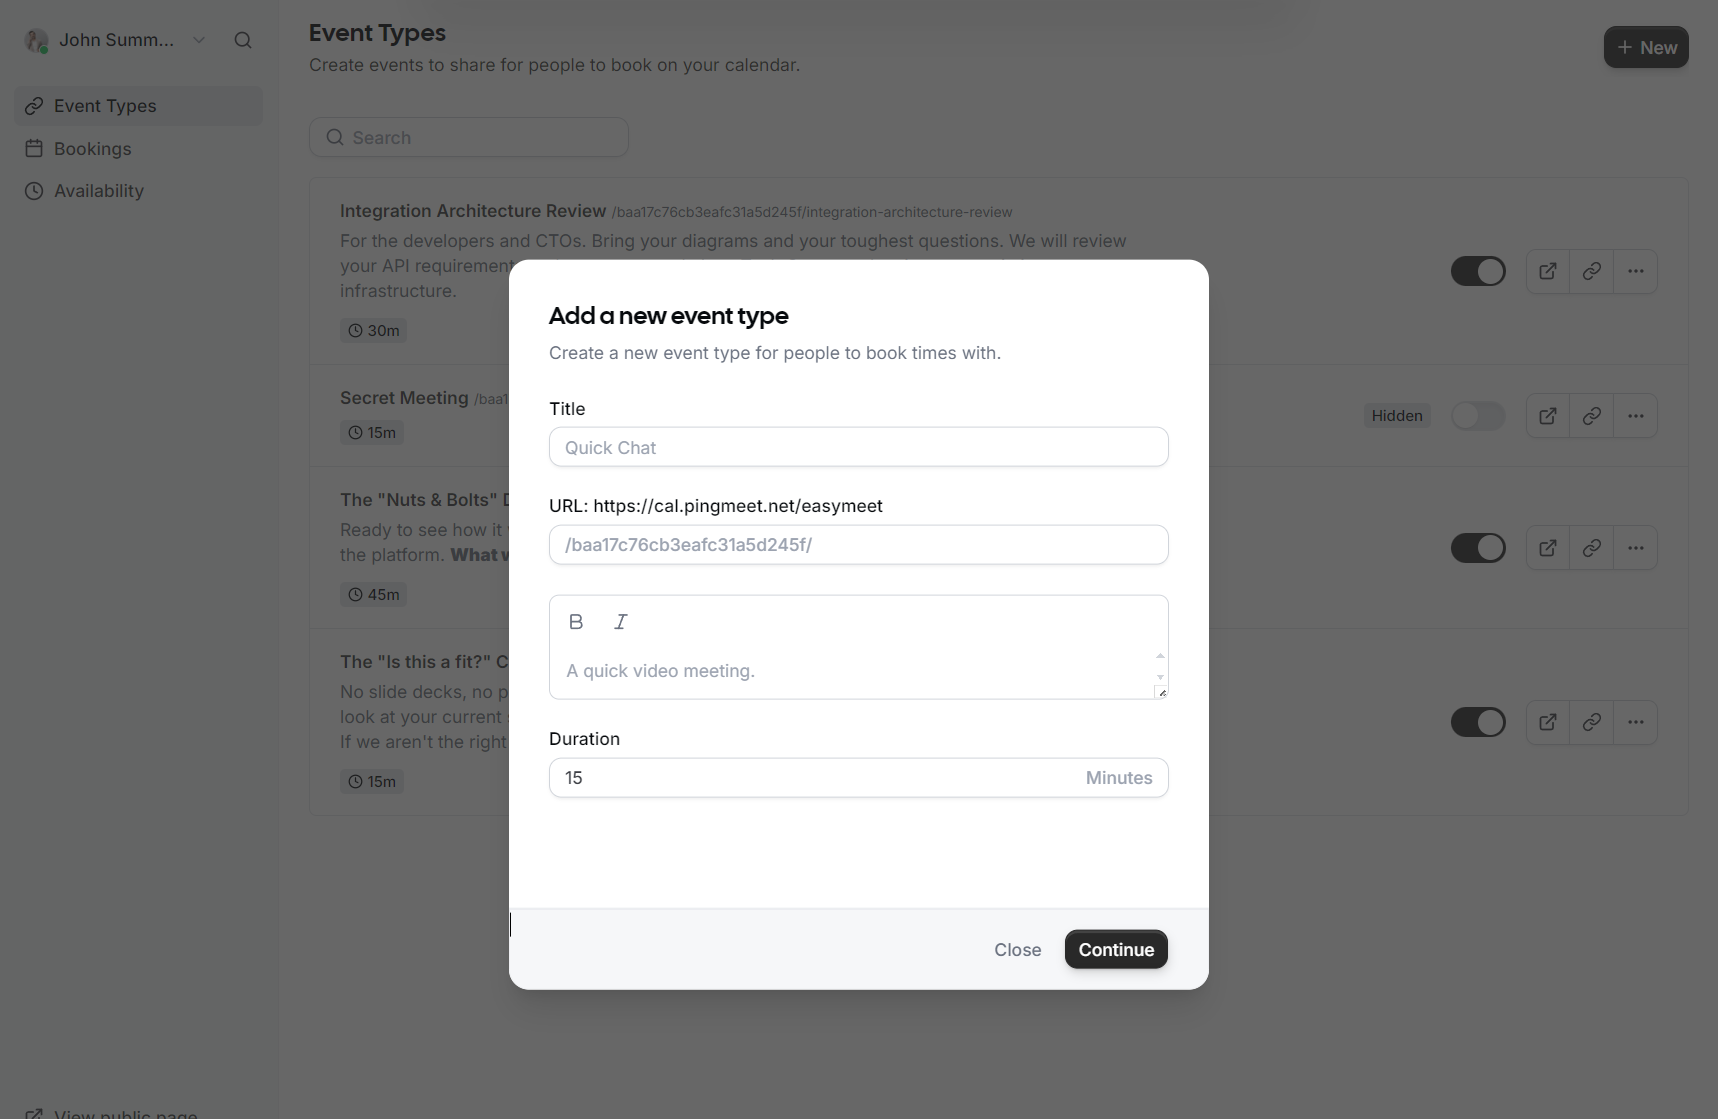](https://wikidev.emailarray.com/uploads/images/gallery/2026-05/easymeet-2-add-event-types-type-of-meetings-your-customers-can-schedule.PNG) 1. Navigate to **Event Types** in the sidebar. 2. Click **+ New** to create a meeting type. 3. Provide a **Title** and a brief **Description** so your guests know what the meeting is about. 4. Set the **Duration** (e.g., 15, 30, or 60 minutes). 5. Choose a **Location** (e.g., Video Meeting). 6. Customize the **URL** slug for this specific event. 7. Click **Continue** or **Save** to publish the event type. ## Sharing Your Link Once your event types are set up, you can share them with the world: [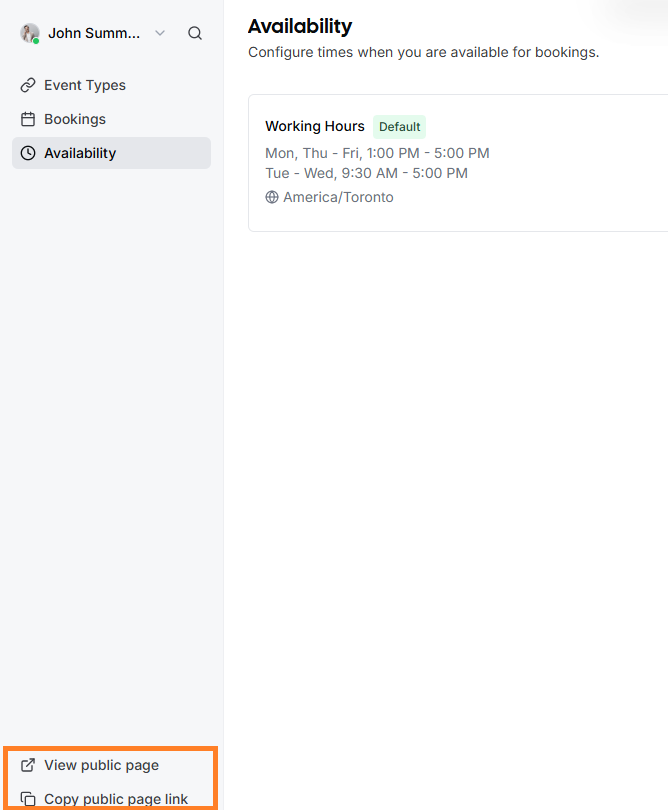](https://wikidev.emailarray.com/uploads/images/gallery/2026-05/easymeet-3-get-your-public-link.png) - **Public Page:** In the bottom left corner of the EasyMeet interface, click **View public page** to see what your customers see. - **Copy Link:** Use the **Copy public page link** to grab your URL and add it to your email signature or share it directly in a chat. ## Managing Bookings When a guest books a meeting, you will receive an email notification, and the event will automatically appear in your calendar. [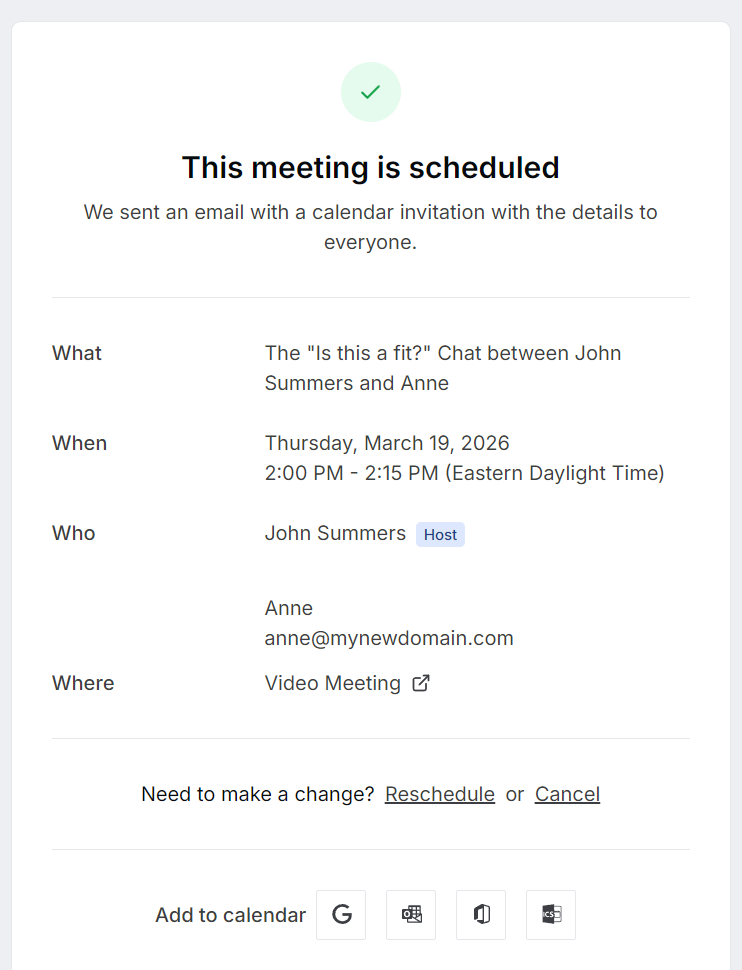](https://wikidev.emailarray.com/uploads/images/gallery/2026-05/easymeet-3-public-link-event-confirmed.PNG) - To view a list of all scheduled meetings, go to the **Bookings** tab. - You can filter between **Upcoming**, **Past**, and **Canceled** events. - Each booking includes a direct link to the **Video Meeting** if applicable. - If you need to change a meeting, you can use the **Reschedule** or **Cancel** options directly from the booking details. [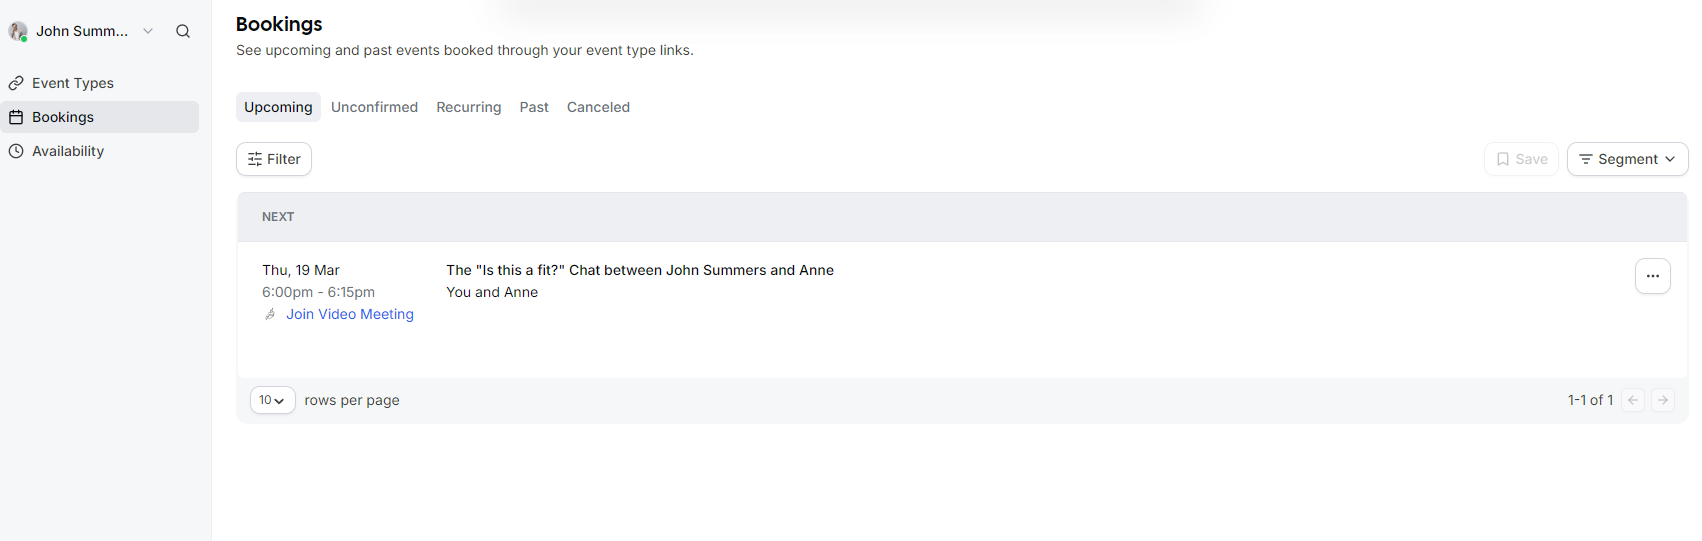](https://wikidev.emailarray.com/uploads/images/gallery/2026-05/easymeet-3-list-bookings.PNG) # Event Advanced Setup This guide details how to configure your **Event Types** to perfectly match your meeting requirements, from basic setup to advanced booking rules. --- ## Creating a New Event Type To start, navigate to the **Event Types** tab and click the **+ New** button. A modal will appear where you can define the core parameters of your meeting: - **Title**: Give your event a clear name, such as "Consultation" or "Quick Chat". - **URL**: Customize the specific link slug guests will use to book this event. - **Description**: Briefly explain what the meeting is for so guests know what to expect. - **Duration**: Select how long the meeting will last in minutes. [](https://wikidev.emailarray.com/uploads/images/gallery/2026-05/easymeet-2-add-event-types-type-of-meetings-your-customers-can-schedule.PNG) --- ## Event Setup Once the event is created, you can access more granular settings in the **Event Setup** section: - **AI Translation**: You can toggle an option to automatically translate your title and description to the visitor's browser language using AI. - **Interface Language**: Set the default language for the booking interface or allow it to match the visitor's browser language. - **Duration Flexibility**: In addition to a fixed duration, you can enable an option that allows the booker to select their preferred meeting length. - **Location**: Define where the meeting takes place, such as a **Video Meeting**. [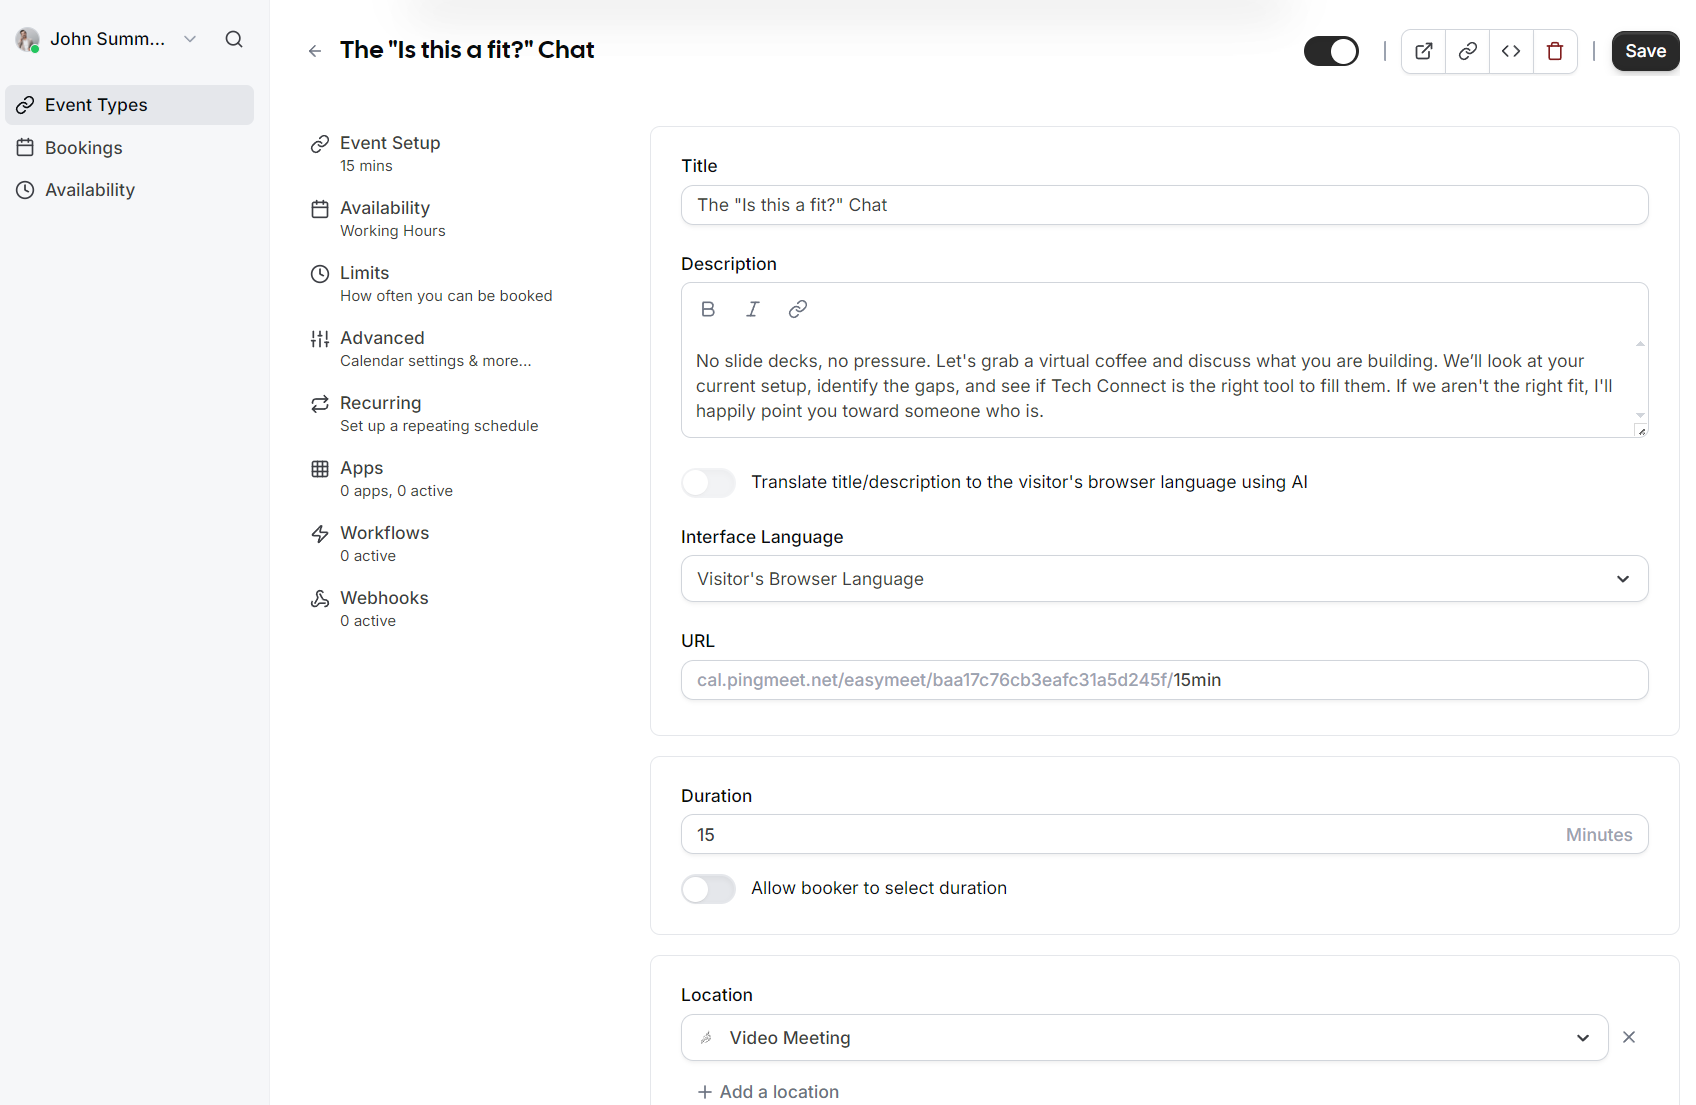](https://wikidev.emailarray.com/uploads/images/gallery/2026-05/easymeet-2-add-event-types-event-setup.PNG) --- ## Availability Assign which schedule this event type should follow. By default, this uses your standard **Working Hours**, but you can select different schedules if you have created them. [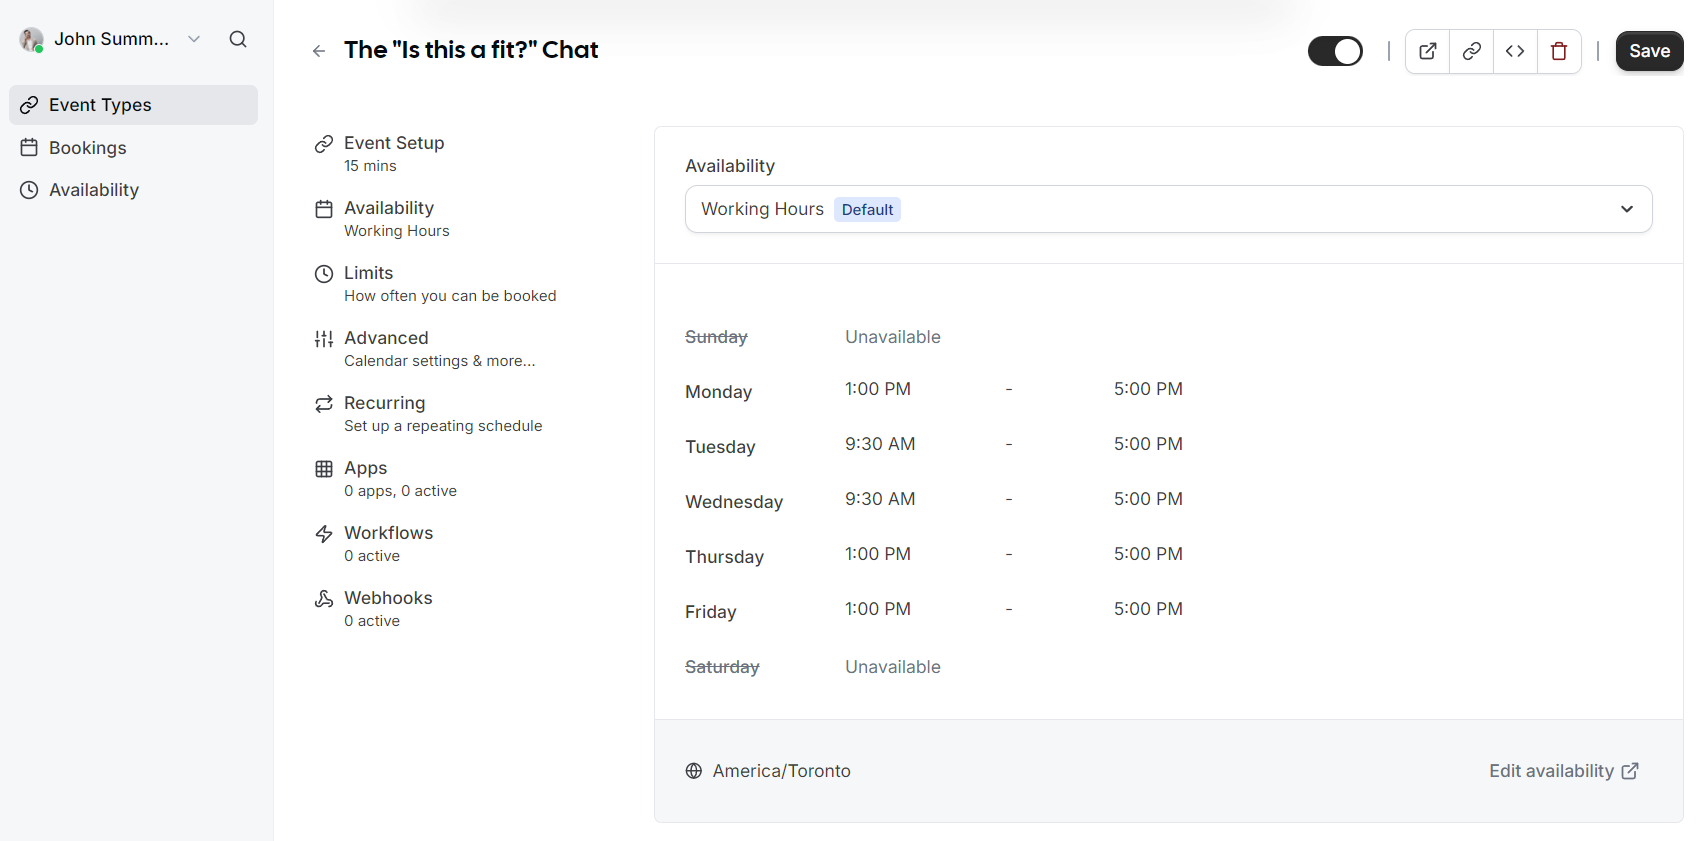](https://wikidev.emailarray.com/uploads/images/gallery/2026-05/easymeet-2-add-event-types-availability.PNG) ## Limits - **Buffers**: Add "No buffer time" or specific intervals before and after events to prevent back to back meetings. - **Minimum Notice**: Prevent last minute surprises by requiring a minimum amount of notice (e.g., 2 hours) before someone can book. - **Time-slot intervals**: Choose how frequently slots are displayed (e.g., every 15 minutes or based on event length). - **Booking Frequency**: Limit how many times this specific event can be booked overall. - **Future Bookings**: Set a limit on how far into the future guests are allowed to schedule a meeting. [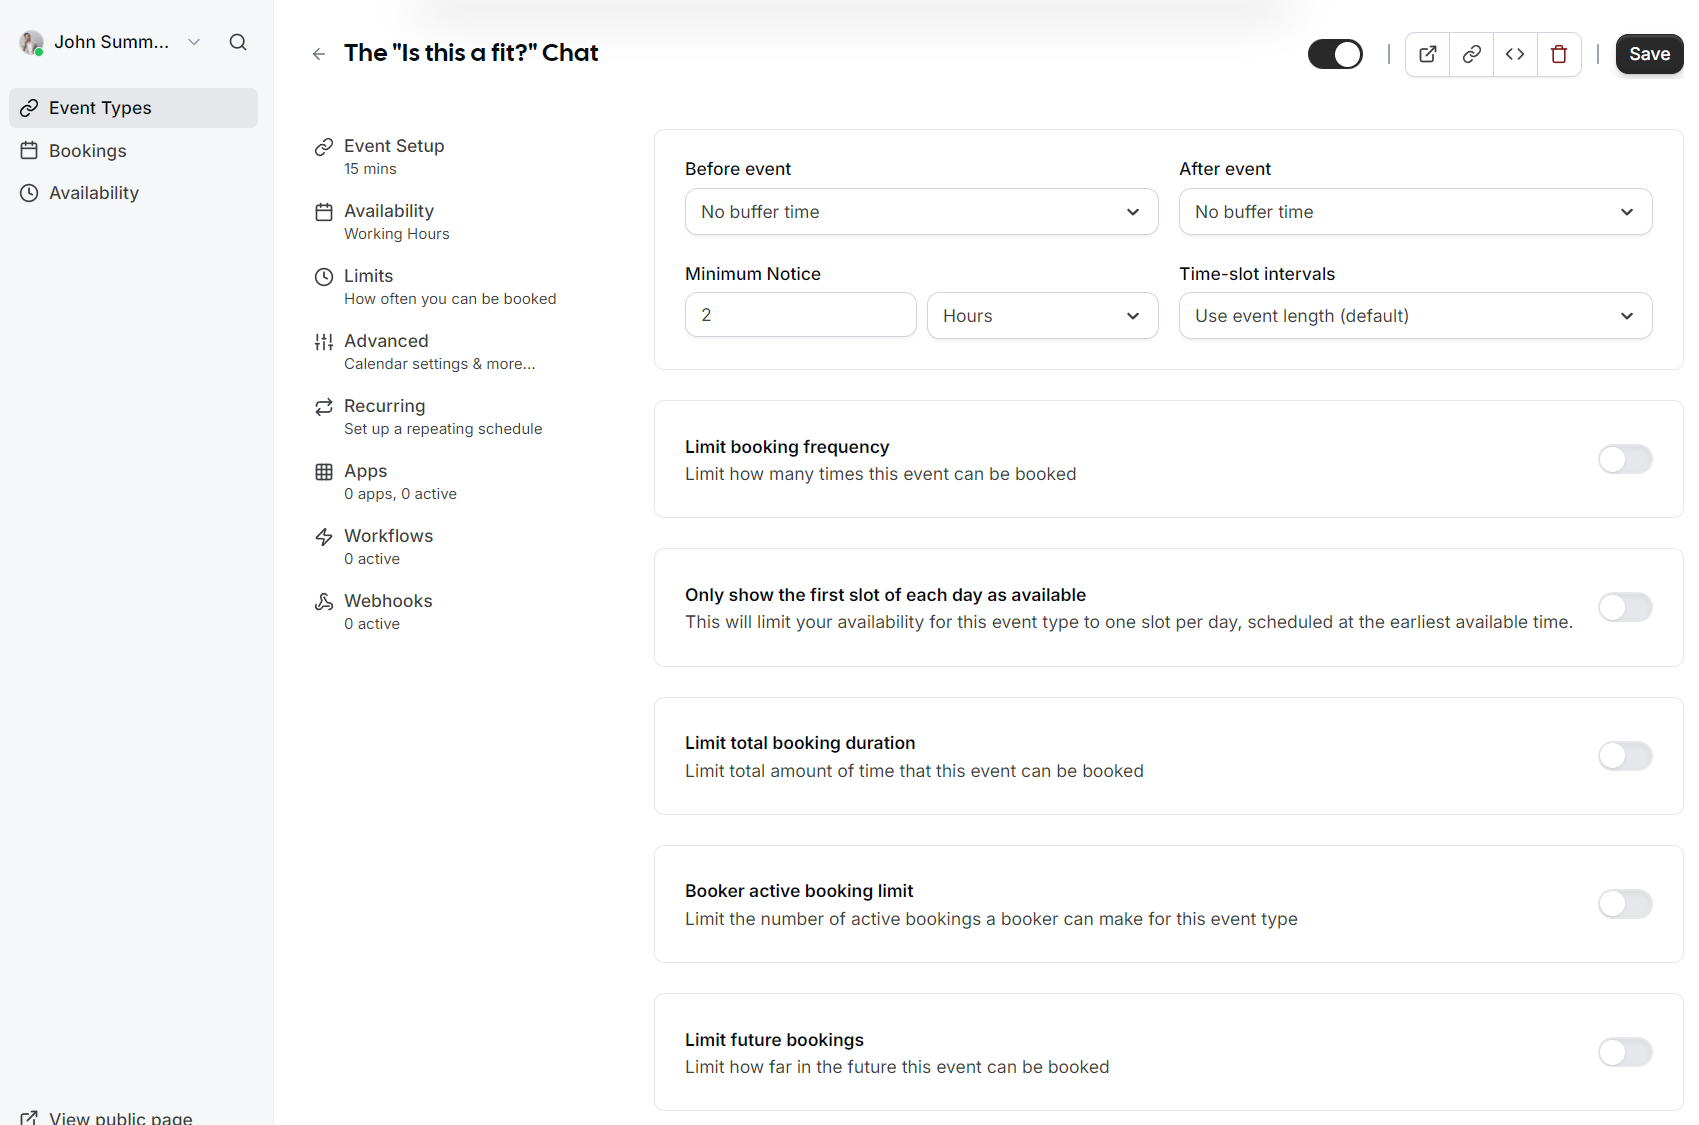](https://wikidev.emailarray.com/uploads/images/gallery/2026-05/easymeet-2-add-event-types-limits.PNG) --- ## Advanced Options| [](https://wikidev.emailarray.com/uploads/images/gallery/2026-05/easymeet-event-setup-advanced-tab-1.png) | [](https://wikidev.emailarray.com/uploads/images/gallery/2026-05/easymeet-event-setup-advanced-tab-2.png) | [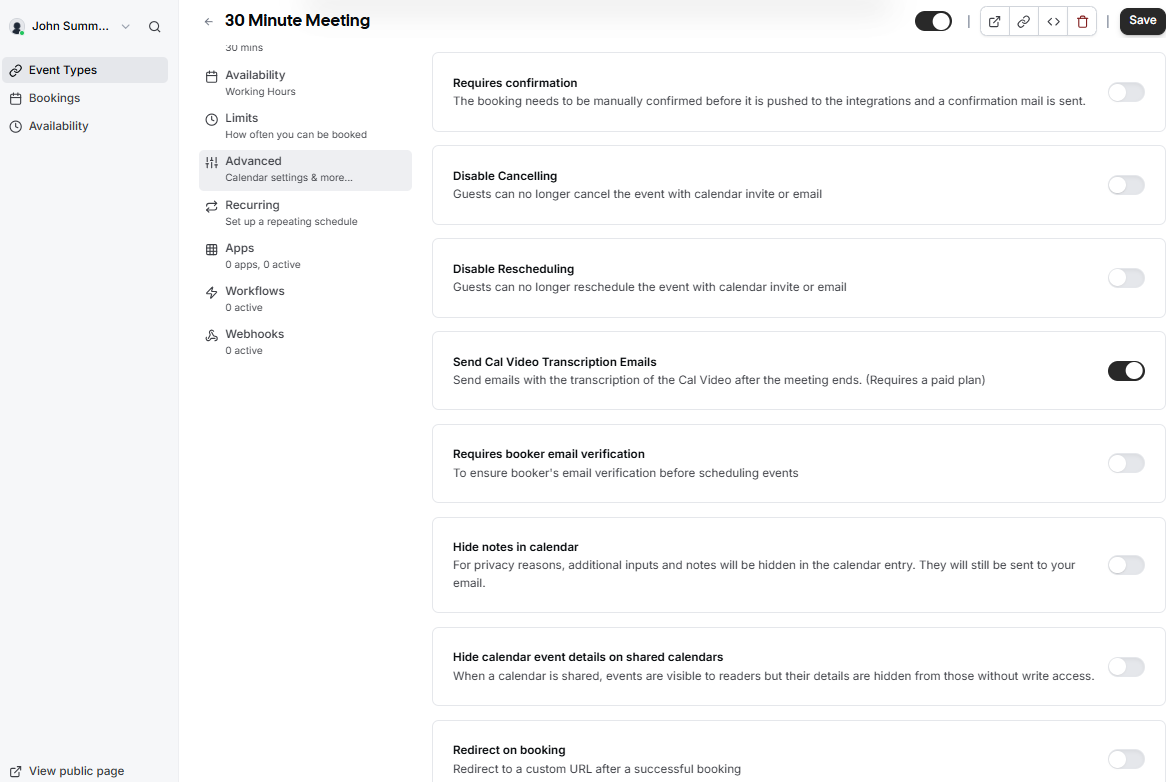](https://wikidev.emailarray.com/uploads/images/gallery/2026-05/easymeet-event-setup-advanced-tab-3.png) | [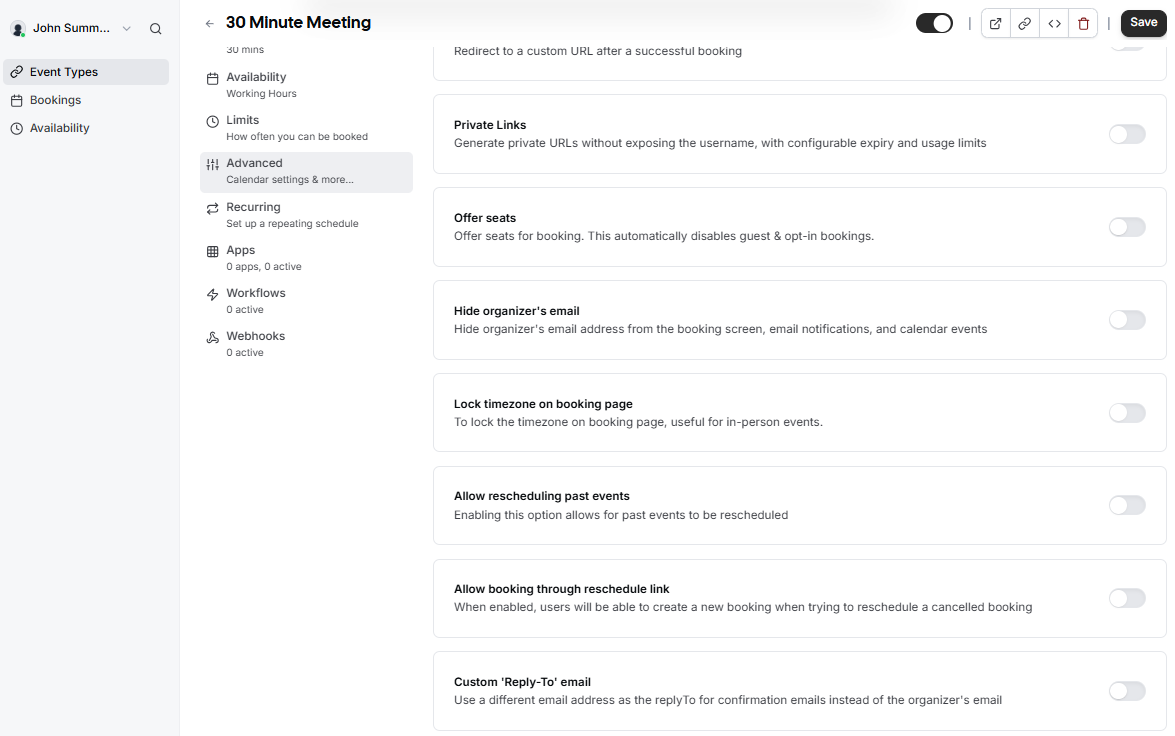](https://wikidev.emailarray.com/uploads/images/gallery/2026-05/easymeet-event-setup-advanced-tab-4.png) |