**Note:** Before you begin, please check your available resources. If you need more mailboxes or storage space, you can easily increase your quota from your billing panel.
### Step 1: Create the Admin Account First, log into your [Super Panel](https://cp.emailarray.com/super) and navigate to the ADMINS tab. 1. Open the Setup Form: Click on New Admin. 2. Basic Information: Enter the administrator's name, choose a unique username, and set a secure password. 3. Set Resource Quotas: You must enter a value for every field (use "0" if a feature isn't needed): - **Mailbox Quotas**: Define how many **Basic or** **Enhanced** they can create. - **Max Domains**: Set the limit for how many domains this admin can manage. *Tip: A standard rule of thumb is one domain per purchased mailbox.* - **Quota (GB)**: Assign the total storage allowance for this customer. You have the flexibility to divide your total storage space however you like among your clients. [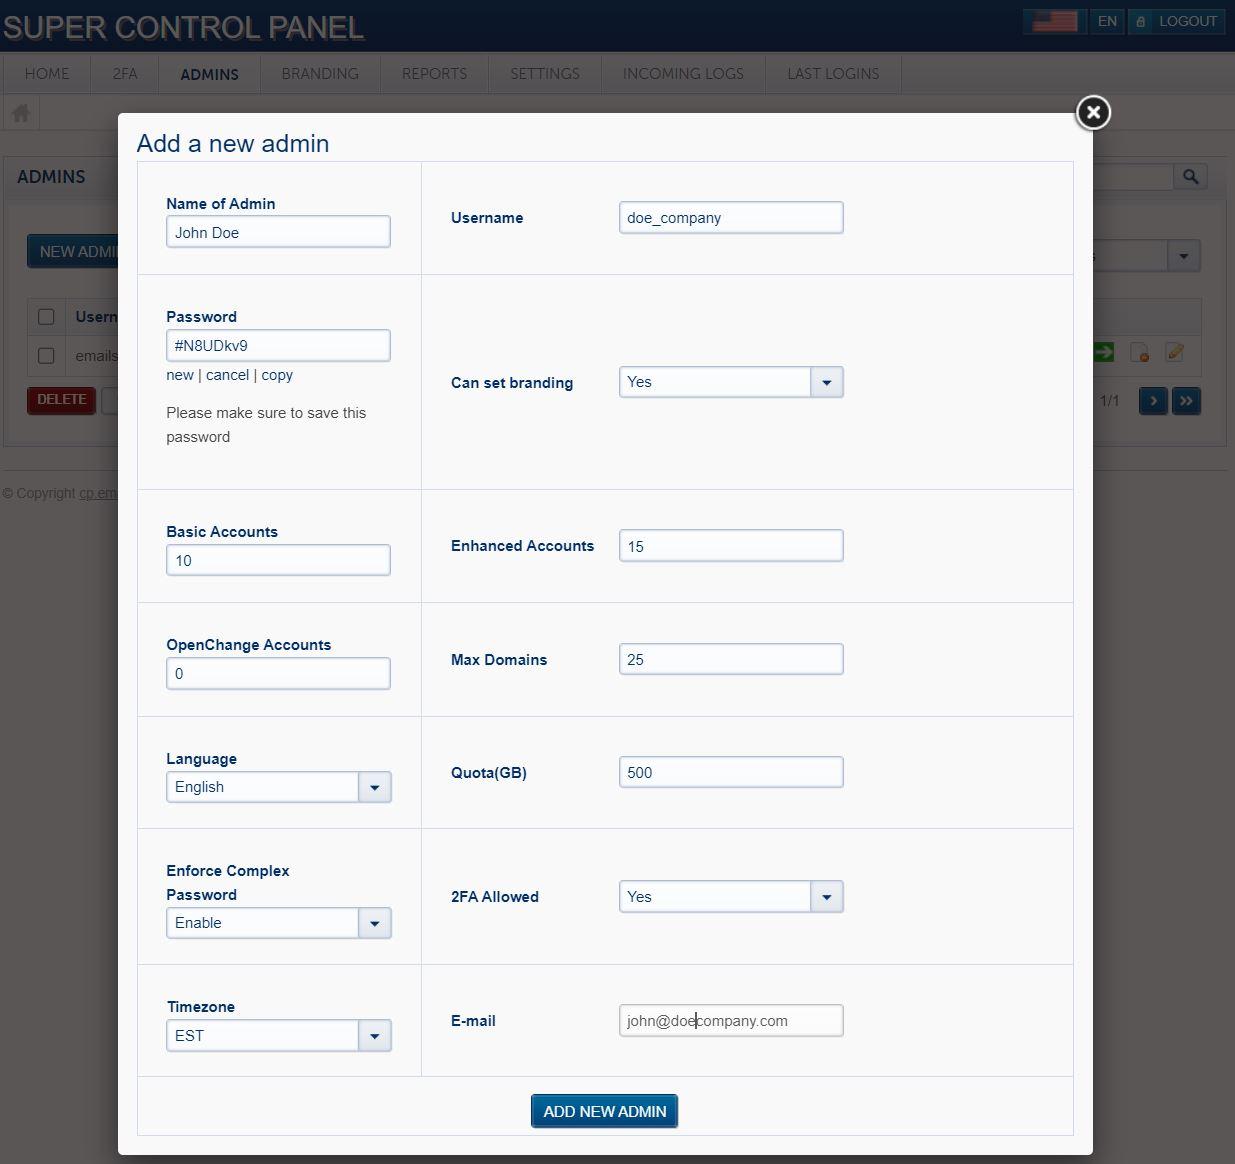](https://wikidev.emailarray.com/uploads/images/gallery/2026-01/example-setup-for-a-new-admin.JPG) 4. Finalize: Choose the default **language** and **timezone** for the admin, then click **Add New Admin**. ### Step 2: Choose Your Onboarding Path Once the account is created, you have two ways to handle the mailbox setup: #### Option A: The Hands-Off Approach (Customer-Led) Provide your customer with their new Admin login credentials. They can then log in and create their own mailboxes at their convenience. #### Option B: The White-Glove Approach (Reseller-Led) If you prefer to set everything up for your client, you can do so without needing their specific password: - Go to the ADMINS tab and click Show All Admins. - Locate your customer in the list. - Click the "Login as" icon (the green arrow) to instantly access their dashboard and create mailboxes on their behalf. [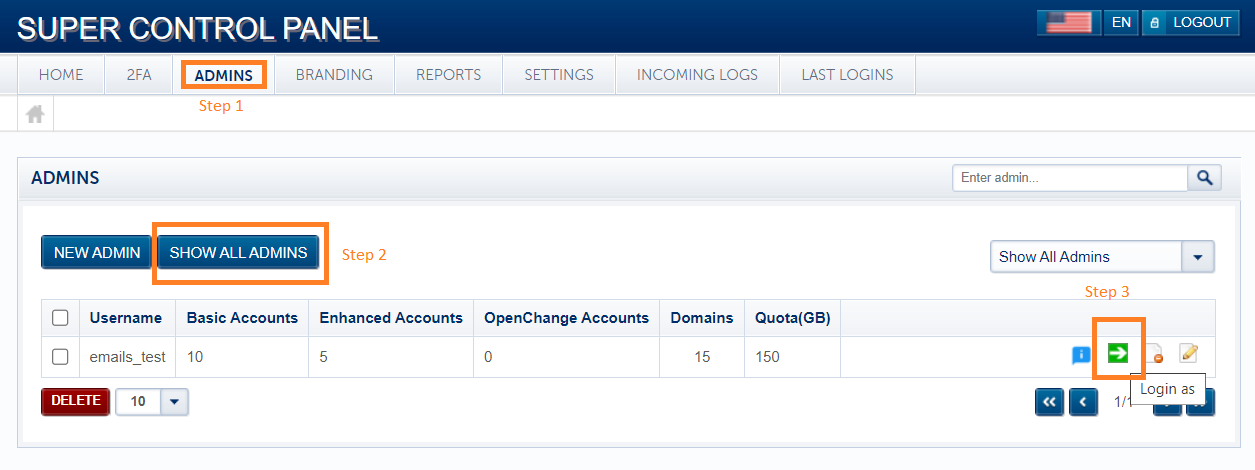](https://wikidev.emailarray.com/uploads/images/gallery/2026-01/login-as-an-admin-from-your-super-panel.PNG)Need help creating the actual mailboxes? We’ve made it super simple. Follow our [Step-by-Step Mailbox Creation Guide](https://wikidev.emailarray.com/books/1-configure-a-new-e-mail-address-getting-started) to get your customer's team up and running in minutes.
# Finding and Managing Admin Accounts As you scale, you may need to quickly locate which **Admin account** manages a specific mailbox or domain. The **Reports** section in your Super Panel allows you to find these accounts in seconds and take immediate action. ### Step 1: Locating the Account To find the necessary account, log into your [**Super Panel**](https://cp.emailarray.com/super) and click on the **REPORTS** tab. 1. **Use Filtering Options**: In the "Filtering Options" section, you can search for an account using several criteria: - **Username** or **Domain**: Best for finding which Admin owns a specific email address or website. - **Last Login**: Useful for identifying inactive accounts. - **Account Type** or **Quota**: To find users based on their service level or storage usage. 2. **Run the Search**: Enter your criteria (e.g., set the filter to "Domain" and type in the customer's domain) and click **SEARCH**. --- ### Step 2: Taking Action Once you’ve located the correct Admin in the search results, you have three primary tools at your disposal: #### 1. Login as Admin (Green Arrow) Click the **green arrow icon** to instantly "log in as" that administrator. This allows you to manage their mailboxes, aliases, and settings directly without needing their password. #### 2. Edit Account Details (Pencil Icon) Click the **pencil icon** to open the Admin’s settings. From here, you can: - **Adjust Quotas**: Increase or decrease the number of allowed mailboxes or total storage space (GB) as your customer’s needs change. - **Update Info**: Change contact details or timezones. #### 3. Enable or Disable an Account Within the edit pop-up, you can toggle the account status between **Enable** and **Disable**. - **When to Disable**: This is a powerful tool for billing management. If a customer hasn't paid, disabling their account **blocks all logins** for both the Admin and their end-users. - **The Benefit**: While logins are blocked, the accounts **will still receive emails**. This keeps the data intact and ensures no mail is lost while you resolve payment issues—a much safer alternative to deleting the account. # Transferring Domains Between Admin Accounts There are times when a customer may start under your direct management but later decides they want to manage their own settings, mailboxes, and quotas. Instead of deleting and recreating everything, you can simply **transfer the domain** from your Admin account to theirs. ### When to Use This Feature - **Customer Autonomy**: A client wants to manage their own mailbox creation and resource allocation. - **Account Reorganization**: You are moving a specific domain to a new sub-admin for better organization. - **White-Label Handoff**: You’ve finished the initial setup for a client and are now handing over the "keys" to their own dashboard. --- ### How to Move a Domain The transfer is handled entirely within the **Super Panel** and takes effect immediately. 1. **Navigate to Domain Transfer**: Log into your [**Super Panel**](https://cp.emailarray.com/super) and go to the **ADMINS** tab. From the dropdown or side menu, select **Domain Transfer**. 2. **Select the Domain**: You will see a list of domains currently under your management. Choose the domain you wish to move. 3. **Choose the Destination**: Select the destination **Admin account** from the provided list. This is the account that will now have "ownership" and management rights over that domain. 4. **Process the Move**: Click the button to finalize the transfer. [](https://wikidev.emailarray.com/uploads/images/gallery/2026-02/super-panel-change-domain-ownership-move-domain-to-a-new-admin-account.PNG) --- ### What Happens After the Transfer? - **Instant Management**: The new Admin will immediately see the domain in their own dashboard. - **Mailbox Preservation**: All existing mailboxes, aliases, and data associated with that domain remain intact and move with it. - **Quota Allocation**: The domain will now count against the destination Admin’s domain quota. Ensure the destination Admin has enough "Max Domains" allowed in their settings before you start. ---**Pro-Tip: Resource Check:** Before moving a domain, use the **pencil icon** in the **Admins** list to verify that the destination account has enough available **Mailbox** and **Storage quota** to support the incoming domain's existing users.
# Super Panel Settings ### Update Your Super Panel Recovery Email Your recovery email is essential for maintaining access to your Super Panel account if you ever forget your password. You can update this address at any time from within your Super Panel dashboard.**Ensure Continuous Access**: Verify that you have a recovery email address on file and that you maintain consistent, long-term access to it. Remember to keep the subscription for your recovery email active and ensure any associated domain names are renewed on time.
#### Steps to change your recovery email 1. **Access Settings:** From the [Super Panel](https://cp.emailarray.com/super), in the main navigation menu, click on the **Settings** tab. 2. **Open the email update tool:** Locate the **Change Email** icon and click on it. 3. **Enter your new address:** In the **Change Email** pop-up window, type your preferred email into the **New Email** field. 4. **Save your changes:** Click the blue **CHANGE** button to update your account settings. [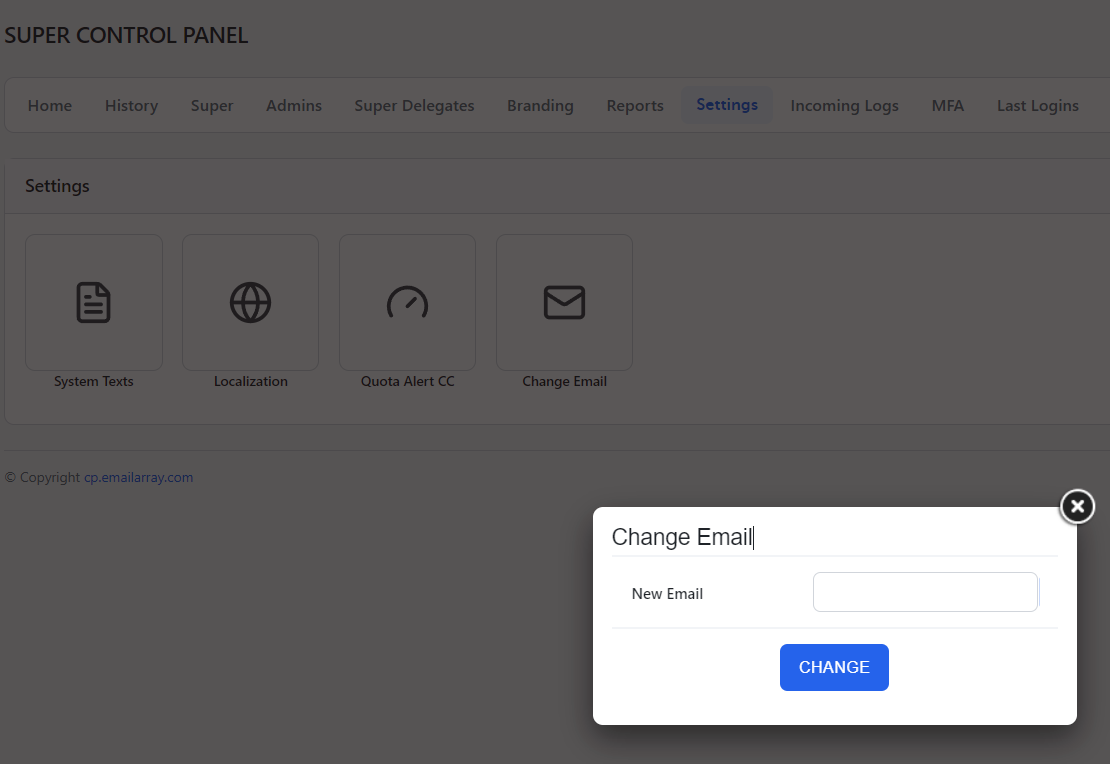](https://wikidev.emailarray.com/uploads/images/gallery/2026-04/super-panel-settings-change-recovery-email-address.PNG)