# Manage Whitelists and Blacklists
Notice that the best way to add whitelist records is using the Spam Monitor reports, as it automatically delivers the email and adds the sender to your whitelist. Our system uses the Sender instead of the From in the email header for blacklist and whitelist, which is automatically done if you authorize emails through spam reports.
If you enter an email address manually to your black or whitelist and notice it doesn't work, check the email header and look for the **X-Barracuda-Envelope-From:** field, which should be used. Yet another possibility is that the sender might change every time you receive a certain email. In this case, you can use [Rules](https://wikidev.emailarray.com/books/2-user-panel-advanced-setup-for-your-mailbox/page/delivery-rules-manage-incoming-email) to delete undesired messages based on the part of the From header address or subject.
Besides being able to whitelist or blacklist an address for the entire domain manually, Administrators can also manage the automatic whitelist. The automatic whitelist is a domain-wide whitelist built from the email-sending patterns of all your users. It ensures that communication with trusted recipients always goes through without being filtered.
### Add a sender to the whitelist.
This will treat the sender as safe and deliver all incoming emails to the Inbox folder (or another folder if you have set up delivery rules)
- Go to the [Admin Panel](https://cp.emailarray.com/admin).
- Log in using your Admin username and password.
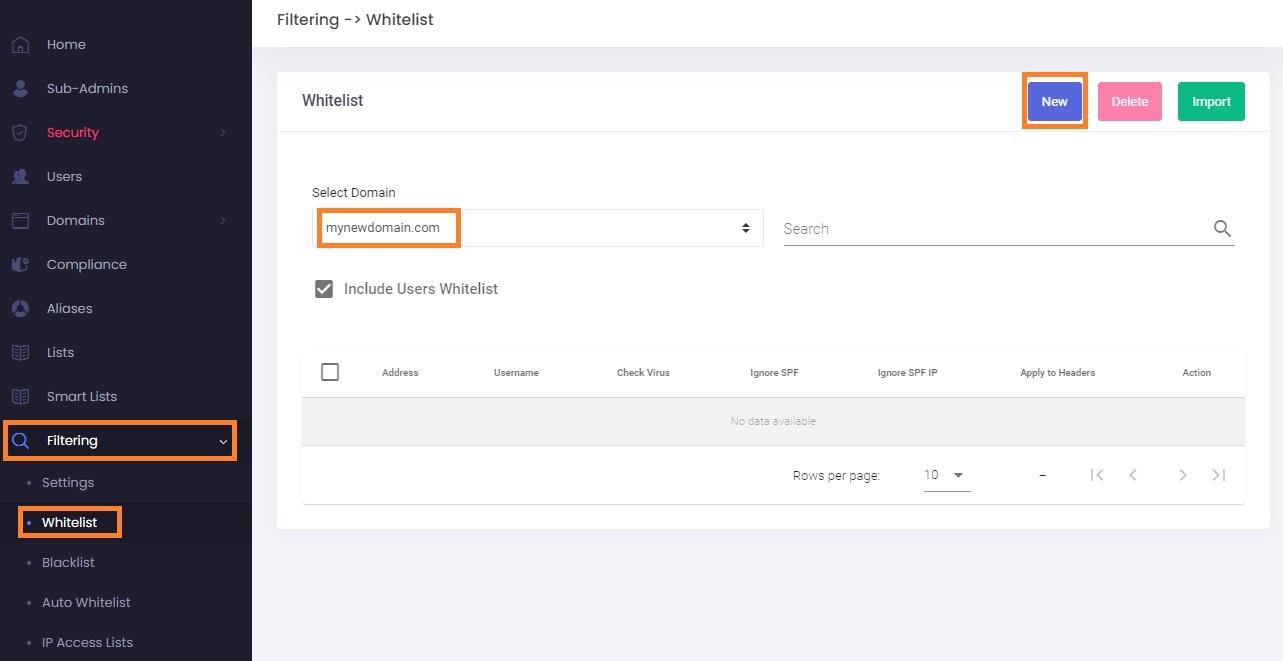
- Click on **Filtering** → **Whitelist** in the menu.
- Choose from the drop-down a **domain .**
- Click on the **New** button.
[](https://wikidev.emailarray.com/uploads/images/gallery/2024-08/admin-panel-whitelist-view-add-new-whitelist-entry.jpg)
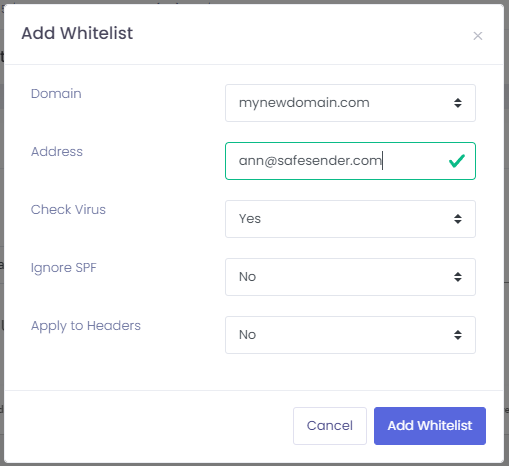
- In the **Address** field, type the email address (or just the domain) you want to whitelist.
- **Check virus**: select whether you still wish to check for viruses ( Recommended: Yes).
- **Ignore SPF**: select whether you want to ignore SPF ( Recommended: No, because it exposes you to forged emails). If the sender is marked as Spam because of the failed SPF, please use the **Whitelist** option from the **Spam Monitor** emails or [**whitelist from the Webmail**](https://wikidev.emailarray.com/books/webmail-how-to/page/webmail-mark-email-as-legit-not-spam). This will ensure you have the correct IP address needed to ignore SPF.
- **Apply to headers**: might be useful if your sender is misconfigured (Recommended: No, because it exposes you to Phishing emails).
- Click on the **Add Whitelist** button.
[](https://wikidev.emailarray.com/uploads/images/gallery/2024-08/admin-panel-add-whitelist.PNG)
### Add a sender to the blacklist
This will treat the sender as high-risk, and all incoming emails from this sender will be rejected (no copy of the email will be saved).
- Go to the [Admin Panel](https://cp.emailarray.com/admin).
- Log in using your Admin username and password.
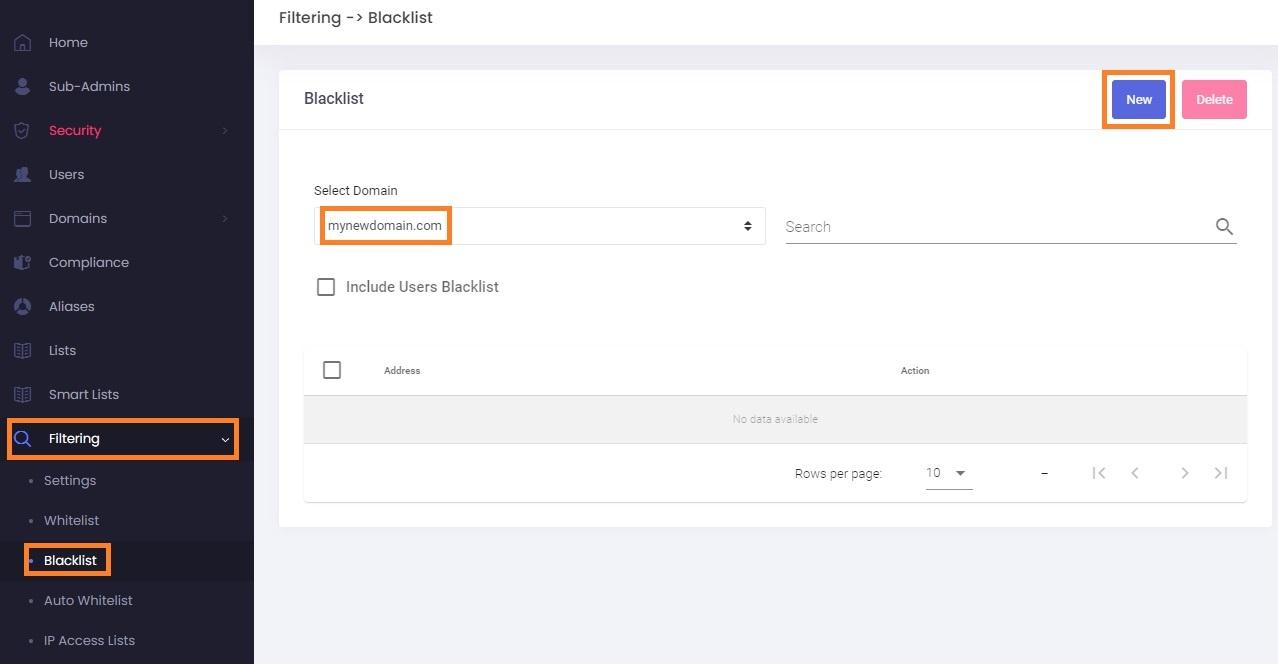
- Click on **Filtering** → **Blacklist** in the menu.
- Choose from the drop-down a **domain .**
- Click on the **New** button.
[](https://wikidev.emailarray.com/uploads/images/gallery/2024-08/admin-panel-blacklist-view-add-new-blacklist-entry.jpg)
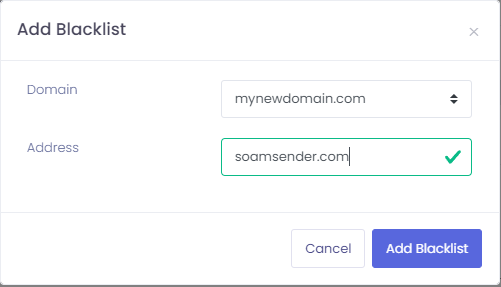
- In the **Address** field, type the email address (or domain) that you want to blacklist.
- Click on the **Add Blacklist** button.
**[](https://wikidev.emailarray.com/uploads/images/gallery/2024-08/admin-panel-add-blacklist.PNG)**
### Remove a sender from the whitelist or blacklist
Sometimes, users accidentally whitelist or blacklist a sender, and you might wish to remove those entries.
- Go to the [Admin Panel](https://cp.emailarray.com/admin).
- Log in using your Admin username and password.
- Click on **Filtering** → **Blacklist** (or **Filtering** → **Whitelist**) in the menu.
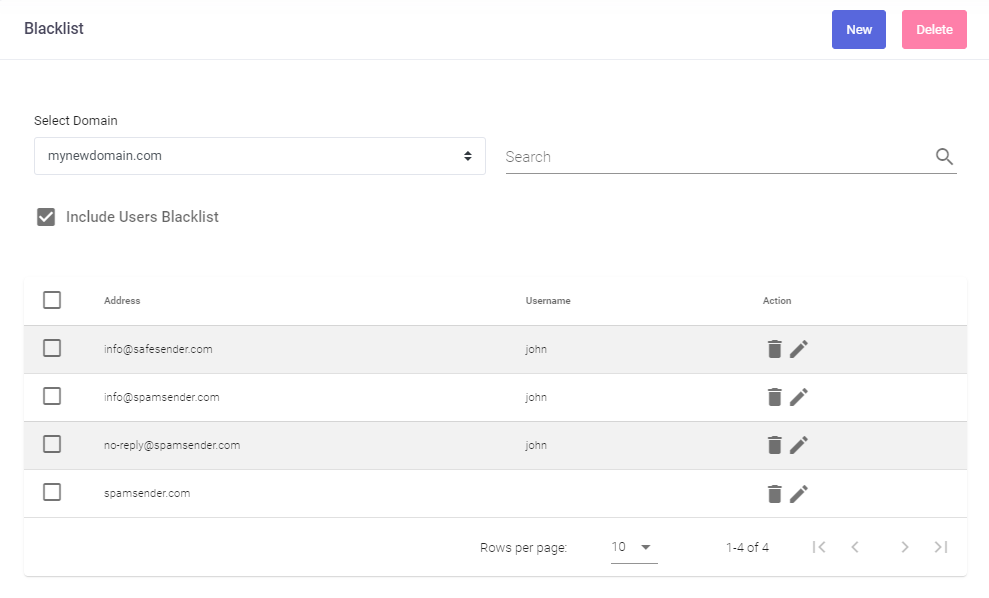
- Select the **domain** which has the entry you want to remove from the drop-down list.
- Click on the **Include Users Blacklist** (or **Include Users Whitelist**) option to include user-generated entries.
- Optional: search for the desired sender email or domain.
[](https://wikidev.emailarray.com/uploads/images/gallery/2024-08/admin-panel-remove-blacklist-entry.PNG)
- Click on the **delete** icon (garbage sign) next to the entry you wish to remove.
- An alert pop-up will appear, showing the entry that will be deleted. Click on the **Delete** button to confirm.
### View the automatic whitelist and/or remove items from it
The automatic whitelist is a domain-wide whitelist built from the email-sending patterns of all your users. It ensures that communication with trusted recipients always goes through without being filtered.
- Go to the [Admin Panel](https://cp.emailarray.com/admin).
- Log in using your Admin username and password.
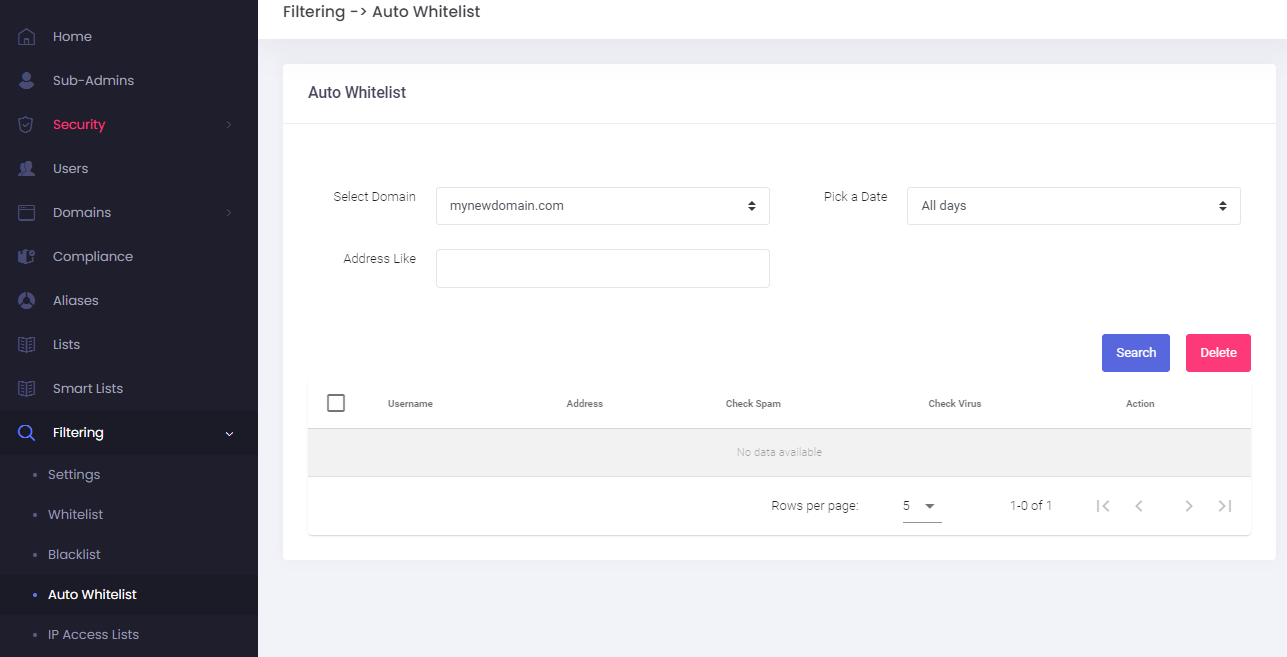
- Click on **Filtering** → **Auto Whitelist** in the menu.
- Choose from the drop-down a **domain .**
- **Pick a date**: choose a specific day or **All days** to show all entries.
- **Address like**: optional; specify a search term.
- Click on the **Search** button.
[](https://wikidev.emailarray.com/uploads/images/gallery/2024-08/admin-panel-view-auto-whitelist-entries.PNG)
- Click on the **delete** icon (garbage sign) next to the entry you wish to remove.
- An alert pop-up will appear, showing the entry that will be deleted. Click on the **Delete** button to confirm.
### Limiting by IP: add the sender's IP to whitelist or blacklist
Sometimes, you need to blacklist or whitelist an entire IP.
- Go to the [Admin Panel](https://cp.emailarray.com/admin).
- Log in using your Admin username and password.
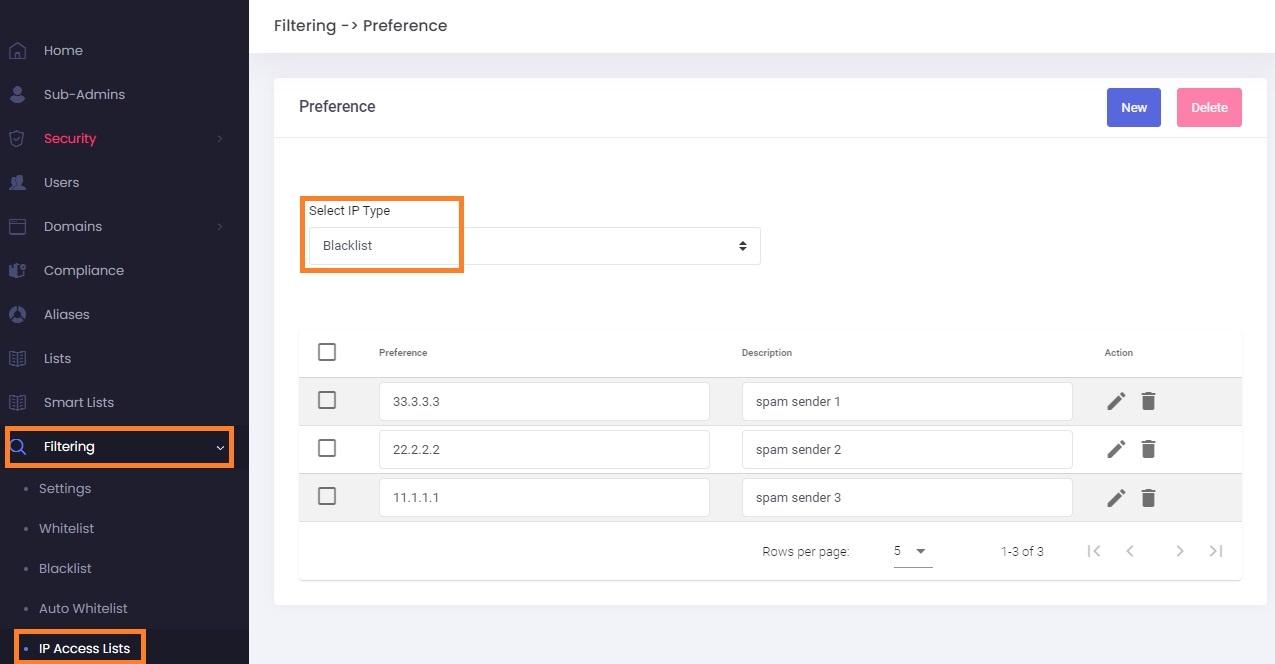
- Click on **Filtering** → **IP Access List** in the menu.
- **Select IP Type**: **Blacklist** or **Whitelist** types of entries.
- A list of existing blacklist/whitelist entries will show.
[](https://wikidev.emailarray.com/uploads/images/gallery/2024-08/admin-panel-whitelist-or-blacklist-by-sender-ip.jpg)
- Click on the **delete** icon (garbage sign) next to the entry you wish to remove.
- An alert pop-up will appear, showing the entry that will be deleted. Click on the **Delete** button to confirm.
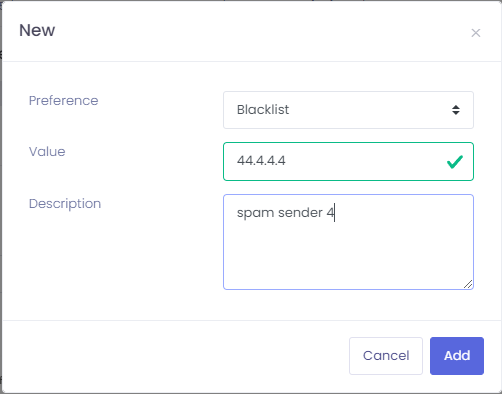
- To add a new entry, click on the **New** button.
- **Preference**: select where you wish to add the entry for, blacklist or whitelist.
- **Value**: a valid IP.
- **Description**: add some details so you can remember this entry.
- Click on the **Add** button.
[](https://wikidev.emailarray.com/uploads/images/gallery/2024-08/admin-panel-add-new-ip-for-blacklist-or-whitelist.PNG)