Manage Users
Each mailbox is defined as a User in the Admin Panel. Here you can manage all of your Users: add new ones, remove or edit any user's settings, as well as login into the User's Control Panel to manage their preferences.
Before adding a new user please make sure you have a sufficient User quota (available mailboxes and quota), which can be checked in the top menu bar of your Admin Panel. You can increase the quota from your billing interface.
Adding a new User
-
Go to the Admin Panel.
- Log in using your Admin username and password.
- Click on Users in the menu bar.
- Click on the New button.
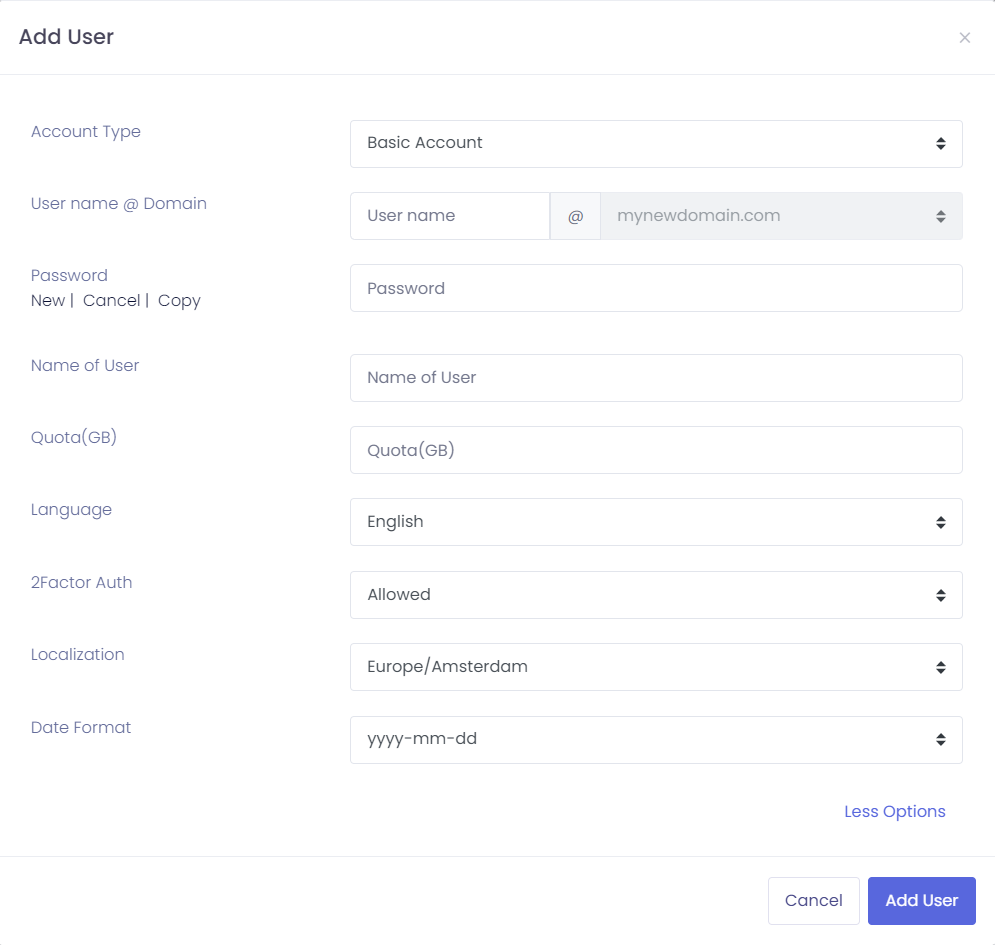
- Choose the Account Type from the dropdown list.
- Choose the Domain where you want to add an account from the drop-down list.
- Enter the Username to add (only the part before the @ sign).
- Enter the Password. Note: Passwords must contain at least 8 characters, including upper/lowercase, numbers, and a symbol.
- Enter the Name of the user to add, for your control (user´s full name, with spaces).
- Enter the Quota for the user, in Gigabytes (GB). In order to assign 5GB, simply type 5. To specify 500 MB (Half of a gigabyte), specify 0.5.
- Optional: you can click on More Options to define the User's Language, Timezone or Localization and Date format.
- Click on the button Add User to finish.
If you receive the error that the User already exists, check if you already have an Alias or a Distribution List with the same name. The username must be unique on a domain level, which means you cannot have a mailbox and an Alias with the same name.
Removing a User
-
Go to the Admin Panel.
- Log in using your Admin username and password.
- Click on Users in the menu bar.
- Select your domain from the Select Domain drop-down box.
- Click on the delete icon (trash icon) next to the account you wish to remove.
- An alert pop-up will appear, showing the User that will be deleted. Click on Delete to confirm.
Deleting an account deletes all its e-mails and data. Be careful!
Resetting a User Password
If a user has forgotten their credentials, you can manually set a new password for them through the Admin Panel.
- Go to the Admin Panel.
- Log in using your Admin username and password.
- Click on Users in the menu bar.
- Select the domain from the Select Domain drop-down box.
- Click on the pencil icon (edit) next to the specific User account.
- In the Password field, type the new password.
- Note: Passwords must contain at least 8 characters, including upper/lowercase letters, numbers, and a symbol.
- Click on Update User to save the changes.
Tip: Since you are manually setting the password, remember to share the new credentials securely with the user so they can log in.
Editing (Updating) a User
-
Go to the Admin Panel.
- Log in using your Admin username and password.
- Click on Users in the menu bar.
- Select your domain from the Select Domain drop-down box.
- Click on the pencil icon (edit) next to the User you wish to edit
- You can update the:
- Name: Update the user's display name.
- Password: Securely reset credentials.
- Account type: Seamlessly switch between Basic and Enhanced tiers.
- Quota: Adjust the storage limit in Gigabytes (GB).
- Click on More Options to update the:
- Language
- Timezone
- Date format.
- Disabled - set to Yes if you want to temporarily deactivate the mailbox, without deleting the emails.
- Only local SMTP - enable this if you want to restrict the User to only send local emails (only to the same domain).
- Click on Update User to save your changes.
Logging in as a User
Admins are able to log in as the User, making it possible to manage several aspects, such as autoresponder, forwarders, rules, black & whitelist on user level, track e-mails sent by account (in Track deliveries) and so on, which are only available on the user level. End users can login with their respective e-mail addresses directly to the User Panel.
-
Go to the Admin Panel
- Log in using your Admin username and password.
- Click on Users in the menu bar.
- Click on the arrow icon next to the account you wish to login as in the User Panel.
- Click on the mailbox icon next to the account you wish to login as in the Webmail.
- Click on the key icon next to the account you wish to generate One Time Password (OTPassword). This password is valid for 5 minutes and you can use it to troubleshoot the User's issue.
Upgrading and Downgrading
You can adjust mailbox types and storage limits at any time to accommodate changing requirements. If your quota is maxed out, please upgrade your subscription first.
Account Types
- Basic and Enhanced: You can switch between Basic and Enhanced tiers seamlessly through the Admin Panel.
- OEX Upgrades: Moving a user to the OEX tier requires an email migration to enable native Outlook connectivity for calendars and contacts.
Storage Quota
- Assigning Space: Mailbox sizes are fully customizable, ranging from 1 GB to 200 GB per user.
- Increasing Quota: Higher limits can be applied instantly to any account.
- Decreasing Quota: You can lower a storage limit at any time, provided the new quota is not less than the mailbox's current used size.
Advanced User Features
This section outlines specialized settings and tools available to manage individual user features, security and access.
Travel Mode
To help protect mailboxes, our system continuously monitors login activity for unusual patterns—for example, signing in from multiple countries within a short period of time. When this happens, an account may be temporarily restricted to prevent unauthorized access.
Travel Mode allows you to set a short-term exception for a user before or during a trip.
How to Enable or Disable Travel Mode
What Travel Mode does
While Travel Mode is active, logins from new countries or locations are less likely to trigger automatic security restrictions. This ensures the user's access is not interrupted while they are on the move.
Note: This feature is intended to be enabled only for a limited time window (the specific dates of travel) and should be turned off immediately afterward.
Recommended Best Practices
-
Enable Temporarily: Turn Travel Mode on as soon as travel dates are confirmed, and disable it once the user has returned.
-
VPN Usage: Be aware that using a VPN may make logins appear as if they are originating from different countries.
-
Security: Always ensure the user maintains a strong, unique password. We also recommend enabling Two-Factor Authentication (2FA) for added security while traveling.
Only Local SMTP
This feature restricts an account so it can only send emails to local destinations—specifically, accounts within its own domain.
When enabled, the user cannot send emails to external addresses (such as gmail.com, yahoo.com, or external business partners). However, the account can still receive emails from the outside world.
How to Enable or Disable Only Local SMTP
Manage User Permissions
The Permissions section allows you to granularly control what features and services a specific user can access. This includes restricting specific protocols (like POP3), disabling specific panel features (like Auto-responders), or strictly limiting login times for compliance.
How to Access Permissions
-
Log in to the Admin Panel and select Users from the left-hand menu.
-
Locate the desired user account in the list.
-
Click on the Permissions icon (typically represented by a user or lock symbol) on the right side of the user row.
General & Service Permissions
The main Permissions screen allows you to toggle specific features on or off.
Can Access (Feature Restrictions) This column controls which features the user can see or modify inside their own User Panel (Webmail). Unchecking a box hides that feature from the user. Common use cases include:
-
Change password: Prevent users from changing their own passwords (useful if you manage credentials centrally).
-
Forwards: Prohibit a user from setting up automatic email forwarding.
-
Vacation message: Prevent the user from setting up auto-replies.
-
AI: Enable or disable AI-assisted composition and summarization features for the user.
Service Permissions (Protocol Restrictions) This column controls the technical methods used to access the mailbox.
-
SMTP: Uncheck this to prevent the user from sending emails. They will still be able to receive incoming mail.
-
IMAP / POP3: Uncheck these to restrict how the user connects to email clients. For example, you might disable the older POP3 protocol to force users to use the more modern sync-capable IMAP.
Click Update permissions to save your changes.
Access Email Only Between Hours
This feature allows you to define a specific time range during which an employee can access their email account. This is particularly useful for compliance with "Right to Disconnect" laws or preventing unauthorized access outside of business hours.
How it works:
-
Outside Access Hours: The system temporarily disables the account. The user cannot log in via Webmail or email clients (Outlook, mobile phones, etc.). However, the account continues to receive incoming email normally.
-
Visual Indicator: In your Admin Panel user list, accounts currently outside their access hours will appear with a pink bar or "Disabled" status.
Setup Instructions:
-
Inside the Permissions modal, click the link labeled Access email only between hours.
-
You will see a schedule for every day of the week. By default, all days are set to unrestricted.
-
Toggle the switch for the specific days you wish to allow access (e.g., Monday through Friday).
-
Enter the Start Time and End Time for each active day (e.g., 09:00 to 17:00).
-
Click Update access hours to save.
Send Email As (Delegation)
This setting allows you to grant other users the permission to send emails on behalf of the current user.
-
Inside the Permissions modal, click the link labeled Send email as.
-
Select the user you wish to grant permission to from the dropdown list.
-
Click Add Member.
-
The added user will now be able to select this email address in the "From" field when composing messages.
Frequently Asked Questions
Why do I see a "Maximum number of users allowed has been reached" error?
This error occurs because you have used all the mailbox licenses included in your current subscription. To resolve this, you must increase your account quota by purchasing additional mailboxes within the billing interface.
Why do I see a "User already exists" error?
The username must be unique across your entire domain. Check if you already have an Alias or a Distribution List using that same name. You cannot have a mailbox and an Alias with the identical name.
Can I change a user's email address?
You cannot rename a username directly. You must create the new user account first, migrate the data, and then remove the old account.
What happens to data when I delete a user?
Deleting an account is permanent and removes all emails, contacts, and settings immediately. We recommend creating a backup before confirming deletion.