3 - Admin Panel - Manage Users, Domains, Aliases and More
The Admin Panel is located at this link: https://admin.emailarray.com/.
This interface will let you manage your domains, users (mailboxes), aliases, lists, branding, and domain-wide preferences.
Some settings overlap with the User-defined settings. In these cases, the User preferences will take over. For example, as an Admin, you can blacklist the domain "abcd.com," but if a user whitelists "joe@abcd.com," the whitelist will take priority.
Check the pages below to find out how to perform everyday administration tasks.
What's my Admin username?
When you signed up for an account, you chose a username (it might be your signup email address) and password for managing your account. This is the Admin Account that you can use to log in to the Admin Panel.
- Change Admin password
- Admin Settings
- Manage Sub-Admins
- Security
- 2FA - Two-factor authentication
- Restrict Login Access: Admin IP Access Lists
- Security Incidents
- User Trusted Login IPs
- Manage Domains
- Manage Users
- Internal Mailbox Migrations
- Manage Alias Domains
- Manage Aliases
- Manage Lists
- Manage Smart Lists
- Filtering: Whitelist / Blacklist
- Settings - Domain Spam Filtering
- Manage Whitelists and Blacklists
- Whitelist / Blacklist by IP - IP Access List
- How to stop trusted sender emails from going to Spam in the Admin Panel
- Set Branding
- Logs
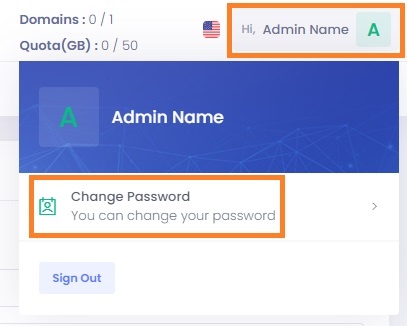
Change Admin password
Update Admin's password
To change your Admin's password:
- Log in to the Admin Panel.
- Click on your name in the top right corner. In that menu, click on Change Password.
- Fill in your new password, confirm it and click on Change.
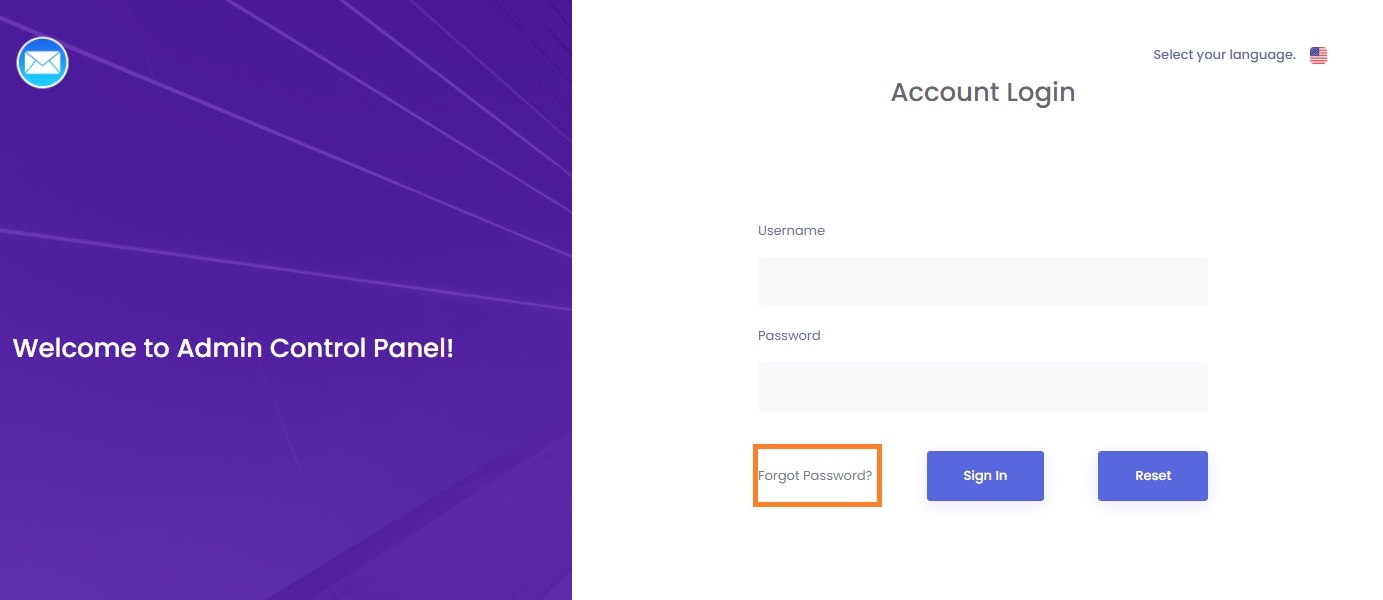
Reset Admin's password
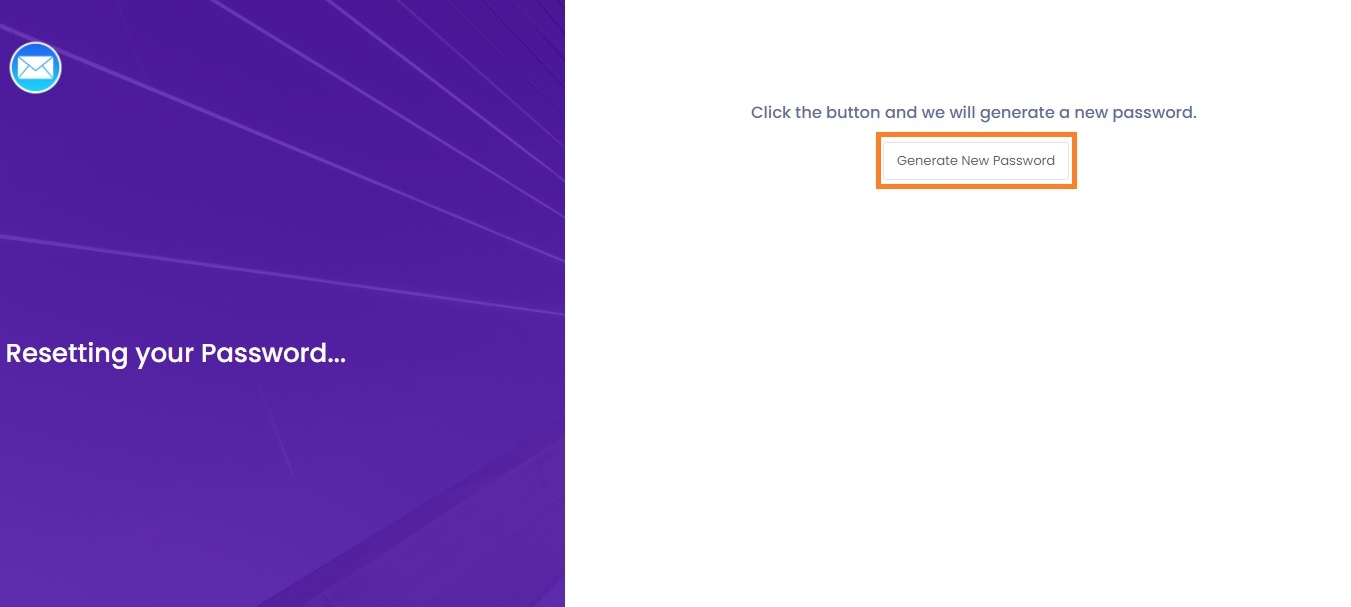
If you don't remember your Admin password, you can request a password reset:
- On the Admin Panel's login page, click on Forgot password?
- In the new pop-up window, fill in your Admin username and recovery e-mail address (the one you used at signup). If your username is the same as your e-mail address, please enter it twice.
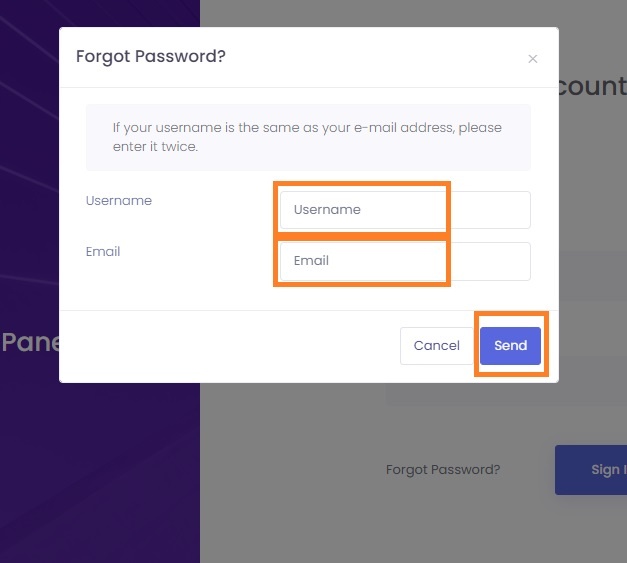
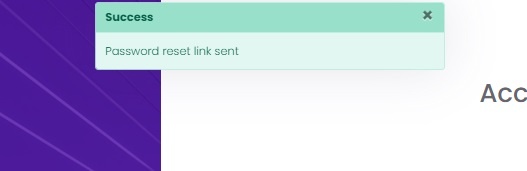
- Click on Send. You will receive an e-mail with a link to reset your password. If your Admin username and recovery e-mail address match what we have on file for your account, you will see the following success message:
- Click on the link you received, and you should see the following page. Click on the Generate New Password button
- Your newly generated password will be displayed on the next page. Copy the new password and use it to log in.
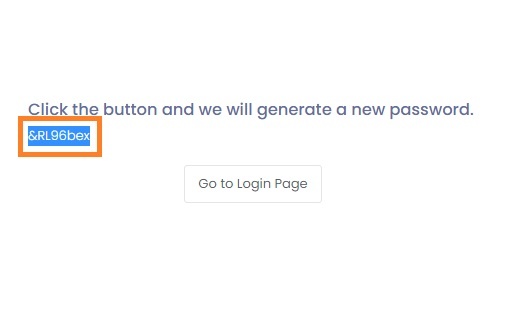
- If you have 2FA (Two Factor Authentication) enabled for your Admin account, you can reset your password, but you still need to use the 2FA code from your 2FA App when logging in.
- After you log in, please use the Change Password feature (see the steps above) to set up a custom password.
| If resetting the password fails, check if your Admin account was locked for unpaid invoices. Please check your billing status for any failed invoices or contact support for more information. |
Admin Settings
Managing Global Admin Settings
Accessing Admin Settings
To modify these settings:
-
Log in to your Admin Panel.
-
Navigate to Settings in the main menu.
-
You will see several icons representing different administrative controls.

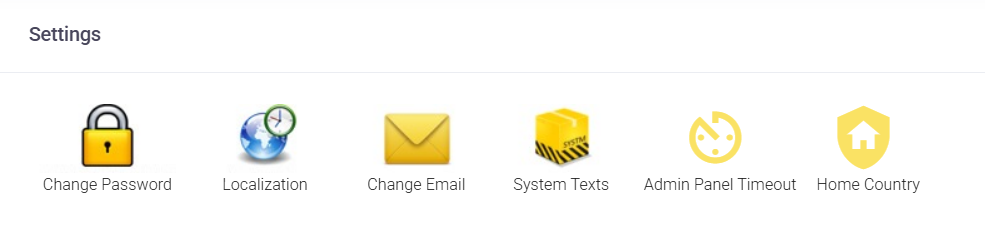
Security and Account Management
Keep your administrative access secure and up to date.
-
Change Password: Use this section to update your Admin Panel login password regularly to maintain high security for your infrastructure.
-
Change Email: Update the primary administrative email address. This address is critical as it is used for password reset requests and official system notifications.
-
Admin Panel Timeout: For security, you can define how many minutes of inactivity are allowed before the system automatically logs you out of the Admin Panel.
System-Wide Defaults and Localization
These settings allow you to establish a consistent experience across all domains and accounts under your management.
-
Localization: Set the default timezone and date format at the Admin level. Once saved, these preferences will automatically apply to all domains and users in your system.
-
Home Country: This feature helps us better detect and prevent unusual or fraudulent login attempts. You can set this globally for all domains, or choose to configure it individually for specific domains if your clients are located in different regions.
Automated Communications
Personalize how the system interacts with your end-users.
-
System Texts: This section allows you to customize the content of automated emails sent by the server. You can update the text for various alerts, such as mailbox quota warnings, to ensure the messaging aligns with your brand voice or language requirements.
Manage Sub-Admins
A Sub-Admin is a specialized account that allows you to delegate administrative tasks while maintaining high security for your primary credentials. You can define granular access levels—ranging from view-only to full delete permissions—across different sections of the Admin Panel, such as Users, Domains, and Logs.
Sub-Admin Scope Limit: Sub-Admins cannot be restricted to manage only specific domains; they have access to the entire account infrastructure. If you require a setup where an administrator is limited to managing only a few specific domains, please contact us about our Super Panel solution.
Common Use Cases
-
API Integration: Avoid using your primary Admin account for automated scripts.
-
WHMCS/HostBill Plugins: Authenticate your billing platform safely using a dedicated Sub-Admin.
-
Team Collaboration: Assign individual accounts to team members to track actions and limit responsibilities.
1. Best Practices to Follow
API Integration
For API authentication, you must use an Admin username and password. To integrate with our JSON API or platforms like WHMCS, we recommend the following security profile:
- Secure Your Main Account: Enable Two-Factor Authentication (2FA) on your primary Admin account for web interface logins.
- Create a Dedicated Sub-Admin: Use a unique Sub-Admin for each integration.
- IP Restriction: Since API / WHMCS Sub-Admins cannot use 2FA, you must secure them by restricting access to the specific IP addresses of your connecting servers.
- optional: create other Sub-Admin for your team members that will use the web interface.
Once you've created your API Sub-Admin, please email our Support Team to enable unlimited email account creation for that Sub-admin. Without this step, the Sub-Admin will be limited by the resources of your current subscription, which will restrict your ability to create accounts for your clients. We'll remove these limits so your API integration can scale properly.
Internal Team Members
Sharing a single Admin account is a security risk. Instead, create a Sub-Admin for each team member:
-
Enable 2FA: Each member should activate their own 2FA for account security.
-
Tiered Permissions: Assign only the level of access required for their specific role (e.g., Support staff may only need "Impersonate" access for troubleshooting).
2. Manage Sub-Admins
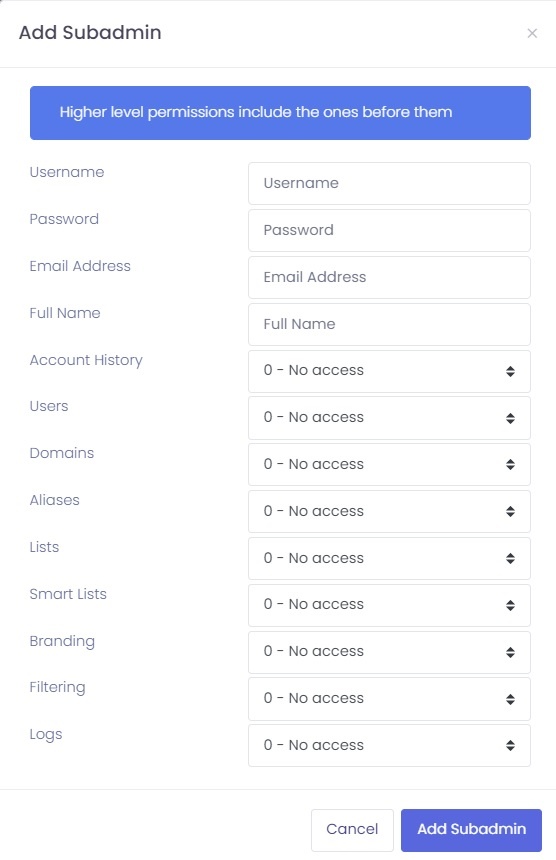
Add a Sub-Admin
-
Go to the Admin Panel.
- Log in using your main Admin username and password.
- Click on Sub-Admins in the menu.
- Click on the New button.
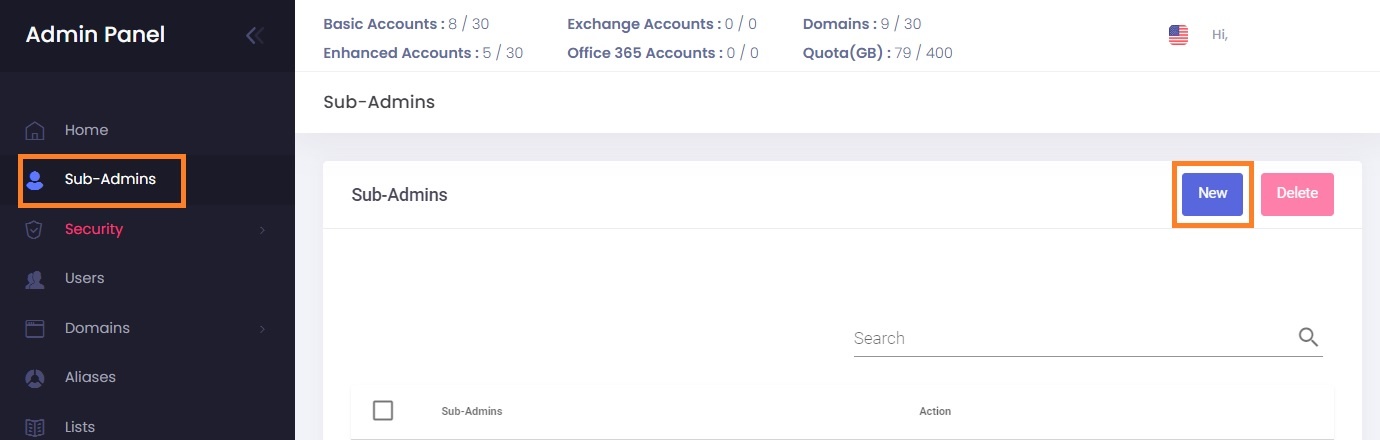
- Fill in the details of your new Sub-Admin:
- Sub-Admin username
- Sub-Admin password
- Sub-Admin e-mail address - will be used for password recovery
- Sub-Admin full name
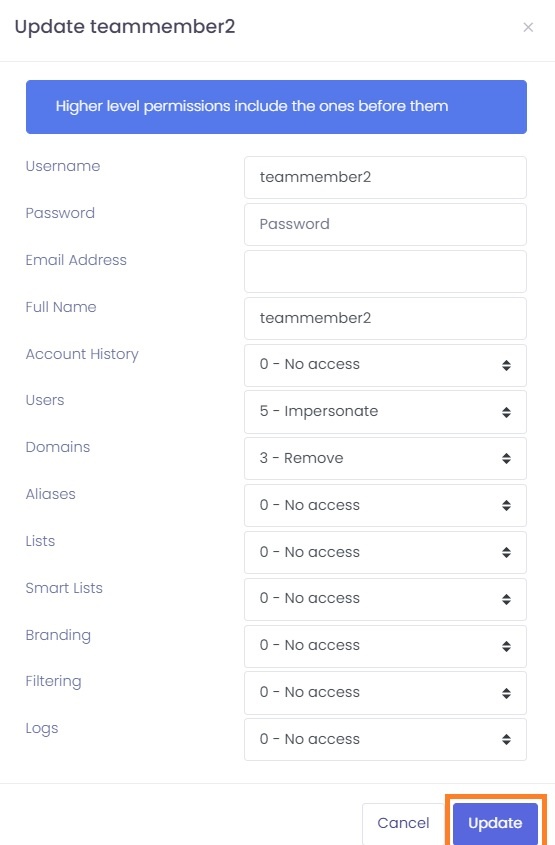
- Select the permissions for each section. Each level of permission is numbered; the higher levels include the ones below it ( level 2 includes level 1, level 3 includes level 1 and 2, etc.):
- Account History: see the actions performed by Admin and Sub-Admins on the Home page
- Users: view/manage/remove/impersonate Users (mailboxes). The highest level is 5 - Impersonate and allows you to "sign in as" the User into Webmail and User Panel.
- Domains: view/manage/remove Domains.
- Aliases: view/manage/remove Aliases.
- Lists: view/manage/remove distribution Lists.
- Smart Lists: view/manage/remove Smart Lists.
- Branding: view/update branding settings for the main Admin account.
- Filtering: view/modify/remove whitelist and blacklist entries for Spam Filtering.
- Logs: view Incoming and Outgoing Logs, Last logins.
- Click on the Add Sub-admin button to save.
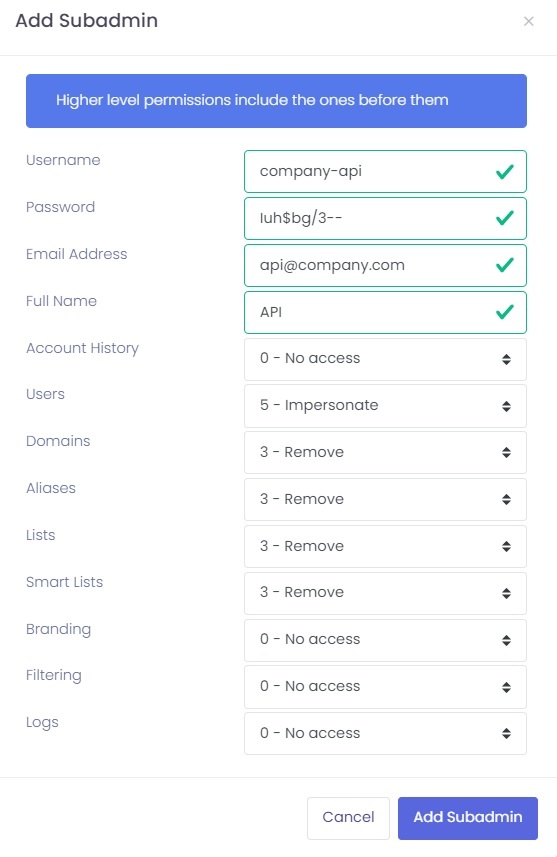
Example:
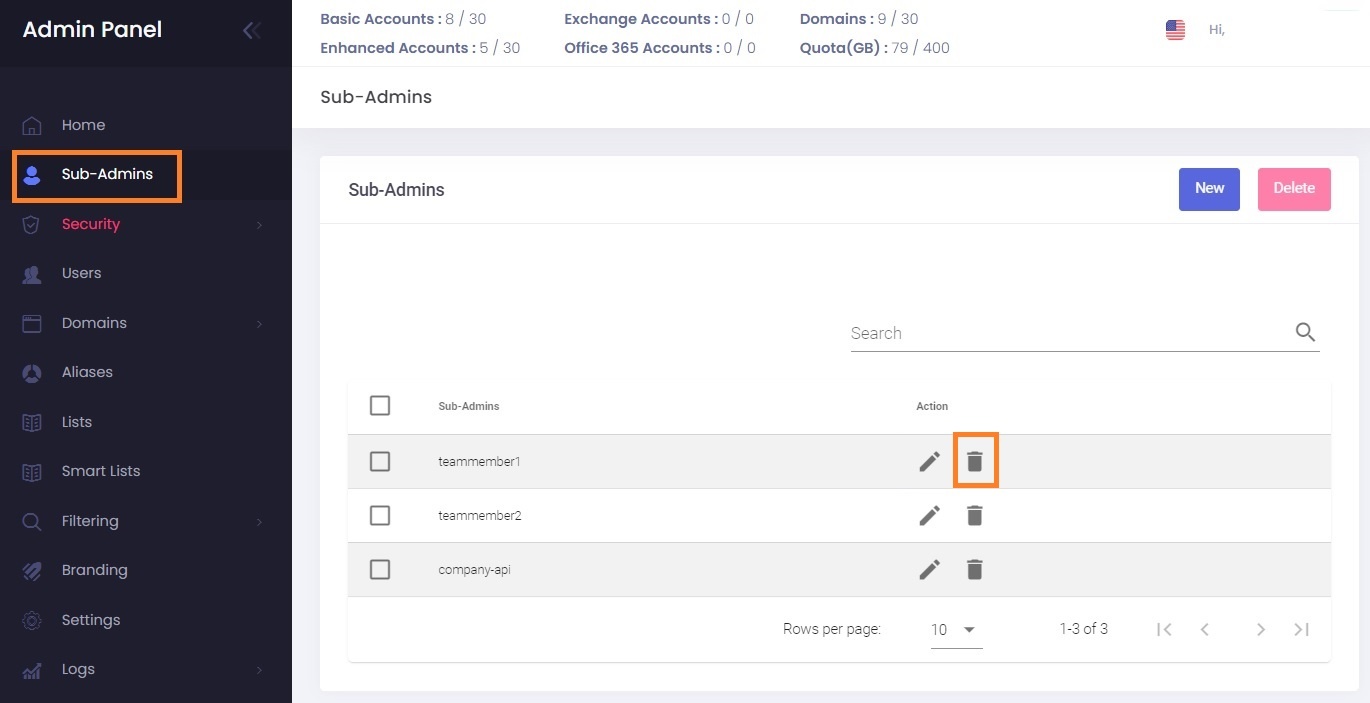
Remove a Sub-Admin
-
Go to the Admin Panel.
- Log in using your main Admin username and password.
- Click on Sub-Admins in the menu.
- Click on the Delete icon next to the Sub-Admin you want to remove.
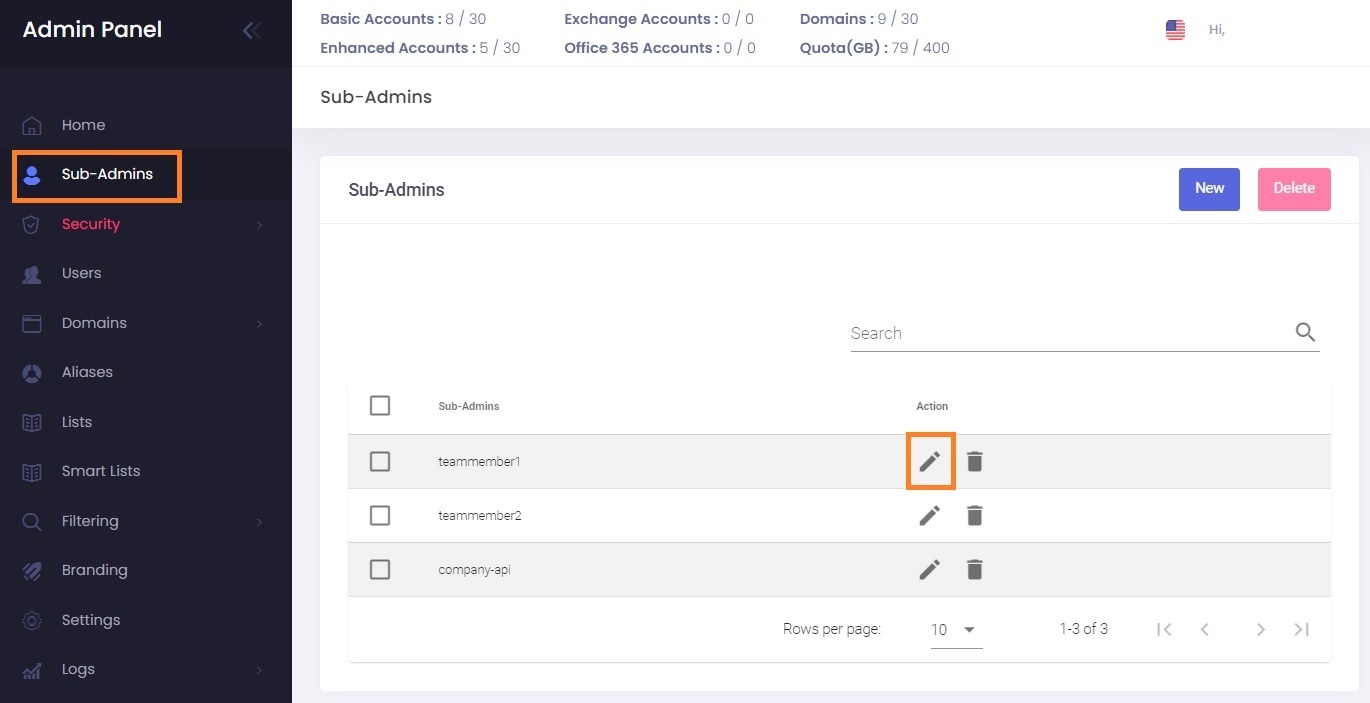
Update a Sub-Admin
You can update all the details and permissions of a Sub-Admin.
-
Go to the Admin Panel.
- Log in using your main Admin username and password.
- Click on Sub-Admins in the menu.
- Click on the Edit (pencil) button next to the Sub-Admin you want to update.
- Update the details. Leave the Password field blank if you want to update permissions but don't want to change the password.
- Click on the Update button to save the changes.
3. Restrict Sub-Admin login access
Log in as the Sub-Admin and follow the instructions for restricting login access.
4. Two-factor authentication for Sub-admins
Log in as the Sub-Admin and follow the instructions for enabling two-factor authentication. Please note you cannot enable two-factor authentication for a Sub-Admin that you use for API or WHMCS authentication - use restricted login access instead.
Security
2FA - Two-factor authentication
Two-factor authentication, or 2FA as it's commonly abbreviated, adds an extra step to your basic login procedure. Without 2FA, the password is your single factor of authentication: you enter your username and password, then you're done.
With 2FA, you log in to the Admin Panel by entering your username and password and the six-digit code provided by an app installed on your smartphone.
After the latest update of the Admin Panel, you will be prompted to enter the 2FA code in a new pop-up window.
Enable 2FA for the Admin Panel
If you're using this Admin account as credentials for the API, the API login will fail after enabling 2FA. To solve this, create a Sub-Admin with special permissions for the API authentication only.
What you need:
- a smartphone with a 2FA App installed (OTP / 2-Step Verification / 2-Factor Authentication), such as Authy or Google Authenticator.
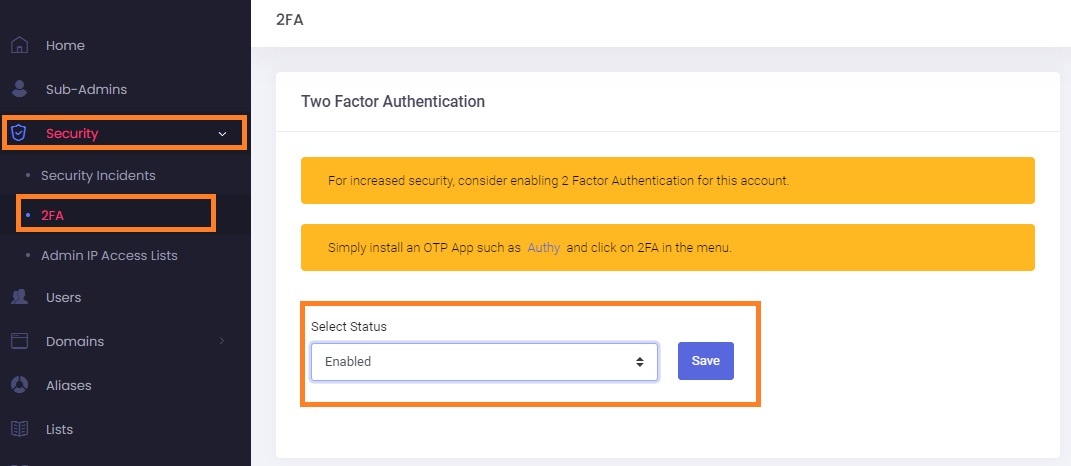
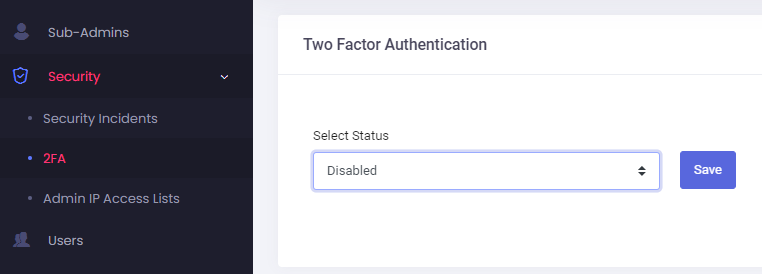
To enable 2FA for your Admin account:
- Log in to the Admin Panel
- From the menu, go to Security → 2FA
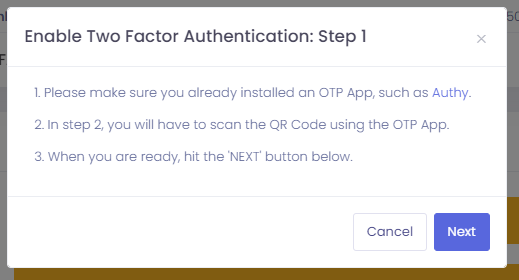
- Update the dropdown Select Status to Enabled. Click on the Save button.
- Recheck the requirements: have a 2FA App installed on your phone.
- When ready, click on the Next button.
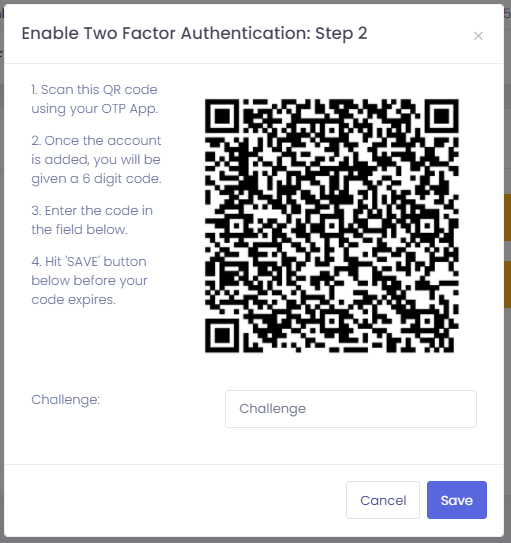
- Scan the QR code with the installed 2FA App and fill in the generated six-digit code in the Challenge input field.
- Click on the Save button before your token expires.
Disable 2FA for the Admin Panel
To disable the 2FA for your Admin account:
- Log in to the Admin Panel
- From the menu, go to Security → 2FA
- Update the dropdown Select Status to Disabled. Click on the Save button.
- Insert the token from your 2FA App (such as Authy or Google Authenticator) in the Challenge input field.
- Click on the Save button before the token expires.
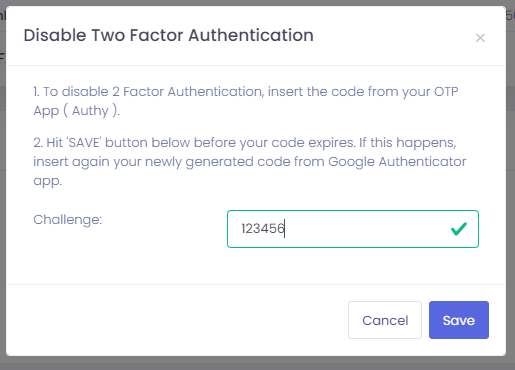
- After you see the confirmation message that the 2FA was disabled, you can delete the entry from your 2FA app.
Restrict Login Access: Admin IP Access Lists
You can increase the security of your account by restricting login access for your Admin (or Sub-Admins) account to a list of know IPs, such as your office, your home, and server IPs for API or WHMCS authentication.
This feature works only with static IPs. Make sure your internet provider doesn't use dynamic IP addresses which change over time.
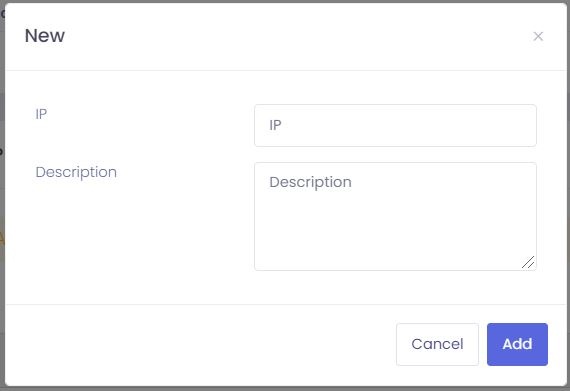
Add a new IP to the Access List
-
Go to the Admin Panel.
- Log in using your Admin (or Sub-Admin) username and password.
- Click on Security → Admin IP Access Lists in the menu.
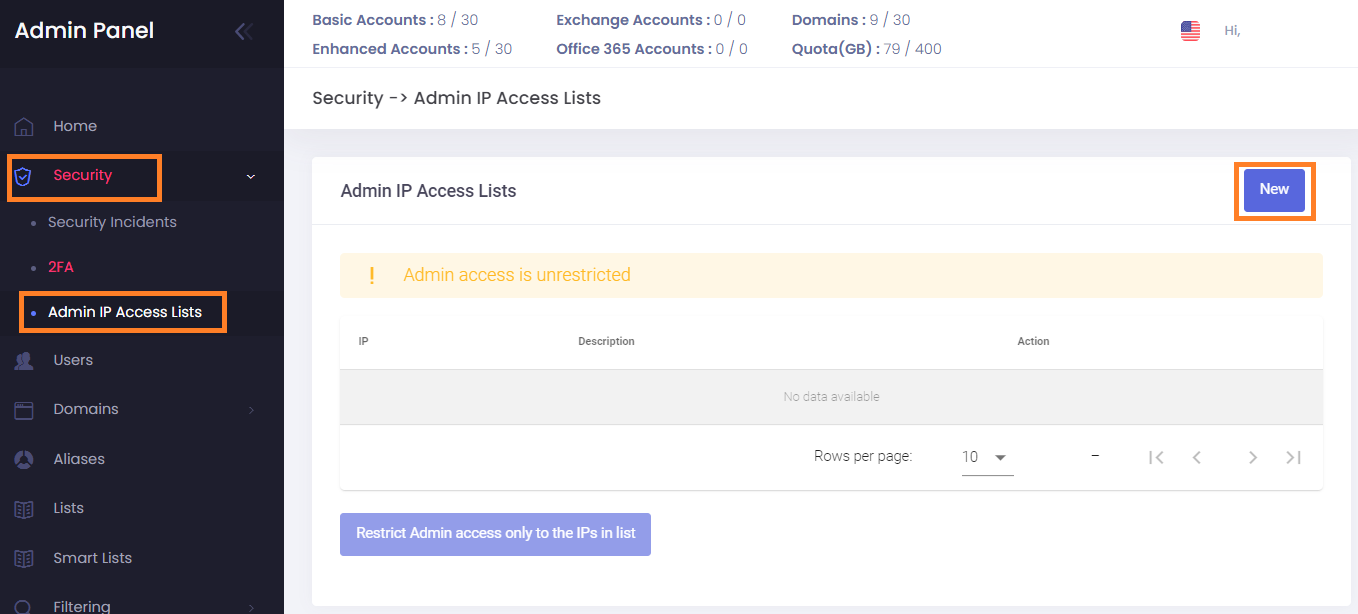
- Click on the New button.
- Fill in the IP and a description.
- Click on the Add button to save.
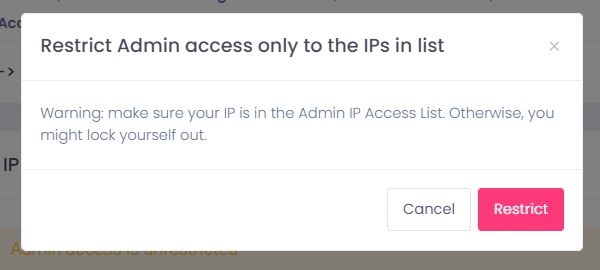
Restrict Admin Login Access to only the IPs in the Access List
-
Go to the Admin Panel.
- Log in using your Admin (or Sub-Admin) username and password.
- Click on Security → Admin IP Access Lists in the menu.
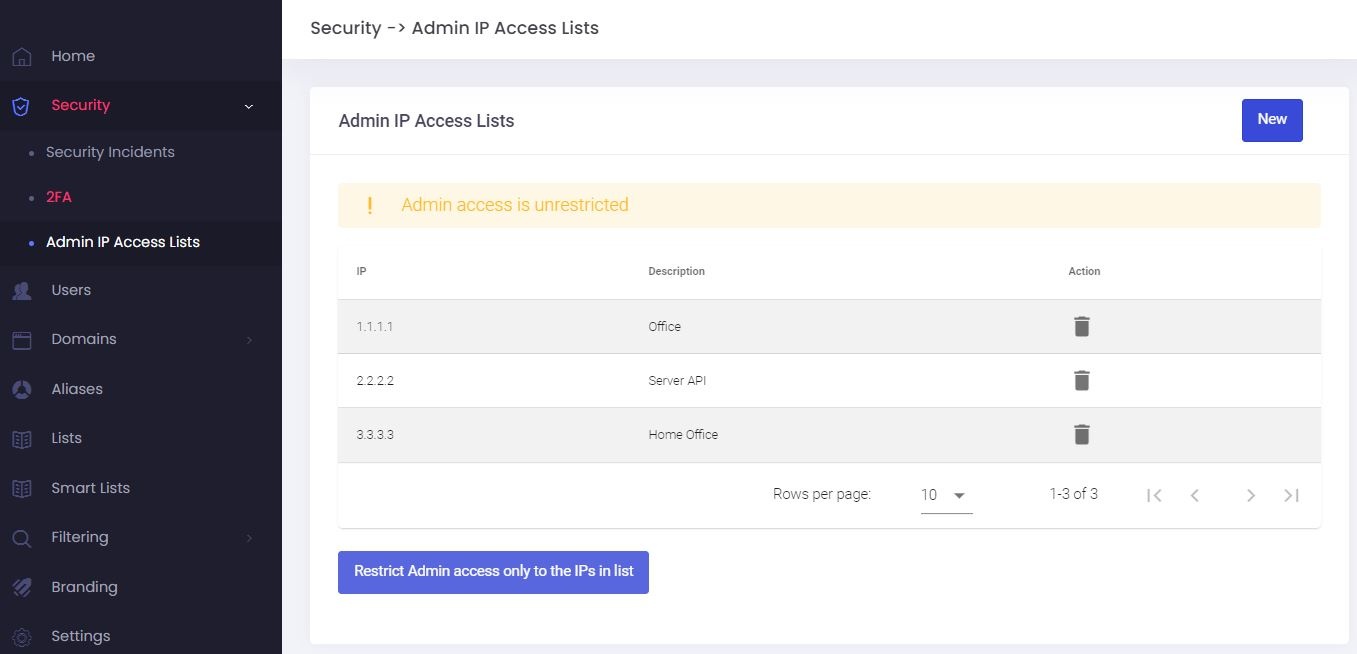
- Click on the Restrict Admin access only to the IPs in list button.
- Read the warning and click on the Restrict button to confirm.
- Access is now restricted to the IPs in your list:
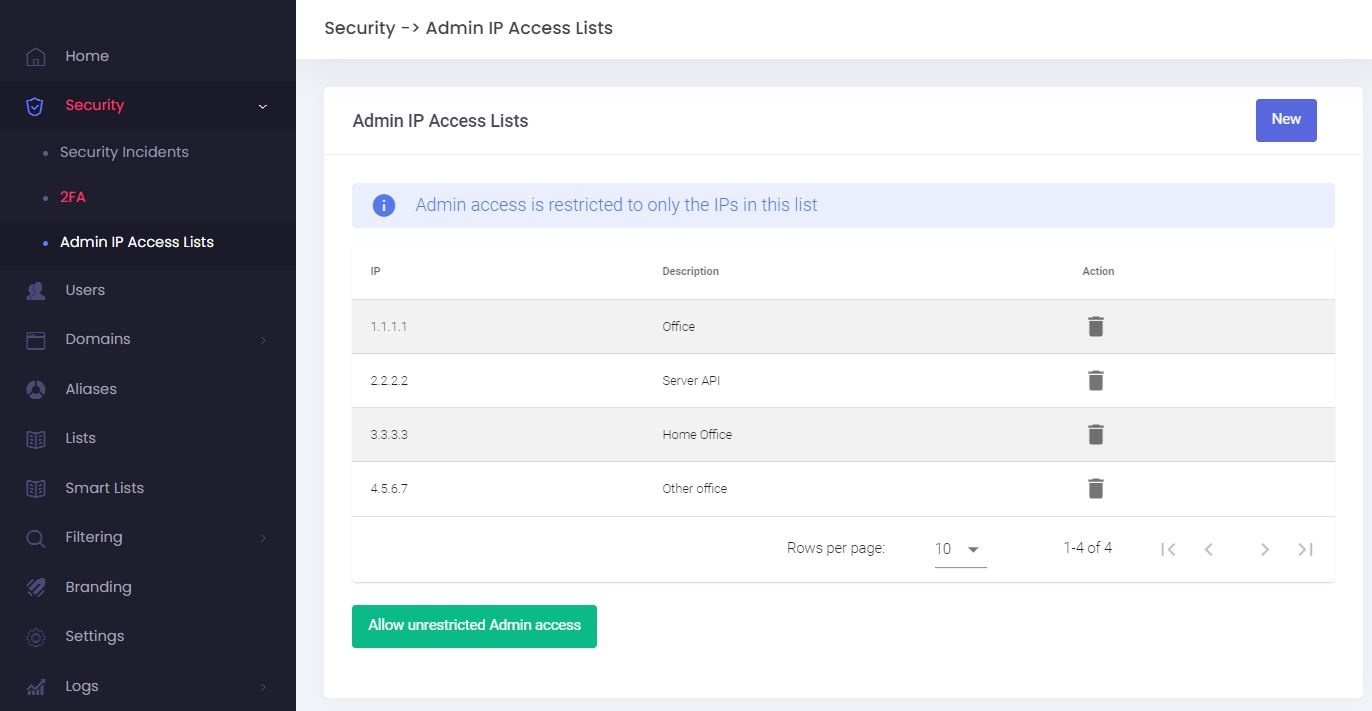
Allow unrestricted access for Admin (or Sub-Admin)
-
Go to the Admin Panel.
- Log in using your Admin (or Sub-Admin) username and password.
- Click on Security → Admin IP Access Lists in the menu.
- Click on the Allow unrestricted Admin access button.

Security Incidents
When you log in to the Admin Panel, on the Home page, you might see this warning message:
New security incidents detected. Click here to check the Security page.
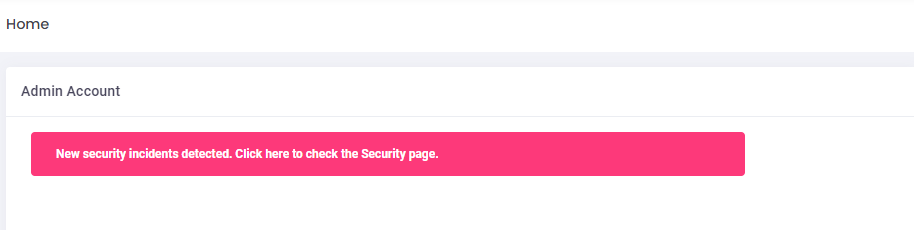
This happens when we detect suspicious logins from more than one location for one of your Users.
Click on the error message to go to the Security Incidents page and review each case.
How to review a Security Incident case
To review the security incidents:
- Log in to the Admin Panel
- From the menu, go to Security → Security Incidents; or click on the error message from the Home page.
- You will see a list of Users that have triggered the warning.
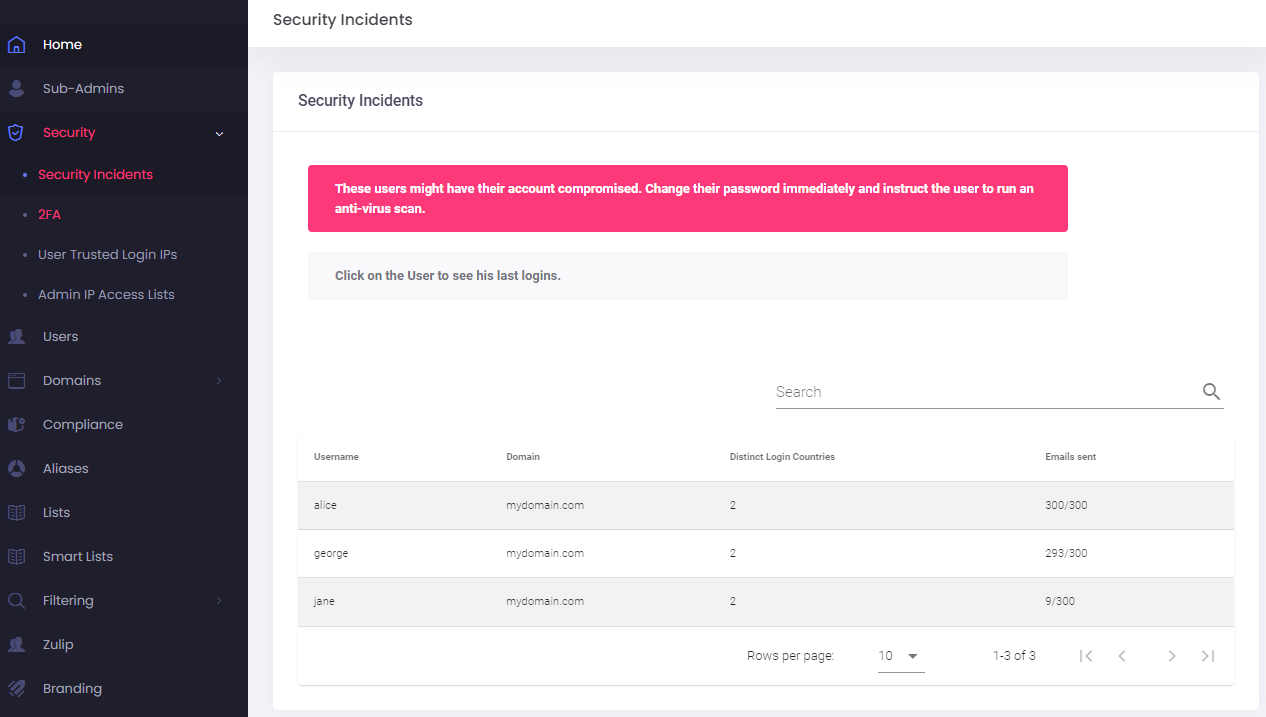
- Check how many messages were sent in the last 24 hours and the number of distinct login countries. A higher number might suggest a compromised account.
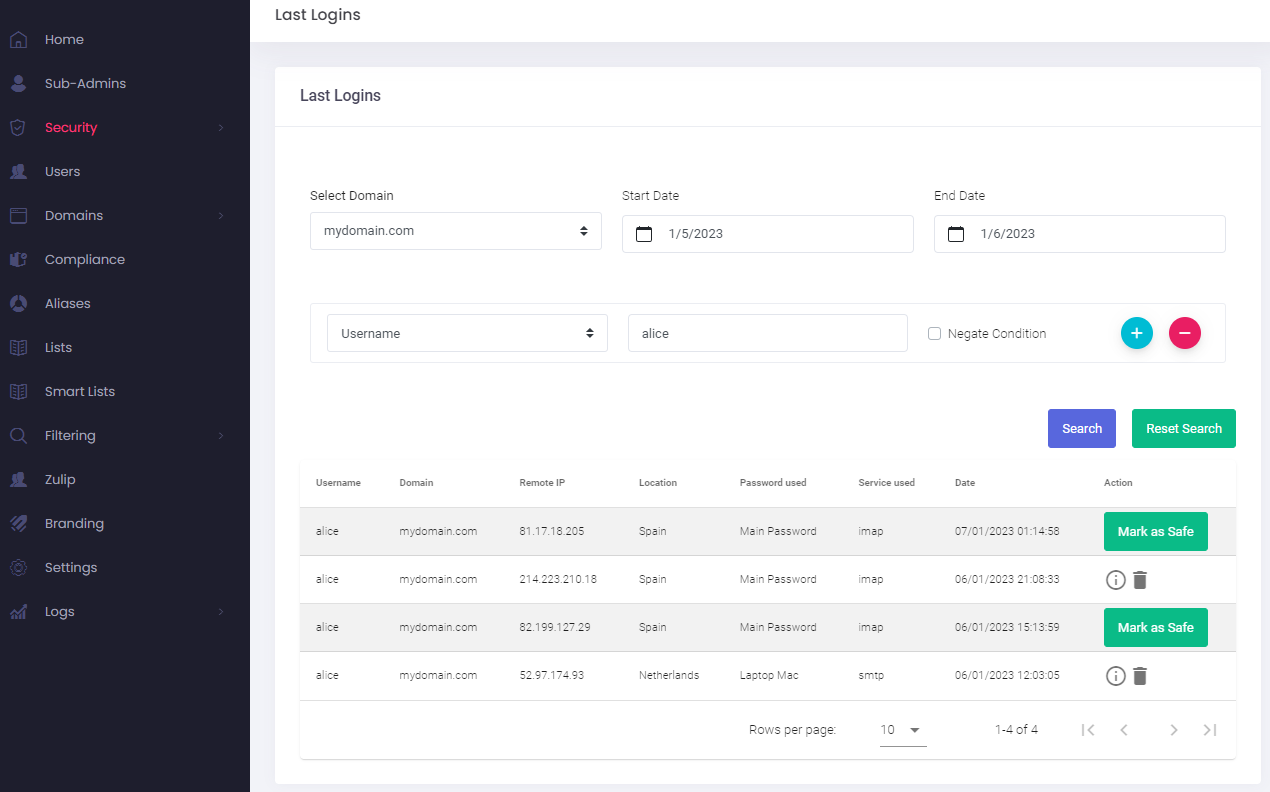
- Click on each user to see a list of their Last Logins. Contact the customer if you suspect the account was compromised.
Possible reasons why the User is on the Security Incidents list
Compromised account
The User's account was compromised and an attacker is sending emails on his behalf or accessing the contents of his emails. This might happen if the User doesn't use a strong password, has malware installed or accessed his account from an insecure location / device and threat actor intercepted their password.
Third-party applications
Some applications that the User has setup will access the contents of his emails from different servers which will trigger the suspicious login warning. You should inform the customer that the application has full access to their mailbox and make sure to read their Terms & Conditions about data processing.
If the User is comfortable with the app having access to their data, you can follow the steps to Mark IP as Safe.
Some examples of such applications include:
- CRM applications (such as Hubspot, Salesforce, etc.)
- Sales automation applications
- Email clients (such as Outlook, MyMail, etc.) that read and process all the User's data through their servers. This includes your password in the clear(!) and all e-mail content
User is traveling
A legitimate case is when the User is traveling and is logging in from new locations.
Mobile connection
The User is accessing the service using a mobile connection that keeps renewing the IP.
Mark IPs as safe
In case of legitimate use, the IPs can be marked as safe and will not trigger the Security Incident warning anymore.
To mark an IP as safe:
- Log in to the Admin Panel
- From the menu, go to Security → Security Incidents; or click on the error message from the Home page.
- Click on the User for which you want to mark an IP as safe. This will take you to his Last Logins logs.
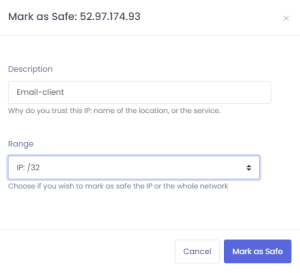
- In the Last Logins logs, you can click on the Mark as Safe button next to the IP you want to whitelist.
- In the new pop-up, give a description to the IP (mandatory) and choose whether you want to mark as safe only the IP or the entire network (with options from /31 to /22)
- If you wish to whitelist all of Google's IPs, please set the Range to /17
- If you wish to whitelist all of myMail's IPs, please set the Range to /22
- Click on the Mark as Safe button to save the changes.
- You can remove an entry anytime.
User Trusted Login IPs
Maintain seamless access for your users while keeping your infrastructure secure. The User Trusted Login IPs feature allows you to whitelist specific IP addresses used by your team or clients, ensuring that legitimate logins from known locations are never interrupted. By marking an IP as "Safe," you prevent future security incident warnings for that specific source, allowing for a smoother user experience without compromising enterprise-grade protection.
Manage User Trusted Login IPs
To manage the User trusted login IPs for an account:
- Log in to the Admin Panel
- From the menu, go to Security → User Trusted Login IPs
- Select the domain from the dropdown and click on the Search button.
- A list of all trusted IPs that were previously Marked as Safe will show.
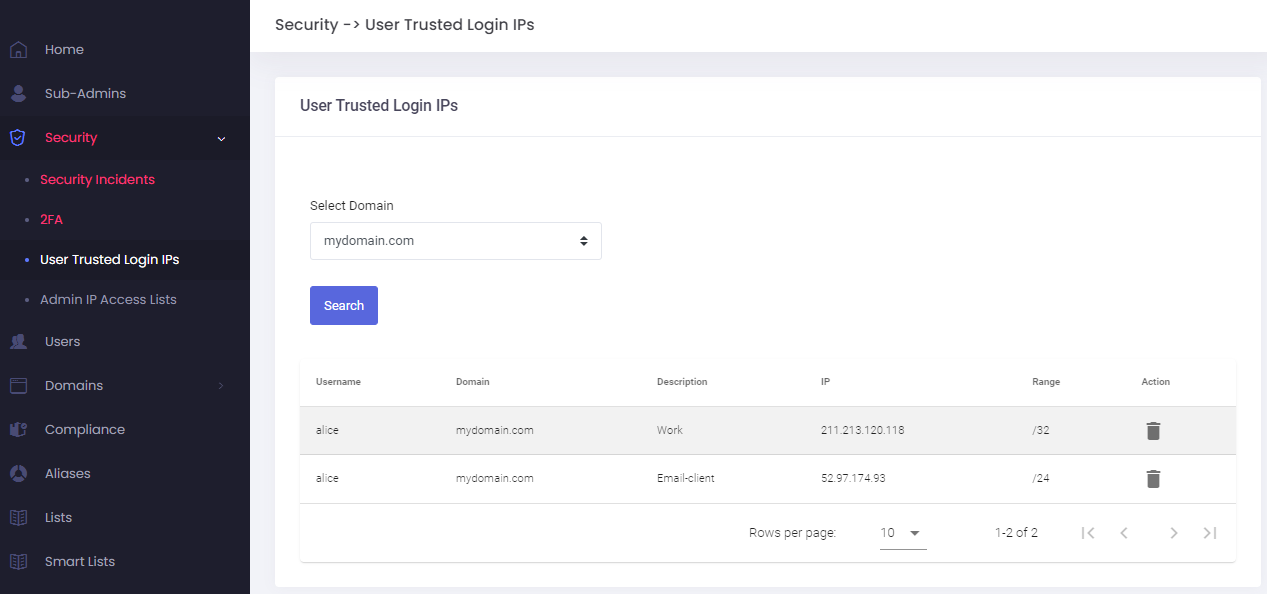
- You can delete an entry at anytime
- To add a new trusted IP, follow these steps to mark IP as safe.
Checking and Unblocking IP Addresses
If a user is unable to connect, it may be because their IP address has been temporarily restricted due to security protocols. You can check the status of an IP and mark it as "Safe" directly from the management panel.
How to Check if an IP is Blocked
Adding an IP to the Safe List
When you choose to mark an IP as safe, a configuration window will open. To ensure the security of the account, please provide the following details:
- Domain & Username: Select the specific domain and user account this rule should apply to.
- Description (Required): Provide a brief note (minimum 2 characters) explaining why this IP is trusted, such as the office location or the specific service name.
- Range: Choose whether to whitelist only the specific Remote IP (/32) or the entire network range.
- Single IP (/32): Use this for individual users working from a fixed location, like a home office with a static IP. It is the most secure option because it only whitelists one specific address.
- IP Range (Network): This is ideal for larger corporate offices where many employees share a single network. Mark the whole network as safe to prevent repeated blocks for different users in the same building.
Security Note: Only whitelist an entire range if you are certain the network is private and managed. Whitelisting large public ranges can leave accounts vulnerable to unauthorized access from other users on that same network.
Once submitted, logins from this IP will no longer trigger security warnings or connection blocks for that user.
Manage Domains
Domains are managed from the Admin Panel. Here you can add or remove domains, set up a catchall, or define a domain-level time zone or footer.
1. Adding a New Domain
This guide will walk you through the process of adding a new domain to your account via the Admin Panel.
1.1. Steps to Add a Domain
-
Navigate to the Admin Panel.
- Log in using your Admin username and password.
- Verify that you have a sufficient domain quota available. This information is visible in the top menu bar of the Admin Panel.
- In the side menu, click on Domains.
- Click on the New button, located in the upper right corner of the Domains section.
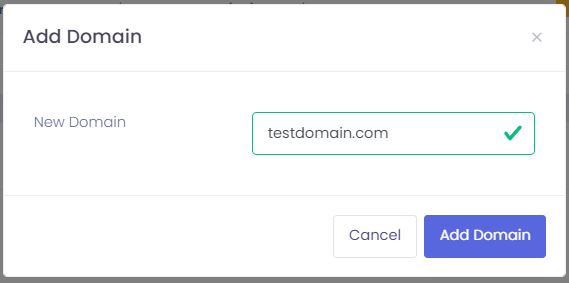
- In the New Domain field, enter the full domain you wish to add (e.g.,
testdomain.com). - Click on Add domain to create the domain.
You won't be able to add any mailboxes (Users) until you verify the domain ownership.
Unverified domains will be removed after 24 hours.
Tip: Managing Local Delivery
By default, our system routes emails locally between domains hosted on our servers, even if your MX records still point to your old provider. To avoid delivery errors during your transition, set Local Delivery to No. You can change this back to Yes once all your users are added and your MX records are officially pointed to us.
1.2. Verify Domain Ownership
After you add a domain, you must verify that you own it. Domain ownership is verified by adding a specific TXT record to the domain’s DNS settings at your domain registrar or DNS provider.
The verification record uses the hostname `mx-verification`. This name is only used for domain ownership verification. It does not change your MX records, does not affect your current email routing, and does not affect email deliverability under your current setup.
Important: unverified domains are removed after 24 hours.
If the mx-verification TXT record is not found within 24 hours after the domain is added, the domain is automatically deleted from the Admin Panel. If this happens, add the domain again and repeat the verification steps.
Get the verification TXT record
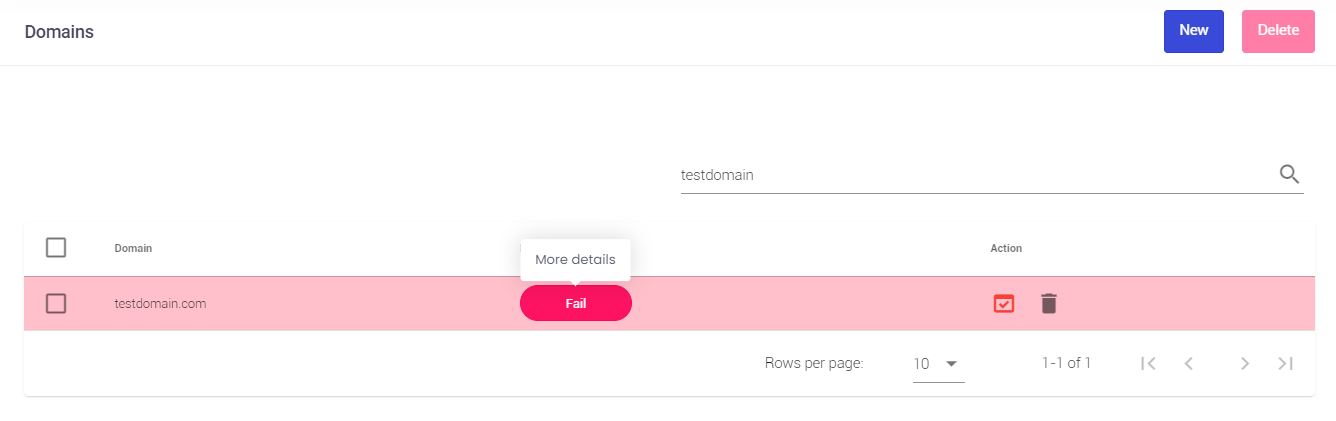
After the domain is added, it appears in the domain list with a Fail health status. This means the domain still needs to be verified.
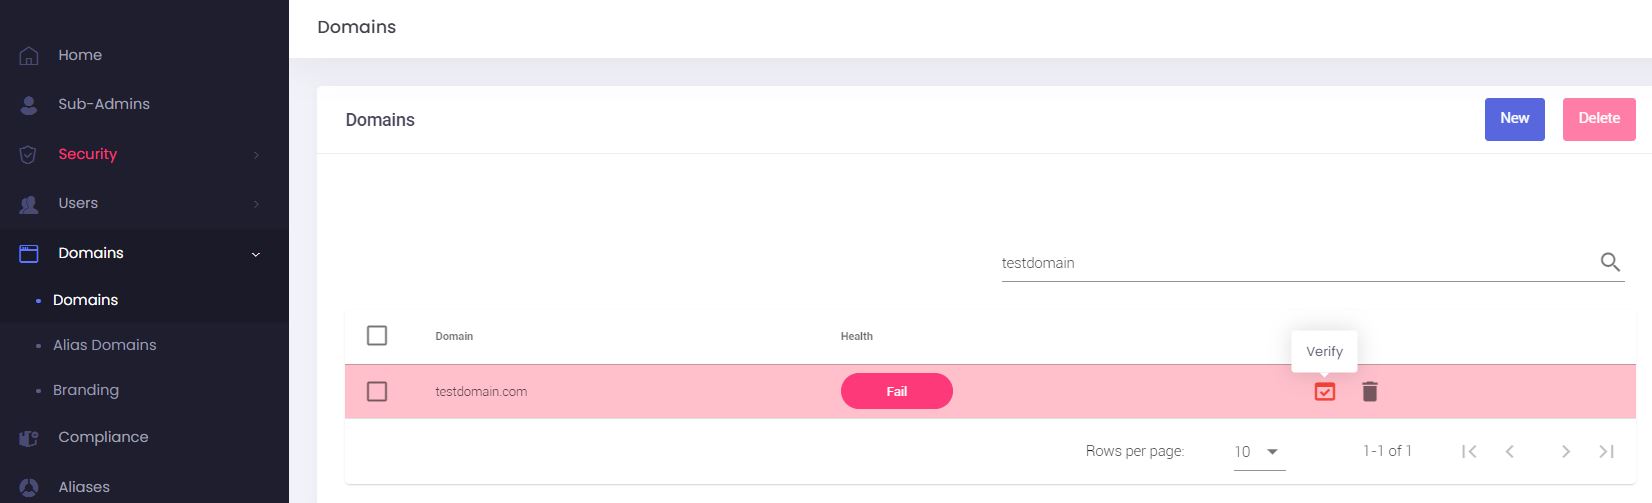
- Locate the newly added domain in the domain list.
- Click the Verify button, shown as a red checkmark icon.
- Copy the DNS record details from the pop-up window. The pop-up shows the required values:
- Hostname:
mx-verification - Type:
TXT - Value: Copy the unique value shown in your pop-up window.

- Hostname:
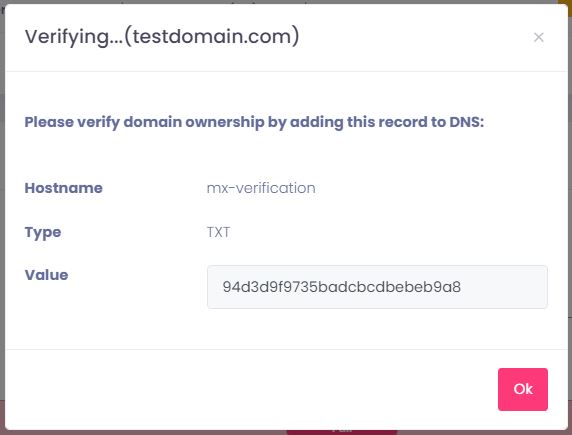
Add the TXT record to your DNS
- Log in to your domain registrar or DNS provider.
- Open the DNS settings for the domain.
- Add a new TXT record using the hostname and value shown in the verification pop-up.
- Save the DNS record.
DNS changes can take time to become visible. If the domain is not verified right away, wait a few minutes and check again.
What happens after verification
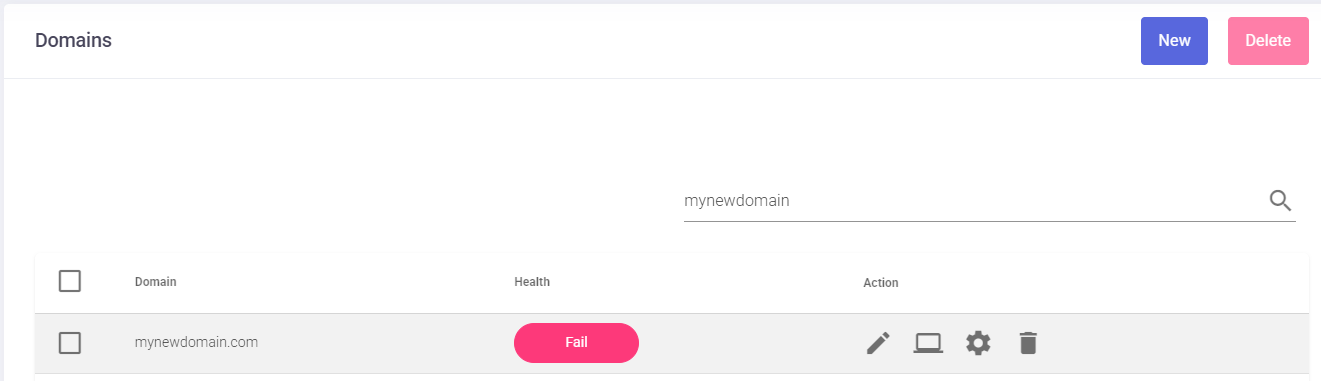
When the TXT record is found, the domain is verified. After verification:
- The domain no longer appears in red in the domain list.
- The red Verify checkmark no longer appears.
- The domain ownership Status changes from Unverified to Enabled.
- The domain Health status may still show as Fail. This is expected until the recommended DNS records, such as MX and SPF, are added and detected.
1.3. Improve Domain Health
After domain ownership is verified, you should configure the recommended DNS records for the domain. These records help email work correctly and improve the domain health status in the Admin Panel.
If you are planning an email migration for this domain, you may choose to postpone making changes to critical records like MX records until the migration process is complete to avoid any disruption to your current email flow.
Open the domain health status
- In the Admin Panel, go to the Domains list.
- Click the domain’s health status, such as Fail, to open the domain health details.

- The Domain health pop-up shows the status of important DNS records and related checks, including: MX records, Webmail record, Webmail SSL, Autodiscover record, Autodiscover SSL, Autoconfig record, Autoconfig SSL and SPF Record
A domain Status of Disabled means domain ownership has not been verified. A status of Enabled means domain ownership has been verified.

Recommended DNS records
When you are ready, follow the DNS Configuration guide to set up the following records correctly:
- MX records - These direct incoming emails for your domain to the correct mail servers. They are crucial for receiving emails.
- SPF record - This is a TXT record that lists authorized mail servers permitted to send emails on behalf of your domain, helping to prevent email spoofing and improve deliverability.
- Webmail record (optional) - This is typically a CNAME record that allows you to access your webmail interface via a custom URL (e.g.,
webmail.yourdomain.com). - Autodiscover / Autoconfig records (optional) - These records simplify the process of configuring email clients (like Outlook / Thunderbird or mobile email apps) by allowing them to automatically discover server settings.
Webmail, Autodiscover and Autoconfig SSL:
After the Webmail, Autodiscover, or Autoconfig DNS records are found for the first time, the matching SSL certificate is generated automatically. You do not need to take any extra action.
SSL generation can take up to 30 minutes after the DNS record is first detected. After about 30 minutes, click Refresh in the Domain health pop-up to check the updated SSL status.
Update the domain health status
The Domain health pop-up includes two actions: Verify again and Refresh.
Verify again
Click Verify again to queue a new DNS check for the domain. The result is not shown instantly. Wait up to 60 seconds, then click Refresh to display the updated health status.
Use Verify again after you add, remove, or change DNS records for the domain.
Refresh
Click Refresh to reload the current domain health status shown in the pop-up. Refresh does not start a new DNS check. It only updates the status displayed in the Admin Panel.
Automatic domain health checks
The system checks domain health automatically during the first 3 days after a domain is added.
Automatic checks run:
1. After the domain is added
2. About 4 hours later
3. About 8 hours after that
4. At increasing intervals during the first 3 days
After the first 3 days, automatic checks stop.
If you change DNS records after that time, you must click Verify again to queue a new DNS check. Wait 1 to 2 minutes, then click Refresh to view the updated health status.
2. Remove a Domain
-
Navigate to the Admin Panel.
- Log in using your Admin username and password.
- Click on Domains in the menu.
- Click on the delete icon next to the domain you wish to remove
- An alert pop up will appear, showing the domain that will be deleted. Click on Delete to confirm.
Removing a domain will PERMANENTLY erase all domain data from our servers, including all the users' messages, the aliases, lists, and all preferences.
3. Edit a Domain
-
Go to the Admin Panel.
- Log in using your Admin username and password.
- Click on Domains in the menu.
- Click on the edit icon next to the domain you wish to edit
- You can edit the following information:
- Domain-level Timezone. Set regional defaults for the entire domain.
- Domain-level Home Country. Helps with detecting unusual logins.
- Catchall. Manage mail sent to non-existent addresses.
- Enable / disable Local Delivery. This can be useful in these cases:
- By default, our system routes emails locally between domains hosted on our servers, even if your MX records still point to your old provider. To avoid delivery errors during your transition, set Local Delivery to No. You can change this back to Yes once all your users are added and your MX records are officially pointed to us.
- You want to forward your emails to another email address but you don't want to keep a local copy - set Local Delivery to No.
- Enable / disable Audit domain. Monitor domain-wide mail activity (click here for details).
You cannot change the name of a domain. The only way to accomplish this is to create the domain with the new name (correct a misspelling, add a hyphen, etc.) and then request a migration from the old domain to the new one by opening a support ticket.
4. Catchall
A Catchall address allows you to capture messages destined for non-existing mailboxes. It can help you salvage important messages that were sent to mistyped addresses. Still, on the other hand, it will surely cause you to receive many Spam emails sent via a dictionary attack, where the sender puts commonly used aliases.
To enable a Catchall:
-
Go to the Admin Panel.
- Log in using your Admin username and password.
- Click on Domains in the menu.
- Click on the edit icon next to the domain you wish to edit
- In the Domain Catchall field, you can choose from the following:
- No catchall: this disables the catchall feature
- Accept & Delete: the catchall will automatically delete all the messages received
- Username: the catchall will forward all received messages to the selected Username (mailbox)
5. Domain Auditing & Compliance
The Audit Domain feature is an essential administrative tool for compliance, security, and record-keeping. By enabling this, the system captures a "Blind Carbon Copy" (BCC) of emails for oversight without disrupting the user's experience.
Step 1: Enable Auditing for the Domain
Before configuring specific rules, you must first activate the audit capability for the entire domain.
Step 2: Create the Audit Storage Mailbox
Now that auditing is enabled, you need a specialized account to receive and store the intercepted emails.
Step 3: Configure Interception Rules
Finally, define exactly which communications the system should capture and where they should go.
- Navigate to the Admin Panel.
- Go to Compliance in the side menu.
-
Select the audit sub-domain from the dropdown.
-
Click New to add a rule.
-
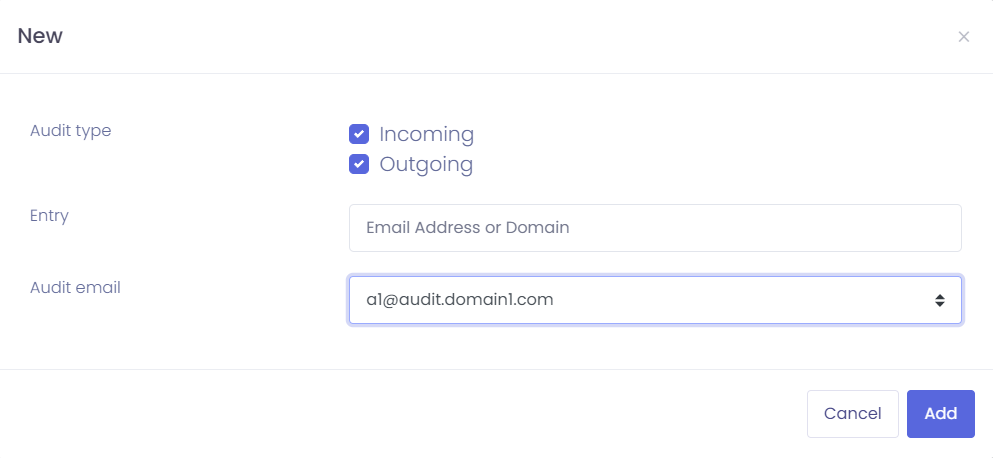
Set your preferences in the New window:

-
Audit type: Check Incoming to capture mail sent to your domain, and Outgoing for mail sent from your domain.
-
Entry: Specify what to monitor. Enter the full domain to audit all users, or a specific email address for a single user.
-
Audit email: Select the destination Audit Account you created in Step 2.
-
-
Click Add to activate the rule.
Note: Enabling this feature will capture all incoming and / or outgoing messages for every user on the domain. Ensure your designated audit mailbox has sufficient storage capacity to handle the volume of traffic.
6. Set a Footer (Domain Level)
A domain-level Footer will show up in all the emails that all the users of the domain send.
To add a domain Footer:
-
Go to the Admin Panel.
- Log in using your Admin username and password.
- Click on Domains in the menu.
- Click on the footer icon next to the domain you wish to update
- Fill in the Footer message using the available HTML editor.
- Click on Update to finish.
7. Setup Branding (Domain Level)
While global branding can be set at the Admin level, you can also override those settings to provide a unique identity for a specific domain.
Steps to Configure Domain Branding:
-
Go to the Admin Panel.
-
Log in using your Admin username and password.
-
Go to Domains > Branding in the Admin Panel sidebar.
-
Select Domain: Choose the specific domain you wish to customize from the drop-down menu.
-
Update Details: Fill in the branding information, including the company name, website link, support email for spam reports, and primary brand color.
-
Upload Logo: Directly upload a logo from your device. For the best display within the Webmail interface, aim for an image that fits or matches the 210px x 35px aspect ratio.
-
Save Changes: Click on Update Settings to apply the branding to that specific domain.
-
Revert Changes: If you wish to remove the domain-specific customization and return to your global settings, click on Reset to Admin Defaults.
Manage Users
Each mailbox is defined as a User in the Admin Panel. Here you can manage all of your Users: add new ones, remove or edit any user's settings, as well as login into the User's Control Panel to manage their preferences.
Before adding a new user please make sure you have a sufficient User quota (available mailboxes and quota), which can be checked in the top menu bar of your Admin Panel. You can increase the quota from your billing interface.
Adding a new User
-
Go to the Admin Panel.
- Log in using your Admin username and password.
- Click on Users in the menu bar.
- Click on the New button.
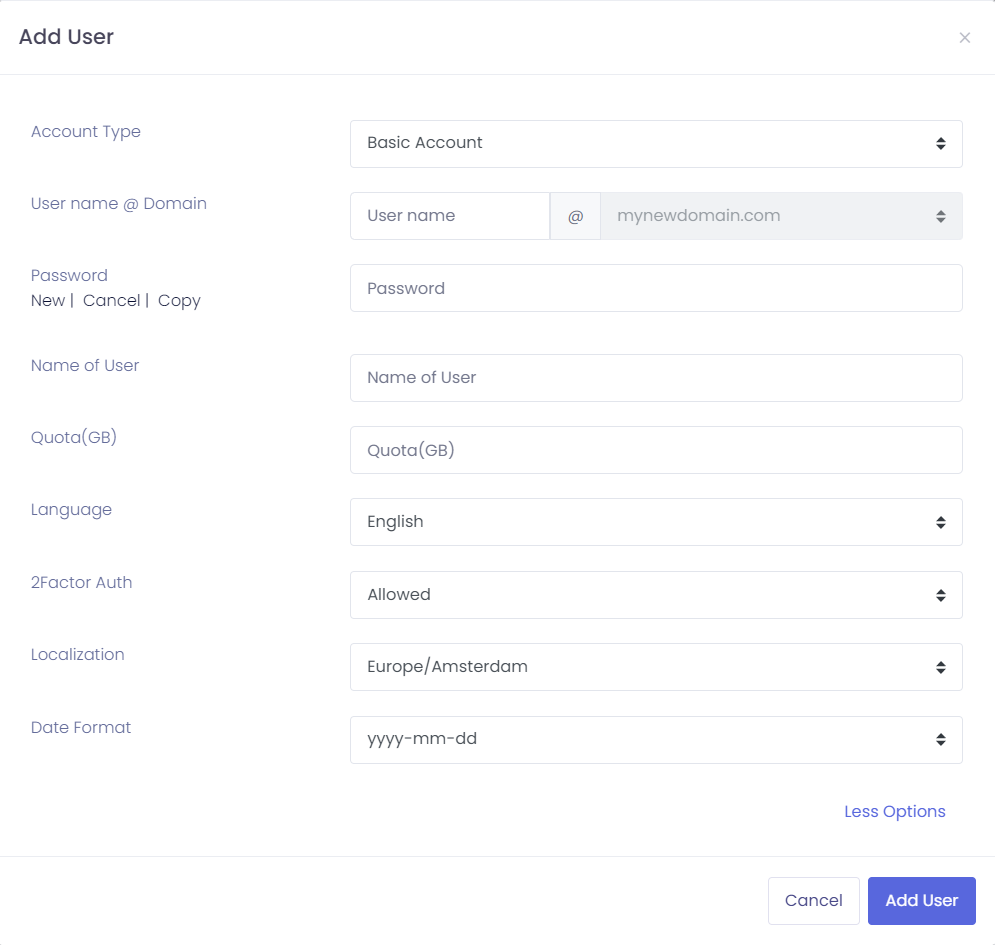
- Choose the Account Type from the dropdown list.
- Choose the Domain where you want to add an account from the drop-down list.
- Enter the Username to add (only the part before the @ sign).
- Enter the Password. Note: Passwords must contain at least 8 characters, including upper/lowercase, numbers, and a symbol.
- Enter the Name of the user to add, for your control (user´s full name, with spaces).
- Enter the Quota for the user, in Gigabytes (GB). In order to assign 5GB, simply type 5. To specify 500 MB (Half of a gigabyte), specify 0.5.
- Optional: you can click on More Options to define the User's Language, Timezone or Localization and Date format.
- Click on the button Add User to finish.
If you receive the error that the User already exists, check if you already have an Alias or a Distribution List with the same name. The username must be unique on a domain level, which means you cannot have a mailbox and an Alias with the same name.
Removing a User
-
Go to the Admin Panel.
- Log in using your Admin username and password.
- Click on Users in the menu bar.
- Select your domain from the Select Domain drop-down box.
- Click on the delete icon (trash icon) next to the account you wish to remove.
- An alert pop-up will appear, showing the User that will be deleted. Click on Delete to confirm.
Deleting an account deletes all its e-mails and data. Be careful!
Resetting a User Password
If a user has forgotten their credentials, you can manually set a new password for them through the Admin Panel.
- Go to the Admin Panel.
- Log in using your Admin username and password.
- Click on Users in the menu bar.
- Select the domain from the Select Domain drop-down box.
- Click on the pencil icon (edit) next to the specific User account.
- In the Password field, type the new password.
- Note: Passwords must contain at least 8 characters, including upper/lowercase letters, numbers, and a symbol.
- Click on Update User to save the changes.
Tip: Since you are manually setting the password, remember to share the new credentials securely with the user so they can log in.
Editing (Updating) a User
-
Go to the Admin Panel.
- Log in using your Admin username and password.
- Click on Users in the menu bar.
- Select your domain from the Select Domain drop-down box.
- Click on the pencil icon (edit) next to the User you wish to edit
- You can update the:
- Name: Update the user's display name.
- Password: Securely reset credentials.
- Account type: Seamlessly switch between Basic and Enhanced tiers.
- Quota: Adjust the storage limit in Gigabytes (GB).
- Click on More Options to update the:
- Language
- Timezone
- Date format.
- Disabled - set to Yes if you want to temporarily deactivate the mailbox, without deleting the emails.
- Only local SMTP - enable this if you want to restrict the User to only send local emails (only to the same domain).
- Click on Update User to save your changes.
Logging in as a User
Admins are able to log in as the User, making it possible to manage several aspects, such as autoresponder, forwarders, rules, black & whitelist on user level, track e-mails sent by account (in Track deliveries) and so on, which are only available on the user level. End users can login with their respective e-mail addresses directly to the User Panel.
-
Go to the Admin Panel
- Log in using your Admin username and password.
- Click on Users in the menu bar.
- Click on the arrow icon next to the account you wish to login as in the User Panel.
- Click on the mailbox icon next to the account you wish to login as in the Webmail.
- Click on the key icon next to the account you wish to generate One Time Password (OTPassword). This password is valid for 5 minutes and you can use it to troubleshoot the User's issue.
Upgrading and Downgrading
You can adjust mailbox types and storage limits at any time to accommodate changing requirements. If your quota is maxed out, please upgrade your subscription first.
Account Types
- Basic and Enhanced: You can switch between Basic and Enhanced tiers seamlessly through the Admin Panel.
- OEX Upgrades: Moving a user to the OEX tier requires an email migration to enable native Outlook connectivity for calendars and contacts.
Storage Quota
- Assigning Space: Mailbox sizes are fully customizable, ranging from 1 GB to 200 GB per user.
- Increasing Quota: Higher limits can be applied instantly to any account.
- Decreasing Quota: You can lower a storage limit at any time, provided the new quota is not less than the mailbox's current used size.
Advanced User Features
This section outlines specialized settings and tools available to manage individual user features, security and access.
Travel Mode
To help protect mailboxes, our system continuously monitors login activity for unusual patterns—for example, signing in from multiple countries within a short period of time. When this happens, an account may be temporarily restricted to prevent unauthorized access.
Travel Mode allows you to set a short-term exception for a user before or during a trip.
How to Enable or Disable Travel Mode
What Travel Mode does
While Travel Mode is active, logins from new countries or locations are less likely to trigger automatic security restrictions. This ensures the user's access is not interrupted while they are on the move.
Note: This feature is intended to be enabled only for a limited time window (the specific dates of travel) and should be turned off immediately afterward.
Recommended Best Practices
-
Enable Temporarily: Turn Travel Mode on as soon as travel dates are confirmed, and disable it once the user has returned.
-
VPN Usage: Be aware that using a VPN may make logins appear as if they are originating from different countries.
-
Security: Always ensure the user maintains a strong, unique password. We also recommend enabling Two-Factor Authentication (2FA) for added security while traveling.
Only Local SMTP
This feature restricts an account so it can only send emails to local destinations—specifically, accounts within its own domain.
When enabled, the user cannot send emails to external addresses (such as gmail.com, yahoo.com, or external business partners). However, the account can still receive emails from the outside world.
How to Enable or Disable Only Local SMTP
Manage User Permissions
The Permissions section allows you to granularly control what features and services a specific user can access. This includes restricting specific protocols (like POP3), disabling specific panel features (like Auto-responders), or strictly limiting login times for compliance.
How to Access Permissions
-
Log in to the Admin Panel and select Users from the left-hand menu.
-
Locate the desired user account in the list.
-
Click on the Permissions icon (typically represented by a user or lock symbol) on the right side of the user row.
General & Service Permissions
The main Permissions screen allows you to toggle specific features on or off.
Can Access (Feature Restrictions) This column controls which features the user can see or modify inside their own User Panel (Webmail). Unchecking a box hides that feature from the user. Common use cases include:
-
Change password: Prevent users from changing their own passwords (useful if you manage credentials centrally).
-
Forwards: Prohibit a user from setting up automatic email forwarding.
-
Vacation message: Prevent the user from setting up auto-replies.
-
AI: Enable or disable AI-assisted composition and summarization features for the user.
Service Permissions (Protocol Restrictions) This column controls the technical methods used to access the mailbox.
-
SMTP: Uncheck this to prevent the user from sending emails. They will still be able to receive incoming mail.
-
IMAP / POP3: Uncheck these to restrict how the user connects to email clients. For example, you might disable the older POP3 protocol to force users to use the more modern sync-capable IMAP.
Click Update permissions to save your changes.
Access Email Only Between Hours
This feature allows you to define a specific time range during which an employee can access their email account. This is particularly useful for compliance with "Right to Disconnect" laws or preventing unauthorized access outside of business hours.
How it works:
-
Outside Access Hours: The system temporarily disables the account. The user cannot log in via Webmail or email clients (Outlook, mobile phones, etc.). However, the account continues to receive incoming email normally.
-
Visual Indicator: In your Admin Panel user list, accounts currently outside their access hours will appear with a pink bar or "Disabled" status.
Setup Instructions:
-
Inside the Permissions modal, click the link labeled Access email only between hours.
-
You will see a schedule for every day of the week. By default, all days are set to unrestricted.
-
Toggle the switch for the specific days you wish to allow access (e.g., Monday through Friday).
-
Enter the Start Time and End Time for each active day (e.g., 09:00 to 17:00).
-
Click Update access hours to save.
Send Email As (Delegation)
This setting allows you to grant other users the permission to send emails on behalf of the current user.
-
Inside the Permissions modal, click the link labeled Send email as.
-
Select the user you wish to grant permission to from the dropdown list.
-
Click Add Member.
-
The added user will now be able to select this email address in the "From" field when composing messages.
Frequently Asked Questions
Why do I see a "Maximum number of users allowed has been reached" error?
This error occurs because you have used all the mailbox licenses included in your current subscription. To resolve this, you must increase your account quota by purchasing additional mailboxes within the billing interface.
Why do I see a "User already exists" error?
The username must be unique across your entire domain. Check if you already have an Alias or a Distribution List using that same name. You cannot have a mailbox and an Alias with the identical name.
Can I change a user's email address?
You cannot rename a username directly. You must create the new user account first, migrate the data, and then remove the old account.
What happens to data when I delete a user?
Deleting an account is permanent and removes all emails, contacts, and settings immediately. We recommend creating a backup before confirming deletion.
Internal Mailbox Migrations
Internal Migrations allow you to move or copy email data directly between mailboxes within your Admin Panel. This tool is specifically designed for local transfers and is the most efficient way to handle account changes without losing historical data.
When should you use Internal Migration?
-
Renaming a Mailbox: Since mailboxes cannot be renamed directly, you can create a new mailbox with the desired name and migrate the data from the old one.
-
Employee Offboarding: When a team member leaves, you can move their historical emails to a manager’s account or a shared archive profile.
-
Domain Rebranding: If you are moving from one domain to another and an alias isn't sufficient, you can copy data from
user@old-domain.comtouser@new-domain.comfor a clean, final setup.
How to Run an Internal Migration
- Go to the Admin Panel. Log in using your Admin username and password.
-
Click on Users in the main menu bar, then select Migrations from the sub-menu.
-
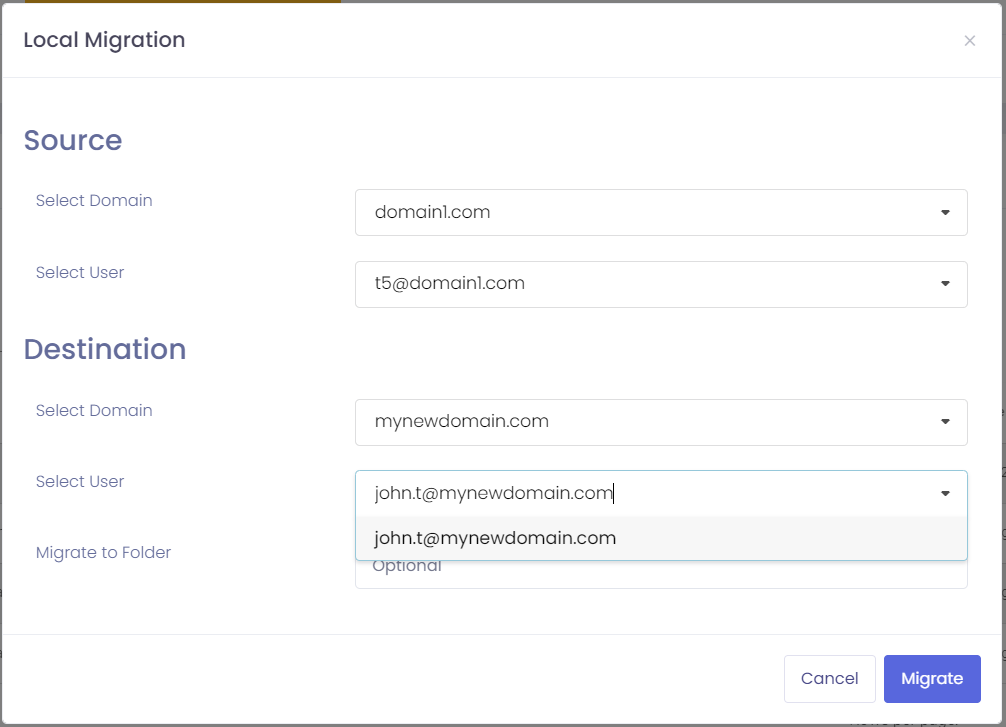
Click the New Migration button and fill in the details:

-
Configure the Source (Old Account):
-
Select Domain: Choose the domain associated with the original mailbox.
-
Select User: Choose the specific mailbox you want to copy data from.
-
-
Configure the Destination (New Account):
-
Select Domain: Choose the domain of the target mailbox.
-
Select User: Choose the mailbox that will receive the emails.
-
Migrate to Folder (Optional): If you want the migrated emails to go into a specific folder (e.g., "Archive_2024") rather than the main Inbox, type the folder name here.
-
-
Start the Process: Click the Migrate button.
Important Notes
-
Data Preservation: This process copies the data. The emails in the source mailbox will remain there until you choose to delete the account.
-
Internal Only: This tool is designed for "Local" moves within your administration. To bring in mail from an external service, please refer to our External Migration guide.
-
Unique Identities: Every mailbox and alias must be unique across your domain. If you are renaming a user, remember to delete or alias the old mailbox after the migration is successfully completed.
Managing Migration Tasks
Once a migration is started, you can monitor the progress from the Migrations dashboard:
-
Status: See if a migration is "Pending," "In Progress," or "Completed."
-
Sync Logic: The system will replicate the folder structure of the source mailbox into the destination mailbox automatically.
Manage Alias Domains
An Alias Domain is an exact copy of a real domain. It is useful when you have multiple domains that should all share the same characteristics.
For example, your company might own several domains: longcompanyname.com, shortcompanyname.com, and oldcompanyname.com, but you don't want to create separate users for each domain. You can set up longcompanyname.com as the primary domain and the other two as Alias Domains. Every user, alias, or list you set up on the primary domain will be available on the Alias Domains. Remote senders can use any domain name to reach your users, and the message will be delivered only once, into a single mailbox. It's a great way to consolidate your domains.
Add an Alias Domain
-
Go to the Admin Panel.
- Log in using your Admin username and password.
- Click on Domains in the menu and choose Alias Domains.
- Select the primary domain from the drop-down list
- Click on the New button.
- Enter the name of the Alias Domain
- Click on the Add button.
- Make sure to modify your DNS settings and add the MX records for the alias domain. They should be:
- Primary with a preference of 5: mx.emailarray.com
- Secondary with a preference of 10: mx2.emailarray.com
Remove an Alias Domain
-
Go to the Admin Panel.
- Log in using your Admin username and password.
- Click on Domains in the menu and choose Alias Domains.
- Select the primary domain from the drop-down list
- Click on the delete icon next to the domain alias you wish to remove
- An alert pop up will appear, showing the alias domain that will be deleted. Click on Delete to confirm.
Manage Aliases
An Alias allows you to create an e-mail address that forwards to a real e-mail account. For example, you can create several aliases such as first.name@domain.com and webadmin@domain.com that point to john@domain.com. john@domain.com would be the only mailbox created.
Choose the right tool for your needs
Before setting up an alias, check if another option might better suit your goals:
-
Sending to multiple people? If you need one address to forward to several recipients at once, create a List or a Smart List.
-
Need to "Send As" from an existing mailbox? If you want to forward mail from one active mailbox to another while maintaining the ability to send replies from that address, you need a Forward.
Adding an Alias
-
Go to the Admin Panel.
- Log in using your Admin username and password.
- Click on Aliases in the menu bar.
- Click on the New Alias button.
- In the Alias field, type the alias (just the part before the at sign)
- In the Domain field, select the domain in which you will create an Alias.
- In the Forward Destination, choose Internal if you want to forward to an email address of the same domain or External to forward to any domain.
External aliases are limited to 4 per account. After this limit, they count as regular mailboxes.
- In the Forwards to field, specify the e-mail account where emails will be sent to, for this alias.
- Click on the button Add Alias.
An Alias is a unique e-mail address that has to be unique across your entire domain. No other e-mail account or distribution list may have the same name as the Alias.
If you receive the error "Alias already in use," it means you already have an existing Alias, User, or Distribution List with the same name.
Removing an Alias
-
Go to the Admin Panel.
- Log in using your Admin username and password.
- Click on Aliases in the menu bar.
- Select the domain which has the alias you want to remove in the drop-down list
- Click on the delete icon next to the alias you wish to remove
- An alert pop up will appear, showing the alias that will be deleted. Click on Delete to confirm.
Manage Lists
Distribution Lists let you reach multiple e-mail addresses at once. For example, you could create a sales address for your sales team (sales@mydomain.com), a support address for your technical support team (support@mydomain.com), and so on.
Distribution Lists can be managed from the Admin Panel:
-
Go to the Admin Panel.
- Log in using your Admin username and password.
Adding a List
- Click on Lists in the left menu bar.
- Click on the button New List.
- In List Name, type in the name of your list (only the word before the '@' sign)
- In the Domain field, choose the domain in which the list will be created.
- In List Type, choose Distribution List.
- Click on the Add List button.
Managing List Members
Adding new members
- Click on Lists in the menu bar.
- Click on the pencil icon next to the list you wish to edit
- You can add internal members (hosted by us, unlimited) or external members (hosted by another provider, maximum 4 per account).
- To add an internal member, select the email address from the list and click on Add Member button.
- To add an external member, type in the input field the email address and click on Add Member button.
Deleting members
- Click on Lists in the menu bar.
- Click on the pencil icon next to the list you wish to edit
- Remove members by clicking on the delete icon next to the member which you want to delete.
- A confirmation pop-up will appear, showing the member that will be deleted. Click on Delete to confirm.
Removing a Distribution List
- Click on Lists in the menu bar.
- Click on the delete icon next to the list which you want to delete.
- An alert pop up will appear, showing the list that will be deleted. Click on Delete to confirm.
Manage Smart Lists
A Smart List is a type of distribution list with more options to make it easier to specify members and who is allowed to send emails to that list.
Just as a distribution list, a Smart List lets you reach multiple email addresses at once. For example, you could create a team address for your whole office team (team@mydomain.com), a billing address for your accounting team (billing@mydomain.com), and so on.
Smart Lists can be managed from the Admin Panel:
-
Go to the Admin Panel.
-
Log in using your Admin username and password.
Adding a Smart List
- Click on Smart Lists in the left menu bar.
- Choose a Domain from the list.
- Click on the button New List.
- In List Name, type in the name of your list (only the part before the '@' sign).
- In List type, you have two options:
- Specify Members (add each member one by one, by email address), or
- All domain users (automatically include all valid emails of the chosen domain).
- In List security, you can choose who can send emails to this smart list:
- Only members can post: all or only some emails from the same domain can post,
- Password protected: only senders that include the password at the beginning of the subject line can send (email subject example, with a custom password between square brackets: [mypass]My Subject ),
- No protection: anyone can send emails to this list.
- If you choose Password protected, type in the chosen password in the input field. You can share this password with accepted senders and instruct them to include it in the email subject (for example: [customPassword]My Subject - the password will be removed before recipients receive the email).
- You can choose to Send a copy of the message to the sender.
- Click on the Add Smart List button to finish the setup.
Managing Smart List Members
Adding new members to a Smart List where List Type is Specify Members:
- Click on Smart Lists in the menu bar.
- Choose a Domain from the list to show the available Smart Lists.
- Click on the member icon next to the list you wish to edit
- You can add internal members (hosted by us, unlimited) or external members (hosted by another provider, maximum 4 per account).
- You can choose if they can post to this smart list by setting Can post to Yes for each member you add.
- To add an internal member, select the email address from the dropdown, and click on Add Member button.
- To add an external member, type in the input field the email address and click on Add Member button.
Deleting members
- Click on Smart Lists in the menu bar.
- Choose a Domain from the list to show the available Smart Lists.
- Click on the member icon next to the list you wish to edit.
- Remove members by clicking on the delete icon next to the member which you want to delete.
- A confirmation pop-up will appear, showing the member that will be deleted. Click on Delete to confirm.
- If the Smart List type is All domain users, you can only remove the member's permission to post to that list.
Removing a Distribution List
- Click on Smart Lists in the menu bar.
- Choose a Domain from the list to show the Smart Lists.
- Click on the delete icon next to the smart list which you want to delete.
- An alert pop up will appear, showing the list that will be deleted. Click on Delete to confirm.
Filtering: Whitelist / Blacklist
Settings - Domain Spam Filtering
Domain Spam Filtering and Security Settings
The Admin Panel allows you to establish default filtering and security preferences for an entire domain. These settings apply to all users unless they have configured their own personal preferences. A user's individual settings will always override these domain-wide defaults.
The spam report is designed to list emails currently held in your spam folder. Depending on your selection for the Spam Report Content setting, the report will either summarize the latest messages received within your chosen delivery frequency or display every message currently residing in the spam folder at the time the report is generated.
Accessing Filter Settings
- Go to the Admin Panel. Log in using your Admin username and password.
-
Click Filtering -> Settings in the navigation menu.
-
Use the Select Domain drop-down menu to choose the domain you wish to modify.
Filtering Preferences
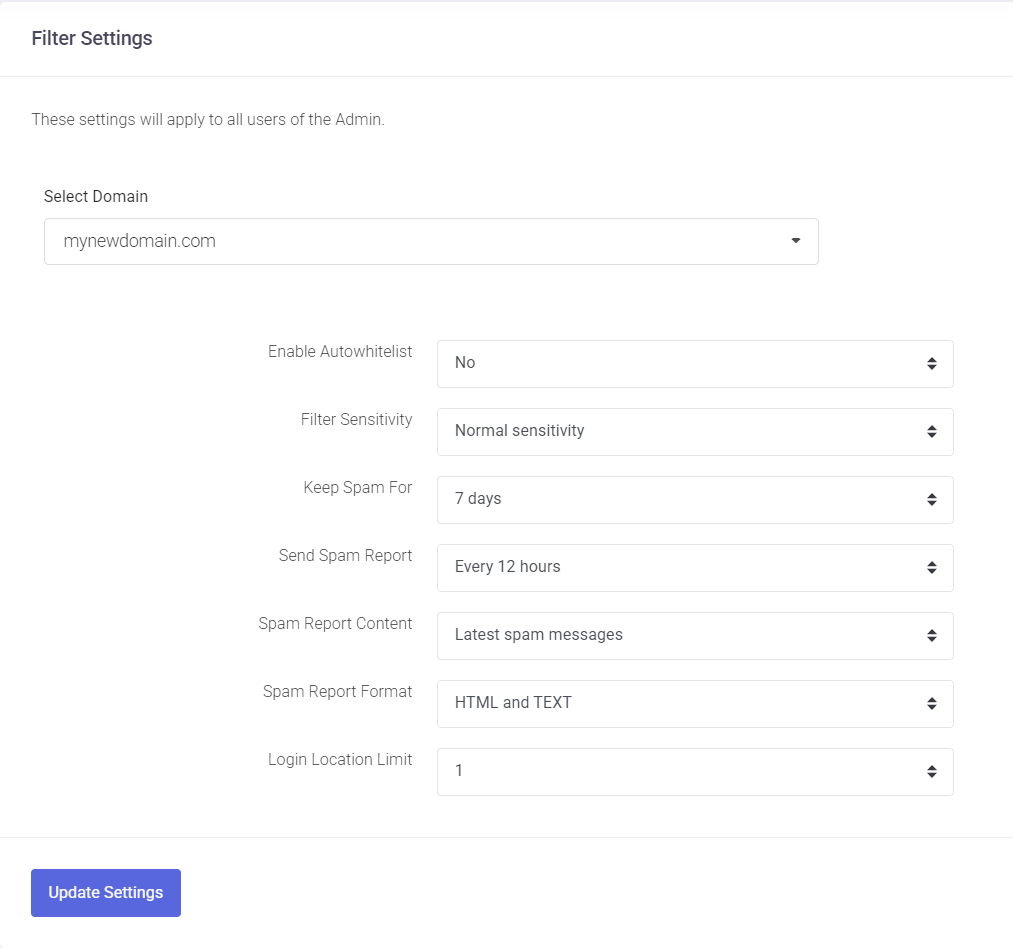
Enable Autowhitelist When enabled, the system automatically adds the email addresses of any external recipients contacted by your users to the domain-wide whitelist. While this reduces the chance of legitimate replies being marked as spam, use it with caution: if a user account is compromised and used for spamming, those recipients will be added to your whitelist automatically.
Filter Sensitivity This setting determines how aggressively the system scans for spam on a scale of 1 to 10.
-
1: Most permissive setting; more spam may reach the inbox.
-
10: Most restrictive setting; a higher volume of messages will be filtered.
-
Normal Sensitivity: This is the default setting and is recommended for most organizations.
Keep Spam For Choose how long messages remain in the Spam folder before being permanently deleted. You can set this duration between 1 and 30 days. The default retention period is 7 days.
Send Spam Report Specify how often users receive a summary of trapped spam messages in their inbox.
-
Frequency: Choose a range from every 1 hour to every 24 hours.
-
Don't Send: Select this to disable the automated reports.
Spam Report Content Determine which messages are included in the summary report:
-
Latest spam messages: Includes only the messages received since the last report was generated.
-
All spam messages: Lists all current messages residing in the user's spam folder.
Spam Report Format Select the delivery format for the report. The default is HTML and TEXT to ensure compatibility across all email clients.
Saving Your Changes Once you have adjusted the settings to your preference, click the Update Settings button at the bottom of the page to apply the changes to the domain.
Security Settings
Login Location Limit This setting helps identify and prevent unauthorized account access by monitoring geographic login patterns. For example, if an employee only works from a specific country, you can limit their account to 1 login location.
Our custom detection system reviews login attempts from new or unusual locations. Depending on the level of risk detected, the system may allow the login or block the account to protect sensitive data.
Manage Whitelists and Blacklists
Notice that the best way to add whitelist records is using the Spam Monitor reports, as it automatically delivers the email and adds the sender to your whitelist. Our system uses the Sender instead of the From in the email header for blacklist and whitelist, which is automatically done if you authorize emails through spam reports.
If you enter an email address manually to your black or whitelist and notice it doesn't work, check the email header and look for the X-Barracuda-Envelope-From: field, which should be used. Yet another possibility is that the sender might change every time you receive a certain email. In this case, you can use Rules to delete undesired messages based on the part of the From header address or subject.
Besides being able to whitelist or blacklist an address for the entire domain manually, Administrators can also manage the automatic whitelist. The automatic whitelist is a domain-wide whitelist built from the email-sending patterns of all your users. It ensures that communication with trusted recipients always goes through without being filtered.
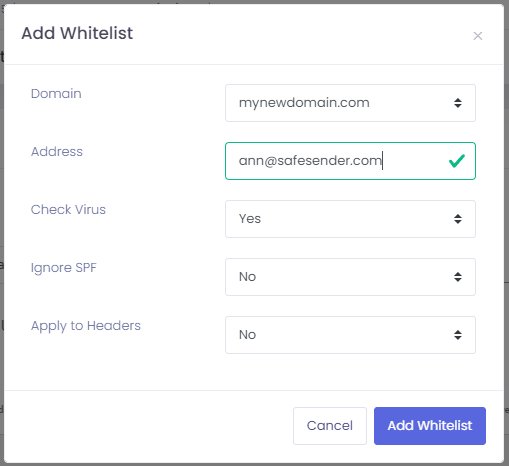
Add a sender to the whitelist.
This will treat the sender as safe and deliver all incoming emails to the Inbox folder (or another folder if you have set up delivery rules)
-
Go to the Admin Panel.
- Log in using your Admin username and password.
- Click on Filtering → Whitelist in the menu.
- Choose from the drop-down a domain .
- Click on the New button.
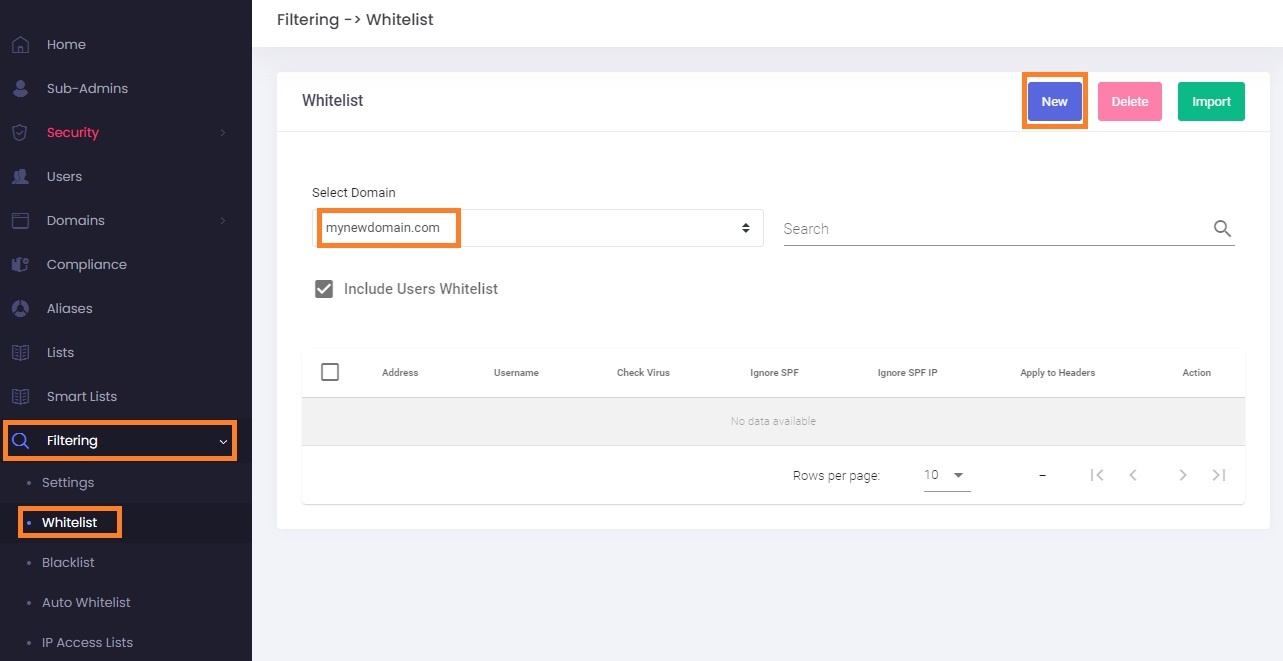
- In the Address field, type the email address (or just the domain) you want to whitelist.
- Check virus: select whether you still wish to check for viruses ( Recommended: Yes).
- Ignore SPF: select whether you want to ignore SPF ( Recommended: No, because it exposes you to forged emails). If the sender is marked as Spam because of the failed SPF, please use the Whitelist option from the Spam Monitor emails or whitelist from the Webmail. This will ensure you have the correct IP address needed to ignore SPF.
- Apply to headers: might be useful if your sender is misconfigured (Recommended: No, because it exposes you to Phishing emails).
- Click on the Add Whitelist button.
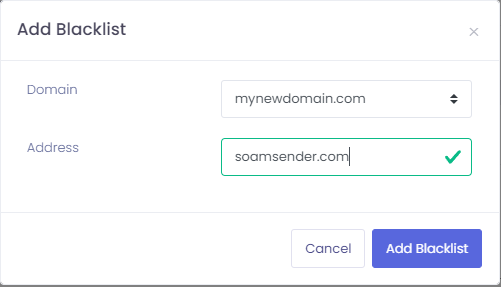
Add a sender to the blacklist
This will treat the sender as high-risk, and all incoming emails from this sender will be rejected (no copy of the email will be saved).
- Go to the Admin Panel.
- Log in using your Admin username and password.
- Click on Filtering → Blacklist in the menu.
- Choose from the drop-down a domain .
- Click on the New button.
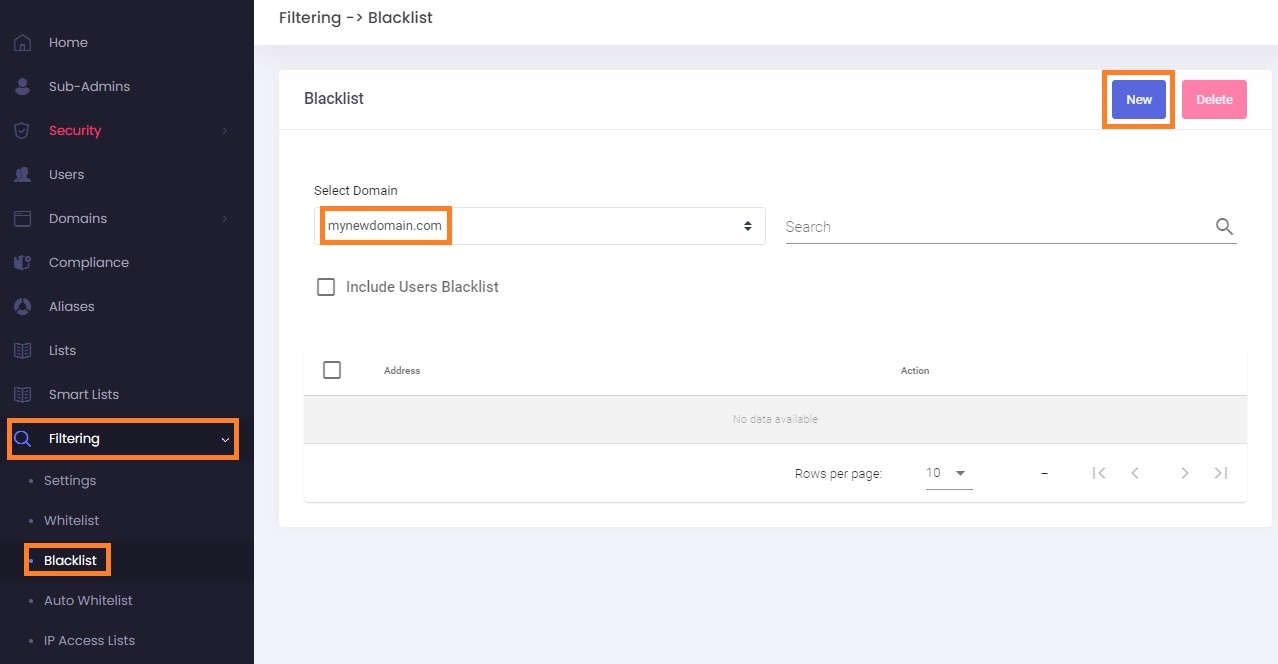
- In the Address field, type the email address (or domain) that you want to blacklist.
- Click on the Add Blacklist button.
Remove a sender from the whitelist or blacklist
Sometimes, users accidentally whitelist or blacklist a sender, and you might wish to remove those entries.
- Go to the Admin Panel.
- Log in using your Admin username and password.
- Click on Filtering → Blacklist (or Filtering → Whitelist) in the menu.
- Select the domain which has the entry you want to remove from the drop-down list.
- Click on the Include Users Blacklist (or Include Users Whitelist) option to include user-generated entries.
- Optional: search for the desired sender email or domain.
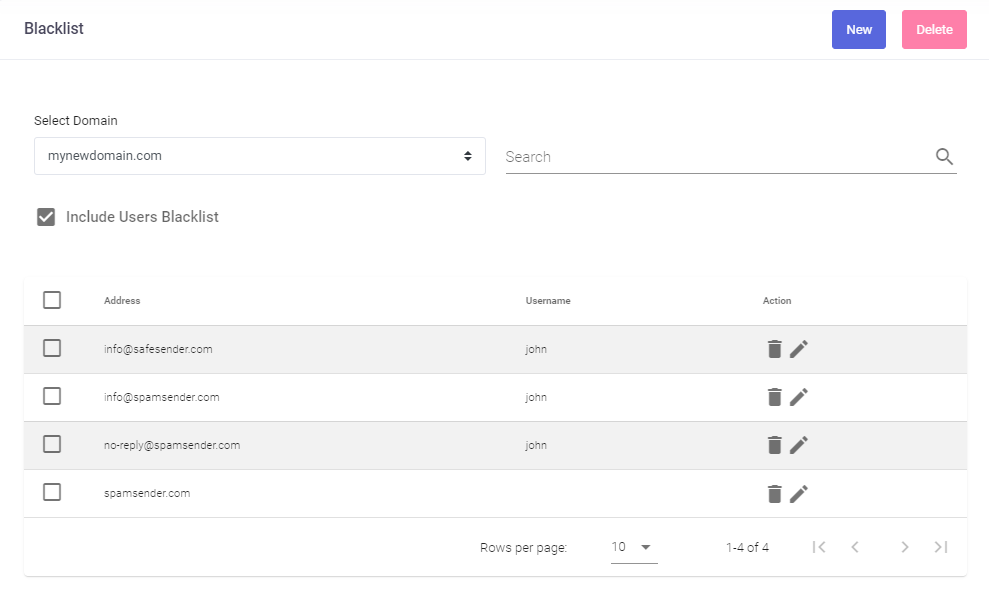
- Click on the delete icon (garbage sign) next to the entry you wish to remove.
- An alert pop-up will appear, showing the entry that will be deleted. Click on the Delete button to confirm.
View the automatic whitelist and/or remove items from it
The automatic whitelist is a domain-wide whitelist built from the email-sending patterns of all your users. It ensures that communication with trusted recipients always goes through without being filtered.
- Go to the Admin Panel.
- Log in using your Admin username and password.
- Click on Filtering → Auto Whitelist in the menu.
- Choose from the drop-down a domain .
- Pick a date: choose a specific day or All days to show all entries.
- Address like: optional; specify a search term.
- Click on the Search button.
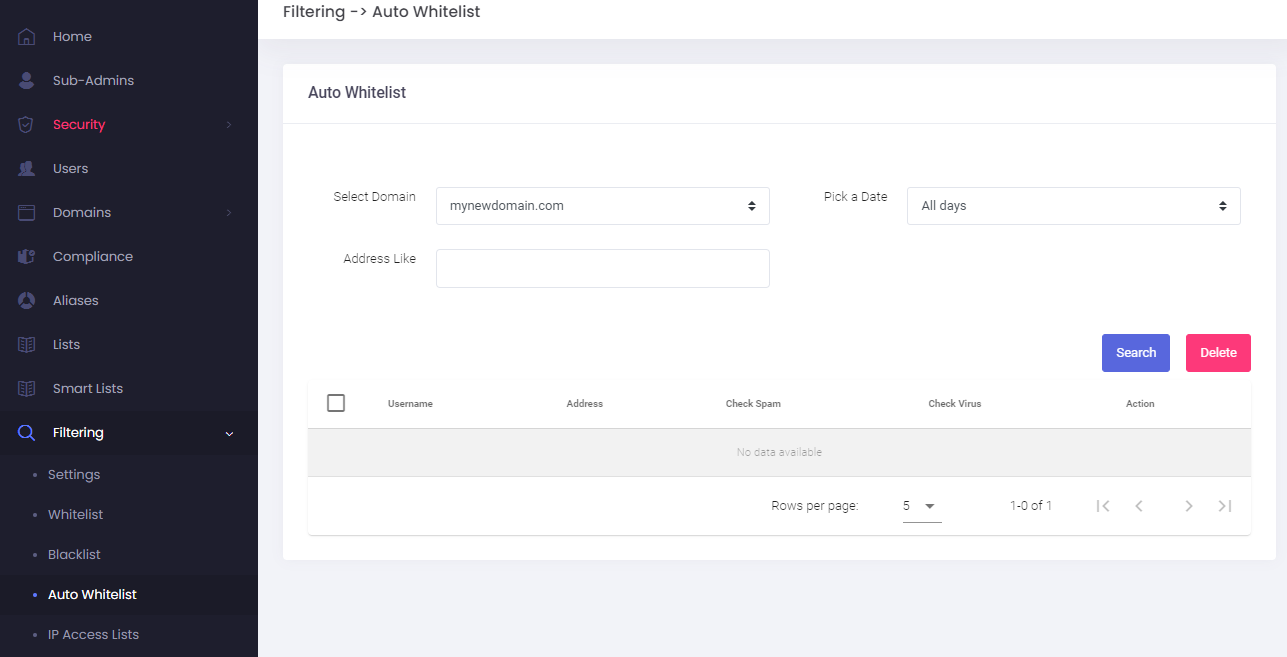
- Click on the delete icon (garbage sign) next to the entry you wish to remove.
- An alert pop-up will appear, showing the entry that will be deleted. Click on the Delete button to confirm.
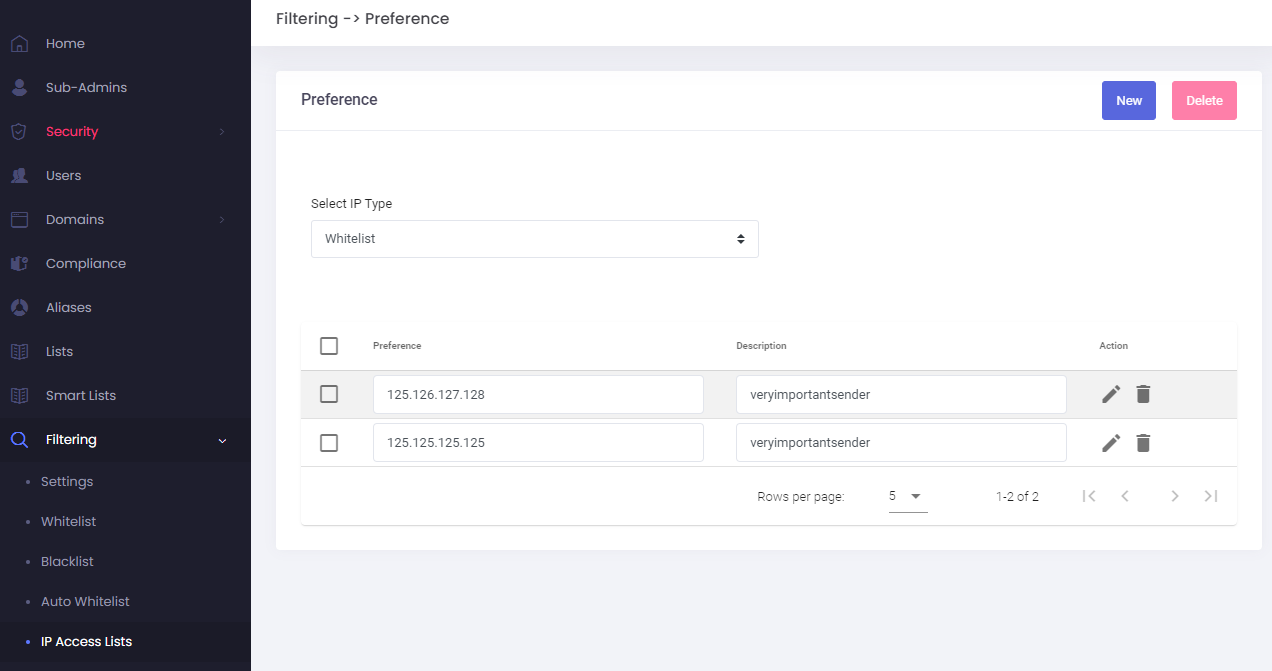
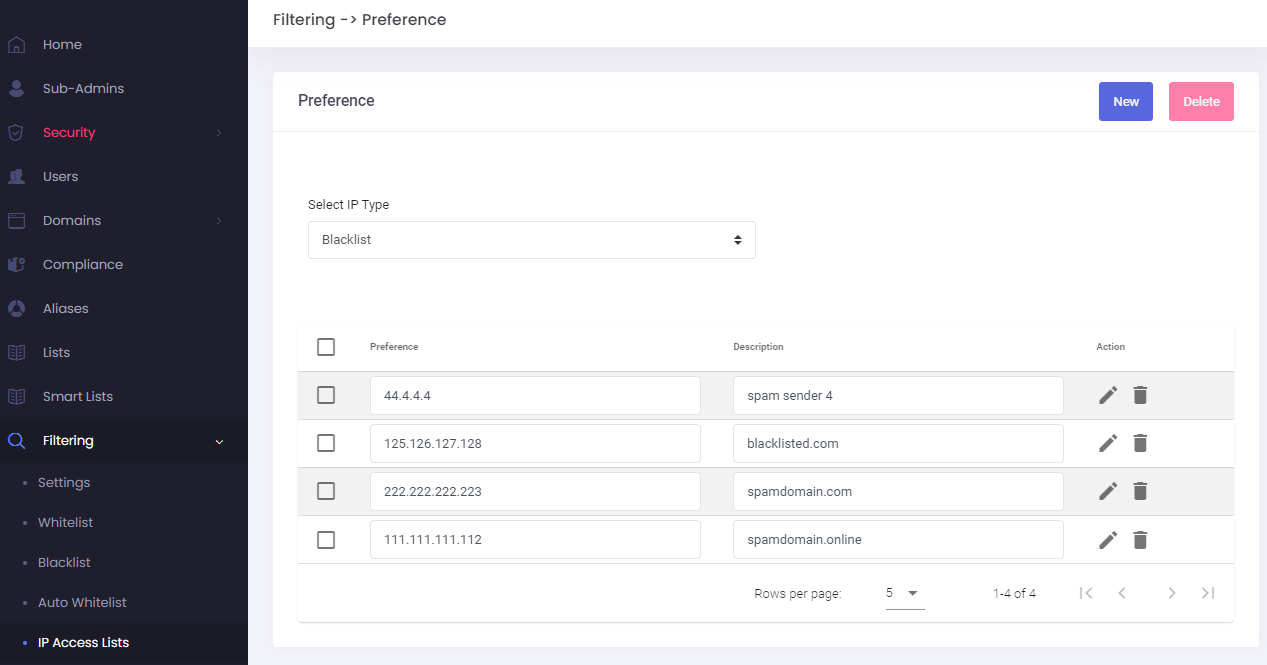
Limiting by IP: add the sender's IP to whitelist or blacklist
Sometimes, you need to blacklist or whitelist an entire IP.
- Go to the Admin Panel.
- Log in using your Admin username and password.
- Click on Filtering → IP Access List in the menu.
- Select IP Type: Blacklist or Whitelist types of entries.
- A list of existing blacklist/whitelist entries will show.
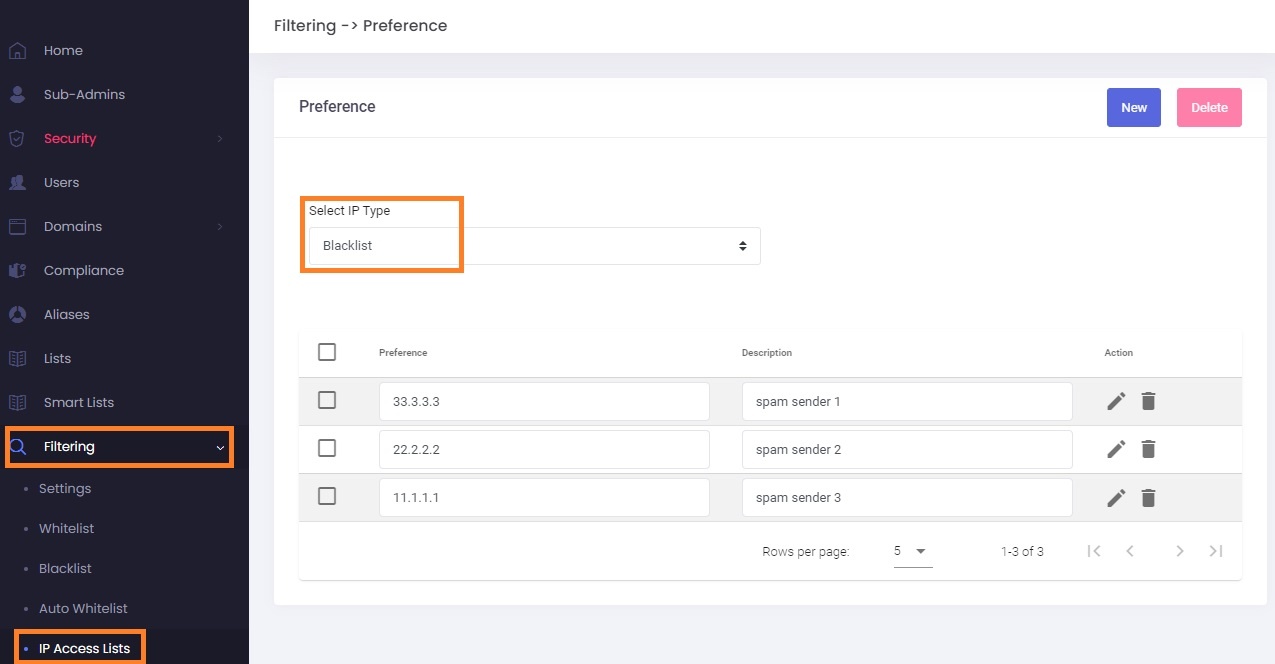
- Click on the delete icon (garbage sign) next to the entry you wish to remove.
- An alert pop-up will appear, showing the entry that will be deleted. Click on the Delete button to confirm.
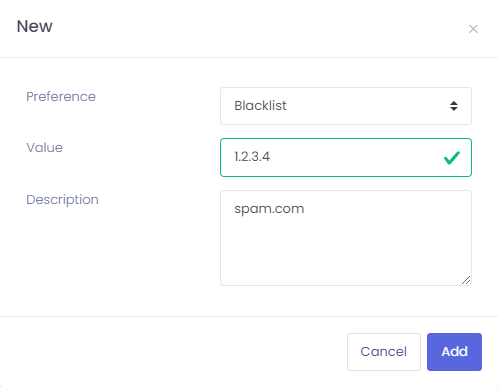
- To add a new entry, click on the New button.
- Preference: select where you wish to add the entry for, blacklist or whitelist.
- Value: a valid IP.
- Description: add some details so you can remember this entry.
- Click on the Add button.
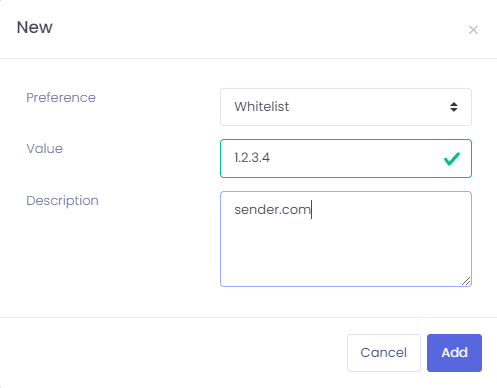
Whitelist / Blacklist by IP - IP Access List
Whitelist Incoming Email by IP
In some limited cases, a legitimate sender has been compromised and all of his incoming emails are marked as Spam. Until the legitimate sender will fix their reputation, you can whitelist their incoming emails. This is a type of whitelist based on IPs. If you specify an IP or IP range as whitelist, e-mails sent from such locations will never be marked as spam, for all your domain's e-mail accounts.
To whitelist a sender's incoming email by IP:
- Log in to the Admin Panel
- From the menu, go to Filtering → IP Access List
- Select the IP Type from the dropdown: whitelist.
- A list of existing IPs that were marked as trusted will appear
- You can edit each entry or delete it.
- To add a new entry, click on the New button.
- In the new pop-up:
- Preference: choose Whitelist
- Value: the IP of the sender - get their IP from the Incoming Logs. You may specify a single IP or an IP range using CIDR notation, for example: 192.168.0.0/24
- Description: such as sender's domain or company name - so you can easily remember it later
- Click on the Add button to whitelist the incoming email from this IP.
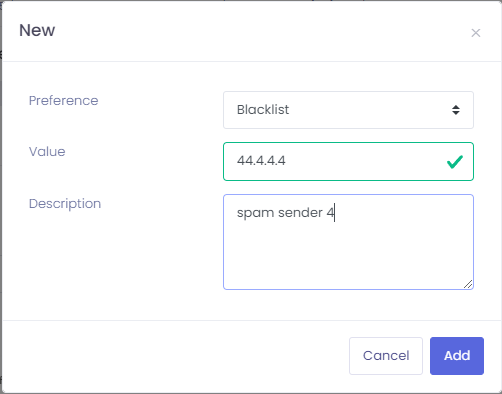
Blacklist Incoming Email by IP
Some spammers will change the email address or domain regularly which makes it harder to blacklist by e-mail / domain only. For this cases, you can blacklist a sender by IP. If you specify an IP or IP range as blacklist, e-mails sent from such locations will be marked as blacklisted and deleted by default, for all your domain's e-mail accounts (this rule can be changed on User level, from the User Panel → Delivery Rules → BlacklistDelete or from the User Panel → Filtering → Blacklisted messages option).
To blacklist a sender's incoming email by IP:
- Log in to the Admin Panel
- From the menu, go to Filtering → IP Access List
- Select the IP Type from the dropdown: blacklist.
- A list of existing IPs that were marked as untrusted will appear
- You can edit each entry or delete it.
- To add a new entry, click on the New button.
- In the new pop-up:
- Preference: choose Blacklist
- Value: the IP of the sender - get their IP from the Incoming Logs. You may specify a single IP or an IP range using CIDR notation, for example: 192.168.0.0/24. Warning: blacklisting an IP range may cause legitimate emails to not be delivered.
- Description: such as sender's domain - so you can easily remember it later
- Click on the Add button to blacklist the incoming email from this IP. All incoming email from this IP will be marked as blacklisted and deleted by default.
How to stop trusted sender emails from going to Spam in the Admin Panel
Use this article when a user reports that emails from a trusted sender are landing in the Spam folder.
Start by checking the Incoming Logs. The logs show why the message was flagged. In most cases, you can fix the issue by using Whitelist & Deliver from the logs. In special cases, such as failed SPF or rotating sender addresses, you may need to edit the whitelist entry.
Before you start
Log in to the Admin Panel before following these steps. You need access to the affected domain and permission to view Incoming Logs and manage whitelist entries.
At a glance: the four steps
- Diagnose in the Admin Panel → Logs → Incoming Logs (find the message, read the Spam Score / SPF / DNSBL columns).
- Apply the quick fix: select the message and click Whitelist & Deliver. This creates a domain-level whitelist entry with safe defaults.
- Handle the special case if the message failed SPF or the sender's setup is broken: edit the whitelist entry under Filtering → Whitelist and adjust Ignore SPF or Apply to Headers.
- Verify the change took effect by re-checking Incoming Logs for a new email from the same sender and confirming the whitelist entry is present.
Alternative path: from the Webmail, the user can right-click the Spam message and choose Deliver to Inbox. See detailed steps and skip Steps 1-3 entirely.
Step 1. Diagnose: check the Incoming Logs
The Incoming Logs show every email received by the domain in the last 60 days, with the delivery status and the scoring data the filter used to make its decision. This is your starting point for any "why did this go to Spam" question.
- Go to Logs → Incoming Logs.
- Select the Domain, Start Date, and End Date.
- Add a filter to narrow down the sender: most often Envelope From, Header From, or To (the recipient).
- Click Search.
How to read the results
Find the message in question and look at these columns:
| Column | What it tells you |
|---|---|
| Status | delivered, spam, rejected, or undelivered. If it's spam, the message was placed in the user's Spam folder. |
| Spam Score | The filter's spam rating. The higher the score, the more spam-like the message looked to the filter. A high score on a legitimate sender usually means content patterns, links, or sending reputation tripped the filter. |
| SPF | Check whether SPF passed, failed, or soft-failed. Failed SPF often means the sender's mail server is not authorized in the sender domain's SPF record. |
| DNSBL | Whether the sending IP appeared in a DNS blacklist. If yes, the sender's mail server has a reputation problem with one or more blacklist providers. |
| IP | The IP the message was sent from. You'll need this if you decide to whitelist by IP later. |
| Envelope From |
The actual SMTP sender: this is the address the filter uses for whitelisting and blacklisting, not the friendly "From" shown in the email client. Hover the column to see the Header From for comparison. |
Envelope From vs Header From
These are two different addresses and they often don't match. The filter only ever matches against the Envelope From.
- Envelope From is the technical sender used in the SMTP transaction. Marketing platforms, transactional email services, and ESPs commonly use bounce/return-path addresses here — for example:
011edab60c-edb126-55h4-4555-b5ym-139af41f-0000@bounce.stripe.com- Header From is the friendly address shown in the email client — for example:
Stripe <notifications@stripe.com>If you manually whitelist
notifications@stripe.com(Header From), the filter will not match incoming Stripe messages, because their Envelope From is underbounce.stripe.com. The reliable approach is to use Whitelist & Deliver directly from the Incoming Logs - the system copies the correct Envelope From for you.If you have to whitelist manually, copy the value from the Envelope From column.
Once you've identified why the message was flagged (high Spam score / SPF fail / DNSBL / mismatched From), move to Step 2.
Step 2. The quick fix: Whitelist & Deliver from Incoming Logs
For most cases, this is all you need.
- In the Incoming Logs results, check the box next to the message (or messages) from the trusted sender.
- Click Whitelist & Deliver.
This does two things at once:
- Delivers the message immediately to the user's Inbox.
- Creates a domain-level whitelist entry under Filtering → Whitelist, using the correct envelope-from address (so you don't have to figure out which header the filter is keyed on).
The new entry uses safe defaults: Check Virus = Yes, Ignore SPF = No, Apply to Headers = No. For most senders, those defaults are exactly what you want - you're done.
When the quick fix is not enough
If the original message failed SPF or the sender has a broken setup, the default whitelist entry won't deliver future emails; the filter will keep rejecting them on SPF grounds. In that case, continue to Step 3.
Step 3. Edit the whitelist entry for special cases
After Step 2, the whitelist entry exists but may need adjustments. Find it under Admin Panel → Filtering → Whitelist, select the recipient's domain from the list and search for the sender's address. Click the edit icon.
Case A: The sender's SPF is failing
If the diagnosis in Step 1 showed SPF = fail or softFail and you trust the sender enough to deliver their mail anyway:
Before settling for this workaround long-term, consider asking the sender to fix their SPF - see The proper long-term fix below. Whitelisting is the right answer when mail needs to flow today, but it doesn't solve the underlying problem.
- Open the whitelist entry under Admin Panel → Filtering → Whitelist.
- Set Ignore SPF to Yes.
- In the IP field, enter the sender's actual IP — copy it from the IP column in Incoming Logs for the offending message. If the sender publishes a known sending range, you can enter a subnet in CIDR notation instead, e.g.
203.0.113.0/24. - Click Update (or Add Whitelist).
This is the recommended approach: the SPF bypass applies only to messages coming from that specific IP or range. A spoofer sending from anywhere else will still be blocked by SPF, so you keep most of the protection.
Last resort: If the sender's IPs are genuinely unpredictable and you can't get a usable list from them, enter 1.2.3.4 in the IP field. This is our convention for telling the system ignore SPF from any IP for this sender - the entry will match no matter where the message comes from.
Treat this as an extreme measure. It removes the IP scope entirely, which means anyone who can spoof the sender's address will pass SPF as far as your filter is concerned. Use it only when:
- You've confirmed the sender is genuinely legitimate, and
- You've ruled out the alternatives above (specific IP, CIDR range, or a published sending-IP list).
Case B: The Envelope From is unusable. Whitelist by header instead
Some senders simply can't be whitelisted by Envelope From, because that address rotates per-send or doesn't belong to them. The classic example:
The third-party email service case (SendGrid, Mailchimp, HubSpot, Postmark, etc.)
A small business sends all of their mail through SendGrid. The Envelope From of every message is something like
bounce-9f8e7d6c@sendgrid.net- it rotates per-send, and it belongs to the service, not to the business. TheFrom:header, however, consistently shows the business:hello@trusted-small-business.com.If you whitelist the bounce address, you'll either miss the next message (rotation) or - if you tried to whitelist the bounce domain - end up trusting every SendGrid customer on the planet, spammers included. Neither is acceptable. The correct fix is to whitelist the business's
From:header address and turn on Apply to Headers.
Other situations where the same pattern applies:
- Mailing lists that rewrite the Envelope From to a list-bounce address (
mailman-bounces@lists.example.org) but preserve the original sender inFrom:. - Forwarded mail where the Envelope From becomes the forwarder's address but
From:keeps the original sender. - Genuinely broken senders whose bounce / return-path setup is random per-send, but whose
From:header is consistent and correct.
How to do it:
- In Incoming Logs, hover the Envelope From column to reveal the Header From and copy the address part — e.g.
hello@trusted-small-business.com, notTrusted Business <hello@...>. - In Admin Panel → Filtering → Whitelist, click New and create an entry with this address. Do not use Whitelist & Deliver from Incoming Logs for this case — it captures the Envelope From, which is the wrong address here.
- Set Apply to Headers to Yes.
- Leave Ignore SPF at No unless you also have a confirmed SPF failure to handle.
- Click Add Whitelist.
What Apply to Headers does technically: the filter normally matches only against the Envelope From. With this flag on, it also checks the From: headers — so the whitelisted address matches if it appears in any of those fields, even when the Envelope From is unrelated.
Why this is risky: read before flipping the flag The
From:header is the easiest field in an email for an attacker to forge. There's no protocol-level binding betweenFrom:and the actual sender — SPF, DKIM, and DMARC all exist precisely becauseFrom:can't be trusted on its own.When Apply to Headers is on, the filter will deliver any message that claims to be from the whitelisted address in its
From:header, regardless of who actually sent it. A phisher who knows you've whitelistedaccounts@important-vendor.comwith this flag can spoof that header from anywhere and walk straight past the spam filter.Use Apply to Headers only when:
- You've confirmed the Envelope From genuinely can't be whitelisted (it rotates, or it belongs to a shared third-party service), and
- You trust the sender enough to accept the spoofing risk.
Save and you're done
Click Update (or Add Whitelist if you're creating a fresh entry instead of editing). Move to Step 4 to verify.
The proper long-term fix: ask the sender to repair their setup
Whitelisting on our side is always a workaround - the root cause sits on the sender's end. Their SPF, DKIM, or DMARC setup is misconfigured, and that misconfiguration affects every recipient they email, not just our users. Until they fix it, you'll have to keep maintaining the whitelist entry, and the safety trade-offs (Ignore SPF, Apply to Headers) keep accumulating.
Before settling for the workaround long-term, suggest that the affected user contact the sender and ask them to repair their DNS. Most senders don't realise their mail is landing in spam folders elsewhere. A polite heads-up often leads to a quick fix on their side, and to better deliverability for them everywhere, not just to our domain.
For large institutions with no contact path (banks, government bodies, healthcare providers), this isn't realistic - the workarounds in Case A and Case B are likely your only practical option.
Email template the user can adapt and send
Hi [sender name],
I wanted to flag something — your recent emails to me have been landing in my Spam folder. My email provider tells me the cause is that your domain's SPF check is failing. In plain terms, that usually means the server you're sending from isn't authorised in your domain's SPF DNS record.
If you have someone managing your domain or email setup, could you ask them to look at the following:
- SPF record: confirm that the SPF TXT record on your domain (
[sender-domain.com]) includes the IP or sending service you're actually sending from. The IP my provider saw your last message come from was[IP from Incoming Logs]. - DKIM: enable DKIM signing for your outgoing mail if it isn't already in place.
- DMARC: publish a DMARC record. Not strictly required, but it improves deliverability everywhere, not just to me.
A free check at https://mxtoolbox.com/spf.aspx or https://www.mail-tester.com will show what's currently wrong and what to change.
I've put a temporary workaround on my side so I keep receiving your mail, but the long-term fix really sits with you — and once it's done, you'll see better deliverability across the board.
Thanks, [your name]
Alternative path: let the user self-serve from Webmail
This is the path we recommend when the end user wants to handle it themselves, no admin involvement needed.
- In Webmail, open the Spam folder.
- Find the message from the trusted sender.
- Right-click the message and choose Move to Inbox folder.
- A confirmation pop-up will appear: "Do you trust this sender? Are you sure you want to whitelist this sender: ...?"
- Click Yes.
This creates a user-level whitelist entry: it applies only to that user's mailbox, not the whole domain. The message is moved to the Inbox immediately.
Only do this for senders you genuinely trust. The pop-up asks for a reason: spammers sometimes spoof familiar addresses, so don't whitelist a sender just because the name looks right.
Step 4. Verify the change worked
There are three quick checks:
Check 1: The entry exists with the settings you expect
Go to Admin Panel → Filtering → Whitelist, search for the sender's address, and confirm:
- The entry is there.
- Ignore SPF and Apply to Headers are set correctly for the case you handled.
- For domain-level entries, the Username column is empty.
Check 2: Ask the sender to send a fresh test email
Then go back to Logs → Incoming Logs, search by the sender's address, and look at the most recent message:
- Status should now be
delivered(notspam). - The message should land in the recipient's Inbox.
Check 3: If a test email isn't possible
Use Logs → Incoming Logs with a date range after you made the whitelist change, search by the sender's address, and confirm any new emails show Status = delivered.
Viewing whitelist entries
After you make a change, you can confirm the entry exists.
Go to Admin Panel → Filtering → Whitelist and select the domain. By default this shows only domain-level entries.
To also see entries that individual users have added for themselves, tick Include Users Whitelist. The combined report shows:
- Domain-level entries : no value in the Username column. These apply to every user on the domain.
- User-level entries : the user's address appears in the Username column. These apply only to that user.
This is the canonical view for understanding "what's currently whitelisted on this domain, by whom, with what settings."
Decision shortcut
| What you saw in Incoming Logs | What to do |
|---|---|
| High Spam Score, SPF passed, DNSBL clean | Step 2: Whitelist & Deliver. Defaults are fine. |
| SPF failed | Step 2, then Step 3 Case A . |
| IP listed in DNSBL | Step 2. If it keeps failing, whitelist by IP via Filtering → IP Access List. |
Envelope From is unusable (rotates per-send, belongs to a third-party relay like SendGrid, or is a mailing-list bounce address) but you trust the address in the From: header |
Try Step 2. If it keeps failing, manually whitelist the From: header address with Step 3, Case B (Apply to Headers). |
| End user only wants their own mailbox fixed | Alternative path: let the user self-serve from Webmail. |
Troubleshooting: The message still goes to Spam
If the message still arrives as spam after whitelisting, the most likely causes are:
-
The sender is now sending from a different Envelope From. Marketing platforms and transactional services (SendGrid, Mailchimp, HubSpot, Postmark, etc.) rotate per-send envelope addresses — e.g.
bounce12435@hubspot.com, thenbounce98712@hubspot.com. A whitelist on the previous exact address won't match the new one, and whitelisting the bounce domain would expose you to every other customer of that service, including spammers. The correct fix is to whitelist the sender'sFrom:header address withApply to Headers = Yes- see Step 3, Case B. -
The sender is now sending from a different IP. Re-check the
IPcolumn in Incoming Logs for the latest message. Update the entry with the new IP, or expand it to a CIDR range if the sender uses several addresses. As a last resort, use1.2.3.4to ignore SPF from any IP - but only after the safer options are exhausted (see Step 3, Case A). -
The user has a user-level blacklist or filter rule blocking the sender. User-level settings are more specific than domain-level and take precedence over a domain-level whitelist. A user-level block will always win. Check
Admin Panel → Filtering → Blacklistand check Include Users Blacklist. Check for entries matching the sender's domain or email address. -
You whitelisted the Header From instead of the Envelope From — e.g. you whitelisted
notifications@stripe.combut Stripe's Envelope From is underbounce.stripe.com. See the Envelope From vs Header From callout in Step 1.
Related pages
- Incoming Logs: Track All Incoming Email
- Manage Whitelists and Blacklists (domain level)
- Whitelist / Blacklist by IP: IP Access List
- Settings: Domain Spam Filtering (defaults that apply when no whitelist entry matches)
- User Panel → Whitelist or Blacklist an e-mail address
Set Branding
The Admin Panel allows you to personalize the name, primary color and logo being displayed in the Webmail.
Need specific branding for different clients? You can override these global settings at the domain level. If you want a specific domain to have its own unique logo and colors, just head over to Admin Panel > Domains > Branding.
To update the branding for your account
- Go to the Admin Panel
- Log in using your Admin username and password.
- Click on Branding in the menu bar
- Update the fields
-
Company Name: Enter your company name - it will be displayed as the Webmail page title in the browser
-
Company Web Link: Enter the link to your website
-
Support e-mail: Enter the e-mail address used as the sender for Spam Reports
-
Company Color: Change the primary color for the Webmail to customize the look and match your own branding guidelines
-
Upload Your Logo: Click the upload button to select a logo file directly from your computer.
Note on Size: While there is no longer a strict size limitation for uploads, your logo will be displayed within a 210px x 35px section in the Webmail. For the best visual results, we recommend using an image that respects these ratios.
-
- Click on the Update Settings button to save the changes.

Managing Defaults and Resets
If you are testing new branding or want to start over:
-
Reset to Admin Defaults: Use this button to clear current custom values and return the branding to the system defaults. You can then enter new branding information as needed.
Logs
Outgoing logs - Track all Remote Deliveries
From the Admin Panel, you can track all the messages sent by your users through our outbound servers.
How to Access Outgoing Logs:
-
Log in to the Admin Panel using your Admin username and password.
- From the menu, go to Logs → Outgoing Logs.
- Select a Domain, Start Date, and End Date.
- You can review Remote Delivery data for up to 30 days in the past.
- Click the Search button.
You will see a list of emails sent by all users for the selected domain and time period.
Filtering Options:
Use the filter s to refine your search:
- View Messages dropdown - choose one of the following:
- Delivered messages
- Temporarily Rejected messages (e.g., user is over quota)
- Permanently Rejected messages (e.g., invalid mailbox, blacklisted)
- All Messages
- Sent To - (Optional) Enter the recipient’s email address or part of it.
- Sent From - (Optional) Enter the sender’s specific email address.
The Outgoing Logs do not display emails sent between addresses on the same domain, as those are delivered locally and bypass external logging.
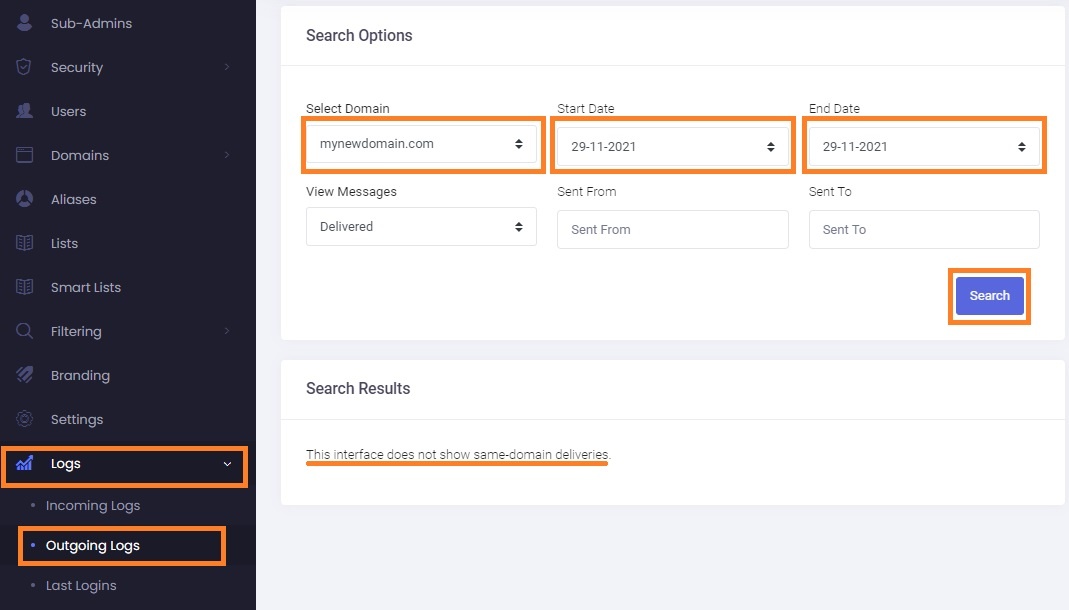
Incoming Logs - Track All Incoming Email
Use the Incoming Logs section in the Admin Panel to track all emails received by your domain. This tool helps you analyze delivery status, sender information, and potential issues with incoming mail.
💡 Tip: Use filters to quickly identify spam, delivery issues, or suspicious activity. You can apply multiple filters to narrow down results efficiently.
How to Access Incoming Logs:
-
Log in to the Admin Panel using your Admin username and password.
- From the menu, go to Logs → Incoming Logs.
- Select a Domain, Start Date, and End Date.
- You can review incoming email data for up to 60 days in the past.
- Click the Search button to view the results.
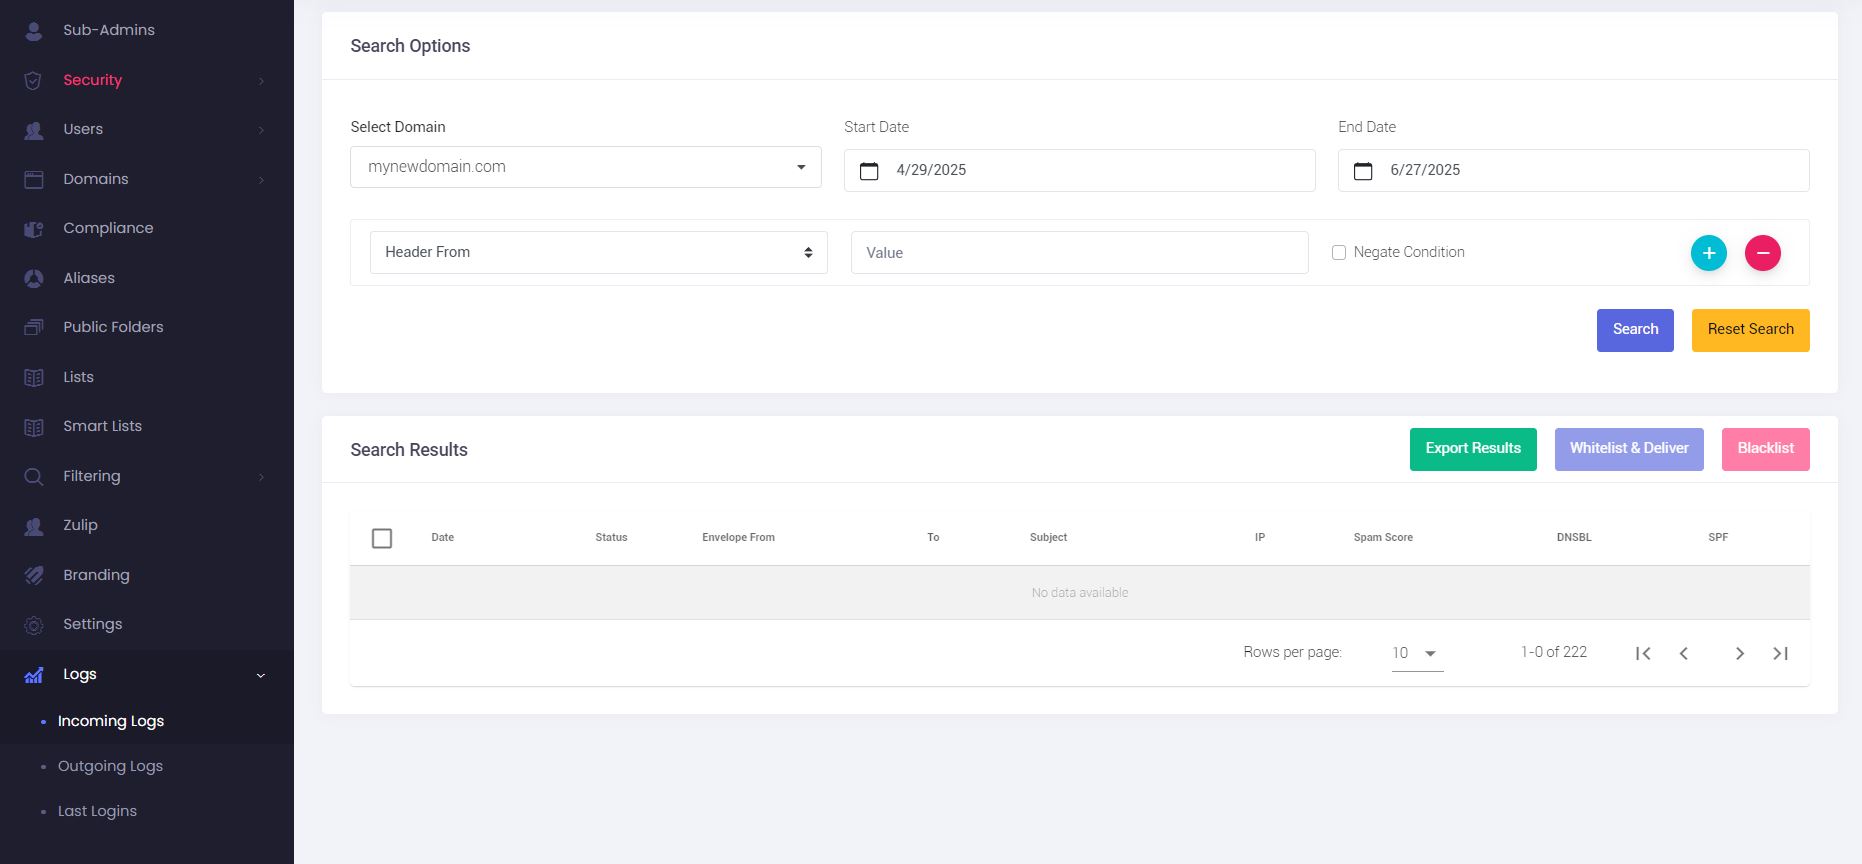
Filtering Options:
You can customize your search by adding one or more filters. Click the + button to add more filters to the search. All filters are optional.
Available filter fields include:
-
Header From – The address in the email’s “From” header.
-
Envelope From – The actual sending address used in the SMTP transaction.
-
Remote IP – The IP address the message was sent from.
-
To – The recipient’s address.
-
Subject – Keywords from the email subject line.
-
Delivered – Search for messages that were successfully delivered.
- Delivered To – The final delivery address (helpful for aliases or forwarding).
-
Undelivered – Find messages that failed to be delivered.
-
Rejected – Messages rejected due to policy or security settings.
You can also check the Negate Condition box next to any filter to exclude results matching that condition.
Understanding Search Results:
The search results table includes:
-
Date – When the message was received.
-
Status – Delivery status (delivered, undelivered, rejected, spam).
-
Envelope From – The actual SMTP sender address.
Hover to see the "Header From" address as shown in the email client. -
To – Recipient address.
-
Subject – Message subject.
-
IP – Sending server’s IP address.
-
Spam Score – Spam rating assigned to the message.
-
DNSBL – Indicates if the IP was listed in a DNS blacklist.
-
SPF – Shows whether the SPF check passed.
You can also:
-
Export Results to a CSV file.
-
Whitelist & Deliver selected messages.
-
Blacklist unwanted senders or IPs.
Last Logins – Monitor User Login Activity
The Last Logins section in the Admin Panel allows you to monitor when users last accessed their mailboxes, from which IPs and locations, and what services or credentials were used.
This feature is useful for detecting unusual login patterns, troubleshooting access issues, or verifying account activity.
💡 Tip: Use this log to spot suspicious login attempts, such as logins from unexpected countries or unknown IP addresses.
How to Access the Last Logins Section:
- Log in to the Admin Panel using your Admin username and password.
- From the menu, go to Logs → Last Logins.
- Select the Domain, and set the Start Date and End Date to define the period you want to analyze.
- Optionally, use filters to narrow down the search (see below).
- Click Search to view the login activity.
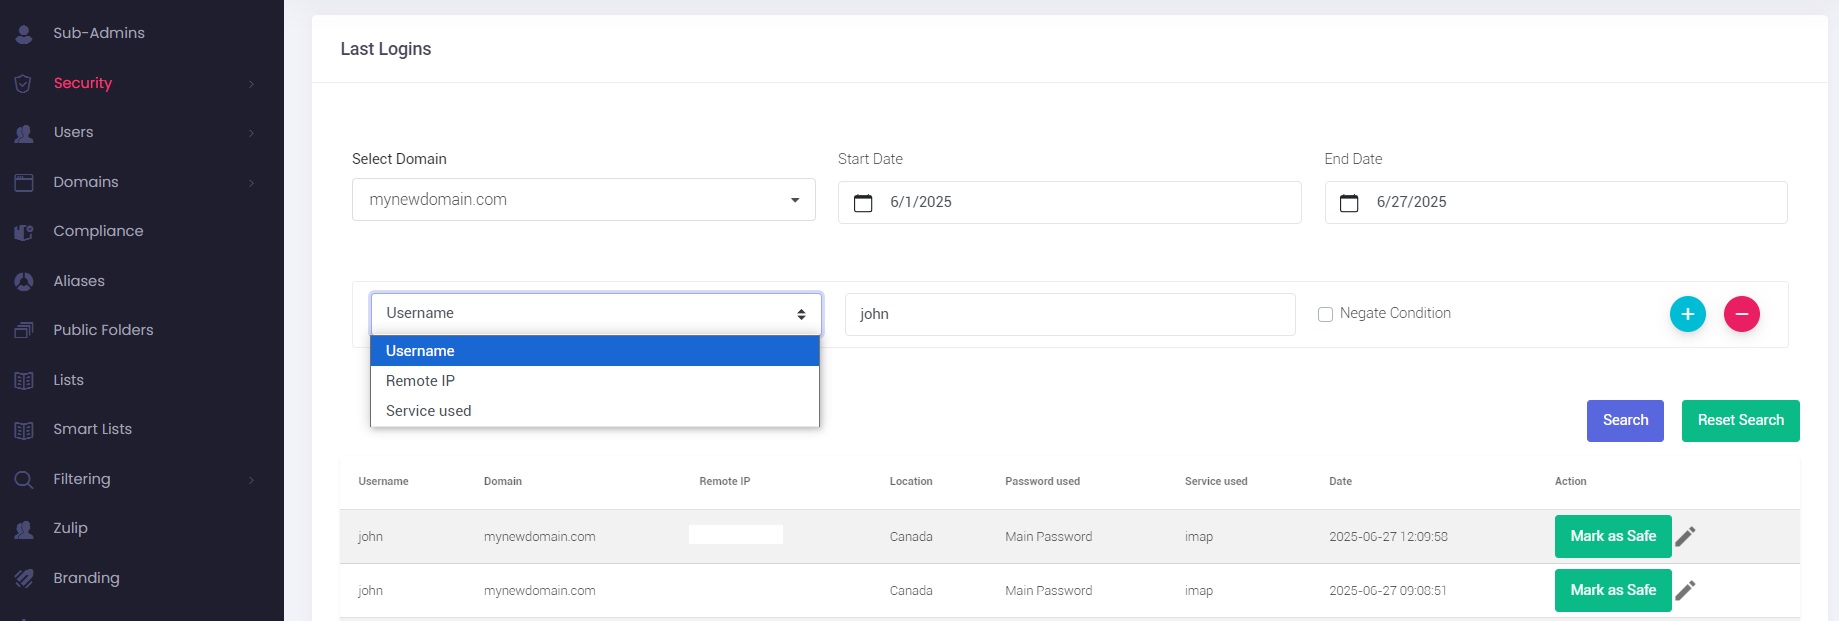
Filtering Options:
To refine your search, you can add one or more filters by clicking the + button. You can also exclude specific values by checking the Negate Condition box.
Available filters include:
-
Username – Search for logins by a specific user.
-
Remote IP – Filter by the IP address from which the login originated.
-
Service used – Filter by the protocol used (e.g., IMAP, SMTP, POP3).
Filters can be combined for more precise results.
Understanding the Results:
Each login entry includes the following information:
-
Username – The mailbox username that logged in.
-
Domain – The associated domain of the mailbox.
-
Remote IP – The IP address from which the login occurred.
-
Location – Estimated location based on IP.
-
Password used – Indicates whether the main mailbox password or an app-specific password was used.
-
Service used – The service used for the login (e.g., IMAP, SMTP, POP3).
-
Date – The exact timestamp of the login.
-
Action – You can Mark as Safe to acknowledge a known login.