# Security
# 2FA - Two-factor authentication
**Two-factor authentication**, or **2FA** as it's commonly abbreviated, adds an extra step to your basic login procedure. Without 2FA, the password is your single factor of authentication: you enter your username and password, then you're done.
With 2FA, you log in to the Admin Panel by entering your username and password and the six-digit code provided by an app installed on your smartphone.
After the latest update of the Admin Panel, you will be prompted to enter the 2FA code in a new pop-up window.
### **Enable 2FA for the Admin Panel**
If you're using this Admin account as credentials for the API, the API login will fail after enabling 2FA. To solve this, create a Sub-Admin with special permissions for the API authentication only.
What you need:
\- a smartphone with a 2FA App installed (OTP / 2-Step Verification / 2-Factor Authentication), such as [Authy](https://play.google.com/store/apps/details?id=com.authy.authy&hl=en) or [Google Authenticator](https://play.google.com/store/apps/details?id=com.google.android.apps.authenticator2&hl=en).
To enable 2FA for your Admin account:
- Log in to the **[Admin Panel](https://admin.emailarray.com/)**
- From the menu, go to **Security** → **2FA**
- Update the dropdown **Select Status** to **Enabled**. Click on the **Save** button.
**[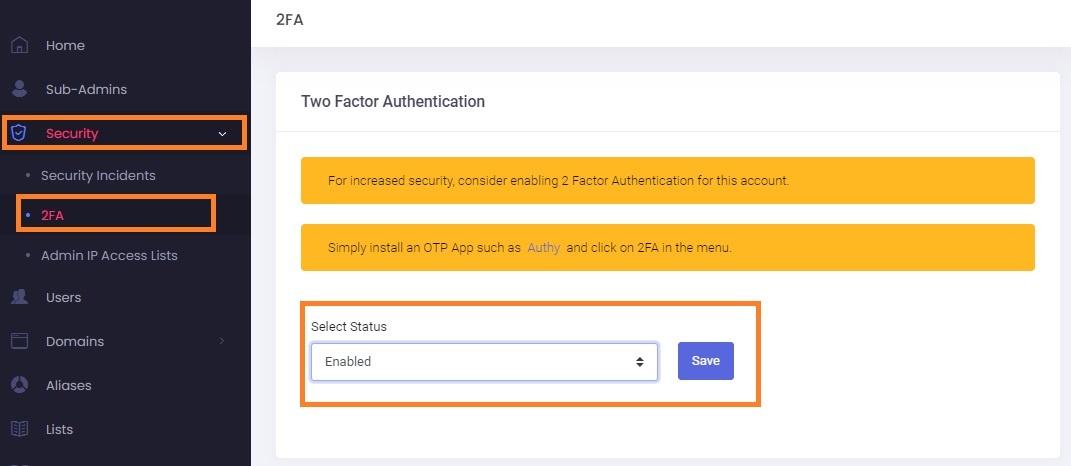](https://wikidev.emailarray.com/uploads/images/gallery/2024-08/admin-panel-2fa-two-factor-authentication-how-to-enable-2fa.jpg)**
- Recheck the requirements: have a 2FA App installed on your phone.
- When ready, click on the **Next** button.
[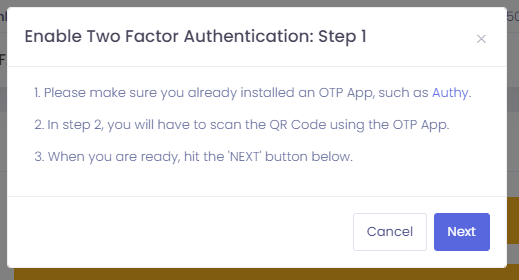](https://wikidev.emailarray.com/uploads/images/gallery/2024-08/admin-panel-2fa-two-factor-authentication-step-1.PNG)
- Scan the QR code with the installed 2FA App and fill in the generated six-digit code in the **Challenge** input field.
- **Click on the Save button before your token expires.**
[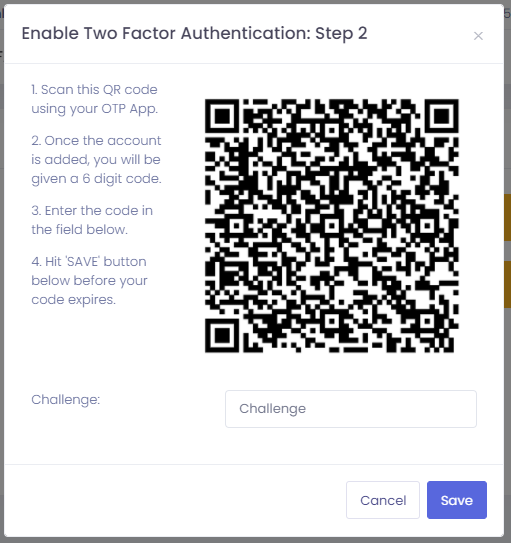](https://wikidev.emailarray.com/uploads/images/gallery/2024-08/admin-panel-2fa-two-factor-authentication-step-2.PNG)
### **Disable 2FA for the Admin Panel**
To disable the 2FA for your Admin account:
- Log in to the **[Admin Panel](https://admin.emailarray.com/)**
- From the menu, go to **Security** → **2FA**
- Update the dropdown **Select Status** to **Disabled**. Click on the **Save** button.
[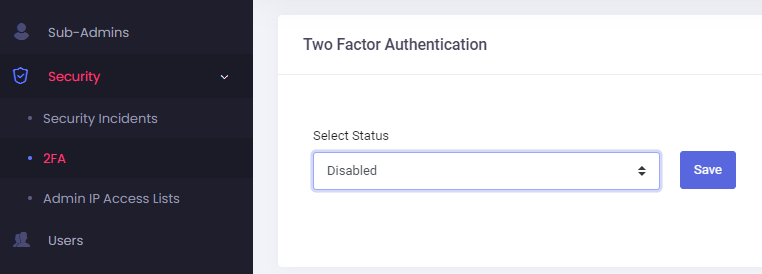](https://wikidev.emailarray.com/uploads/images/gallery/2024-08/admin-panel-2fa-two-factor-authentication-disable.PNG)
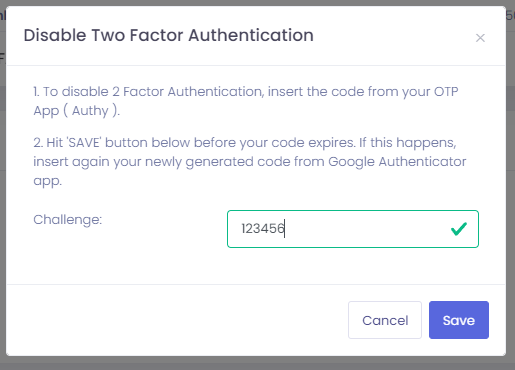
- Insert the token from your 2FA App (such as Authy or Google Authenticator) in the **Challenge** input field.
- **Click on the Save button before the token expires.**
[](https://wikidev.emailarray.com/uploads/images/gallery/2024-08/admin-panel-2fa-two-factor-authentication-disable-step-1.PNG)
- After you see the confirmation message that the 2FA was disabled, you can delete the entry from your 2FA app.
# Restrict Login Access: Admin IP Access Lists
You can increase the security of your account by restricting login access for your Admin (or Sub-Admins) account to a list of know IPs, such as your office, your home, and server IPs for API or WHMCS authentication.
This feature works only with static IPs. Make sure your internet provider doesn't use dynamic IP addresses which change over time.
### Add a new IP to the Access List
- Go to the [Admin Panel](https://cp.emailarray.com/admin).
- Log in using your Admin (or Sub-Admin) username and password.
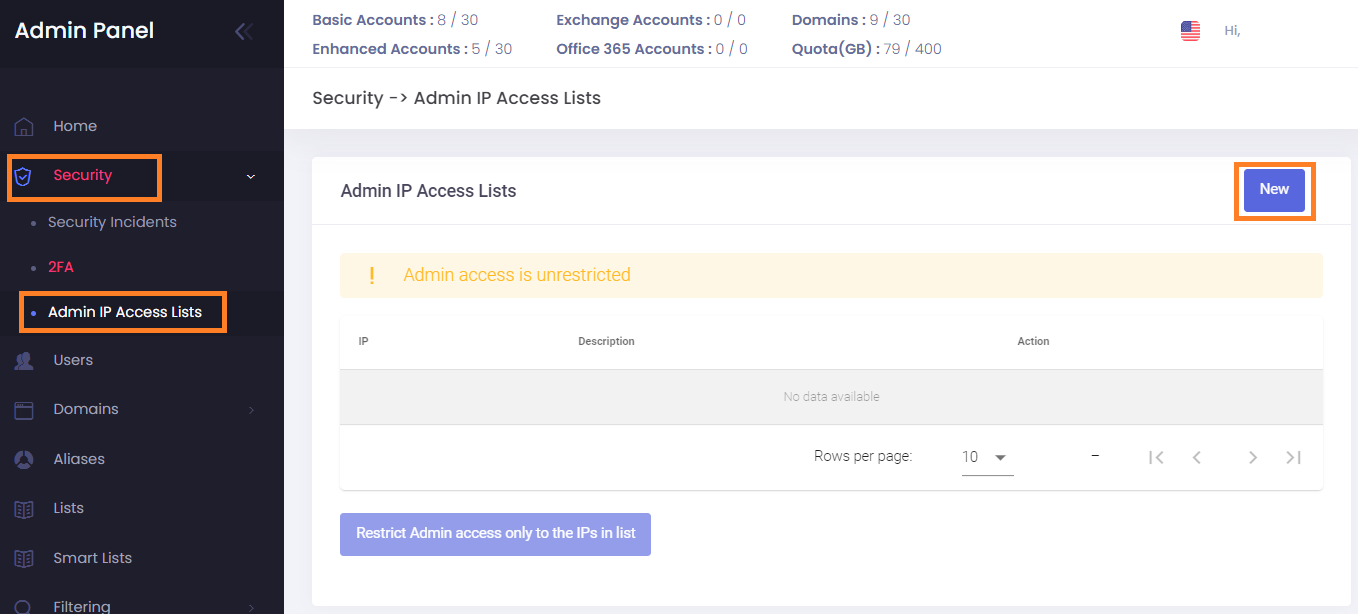
- Click on **Security** → **Admin IP Access Lists** in the menu.
[](https://wikidev.emailarray.com/uploads/images/gallery/2024-08/admin-panel-admin-access-list.png)
- Click on the **New** button.
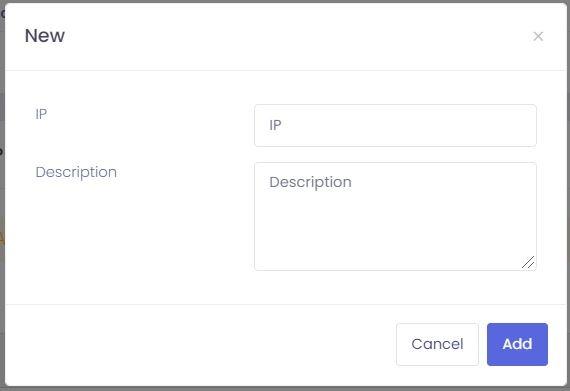
- Fill in the IP and a description.
- Click on the **Add** button to save.
[](https://wikidev.emailarray.com/uploads/images/gallery/2024-08/admin-panel-add-ip-for-admin-access-lists.JPG)
### Restrict Admin Login Access to only the IPs in the Access List
- Go to the [Admin Panel](https://cp.emailarray.com/admin).
- Log in using your Admin (or Sub-Admin) username and password.
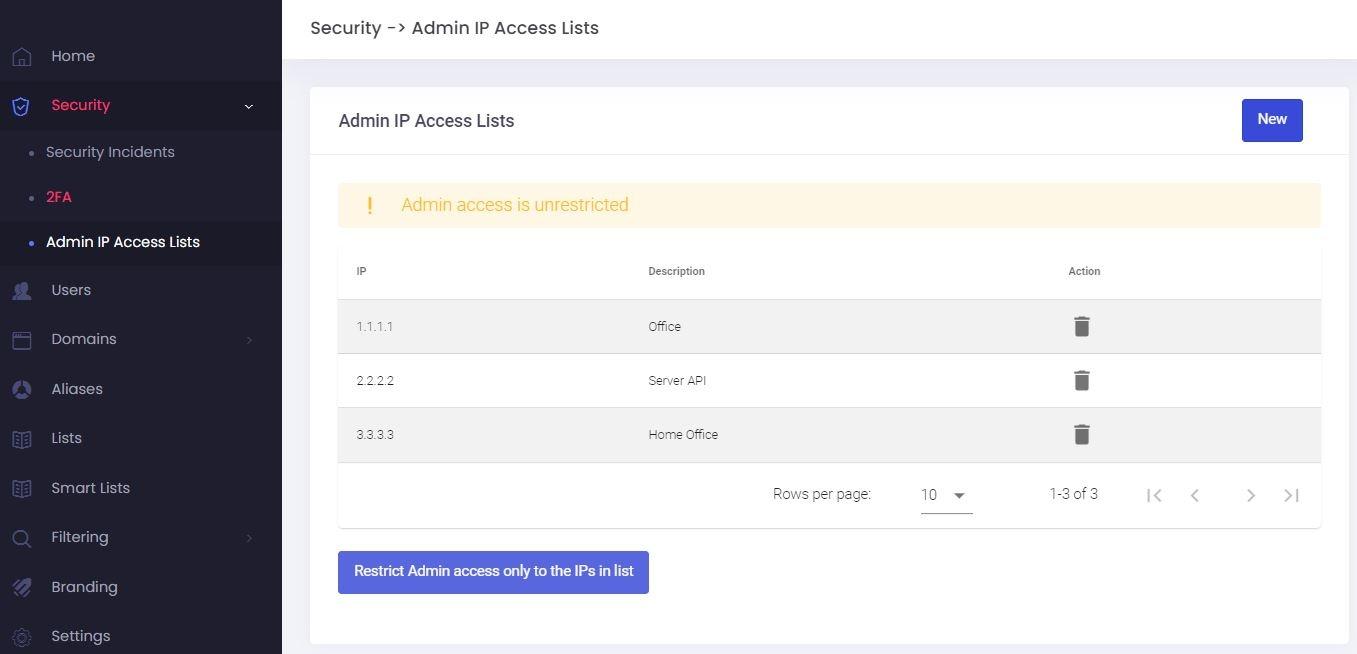
- Click on **Security** → **Admin IP Access Lists** in the menu.
[](https://wikidev.emailarray.com/uploads/images/gallery/2024-08/admin-panel-restrict-access.JPG)
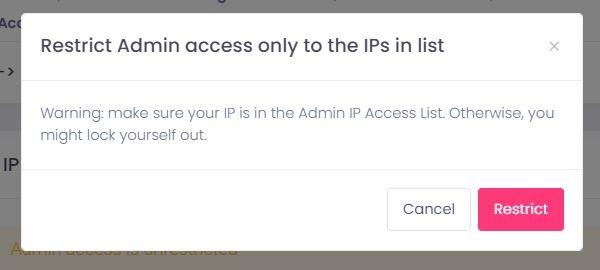
- Click on the **Restrict Admin access only to the IPs in list** button.
- Read the warning and click on the **Restrict** button to confirm.
[](https://wikidev.emailarray.com/uploads/images/gallery/2024-08/admin-panel-restrict-access-warning.JPG)
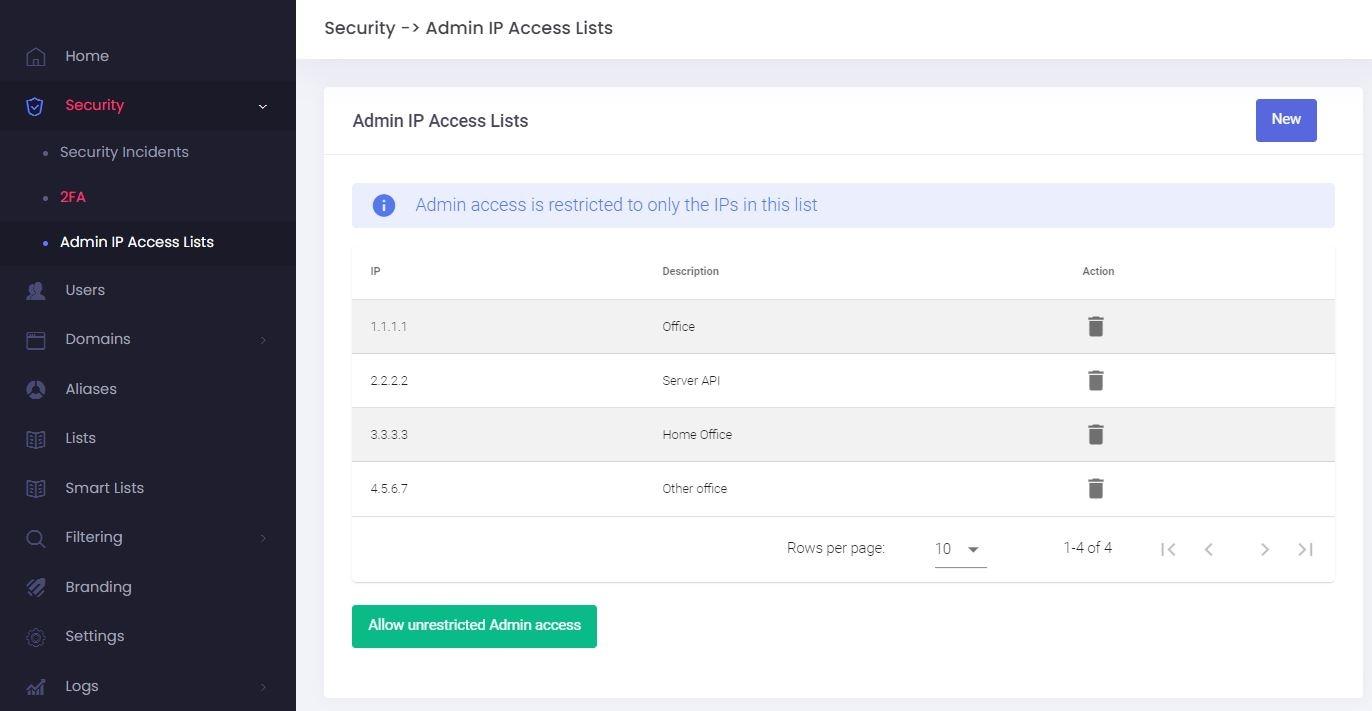
- Access is now restricted to the IPs in your list:
[](https://wikidev.emailarray.com/uploads/images/gallery/2024-08/admin-panel-access-is-restricted.JPG)
### Allow unrestricted access for Admin (or Sub-Admin)
- Go to the [Admin Panel](https://cp.emailarray.com/admin).
- Log in using your Admin (or Sub-Admin) username and password.
- Click on **Security** → **Admin IP Access Lists** in the menu.
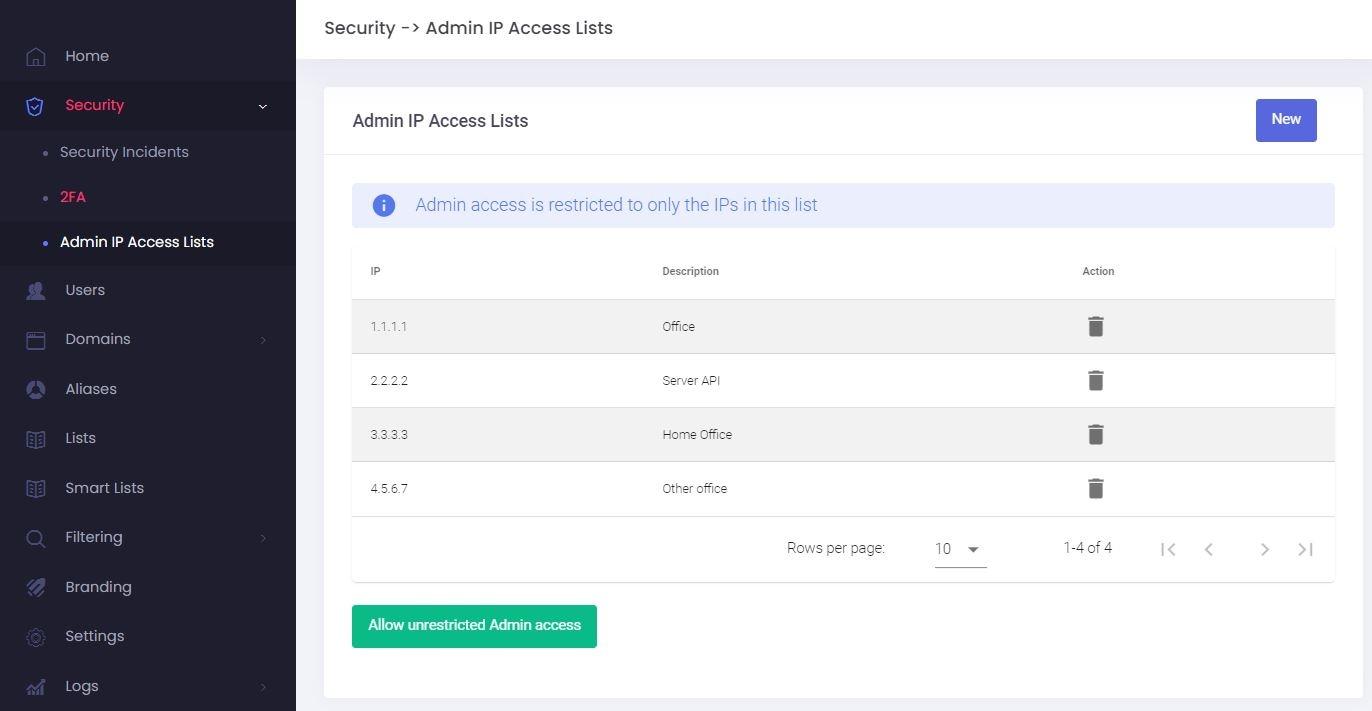
- Click on the **Allow unrestricted Admin access** button.
[](https://wikidev.emailarray.com/uploads/images/gallery/2024-08/admin-panel-allow-unrestricted-access.JPG)
# Security Incidents
When you log in to the Admin Panel, on the Home page, you might see this warning message:
**New security incidents detected. Click here to check the Security page.**
**[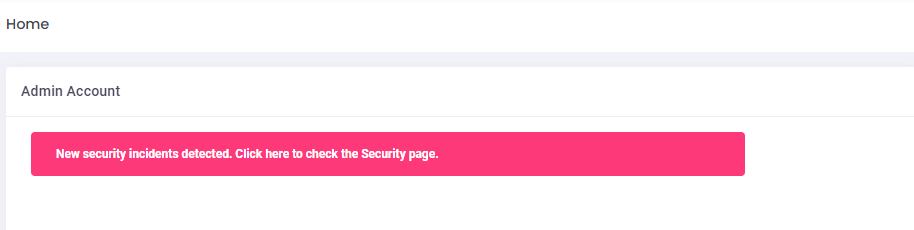](https://wikidev.emailarray.com/uploads/images/gallery/2024-08/admin-panel-dashboard-security-incidents.PNG)**
This happens when we detect suspicious logins from more than one location for one of your Users.
Click on the error message to go to the Security Incidents page and review each case.
### How to review a Security Incident case
To review the security incidents:
- Log in to the **[Admin Panel](https://admin.emailarray.com/)**
- From the menu, go to **Security** → **Security** **Incidents**; or click on the error message from the Home page.
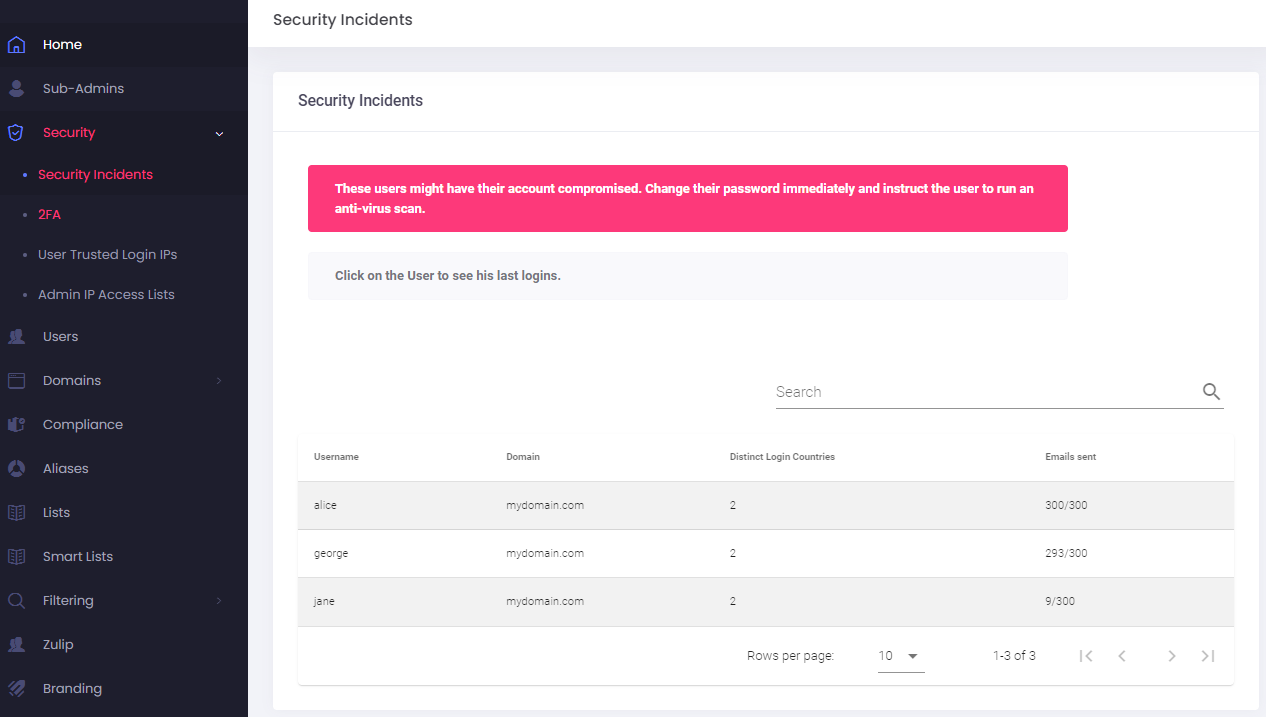
- You will see a list of Users that have triggered the warning.
[](https://wikidev.emailarray.com/uploads/images/gallery/2024-08/admin-panel-security-incidents.PNG)
- Check how many messages were sent in the last 24 hours and the number of distinct login countries. A higher number might suggest a compromised account.
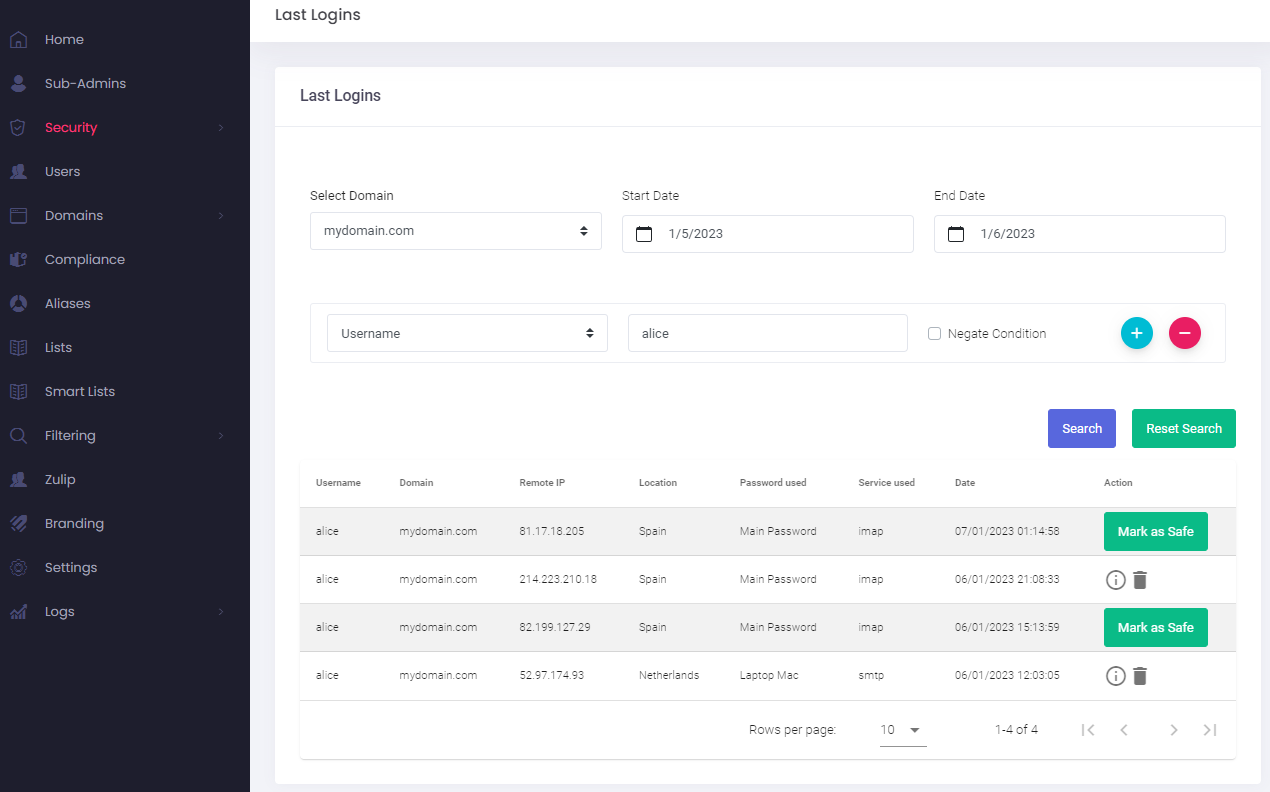
- Click on each user to see a list of their Last Logins. Contact the customer if you suspect the account was compromised.
### Possible reasons why the User is on the Security Incidents list
#### Compromised account
The User's account was compromised and an attacker is sending emails on his behalf or accessing the contents of his emails. This might happen if the User doesn't use a strong password, has malware installed or accessed his account from an insecure location / device and threat actor intercepted their password.
#### Third-party applications
Some applications that the User has setup will access the contents of his emails from different servers which will trigger the suspicious login warning. **You should inform the customer that the application has full access to their mailbox and make sure to read their Terms & Conditions about data processing.**
If the User is comfortable with the app having access to their data, you can follow the steps to **Mark IP as Safe**.
Some examples of such applications include:
- CRM applications (such as [Hubspot](https://en.wikipedia.org/wiki/HubSpot), [Salesforce](https://en.wikipedia.org/wiki/Salesforce), etc.)
- Sales automation applications
- Email clients (such as [Outlook](https://en.wikipedia.org/wiki/Microsoft_Outlook), [MyMail](https://en.wikipedia.org/wiki/MyMail), etc.) that read and process all the User's data through their servers. This includes your password in the clear(!) and all e-mail content
#### User is traveling
A legitimate case is when the User is traveling and is logging in from new locations.
#### Mobile connection
The User is accessing the service using a mobile connection that keeps renewing the IP.
### Mark IPs as safe
In case of legitimate use, the IPs can be marked as safe and will not trigger the Security Incident warning anymore.
To mark an IP as safe:
- Log in to the **[Admin Panel](https://admin.emailarray.com/)**
- From the menu, go to **Security** → **Security** **Incidents**; or click on the error message from the Home page.
- Click on the User for which you want to mark an IP as safe. This will take you to his **Last Logins** logs.

- In the Last Logins logs, you can click on the **Mark as Safe** button next to the IP you want to whitelist.
- In the new pop-up, give a description to the IP (mandatory) and choose whether you want to mark as safe only the IP or the entire network (with options from /31 to /22)
- If you wish to whitelist all of Google's IPs, please set the Range to /17
- If you wish to whitelist all of myMail's IPs, please set the Range to /22
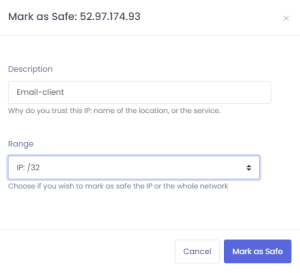
- Click on the **Mark as Safe** button to save the changes.
- You can remove an entry anytime.
# User Trusted Login IPs
Maintain seamless access for your users while keeping your infrastructure secure. The **User Trusted Login IPs** feature allows you to whitelist specific IP addresses used by your team or clients, ensuring that legitimate logins from known locations are never interrupted. By marking an IP as "Safe," you prevent future security incident warnings for that specific source, allowing for a smoother user experience without compromising enterprise-grade protection.
### Manage User Trusted Login IPs
To manage the User trusted login IPs for an account:
- Log in to the **[Admin Panel](https://admin.emailarray.com/)**
- From the menu, go to **Security** → **User Trusted Login IPs**
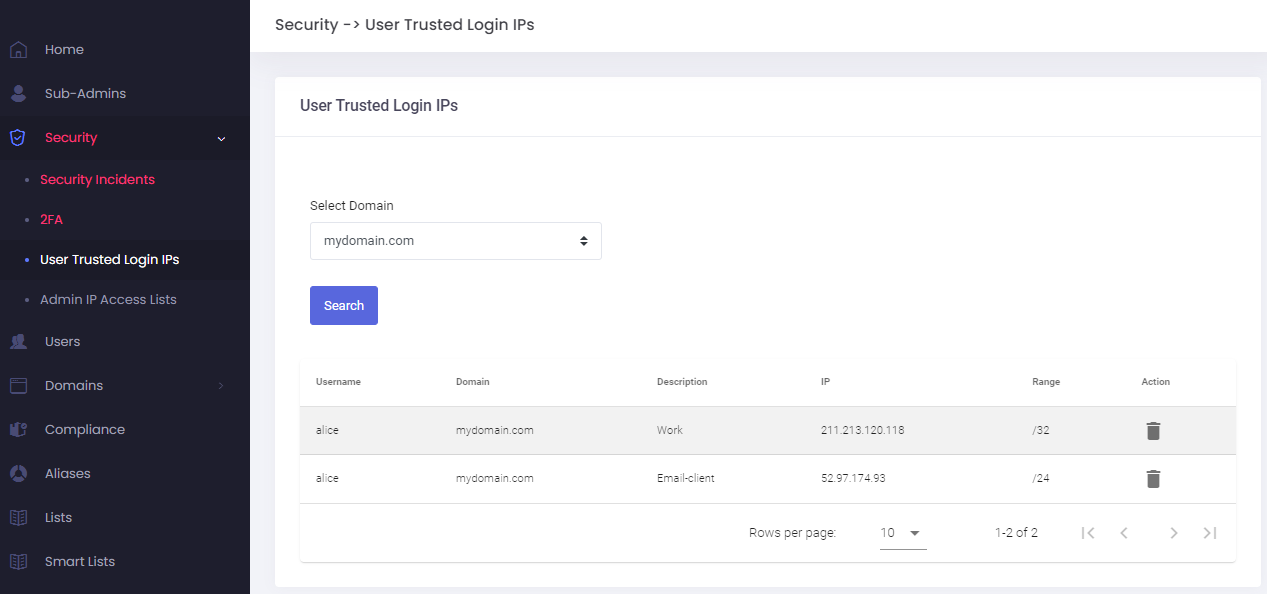
- Select the domain from the dropdown and click on the **Search** button.
- A list of all trusted IPs that were previously Marked as Safe will show.
[](https://wikidev.emailarray.com/uploads/images/gallery/2024-08/admin-panel-security-user-trusted-login-ips.PNG)
- You can delete an entry at anytime
- To add a new trusted IP, [follow these steps to **mark IP as safe**](https://wikidev.emailarray.com/books/3-admin-panel-manage-users-domains-aliases-and-more/page/security-incidents#bkmrk-mark-ips-as-safe).
### Checking and Unblocking IP Addresses
If a user is unable to connect, it may be because their IP address has been temporarily restricted due to security protocols. You can check the status of an IP and mark it as "Safe" directly from the management panel.
#### How to Check if an IP is Blocked
- Navigate to the **Security** → **User Trusted Login IPs** section in your panel.
- Enter the specific **IP address** into the search field.
- If the IP is restricted: An option to **Mark as Safe** will appear.
#### Adding an IP to the Safe List
When you choose to mark an IP as safe, a configuration window will open. To ensure the security of the account, please provide the following details:
- **Domain & Username**: Select the specific domain and user account this rule should apply to.
- **Description (Required)**: Provide a brief note (minimum 2 characters) explaining why this IP is trusted, such as the office location or the specific service name.
- **Range**: Choose whether to whitelist only the specific Remote IP (/32) or the entire network range.
- **Single IP (/32):** Use this for individual users working from a fixed location, like a home office with a static IP. It is the most secure option because it only whitelists one specific address.
- **IP Range (Network):** This is ideal for larger corporate offices where many employees share a single network. Mark the whole network as safe to prevent repeated blocks for different users in the same building.
**Security Note:** Only whitelist an entire range if you are certain the network is private and managed. Whitelisting large public ranges can leave accounts vulnerable to unauthorized access from other users on that same network.
Once submitted, logins from this IP will no longer trigger security warnings or connection blocks for that user.