2 - User Panel - Advanced Setup for Your Mailbox
The User Control Panel is located at http://cp.emailarray.com and can also be accessed via Webmail, from the "User Settings" link.
It lets users manage several aspects, such as change their password, setup autoresponder, manage spam quarantine, forwarders, track deliveries, create delivery rules, manage white and blacklist and much more.
- Change your mailbox password
- MFA - Multi-factor authentication for your mailbox
- Forward Messages
- Vacation Message (Autoresponder)
- Sharing Email Folders
- Extensions
- Spam filtering
- Whitelist or Blacklist an e-mail address
- Retrain Messages
- Track Remote Deliveries
- Delivery Rules - Manage Incoming Email
- Disabling local delivery to an account
- How to avoid forged e-mails?
- ownCloud - Free File Storage and Sharing on the Cloud
- Folder Cleanup Rules
- Recovering Your Emails: Archive vs. Gateway Manager
Change your mailbox password
Your mailbox password is the one you use when you log in to the Webmail or e-mail client, such as Apple Mail, Outlook, or the mail app on your phone.
If you have set up the e-mail address on other devices, once you update the e-mail password, you should update the settings of all your e-mail clients to use this new password for IMAP and SMTP logins.
Your password must contain at least 8 characters, and at least one UPPERCASE letter, one lowercase, one number, and one special character (,./!@#$%^&*, etc.)
1. Change your mailbox password from the Webmail
To change the password for your e-mail address, log in to the GroupOffice Webmail using your current password:
- Log into the Webmail using your full e-mail address and your current e-mail password.
- Click on the User icon from the top right to activate the menu. Then click on My account.

- In the Account tab, in the Password section, you can fill in the new password.
- Fill in and confirm the new password. Please note the password must meet all the requirements.
- You can also generate a strong password by clicking on the Refresh arrow icon at the right of the Password field.
- Click on the Update password and log me out from everywhere button. This will log you out of every device or email client.
- Your password was updated, and you can now use it to log back in.


2. Change your mailbox password from the User Panel
To change your password for your e-mail address:
-
Go to the User Panel
- Log in using your full e-mail address ( user@domain.com ) and your current e-mail password.
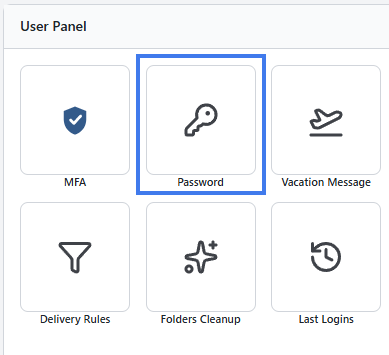
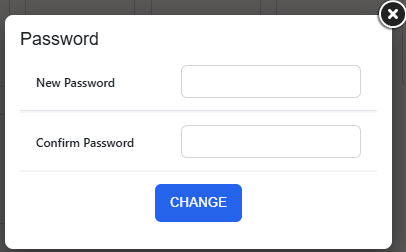
- Click on the Password icon from the menu
- Enter your new password, confirm it and click on the Change button
3. Change the mailbox password from the Admin Panel
If you have administration permissions, you can update the password of a mailbox without knowing the current one.
To update the password:
- Go to the Admin Panel
- Log in using your Admin username and password
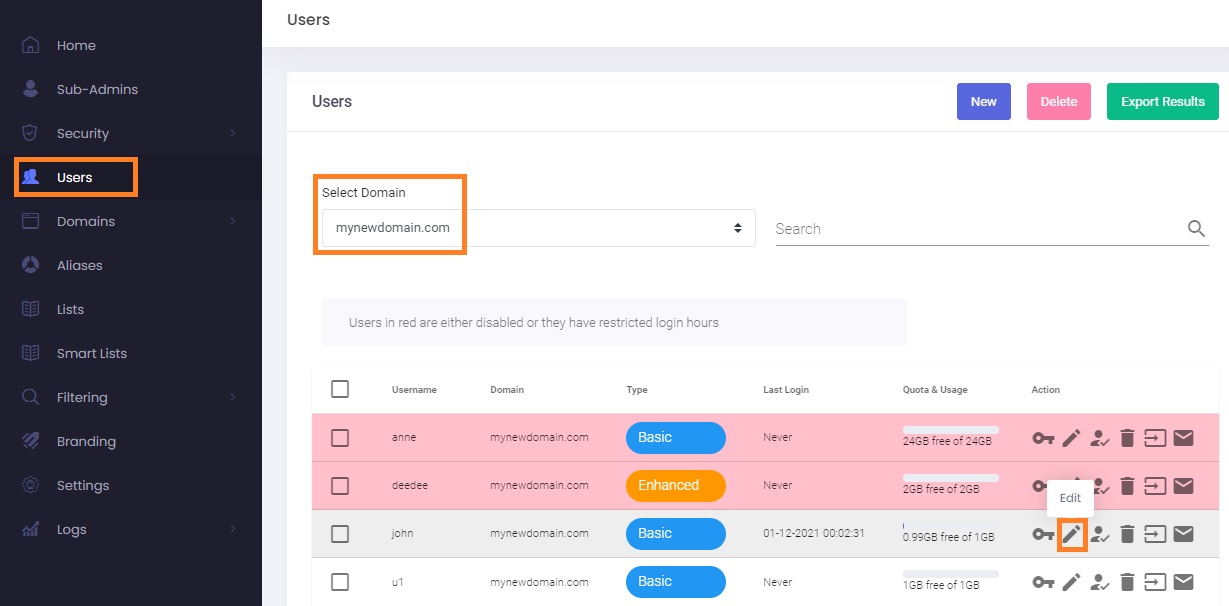
- Go to the Users tab from the menu
- From the Select Domain dropdown, select the desired domain name
- Click on the Edit (pencil) icon to update the desired mailbox
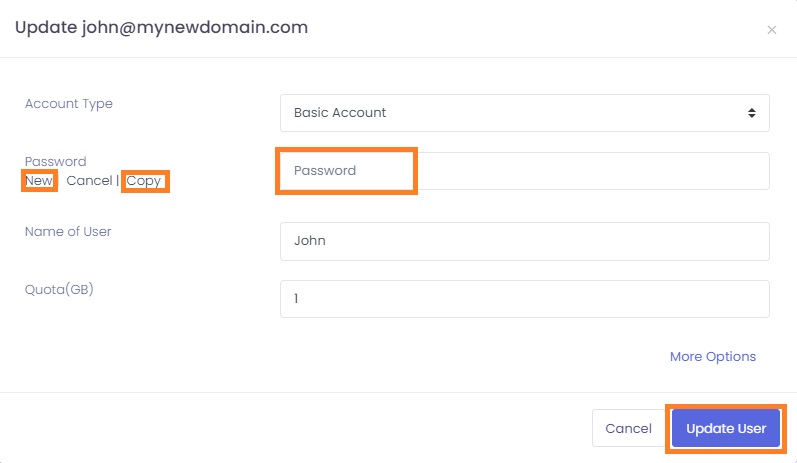
- In the new pop-up window, you can fill in the new Password for the e-mail address.
- You can also use the New button to generate a complex password and copy it to clipboard using the Copy button.
- Click on the Update User button to save the changes.
MFA - Multi-factor authentication for your mailbox
Multi-factor authentication, or MFA as it's commonly abbreviated, adds an extra step to your basic login procedure. Without 2FA, the password is your single factor of authentication: you enter your username and password, then you're done.
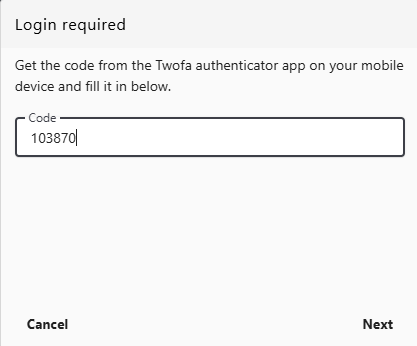
With MFA, you log in to the Webmail by entering your username and password and the six-digit code provided by an app installed on your smartphone.
In the Webmail, you will be prompted to enter the MFA code in a new pop-up window.
1. How to enable MFA from the Webmail
- Log into the Webmail using your full e-mail address and your current e-mail password
- Click on the User icon from the top right to activate the menu. Then click on My account

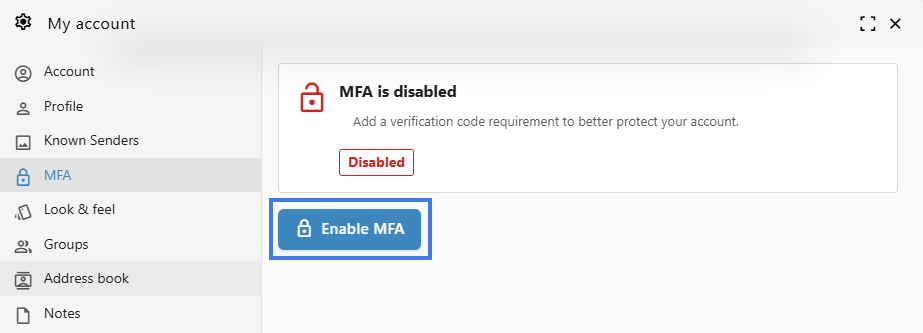
- In the Account tab, reach for the MFA section.
- Click on Enable MFA.

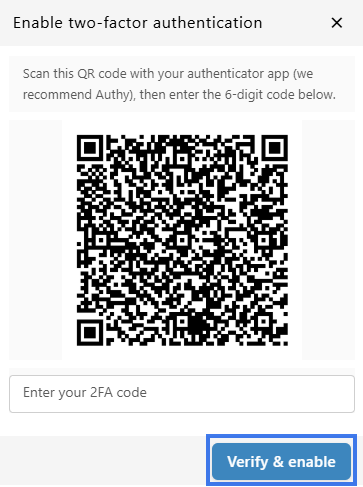
-
Use your authenticator app to scan the QR code, then enter the 6-digit verification code and click Verify & Enable.

- Click Save.

2. How to enable MFA from the User Panel
First, you need a smartphone with a two-factor authenticator App installed (OTP / M-Step Verification / M-Factor Authentication), such as Authy or Google Authenticator.
To enable MFA for your e-mail address:
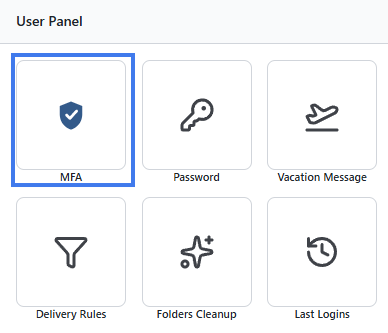
- Log in to the User Panel
- From the menu, go to MFA
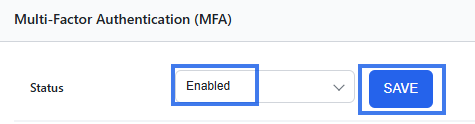
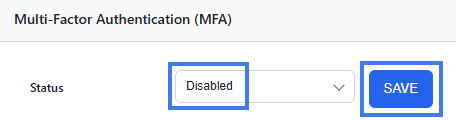
- Update the dropdown Status to Enabled. Click on the Save button.
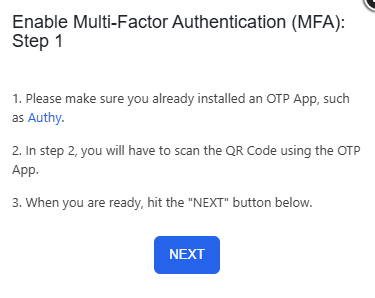
- Recheck the requirements: have a MFA App installed on your phone, such as Authy or Google Authenticator
- When ready, click on the Next button
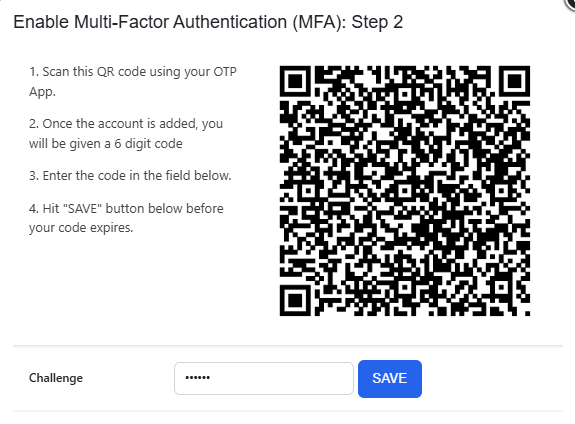
- Scan the QR code with the installed MFA App and fill in the generated six-digit code in the Challenge input field.
- Click on the Save button before your token expires. It is always better to wait for the app to generate a fresh token, so you have enough time before it expires.
- You have enabled MFA, and you will be prompted to fill in the token every time you log in using Webmail.
3. Disable MFA from the Webmail
- Log into the Webmail using your full e-mail address and your current e-mail password
- Click on the User icon from the top right to activate the menu. Then click on My account
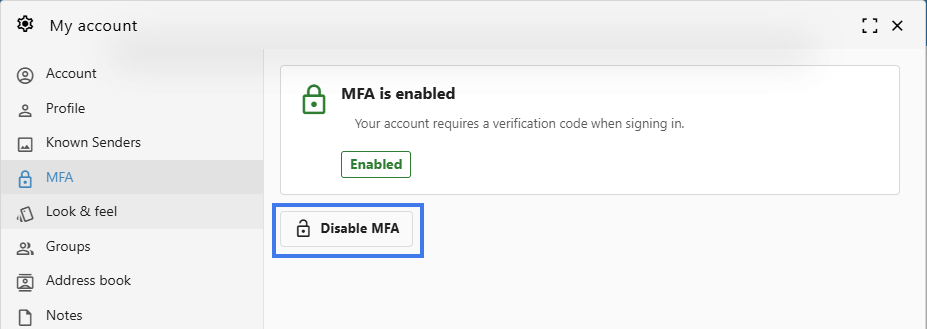
- In the Account tab, reach for the MFA section.
- Click on Disable MFA.

-
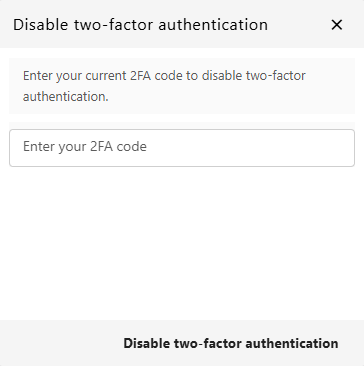
Use your authenticator app to generate a 6-digit code, then enter it and click Disable two-factor authentication.

- Click Save.
4. Disable 2FA from the User Panel
To disable MFA for your e-mail address:
- Update the dropdown Status to Disabled. Click on the Save button.
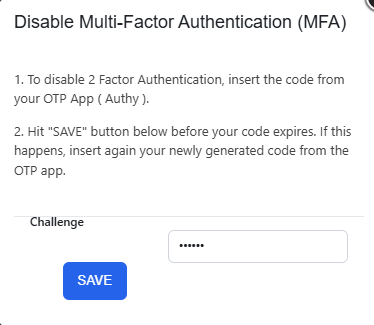
- Insert the token from your MFA App (such as Authy or Google Authenticator) in the Challenge input field.
- Click on the Save button before the token expires. It is always better to wait for the app to generate a fresh token, so you have enough time before it expires.
- After you see the confirmation message that the MFA was disabled, you can delete the entry from your MFA app.
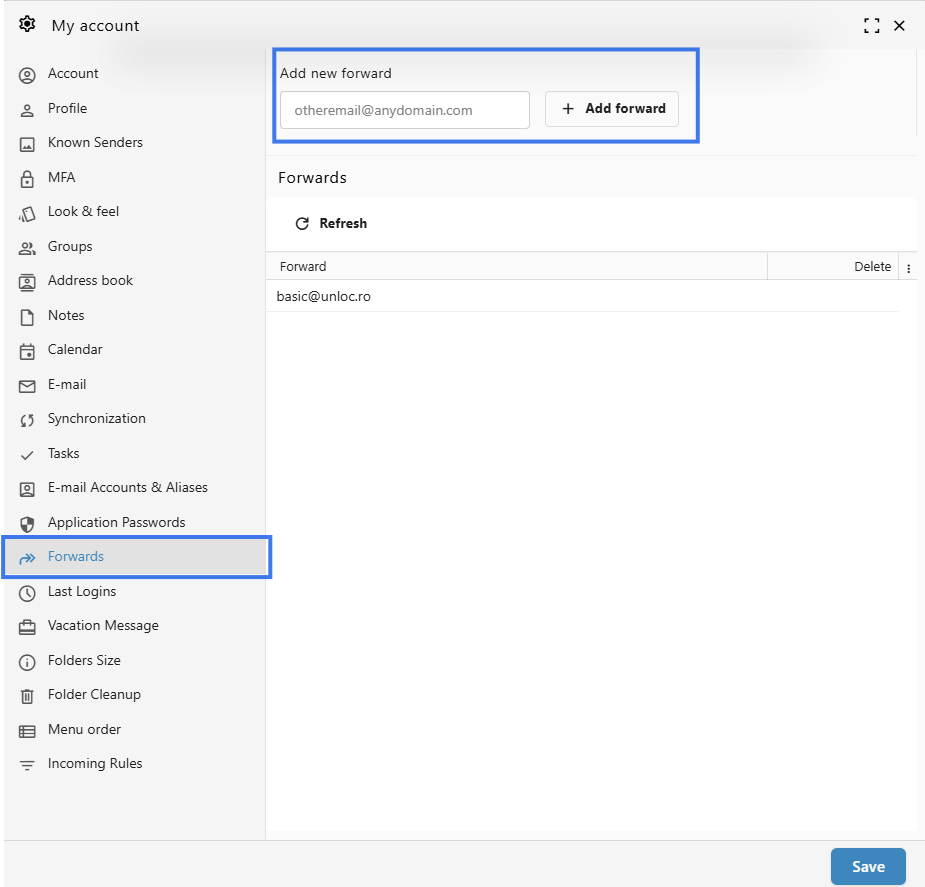
Forward Messages
Incoming e-mail messages to your account can automatically be forwarded to other accounts while also delivering a copy locally. E-mails detected by our server as spam are not forwarded.
Add a Forward
Option 1: from the Webmail

Option 2: from the User Panel
Remove a Forward
Option 1: from the Webmail
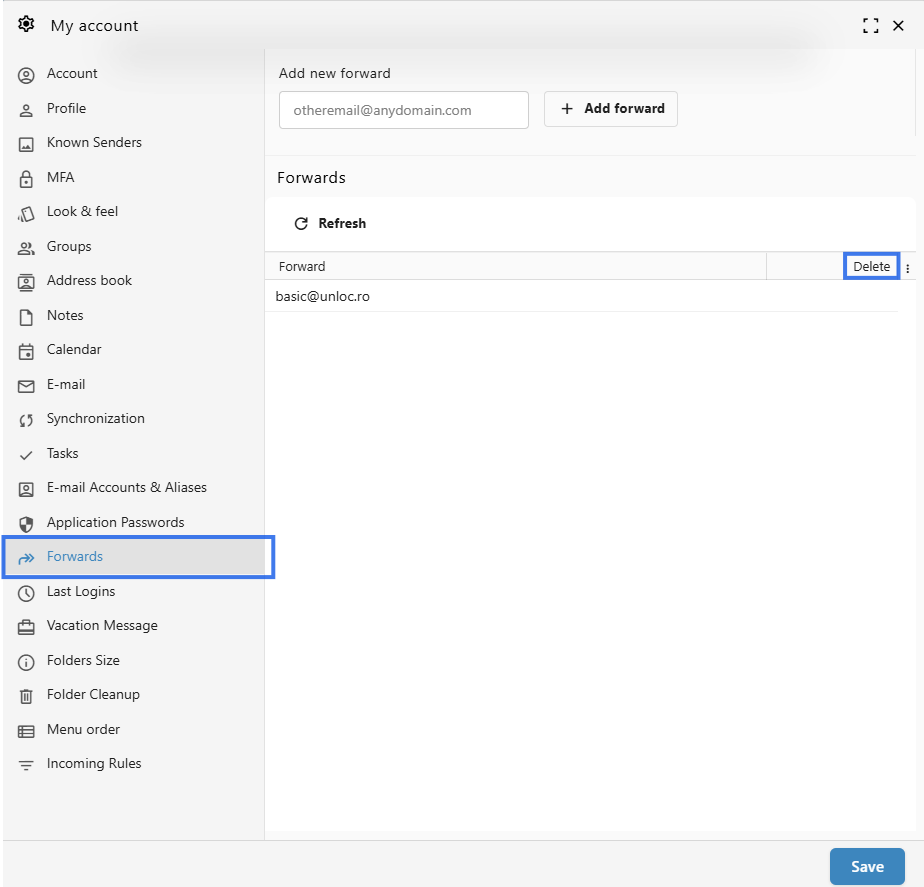
Option 2: from the User Panel
Vacation Message (Autoresponder)
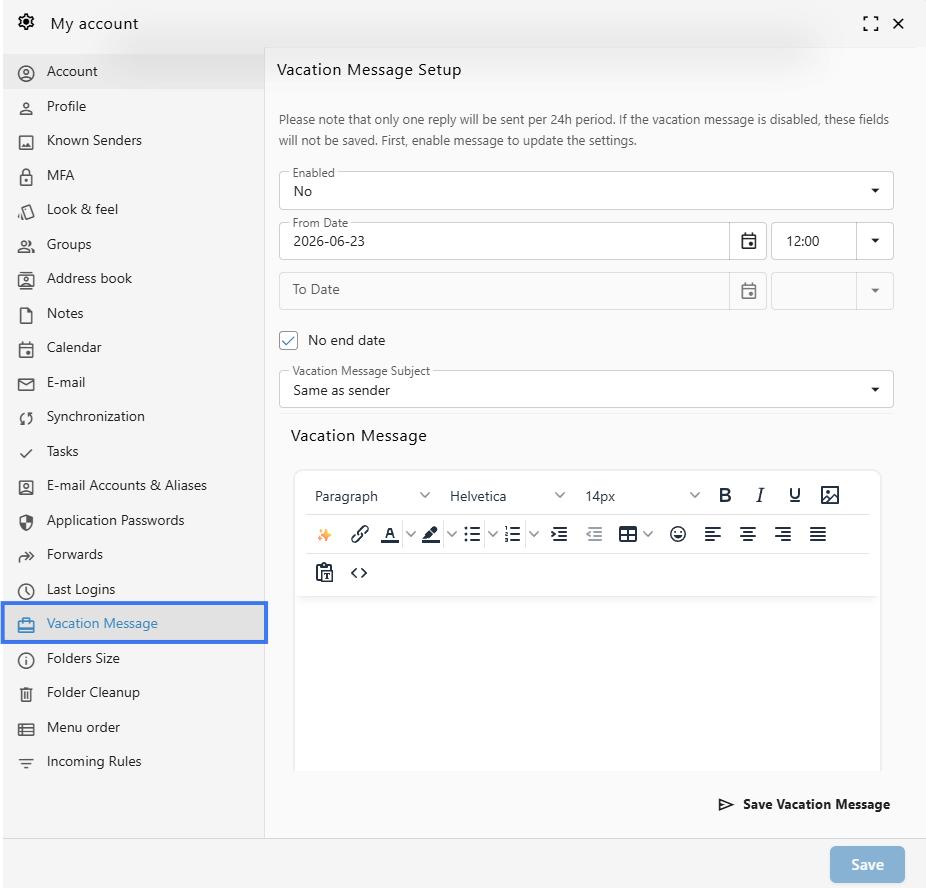
Setting Up Your Vacation Message (Autoresponder)
A vacation message automatically notifies people that you are away or unavailable. To prevent email loops and technical issues, the system sends one automatic reply per sender every hour.
How to Enable Your Vacation Message
Option 1: From the Webmail (Recommended)
- Go to the Webmail. Log in using your full e-mail address and your current e-mail password.
- Click on the User icon from the top right to activate the menu. Then click on My account
-
Access Settings: Click on the User icon in the top-right corner and select My account.
-
Configure: Navigate to the Vacation Message tab.

-
Set the Schedule:
-
Ensure the Status is set to Enabled.
-
Choose a From and To date. If you leave these blank, the message will remain active until you manually disable it.
-
-
Write your Message:
-
Enter your text in the Vacation Message box.
-
-
Save: Click the Save Vacation Message button.

Option 2: From the User Panel
-
Visit the User Control Panel (https://cp.emailarray.com).
-
Log in using your full email address and password.
-
Click the Vacation Message icon (the envelope with an arrow).

-
Set the Schedule:
-
Ensure the Status is set to Enabled.
-
Choose a From and To date. If you leave these blank, the message will remain active until you manually disable it.
-
-
Write your Message:
-
Enter your text in the Vacation Message box.
-
- Save: Click the Update button.

How to Disable Your Vacation Message
Option 1: From the Webmail (Recommended)
-
In the Webmail, go to User Icon > My account > Vacation Message.
-
Switch the Enabled to No
-
Click Save.
Option 2: From the User Panel
-
In the User Control Panel, click the Vacation Message icon.
-
Select Disabled from the Status menu.
-
Click Update.
Pro-Tip: If you are using the date range feature, your vacation message will automatically stop sending at the end of your "To" date, so you don't have to worry about turning it off the moment you get back!
Sharing Email Folders
Folder sharing allows you to give colleagues access to specific folders in your mailbox. You can grant "Read-only" access for viewing or "Full" access for those who need to manage and reply to messages on your behalf.
How to Share a Folder
Option 1: From the Webmail (Recommended)
- Go to the Webmail. Log in using your full e-mail address and your current e-mail password.
Click on the User icon from the top right to activate the menu. Then click on My account -
Access Settings: Click on the User icon in the top-right corner and select My account.
-
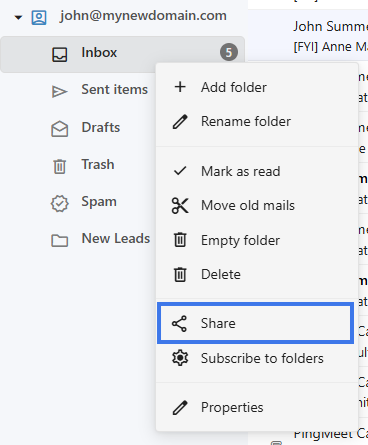
Right-Click to Share: In the folder list on the left-hand side, find the folder you wish to share and right-click on it.
-
Open Share Settings: Select Share from the context menu.

-
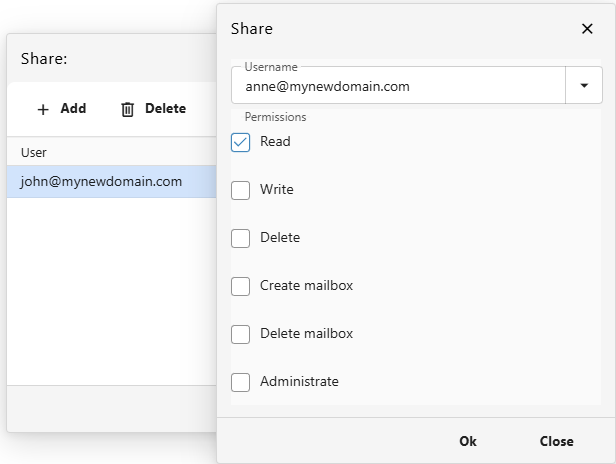
Add a new User and sharing permissions:
-
Click the Add button.
-
Select the user you wish to share with from the list.
-
Choose the appropriate Permissions (see the guide below).
-
Click on Ok button to save.

-

Option 2: From the User Panel
-
Visit the User Control Panel (https://cp.emailarray.com). Log in using your full email address and password.
-
Click on the Folders icon.
-
Click the Edit (pencil) icon next to the folder you want to share.
-
Click New Share, select the user and their permissions, and click Share.
Managing or Removing Permissions
From the User Panel
-
In the User Control Panel, click the Folders icon.
-
Click the Edit (pencil) icon next to the folder.
-
Click the "-" (minus sign) next to the user you wish to remove.
Understanding Permissions
| Level | What can they do? |
| Read-only | Can see and read messages, but cannot move, delete, or mark them as read/unread. |
| Read/Write | Can read, move, and flag messages. |
| Full | Can read, write, delete, and manage the folder's contents entirely. |
Don't Lock Yourself Out: By default, your own account has "Full" permissions. Do not remove your own permissions from the list, or you will lose access to that folder and will need an administrator to restore it for you.
Extensions
User Extensions allow you to create unique, disposable variations of your email address by adding a suffix to your username. These are perfect for tracking who is selling your data, organizing sign-ups, or creating temporary contact points without revealing your primary address.
Extensions use the format: user-extension@domain.com.
Add a static extension
A static extension creates one specific address. For example, if your username is kim, creating an extension called shopping results in kim-shopping@domain.com.
-
Log in to your User Panel. Use your full email address and password to sign in.
- Click the Extensions icon.
- Click the Add Extension button.
- Name your extension: Enter a word (e.g., sales).
- Set the destination: Enter the email address where messages should be delivered (usually your full email address).
- Click Add Extension.
Add a dynamic (wildcard) extension
Dynamic extensions act as a "catch-all" for any variation following your keyword. If you create a wildcard extension named project, it will accept mail sent to user-project-anything@domain.com.
-
Log in to your User Panel. Use your full email address and password to sign in.
- Click the Extensions icon.
- Click the Add Extension button.
- Name your extension: Enter your keyword followed by -default (e.g., sales-default).
- Set the destination: Enter your email address in the Deliver to field (usually your full email address).
- Click Add Extension.
Example: This will now accept mail for user-sales-john@domain.com, user-sales-amy@domain.com, and any other variation starting with user-sales-.
Remove an extension
-
Log in to your User Panel. Use your full email address and password to sign in.
- Click the Extensions icon.
- Click on the remove icon next to the extension you want to remove
Spam filtering
Personalizing Your Spam Filter and Security Settings
You can customize your email experience by adjusting how the system handles incoming messages. While your administrator establishes domain-wide defaults, your personal settings always take priority and will override those defaults.
The spam report is designed to list emails currently held in your spam folder. Depending on your selection for the Spam Report Content setting, the report will either summarize the latest messages received within your chosen delivery frequency or display every message currently residing in the spam folder at the time the report is generated.
Accessing Your User Panel
There are two primary ways to manage your personal settings:
-
Via Webmail: click on the User icon to show the menu, and then go to User Settings. You will be automatically logged into your User Panel.
-
Direct Login: Navigate to the User Panel and log in using your full email address and current password.

Filtering Preferences
Once logged in, click FILTERING in the top navigation bar to view your options:

-
Accept e-mails from: Choose Everyone to receive all messages by default. Alternatively, select Whitelist & Address Book to permit only known contacts into your Inbox, sending everything else to the Spam folder.
-
Blacklisted Messages: Decide what happens to mail from blocked senders. You can choose to move these messages to your Spam folder or select Delete to remove them automatically.
-
Enable autowhitelist: When enabled, this feature automatically adds the email address of anyone you message to your whitelist, ensuring their replies reach your Inbox. This is disabled by default in the interface but can be turned on for convenience.
-
Send spam to: Choose where identified spam is delivered. Options include the Spam folder, your Inbox (effectively disabling the filter), or Delete.
-
Filter sensitivity: Adjust the scanning threshold on a scale of 1 to 10.
-
1: Most permissive setting; more spam may reach the inbox.
-
10: Most restrictive setting; a higher volume of messages will be filtered.
-
Regular Sensitivity: This is the default setting and is recommended for most organizations.
-
-
Keep spam for: Set how many days messages remain in your Spam folder before they are permanently removed.
-
Send spam report: Specify how often you receive a summary of trapped messages. This is also helpful if you use a POP connection, which cannot view the Spam folder directly.
-
Spam report format: Select your preferred format for the email summary. HTML and TEXT is the default for maximum compatibility.
-
Spam Report Content: Determine if your report shows the Latest spam messages received since the last report or All spam messages currently in the folder.
-
Detect Forged From: This security feature checks if an incoming email claiming to be from your own address is authentic. If the message did not originate from your account, it is moved to the Spam folder to prevent spoofing. Click here for our wiki page about this topic.
Note on Spam Reports
The spam report is designed to list emails currently held in your spam folder. Depending on your selection for the Spam Report Content setting, the report will either summarize the latest messages received within your chosen delivery frequency or display every message currently residing in the spam folder at the time the report is generated.
Managing Spams and False Positives
Email accounts include a folder titled Spam where filtered messages are stored. You can view this folder via Webmail or an IMAP-configured email client.
The automated Spam Reports are an efficient way to manage "false positives" (legitimate mail incorrectly marked as spam). From the report, you can:
-
Whitelist: Move the message to your Inbox and ensure the sender is never blocked again.
-
Deliver: Move the message to your Inbox once without whitelisting the sender.
-
Delete: Permanently remove the selected messages.
- Blacklist: This helps minimize future spam by deleting the message and blocking the sender. Use caution with this option, as spammers often forge addresses; you can verify the sender by rolling your mouse over the From field to see the actual address.
If you frequently encounter undetected spam or messages that are incorrectly identified, please reach out to our support team for assistance.
Tips for Reducing Spam
-
Use Email Aliases: Create an alias to use when filling out web forms or registering on sites that may expose your data. If an alias begins receiving spam, you can simply remove it without affecting your primary address.
-
Avoid Common Usernames: Spammers often target common names like "John." Using a format such as
firstname.lastname@domain.comis more secure. -
Never Reply to Spam: Responding confirms your address is active and may accidentally whitelist the spammer through the Autowhitelist feature.
-
Hide Your Address: Instead of publishing your email address directly on a website, use a contact form. If you must list your address, consider encoding it to prevent automated harvesting tools from finding it.
Whitelist or Blacklist an e-mail address
Whitelist / Blacklist an e-mail address
Our system automatically whitelists e-mail addresses that you communicate with, for your entire domain. For example, within your domain hosted with us, you have two users: joe@domain.com and amy@domain.com. If joe e-mails mary@hotmail.com , mary@hotmail.com will become whitelisted for both joe and amy. If mary@hotmail.com decides to write to amy@domain.com or joe@domain.com, her e-mail will get through without being filtered. For more details on this, please see our page about whitelist / blacklist on domain level.
You can also manually add an e-mail address to the whitelist or blacklist, as described below. Notice that the best way to add whitelist records is using the Spam reports, as it automatically delivers the e-mail and adds sender to your whitelist. Our system uses the Sender instead of the From in the e-mail header, both for blacklist and whitelist, which is automatically done if you authorize e-mails through spam reports. If you enter an e-mail address manually to your black or whitelist and notice it doesn't work, check the e-mail header and look for the X-EmailArray-EnvFrom: field, which should be used. Yet another possibility is that the sender might change each time you receive a certain e-mail. In this case, you can use Rules to delete undesired messages, based on part of the From header address or subject.
Add an e-mail address to the whitelist
- Log in using your full e-mail address ( user@domain.com ) and current password.
- Pass your mouse over the Filtering menu and choose Blacklist
- Make sure you have the correct domain selected in the pull down menu on the left side
- Click on the New Whitelist button
- In the text field next to Address, enter the e-mail address you wish to whitelist
- Select whether you still wish to check for viruses ( Recommended! )
- Click on the Add Whitelist button
Add an e-mail address to the blacklist
- Log in using your full e-mail address ( user@domain.com ) and current password.
- Pass you mouse over the Filtering menu and choose Blacklist
- Make sure you have the correct domain selected in the pull down menu on the left side
- Click on the New Blacklist button
- In the text field next to Address, enter the e-mail address you wish to blacklist
- Click on the Add Blacklist button
Remove an e-mail address from the whitelist or blacklist
- Log in using your full e-mail address ( user@domain.com ) and current password.
- Pass you mouse over the Filtering menu and choose either Blacklist or Whitelist
- Make sure you have the correct domain selected in the pull down menu on the left side
- Click on "-" icon (minus sign) next to the e-mail address you wish to remove
Retrain Messages
Sometimes it happens that messages are classified incorrectly by the filtering system.
A false positive refers to a message that was incorrectly classified as being Spam.
A false negative refers to a message that was incorrectly classified as NOT being Spam.
In other words, false positive messages end up in the Spam folder instead of the Inbox, while false negative messages end up in the Inbox instead of the Spam folder.
We have several methods to help retrain our system so that it doesn't make the same mistake again:
- In your configured IMAP account or in Webmail, simply drag the message from the Inbox to the Spam folder or vice-versa and keep it there at least overnight
- Retrain using the Spam Quarantine feature of the User Control Panel:
- Go to
Unknown macro: {link-window}
- Log in using your full e-mail address ( user@domain.com ) and current password.
- Click on the Spam Quarantine icon
- Search for the Spam message by selecting the appropriate date, optionally defining a search term and clicking on the Display button
- Mark the checkbox next to desired email and click on one following buttons: deliver and whitelist the sender, deliver only or delete
- Forward the offending message to the specific retraining address as defined by your Administrator. Usually they are of the form: spam@domain.com & notspam@domain.com
Track Remote Deliveries
You can easily determine if the messages you send out reach your recipients or not. While this is no guarantee that your recipient read the message, you can at least find out if their e-mail services provider properly received the message and warn them in case of problems.
- Go to the User Panel: https://cp.emailarray.com

- Log in using your full e-mail address ( user@domain.com ) and current password.
- Click on the Track Deliveries button
By default, after clicking on the Search button, you will see the list of e-mails that you sent during the current day and which were delivered. You need to click on the arrow next to each delivery's date/subject to view details.
You can alter your search criteria and filter out by: Temporarily Rejected Messages ( for example, user is over quota ), Permanently Rejected Messages ( invalid mailbox, blacklisted, etc. ) or All Messages. You can also specify the range of dates to search for while also specifying the e-mail address where you sent it.
Optionally, you can mark the checkbox next to Send me a monthly PDF report, to receive such reports via e-mail.
| You can review Remote Delivery data for up to 60 days in the past |
Here's an example of a successful delivery:
2014-10-27 15:24:35 - test
Sent From: tests@emailarray.com
Sent To: "testsemailarray@gmail.com"
Recipient delivery status: Message accepted
Message delivery status: 74.125.193.26 accepted message.Remote host said: 250 2.0.0 OK 1414437875 x11si18095722icx.68 - gsmtp
In this case, email was delivered to the remote server who answered with some SMTP codes initiated by the number 2, indicating that such e-mail is in the queue to be delivered to the recipient. It does not mean the recipient received or read the email, but usually that should occur, since the remote server did receive it and queued it to be delivered, unless recipient's mail server has some technical problem.
If our server is unable to connect to the recipient server, it will try to send your e-mail for 7 days, after which it will bounce back an error message indicating that the email could not be sent. In these cases, a temporary rejection error is presented, such as the example below:
From and To: may show as "null", since our server did not even connect to the recipient server
Message delivery status:Sorry, I wasn't able to establish an SMTP connection. (#4.4.1)
| There isn't an always guaranteed way to know that the recipient read an e-mail. Some email clients, such as Thunderbird, Windows Live Mail and our WebMail are able to send a delivery receipt, which can be granted if the recipient decides to do so. On the other hand, some clients such as Thunderbird and Outlook are able to send a delivery receipt, to verify if an e-mail was received by a recipient server, however, many servers don't grant such confirmation. Still, some services do offer a way to track if a user opened an email, such as the free WhoReadMe |
Delivery Rules - Manage Incoming Email
Manage Your Incoming Email Rules
Email rules help you stay organized by automatically processing messages before they even hit your inbox. You can use these rules to sort newsletters into specific folders, redirect important updates to a colleague, or delete unwanted clutter.
Rules apply only to clean messages (messages not marked as spam) and are processed in the order they were created.
Create a New Rule
Note: New rules are created in a DISABLED state by default. A rule will not process any email until you manually change its status to ENABLED. Whenever you create or modify a rule, you must click the status button to push your changes live.
-
Log in to your User Panel. Use your full email address and password to sign in.
-
Click the Delivery Rules icon on your dashboard.
-
Click the New Rule button.
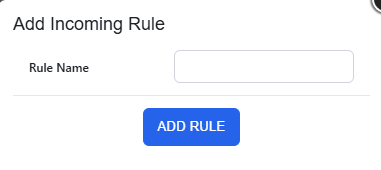
-
Name your rule. Enter a unique name (use underscores or hyphens instead of spaces) and click Add Rule.

-
Edit your rule. Click the pencil icon next to your new rule to define what it does.
A rule consists of two parts:-
Conditions (what to look for) and
-
Actions (what to do with the message).
-
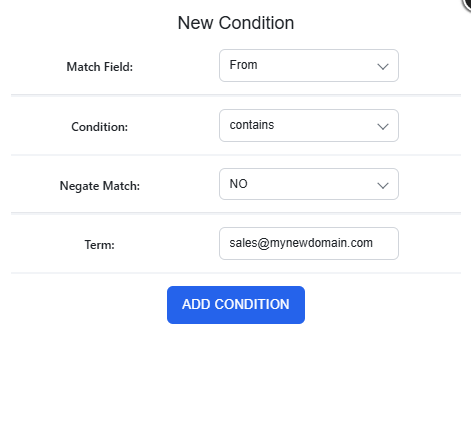
1. Define the Condition
Conditions tell the system which emails to pick up. You can filter by sender, recipient, subject, message size, or List-ID.
-
Click New 'AND' Condition (if all criteria must be met) or New 'OR' Condition (if only one of several criteria must be met).
-
Match Field: Select the part of the email to scan (e.g., Subject, From, To).
-
Condition: Choose how to match the text (contains, equals, starts with, ends with).
- Negate Match: Select YES to target emails that do not match your term (perfect for external email warnings).
-
Enter your Term (the specific email address, domain, word or phrase you are looking for).
-
Click Add Condition.

2. Choose Your Actions
Once an email matches your condition, decide what happens next by clicking one of the action buttons
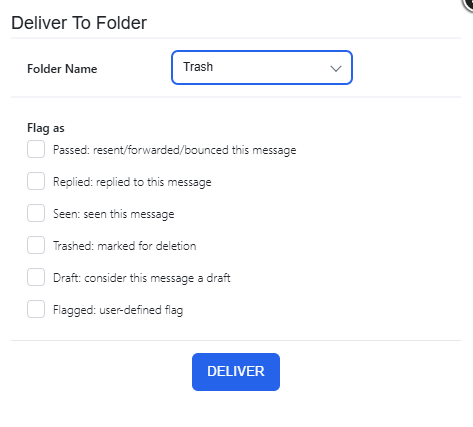
- Deliver to Folder: Move the email to a specific folder. Optionally "Flag" it as Seen, Answered, or Trashed.
For example:

- Deliver to E-mail: Redirect or forward the message to another address.
- Delete: Automatically discard the message.
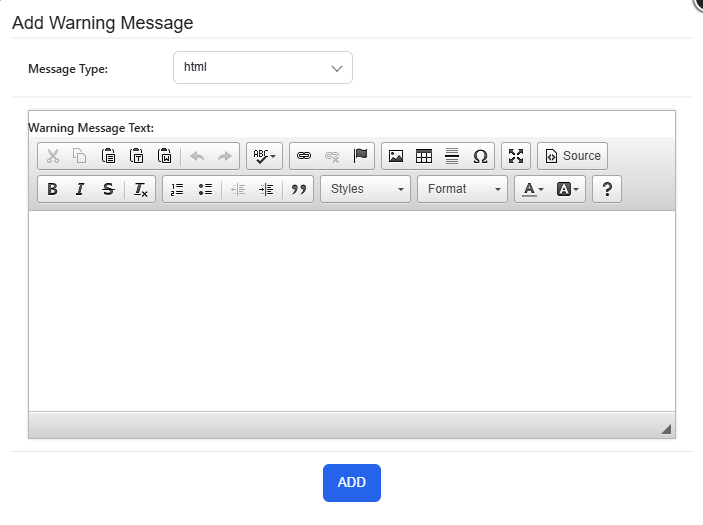
- Add Send Reply Back: Set up an automated response (Autoresponder) using the built-in HTML editor.
For example:

- Add Warning Message: Insert a security banner or custom notification at the very top of the email.
For example:


Pro Tip: If you want to forward a message but also keep a copy in your own Inbox, add two actions: one to "Deliver to Email" and a second one to "Deliver to Folder" (selecting your Inbox).
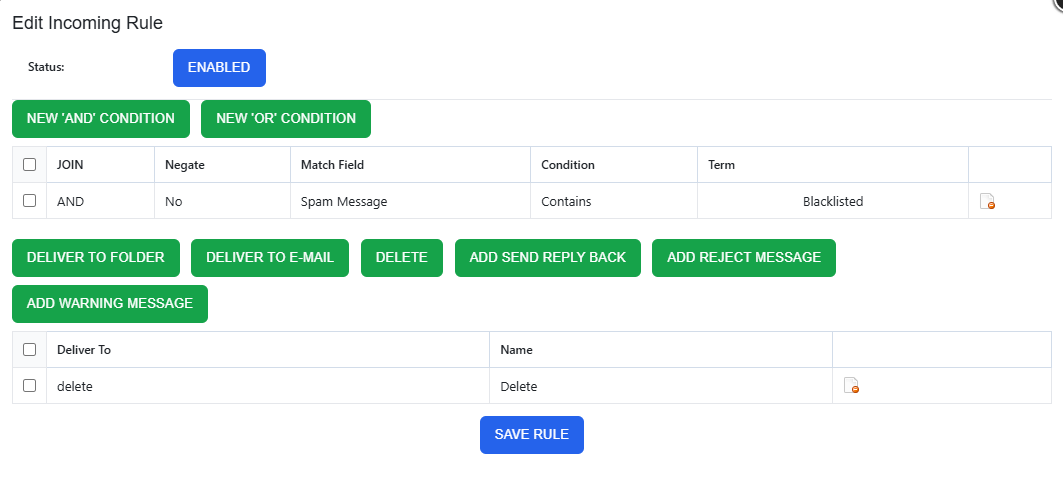
3. Enable and Activate Your Rule
To prevent unfinished rules from running, new rules are created in a Disabled state.
To make your rule active, you must update its status within the editor:
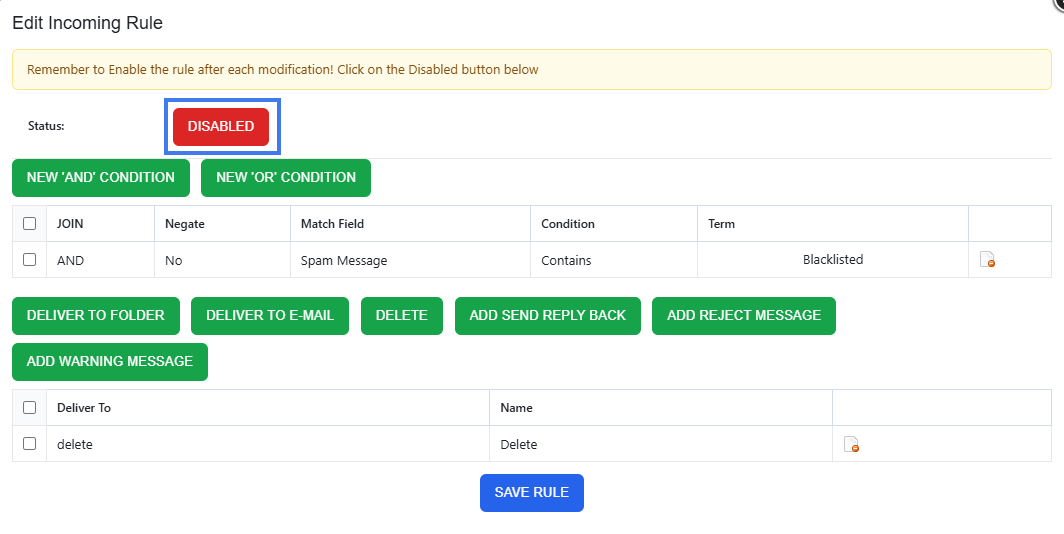
- Check the Status: Look for the Status indicator at the top of the "Edit Incoming Rule" screen.
- Toggle to Enabled: If the button shows a red DISABLED label, click it.
- The button will switch to a green ENABLED state. Click Save Rule at the bottom of the page to finalize your settings.
Remove a Rule
- Go to the User Panel
- Log in using your full email address ( user@domain.com ) and password.
- Click on the Delivery Rules icon
- Click on the delete icon next to the rule you want to remove


Common automation examples
Use delivery rules to build powerful sequences and manage your daily communications.
Smart Organization
- Departmental Routing: Route emails sent to specific aliases like sales@ or support@ into dedicated folders to keep your main inbox clear.
- Project Tagging: Automatically move messages containing specific project codes in the Subject line to project-specific folders.
- Newsletter Management: Identify newsletter emails using the From field and move them to a "Read Later" folder to reduce daily distractions.
- VIP Filtering: Ensure emails from your most important clients are always delivered to the top of your Inbox or a "High Priority" folder.
Security & Compliance
- External Sender Alerts: Use a Negate Match on your own domain to prepend a "Caution: External Sender" warning to any email originating from outside your company.
- Sensitive Data Reminders: Search for keywords like "Invoice" or "Payment" to insert a header reminding users to verify wire instructions before proceeding.
- Attachment Quarantine: Route messages over a specific Message size to a "Large Attachments" folder to review them for security before opening.
Enhanced Responsiveness
- Instant Lead Acknowledgment: Combine a Deliver to Folder action with an Autoresponder to immediately thank new leads for their inquiry while sorting their request for the sales team.
- Hybrid Forwarding: Use multiple delivery actions to send a copy of a message to your CRM via email while keeping the original in your local Inbox for your records.
Maintenance & Cleanup
- Automated Deletion: Set rules to automatically Delete known automated notifications or "Out of Office" replies that don't require your attention.
Disabling local delivery to an account
Note that the procedure below is unusual. It may be useful, for example, if you want an account do not store received emails (to prevent the account from reaching its storage limit), but forward incoming emails to another account (case in which you'd have to setup a forwarder). Use with caution and note that you lose the backup functionality of incoming mail for the source account.
See below how to disable local delivery to an account (incoming emails are NOT stored in the e-mail account).
Option 1: from the Webmail
- Go to the Webmail
- Log in using your full e-mail address and your current e-mail password
- Click on the User icon from the top right to activate the menu. Then click on My account

- In the E-mail tab, find the Local Delivery section.
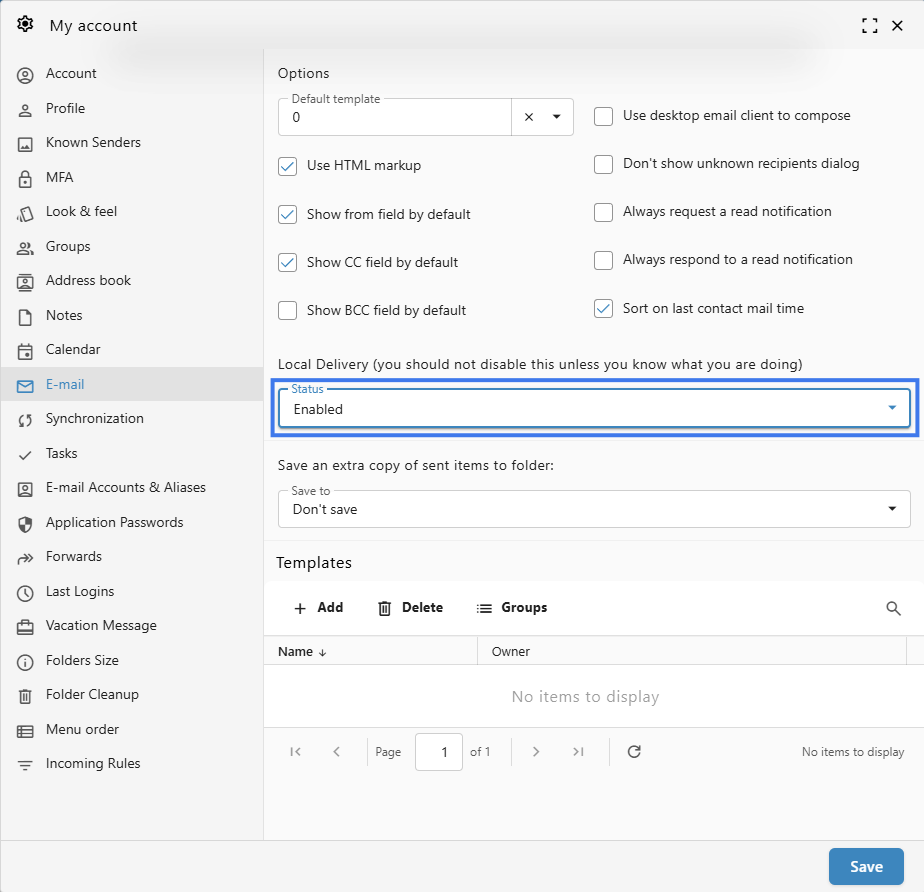
- Change the status to Disabled
- Click on the Save button
Option 2: from the User Panel
- Visit the User Control Panel (https://cp.emailarray.com)
- Log in using your full e-mail address ( user@domain.com ) and current password.
- Click on the Local Delivery icon
- Change the Status to Disabled
- Click on the Update button
How to avoid forged e-mails?
The From header of an e-mail, which you view in the header of e-mails can be anything, it doesn't even need to be a valid e-mail address and it can be different from the actual sender of the message.
For that reason, it's possible that you will receive forged e-mails as if they were sent from/to your account or from some other account in your domain to you. Usually, such emails, many times hoaxes or phishing attempts, are correctly caught as spam.
Let's start off enabling a rule that tries to catch e-mails sent from and to your account. So for example, From test@emailarray.com and To test@emailarray.com.
- Go to
- Log in using your full e-mail address ( user@domain.com ) and current password.
Alternatively, you can login to the user control panel using the respective link while logged to Webmail.
After logging in and click on Filtering, on the top bar.
Change the Detect Forged From pull-down menu to Yes and click on Update settings.
Afterwords, click on Home in the top bar, followed by the Delivery Rules icon.
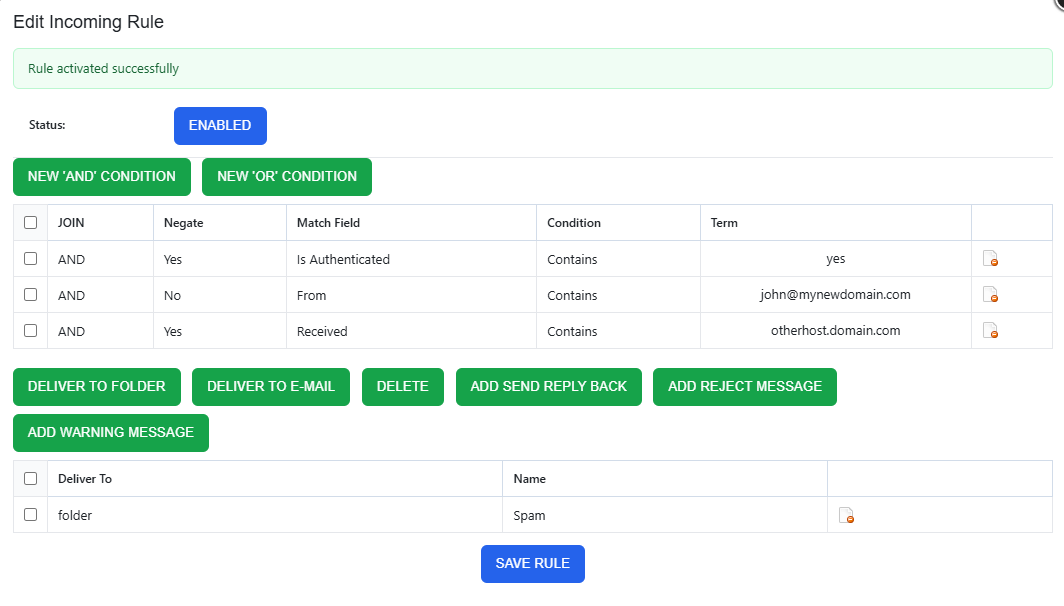
You will notice a new rule entitled "DetectForgedFrom". Click on the pencil icon next to it, to edit it. This is what it looks like:
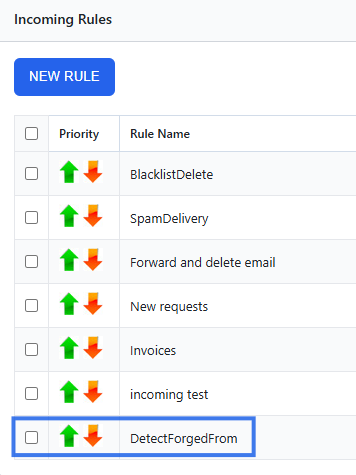
What the rule does is check if the user did NOT authenticate using our SMTP (notice that the Negate column for the first condition is set to Yes) and uses your address as a FROM address and in such cases, it moves such e-mails to your spam folder.
This rule can currently be created only on the user level, however, if you decide to implement it for all your users, contact us, and we will enable it automatically for everyone.
One possibility is to change the folder where such e-mails are sent to. This will let you tweak the rule in an easier way. First of all, create a folder in WebMail or an e-mail client using IMAP, such as "Forged". Then, simply click on the minus sign icon next to the Spam folder action (shown above), click on Deliver to folder button and choose your "Forged" folder.
Notice that there's another rule entiled "SpamDelivery", responsible for moving spams to your spam folder and it comes before the Forged From rule. For that reason, forged e-mails detected as spam will be moved to your spam folder. If you decide to create a separate folder, such as the suggested "Forged folder", consider clicking on the up arrow next to the Forged From rule and moving this rule above the SpamDelivery rule. This way, all forged e-mails will be sent to your "Forged" folder, avoiding clutter in your spam folder.
Besides catching forged e-mails, this rule may catch legitimate messages that were send as being you, from some other SMTP server. For example, some website form or application that sends emails using your e-mail address in the From header.
You can tweak the rule by denying such cases, so the filter does not catch such cases.
For example, let's say you receive legitimate e-mails that come From your email and to your e-mail address, sent from a remote server called otherhost.domain.com, which is the hostname of the system that sends our server the e-mail, shown in the e-mail header. What we do is click on New And Condition. This new condition should have the Match field menu set to Received and Negate Match set to Yes. In the term field, type in otherhost.domain.com and click on Add Condition. Notice that rule is not set to Disabled. Click on the Disabled button to enable the rule and click on Save rule. What we did, is inform the system to NOT run the rule for e-mails that come from otherhost.domain.com.
This is how the rule now looks:
Let's consider one last scenario. Consider that you want to avoid forged e-mails coming from ANY account of your domain, not just your own account.
In such case, click on the minus sign icon next to the FROM condition and add a New And Condition of the type FROM and for Term, type in your domain, in this case "emailarray.com" (without quotes).
It might give you a bit of work to fine tune the rule so that it is near perfect, but many customers and companies consider it a good idea.
ownCloud - Free File Storage and Sharing on the Cloud
With ownCloud, we provide fully-featured file sync and sharing solution, with access to your data through a web interface, sync clients or WebDAV, while providing a platform to view, sync and share files across your devices easily all under your control.
This is an extremely useful feature, as it lets you synchronize your most important files to our cloud storage, keeping them safely backed up for up to 30 days. Besides that, it lets you install the ownCloud app on your mobile devices, such as smartphones and tablets, so that your files are easily accessible from wherever you are. There's more... You can also view and edit your files with an easy to use, visually clear and fast interface and share files with external users, using safe links generated by ownCloud, protect them my password and even set an expiration date for them.
You can even edit PDF, text and Office files using the web interface (https://files.emailarray.com), complete with revisions available for each copy you edited, with the option to roll back to a previous version of the file (up to 30 days).
Enhanced accounts have the advantage of being able to share files between users, including revision control, which details changes made to a file which is accessed by several users. You can even work at one same file at the same time as a colleague and, in real time, owncloud shows you who is editing what (text) with a differentiated color. If you have an existing Enhanced account, please open a ticket so that we can enable Owncloud in your account.
We are offering 5GB of space on ownCloud FREE to each Basic email account and 15GB for Enhanced accounts.
You can easily setup ownCloud to sync files from your local computer/devices (smartphones/tablets) to our ownCloud storage.
Logging in
Authentication credentials are the same as your e-mail account, thanks to our single sign-on technology.
Server address: files.emailarray.com
Username: your email address
Password: your email's password
Web interface
Access https://files.emailarray.com and login with your e-mail address and respective password.
ownCloud applications
ownCloud has desktop clients (Windows, OSX or Linux) and apps for both Android and iOS.
Sharing
You can share files with external users, using safe links generated by ownCloud, protect them my password and even set an expiration date for them.
Other features
Regarding deleted files, you can restore them in the "Deleted files" link, on the bottom left. Then, pass your mouse over the file you want to restore and click on the "Restore" link.
Consider watching this short introduction video (5:14 min.): https://www.youtube.com/watch?v=RrAhClhrRAc
Folder Cleanup Rules
Folder Cleanup allows you to automate your mailbox maintenance by automatically deleting items older than a specific number of days. This is a powerful tool for managing storage and keeping folders like Trash or Spam from accumulating excessive data.
System Default: Please note that by default, the Trash folder is automatically emptied of all emails older than 30 days. You can create additional rules to manage other folders or adjust this timeframe as needed.
1. Set up Folder Cleanup from Webmail
Managing your cleanup rules directly in Webmail is the most efficient way to maintain your folders.
-
Log into the Webmail using your full email address and current password.
-
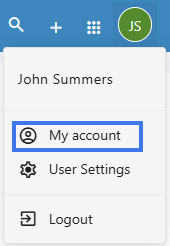
Click on the User icon in the top right corner to open the menu and select My account.
-
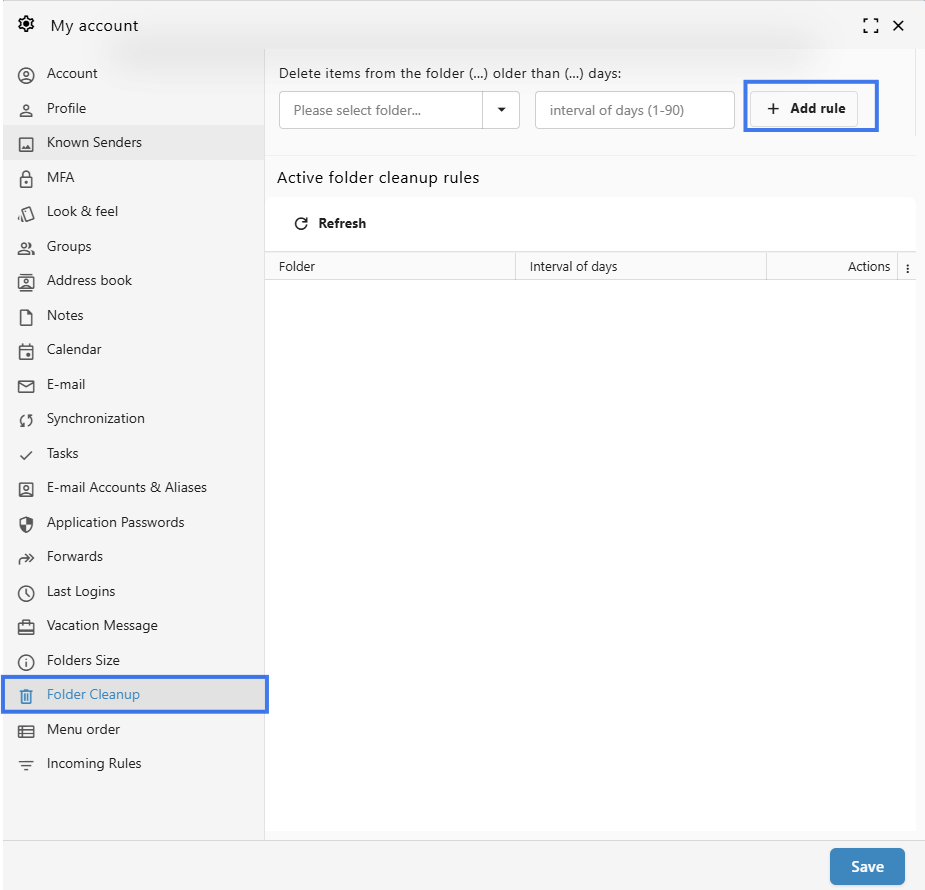
In the sidebar on the left, click on Folder Cleanup.
-
Add a new rule: * Select the Folder you wish to clean (e.g., Trash, Monitor, or Inbox).
-
Enter the Interval of days (1-90). Items older than this number will be permanently deleted.
-
Click + Add rule.

-
-
Manage existing rules: Your active rules are listed at the bottom.
-
Edit: Hover over the Actions column and click the pencil icon to change the number of days for an existing rule.
-
Delete: Hover over the Actions column and click the delete (trash) icon to remove a rule and stop automatic cleanup for that folder.
-
2. Set up Folder Cleanup from the User Panel
You can also manage these rules through the central User Control Panel.
-
Go to the User Panel.
-
Log in using your full email address and current password.
-
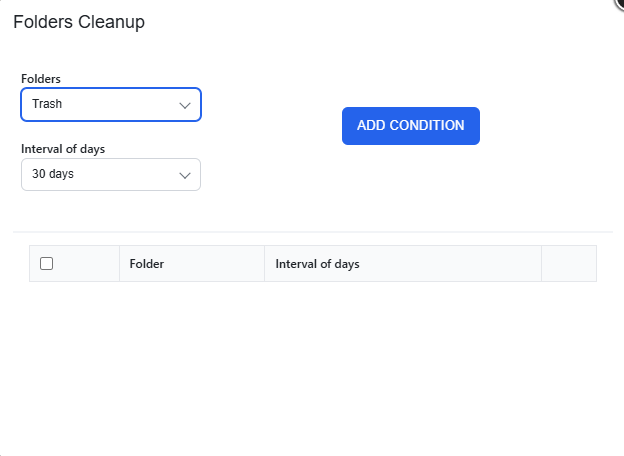
Click on the Folders Cleanup icon.

-
Add a condition:
-
From the Folders dropdown, select the desired folder.
-
From the Interval of days dropdown, select the timeframe (up to 120 days depending on your account configuration).
-
Click the ADD CONDITION button.

-
-
Your new rule will appear in the list below. You can use the icons in the right-hand column to edit the interval or remove the condition entirely.

Recovering Your Emails: Archive vs. Gateway Manager
Mistakes happen. Whether you accidentally emptied your trash or a filter rule moved a message to a mystery location, we have two powerful tools to help you get your data back.
Think of these as your "Safety Nets." While they look similar, they serve different purposes.
Which tool should I use?
| Feature | Best For... | How it works |
| Archive Manager | Restoring a message from a specific folder or a snapshot of your mailbox from a previous day. | A daily "photo" of your entire mailbox. |
| Gateway Archive | Finding an incoming email from the last 30 days, regardless of which folder it ended up in. | A log of every external message received. |
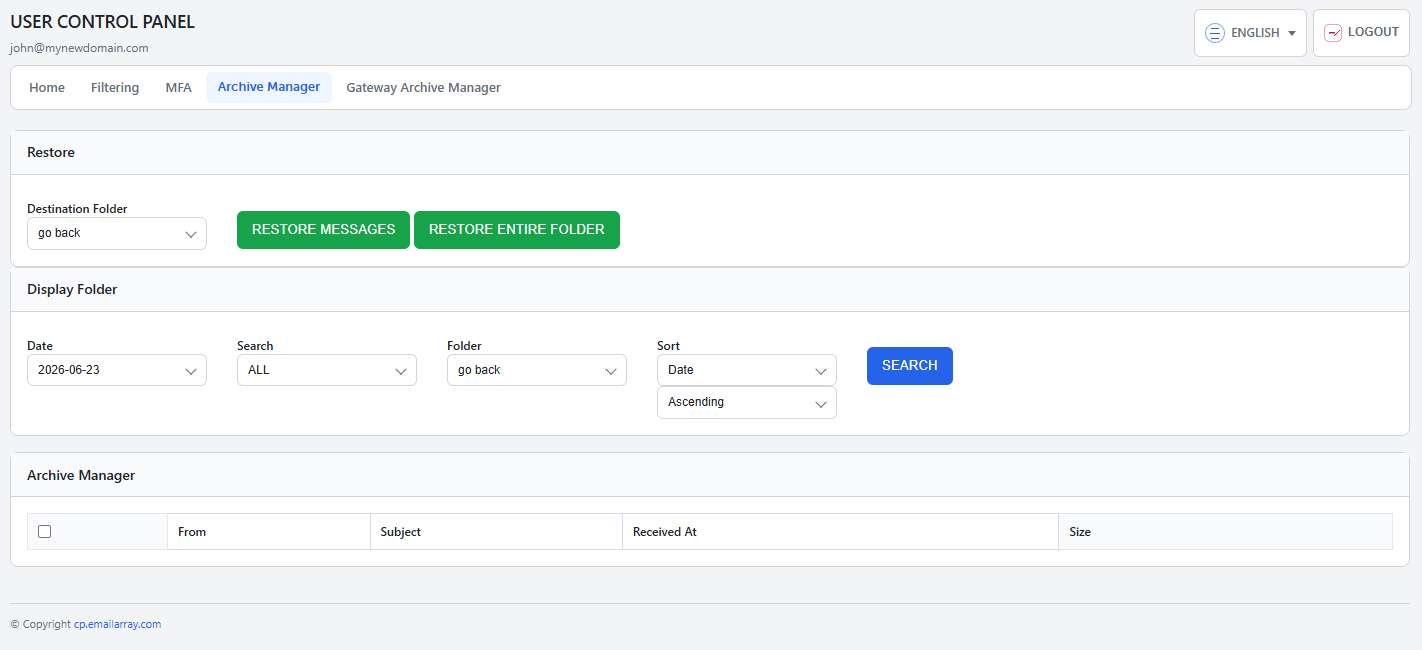
1. Archive Manager (Mailbox Snapshots)
The Archive Manager allows you to look back at your mailbox exactly as it appeared on a specific date. This is best if you know exactly where the email was before it went missing.
How to restore messages:
Go to the User Panel and log in using your full e-mail address ( user@domain.com ) and your current e-mail password.
Go to Archive Manager.
-
Choose your date: In the Display Folder section, select the date you’d like to view.
-
Select the folder: Choose the folder you want to inspect. The Archive Manager section will automatically load a list of every message that existed in that folder on that specific day.
-
Find your email: Use the search and sort tools to narrow down the list.
-
Select and Restore:
-
Check the box next to the message(s) you need.
-
Scroll back to the Restore section at the top.
-
Choose a destination: You can restore the email to its original folder or a temporary "Troubleshooting" folder to keep things organized.
-
Click Restore Messages.
-
Select Folder: The folder menus act as a hierarchy navigator. You can click into subfolders to go deeper into your mailbox structure. If you need to return to a previous level, simply select the "go back" option at the top of the menu to move up one level.
Restore Entire Folder: You can also restore a full folder at once. Note that this may create duplicates of emails that are already in your mailbox.
2. Gateway Archive Manager (30-Day Incoming Log)
The Gateway Archive is your "Master Log" for incoming mail. If you received an email in the last 30 days but can't find it (perhaps because a rule moved it or you don't remember the folder) look here.
How to restore messages:
Go to the User Panel and log in using your full e-mail address ( user@domain.com ) and your current e-mail password.
Go to Gateway Archive Manager.
-
Select the date: In the Display Folder section, pick the day the email was received. A list of all incoming mail for that day will load below.
-
Filter your results: Use the search bar to find the specific sender or subject line.
-
Select and Restore:
-
Select your messages.
-
Scroll up to the Restore section.
-
Select your destination folder.
-
Click Restore Messages.
-
Select Folder: The folder menus act as a hierarchy navigator. You can click into subfolders to go deeper into your mailbox structure. If you need to return to a previous level, simply select the "go back" option at the top of the menu to move up one level.
Note: Messages restored from the Gateway bypass your existing filters and rules, delivering them straight to your chosen folder.
Seeing a "Could not get folder list" error? Don't worry! This just means the system is currently indexing your folders. Please wait about 10 minutes and try again.