1 - Configure a new e-mail address - Getting started
Getting Started - How to Configure Your New Email Account
- Add a new Domain & verify it
- Add a new email address (we call it User)
- Transfer your old emails - request a migration (optional step)
- Set up the DNS records
- Access your Webmail
- Set up your mailbox in your email client
- Server names & Ports
- Cheat Sheet with all the setup details
The following guides apply to both Basic and Enhanced mailboxes:
- DNS Configuration
- Webmail Access
- E-mail Migration
- Servers & Ports
- Autodiscover and Autoconfig
- Configure your favorite email app
- Setup Email on Thunderbird (IMAP)
- Setup Email on Outlook (IMAP)
- Setup Email on iOS
- Setup Email on Android (IMAP)
- Setup Email on eM Client (IMAP)
- ActiveSync / EAS - Sync Email, Calendars and Contacts
- Creating a New Outlook Profile
- Setup Calendar and Contacts
- Sync Contacts and Calendars using CalDAV and CardDAV
- Outlook - CalDAV Synchronizer Setup
- Thunderbird - Syncing Contacts and Calendars
- eM Client - Syncing Calendar and Contacts
- ActiveSync / EAS - Syncing Calendars and Contacts
- Cheat Sheet with all the details
DNS Configuration
DNS Updates
It might take some time to see the changes in your DNS based on your provider and domain settings.
Migrating from another email hosting provider
If you are planning an email migration, you may choose to postpone making changes to critical records like MX records until the migration process is complete to avoid any disruption to your current email flow.
Cloudflare’s proxy feature (the Orange Cloud) is designed for web traffic (HTTP/HTTPS) and will interfere with email protocols like IMAP, POP, and SMTP.
Action Required: When adding or editing email records in Cloudflare, ensure the Proxy status is toggled to Off.
Visual Indicator: The cloud icon next to the record should be Grey, not Orange.
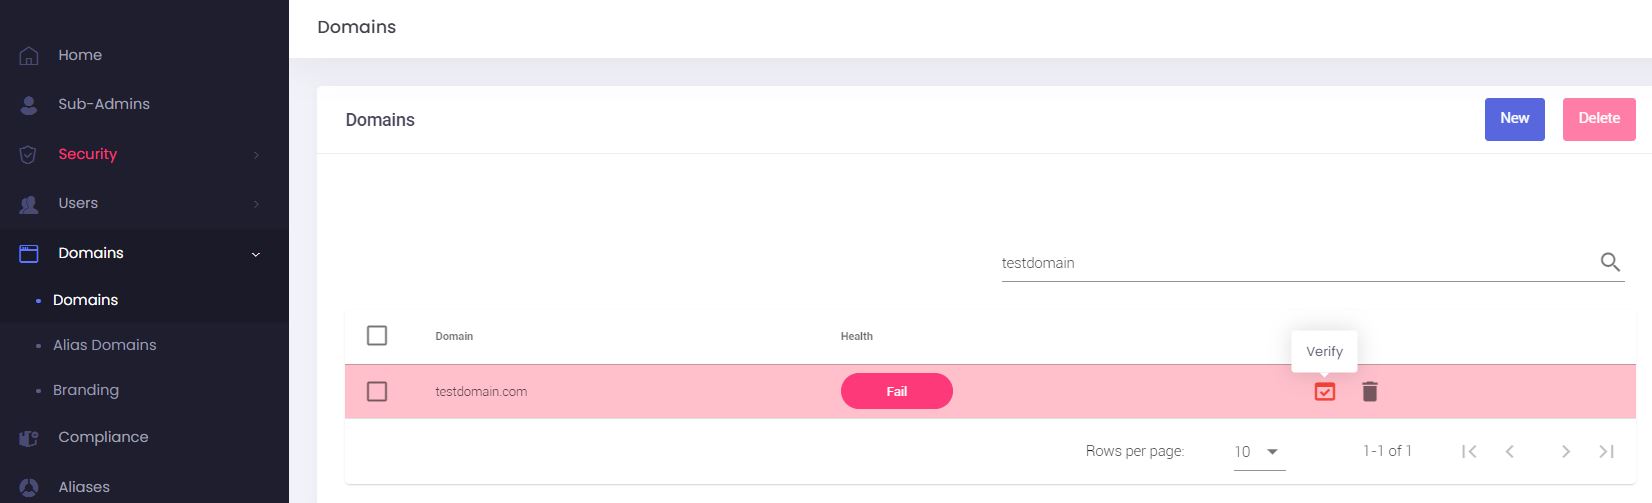
0. Verify Domain Ownership - TXT Record
Follow these steps to obtain the details for the Verification TXT Record.
-
Navigate to the Admin Panel.
- In the side menu, click on Domains.
- Click on the Verify button (represented by a red checkmark icon).

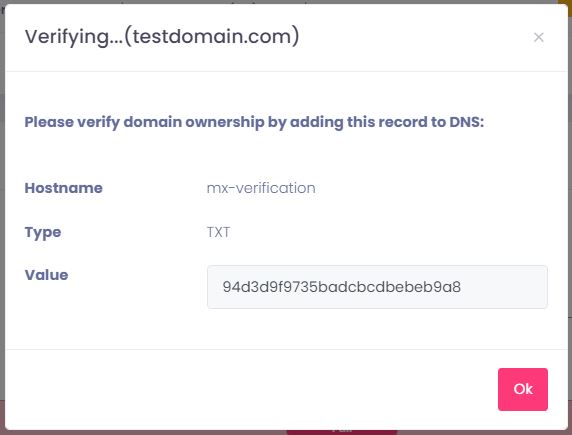
- A pop-up window will appear, displaying the Hostname, Type, and the unique Value required for the DNS record.

- You must add a TXT record with the following value:
|
HOST |
TXT Value |
|
|---|---|---|
| TXT |
mx-verification |
The unique string from your Admin Panel pop-up |
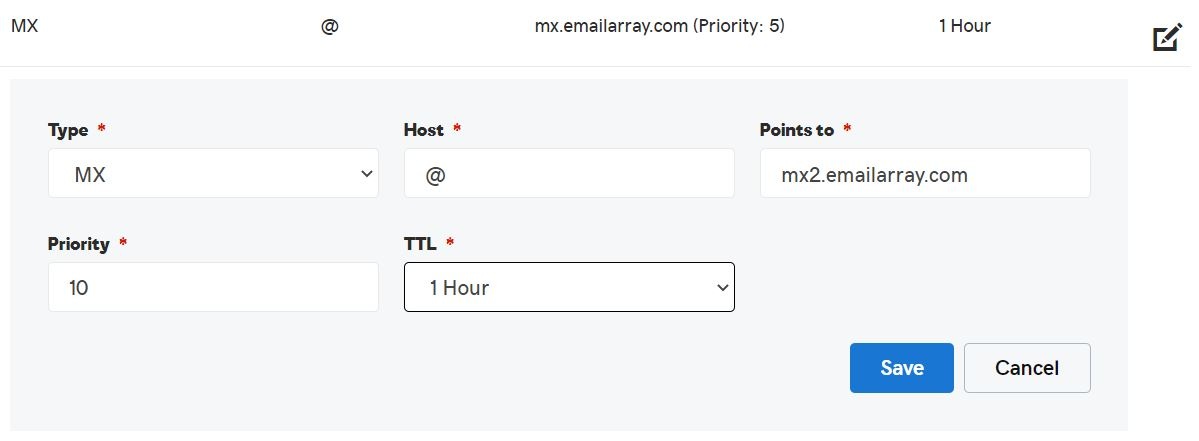
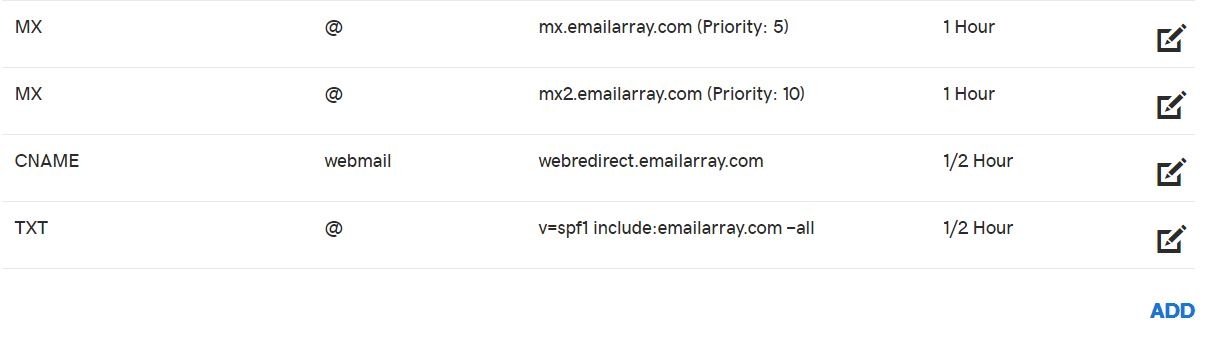
1. MX Records
The first step in configuring your DNS is updating your MX records.
MX records tell the world which server should receive the e-mails sent to your domain and deliver them to the specified e-mail provider, straight to your mailbox. You can usually edit the MX records for your domain from the same Control Panel you use for managing your DNS. You can safely keep your website hosted with another provider and only use our hosting services for the e-mail.
You should first remove all other MX records and then add the following, with the specified preference (the Host value is usually '@'):
|
Points to |
Priority / Preference |
||
|---|---|---|---|
| MX | @ |
mx.emailarray.com |
5 |
| MX | @ |
mx2.emailarray.com |
10 |
Important: It is not recommended to create CNAME records within your domain that point to EmailArray MX records and use that CNAME as your MX records.
Update Local Delivery: Did you temporarily set Local Delivery to "No" to prevent bounced emails? Now that your MX records are updated, it is time to switch it back to "Yes".
Example configuration for MX records in GoDaddy DNS:
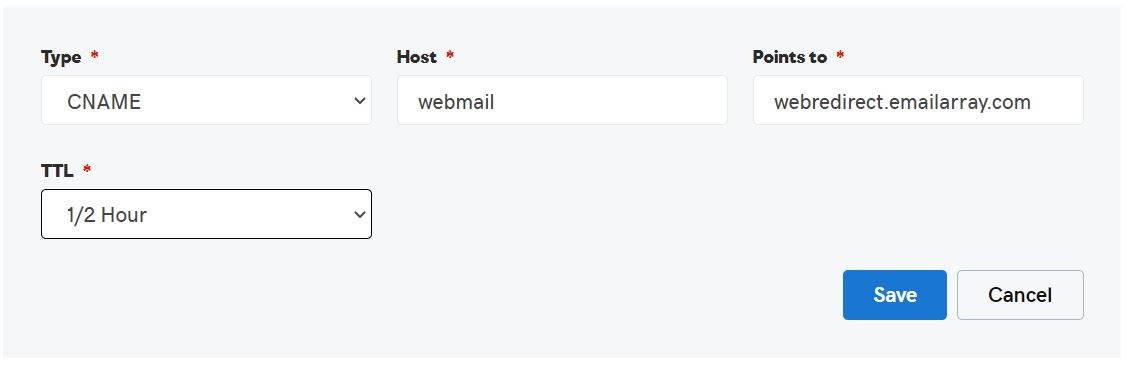
2. Webmail Record
To access your webmail using a custom URL, you must configure CNAME records within your domain for the webmail host.
You must create:
|
HOST |
Points to |
||
|---|---|---|---|
| CNAME |
webmail |
webredirect.emailarray.com |
webmail.yourdomain.com |
Don't forget to replace yourdomain.com with the actual name of your domain.
Please allow 30-40 minutes for the Webmail SSL status to update in your Admin Panel domain health page.
Example configuration for Webmail records in GoDaddy DNS:

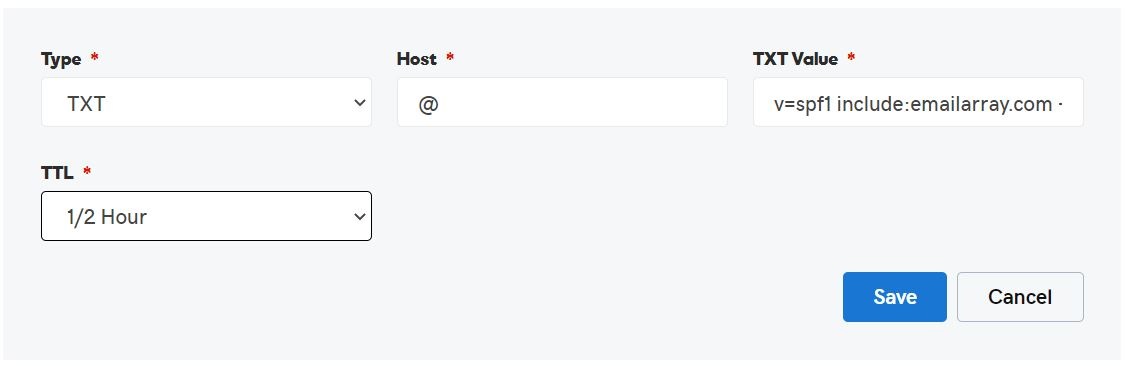
3. SPF Record
The SPF record is necessary, so your e-mail is not marked as Spam. The SPF will help with your e-mail deliverability because it specifies a list of authorized hosts that can send e-mails on behalf of a domain.
First, check for any existing TXT records with SPF.
If you don't have an existing SPF record, you must add a TXT record with the following value (the host value is usually '@'):
|
HOST |
TXT Value |
|
|---|---|---|
| TXT |
@ |
v=spf1 include:emailarray.com -all |
If you have an SPF record, you should edit it and insert before the final -all directive, the following value: include:emailarray.com
Example configuration for SPF TXT records in GoDaddy DNS:
4. DKIM Records
To improve e-mail deliverability, you should enable DKIM for your domain from your Admin Panel and then add the records to your DNS.
DKIM is an e-mail authentication method designed to detect forged sender addresses in e-mails, a technique often used in phishing and e-mail spam (Wikipedia).
To enable DKIM for your domain:
-
Go to the Admin Panel.
- Log in using your Admin username and password.
- Click on Domains in the menu.
- Click on the DKIM icon next to the domain you wish to activate DKIM for
- In the new window, switch the Enable option to Yes. This will generate your DKIM record.
- Update your DNS to include the generated DKIM record as TXT record (use the Host value for Host and the Key value for TXT Value).
- Note it might take some time to propagate in the DNS.
| Type | Name (Host) | Value (TXT) | TTL |
|---|---|---|---|
| TXT | Provided Host by Admin Panel | Provided Key by Admin Panel | 3600 |
5. Autodiscover & Autoconfig Records
To simplify the configuration on some desktop & mobile e-mail clients, you should use the Autodiscover / Autoconfig web service records to configure these clients automatically. You have to two A records in the DNS for your domain:
|
A record hostname |
Points to |
|---|---|
|
autodiscover.yourdomain.com |
69.28.212.195 |
|
autoconfig.yourdomain.com |
69.28.212.195 |
Visit the "Autodiscover & Autoconfig" page for more information.
Don't forget to replace yourdomain.com with the actual name of your domain.
Please allow 30-40 minutes for the Autodiscover & Autoconfig SSL statuses to update in your Admin Panel domain health page.
Example Setup in GoDaddy:


Example Setup in Cloudflare:
| Record Type | Host / Name | Value / Points To | Proxy Status |
| TXT (Domain Verification) | mx-verification | [Provided Key] |
DNS Only (Grey Cloud) |
| MX | @ |
mx.emailarray.com |
N/A (MX records are never proxied) |
| MX | @ |
mx2.emailarray.com |
N/A |
| TXT (SPF) | @ |
v=spf1 include:emailarray.com -all |
DNS Only (Grey Cloud) |
| TXT (DKIM) | [Provided Host] |
[Provided Key] |
DNS Only (Grey Cloud) |
| CNAME | webmail |
webredirect.emailarray.com |
DNS Only (Grey Cloud) |
| A | autodiscover |
69.28.212.195 |
DNS Only (Grey Cloud) |
| A | autoconfig |
69.28.212.195 |
DNS Only (Grey Cloud) |
Webmail Access
For both Basic and Enhanced mailboxes, our supported Webmail interface is the Group-Office Webmail. It’s a complete re-design, very modern and fast, and it works as well on mobile as on the desktop.
How to access your Webmail
The Webmail doesn’t need additional setup, and you can access it from any computer, smartphone, or tablet without installing other applications.
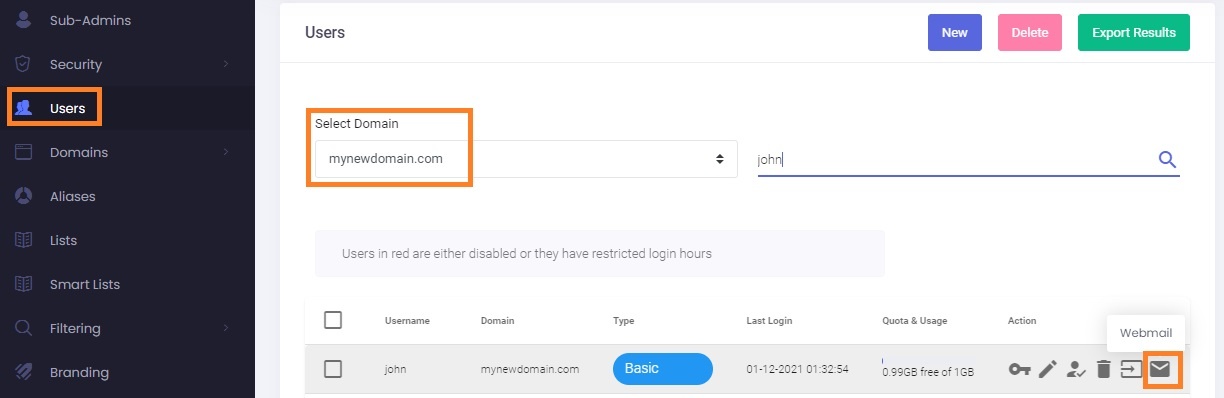
You can access the Webmail in a few ways:
- Option 1: Log in directly to login.emailarray.com using your full email address and password.
- Option 2: From your Admin Panel, click on the envelope icon on the Users page. You can save the link and bookmark it to your favorite Browser for quick use in the future.
- Option 3: adding to your DNS the Webmail record and using this type of URL in the Browser: webmail.mydomain.com (make sure you replace mydomain.com with your domain name). This works only if you have set up the DNS records for the Webmail.
How to Switch to the New Webmail?
You need to configure or modify your DNS by pointing ‘webmail.yourdomain.com’ to webredirect.emailarray.com via a CNAME record.
You would then access your Webmail by visiting http://webmail.yourdomain.com. Use the HTTP protocol, and it will be automatically redirected to HTTPS.
E-mail Migration
Your inbox, unchanged. We transfer all your email data, including your specific folder hierarchy, so you can pick up exactly where you left off.
1. How to Request an Email Migration
We handle migrations in a multi-step process to ensure everything is transferred over safely before and after you change your MX records.
Step 1: Prepare the Mailboxes
- Create the mailboxes on our side from your Admin Panel or WHMCS.
For bulk import (100+ mailboxes), add and verify the domains first, then we can perform a bulk creation of the users from a CSV file (Download example CSV for bulk import users). - Set temporary passwords. We need the current passwords of the mailboxes to perform the migration, but please do not request these from your customers. Instead, set up temporary passwords with the previous provider and inform your customers what passwords to use during the migration. They can continue using the current provider until the MX records are changed.
- Collect the IMAP server address of the previous provider. For some providers, like Google Workspace, you will need to enable IMAP access and set up application passwords for each mailbox.
Tip: Managing Local Delivery
By default, our system routes emails locally between domains hosted on our servers, even if your MX records still point to your old provider. To avoid delivery errors during your transition, set Local Delivery to No. You can change this back to Yes once all your users are added and your MX records are officially pointed to us.
Step 2: Submit Your Request
- Batch your requests: We recommend one ticket per migration batch (1 to 2 domains are the easy to manage, especially for DNS updates and client setups).
- Open a Support Ticket. Visit our Support Portal and
- Choose "3 - Migrations" as the help topic.
- Mention the domain(s) you're migrating in the ticket subject line (easier to track progress).
- Schedule it (optional): Use the "Schedule for" field to set a date and time. We treat this as a "do not start before" limit - perfect for after-hours migrations.
-
Attach your migration CSV file: Include your migration CSV file (Download example CSV file for migration) with:
-
the email addresses
-
temporary passwords
-
source IMAP server
- Leave the "Destination Email Address" column completely blank unless the new address is actually changing.
-
Note on Trash & Spam: To keep your new inbox clean, we don't migrate the Trash or Spam folders by default. If you need us to bring the Trash folder along, just mention it in your support ticket!
Step 3: The Migration Process
- Automated updates. We send automated emails when the migration starts and when it ends.
- Ticket communication: You can reply to the ticket anytime. To keep your ticket moving swiftly through our active queue, our team will only reply if we need information or to notify you that a step is complete.
- Timeframe & Next steps: Migrations usually take under 24 hours, depending on data size and the old server's speed. Once the initial transfer is done, we will update your ticket with instructions for the next steps.
Step 4: Final Sync and Client Setup
- Update the DNS records (MX, SPF, DKIM, webmail, etc.) for the domains to point to our servers ( use the information in this guide: DNS Configuration).
-
Important: If you temporarily set Local Delivery to "No" before the migration, it is time to switch it back to "Yes" now.
- Reply to your ticket. Once your MX records are changed, reply to the migration ticket so we can perform the second migration pass. This catches any residual emails delivered to the old provider during the transition.
- Setup your email clients to use the new IMAP and SMTP hostnames. (See Section 4 below).
2. Migrating Other Data
We can also import your Contacts, Calendars, Aliases, Forwards, Distribution Lists, and help you carry over your Outlook rules.
- Contacts and Calendars: you can import them via email or attach exported .vcf files for contacts and .ics files for calendars to your migration support ticket.
- Aliases: Download an example CSV file for alias migration. Fill it out and attach it to your migration ticket.
- Forwards: Download an example CSV file for forwards migration. Fill it out and attach it. Add multiple lines for a single user if they have multiple forwards.
- Distribution Lists: Create the empty list in your Admin Panel first. Then, download an example CSV file for list migration, listing each member on a separate line, and attach it to your ticket.
- Outlook Rules & Filters: Your organizational rules are tied to your specific Outlook profile. To keep them, export your rules (.rwz file) from the old Outlook profile via
File > Manage Rules & Alerts > Options > Export Rules. Once you set up your new profile (see Section 4), import that same file into it.
3. What to Expect After Migration
Your Folder Structure & The Auto-Archive Feature
We transfer all your email data and folder hierarchy. However, to ensure your service remains fast and reliable, our system uses an automated optimization tool.
- The 10,000 Item Threshold: If any folder contains more than 10,000 emails, our system automatically moves older messages into an archive sub-folder. For example, if your "Inbox" has over 10,000 emails, older messages will be moved to
Archive.Inbox.2023,Archive.Inbox.2022, etc. - Why we do this: This prevents email clients from slowing down or corrupting data files, and keeps webmail searches nearly instantaneous.
- Current + Last Year: Active folders retain messages from the current year and the previous year. Older data is safely moved to archives.
- Full Accessibility: Archived emails remain fully searchable and accessible across all your devices. If a folder seems to have fewer messages than expected after a migration, simply check the sub-folders for an Archive directory.
Missing emails? Check your archive folders.
If you notice a folder has fewer messages than expected after migration, don't worry, your data is safe. Simply check the sub-folders for an Archive directory. All your historical data remains fully searchable and accessible across all your devices.
4. Updating Your Email Clients
When it is time to connect your email apps (Outlook, Apple Mail, Thunderbird, eM Client, iOS, Android, etc.) to our servers, you must follow this one crucial rule to avoid corrupting your setup or losing your email history.
The Golden Rule: Always Add a New Account / Profile
Do not simply edit your existing IMAP or POP profile to change the server names. Overwriting an old profile often causes the setup to fail.
-
Keep your current email account profile untouched as a reference.
-
Add a completely new account or profile to your app using your new server details.
-
Once the new account is verified, syncing, and set as the default, you can safely delete the old one.
For step-by-step configuration guides for your specific app, please visit: Setup IMAP on email clients.
5. If You Were Previously Using a POP3 Connection
If you were using a POP3 connection in Outlook or another email client, your emails are likely stored only on your local computer and not on the previous server.
Backup First: Before you begin, export your entire profile as a local backup ( like a PST file in Outlook).
-
Local Storage Risk: Since your computer is the only home for these emails, this backup is critical to prevent permanent data loss.
-
The Transition: Create your new IMAP profile first. Once active, you can import your old PST/backup file into the new profile to merge your history with the new service.
-
Safety Check: Do not delete your old account profile until you are 100% sure your data has been successfully imported into the new one.
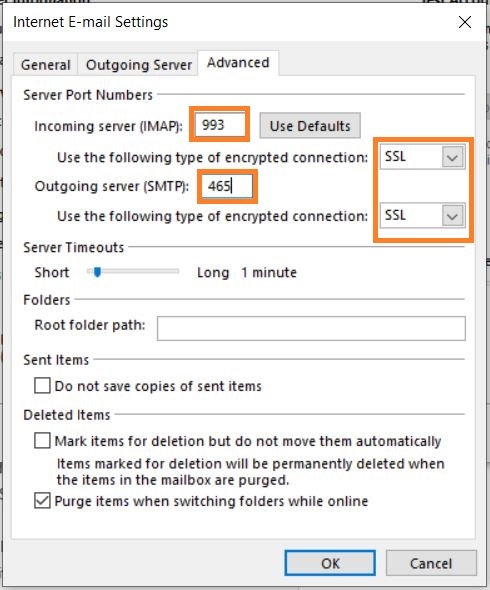
Servers & Ports
Recommended setup for SSL connection:
Configuring Autodiscover & Autoconfig DNS records for your domain can simplify the configuration of your desktop clients, such as Outlook and Thunderbird.
|
Protocol |
Server Address |
Ports |
|---|---|---|
| IMAP (Incoming) |
imap.emailarray.com |
993 |
|
SMTP (Outgoing) |
smtp.emailarray.com |
465 |
|
POP3 (Incoming) |
pop.emailarray.com |
995 |
You must enable SMTP Authentication in your e-mail client in order to send e-mails out.
Also note that IMAP is recommended rather than POP, as it´s a protocol made to support several devices accessing one same account, with all folders synced at our server, which also guarantees that our backups will be executed.
Other ports are available, for SSL, TLS or non-SSL setup:
IMAP Service
|
Encryption |
Server Address |
Ports |
|---|---|---|
|
SSL |
imap.emailarray.com |
993 |
|
TLS |
imap.emailarray.com |
143 |
|
NONE |
imap.emailarray.com |
143 |
SMTP Service
|
Encryption |
Server Address |
Ports |
|---|---|---|
|
SSL |
smtp.emailarray.com |
465 |
|
TLS |
smtp.emailarray.com |
25,26,587 |
|
NONE |
smtp.emailarray.com |
25,26,587 |
|
Important You must enable SMTP Authentication in your e-mail client in order to send e-mails out. |
POP3 Service
| Also note that IMAP is recommended rather than POP, as it´s a protocol made to support several devices accessing one same account, with all folders synced at our server, which also guarantees that our backups will be executed. |
|
Encryption |
Server Address |
Ports |
|---|---|---|
|
SSL |
pop.emailarray.com |
995 |
|
TLS |
pop.emailarray.com |
110 |
|
NONE |
pop.emailarray.com |
110 |
Autodiscover and Autoconfig
Autodiscover / Autoconfig for Outlook, Thunderbird & Mobile Devices
What is Autodiscover / Autoconfig ?
It's a web services that is used by a growing number of applications and which helps in configuring your mobile devices and desktop clients. Autodiscover / Autoconfig is used by Outlook, Thunderbird, eM Client, iOS & Android devices in order to automatically configure the e-mail application.
This services allow you to configure an e-mail account by only entering your e-mail address and password, without having to worry about incoming servers, outgoing servers, or ports. All communication is configured to be secured through SSL by default. However, the implementation is heavily dependent on the software maker ( Apple, Microsoft ) and some versions have better integrations than others.
DNS Configuration
Add an A type record in the DNS of the domain for which you'd like to enable this services (Don't forget to replace yourdomain.com with your actual domain name):
|
A record hostname |
Points to |
|---|---|
|
autodiscover.yourdomain.com |
69.28.212.195 |
|
autoconfig.yourdomain.com |
69.28.212.195 |
Configure your favorite email app
Step-by-step guides for IMAP and SMTP setup.
Whether you prefer the desktop power of Outlook and Thunderbird or the mobility of your smartphone, we’ve got you covered. Pick your platform below for a tailored, step-by-step guide.
Quick Server Settings: If you’re an advanced user and just need the "cheat sheet," use these secure settings:
Protocol Server Address Ports
IMAP (Incoming) imap.emailarray.com 993
SMTP (Outgoing) smtp.emailarray.com 465
POP3 (Incoming) pop.emailarray.com 995
Important: When setting up your outgoing server (SMTP), always ensure "Authentication Required" is enabled using your full email address and password.
Pro Tip: Use IMAP. We strongly recommend IMAP over POP3. It keeps all your folders in sync across every device and ensures your data is protected by our 30-day (Basic) or 365-day (Enhanced) backups.
Setup Email on Thunderbird (IMAP)
Thunderbird is a free, open-source email client that offers excellent support for IMAP and advanced groupware features. Follow the steps below to connect your mailbox.
Large Mailboxes: Depending on your internet speed and the size of your mailbox (up to 200GB per account), the initial synchronization can take anywhere from a few hours to a few days to fully build your local data file.
You can setup Autoconfig in your DNS to make the process of setting up Thunderbird much easier.
Enhanced mailbox? Connect a CardDAV address book or a remote calendar (CalDAV) to keep your contacts and schedule in sync.
Getting Started
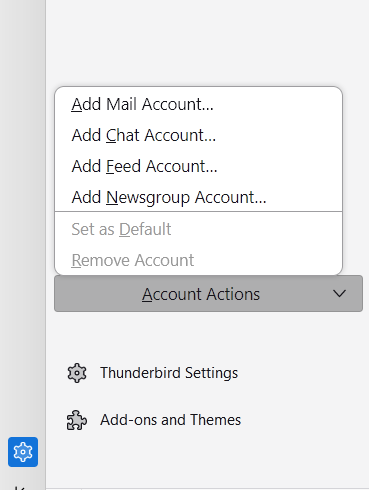
To open the setup window for a new email account:
-
Click on Account Actions in the bottom left of the account pane.
-
Select Add Mail Account... from the menu.

Option 1: Automatic Configuration (Recommended)
If you have Autoconfig set up in your DNS, Thunderbird will handle the heavy lifting for you.
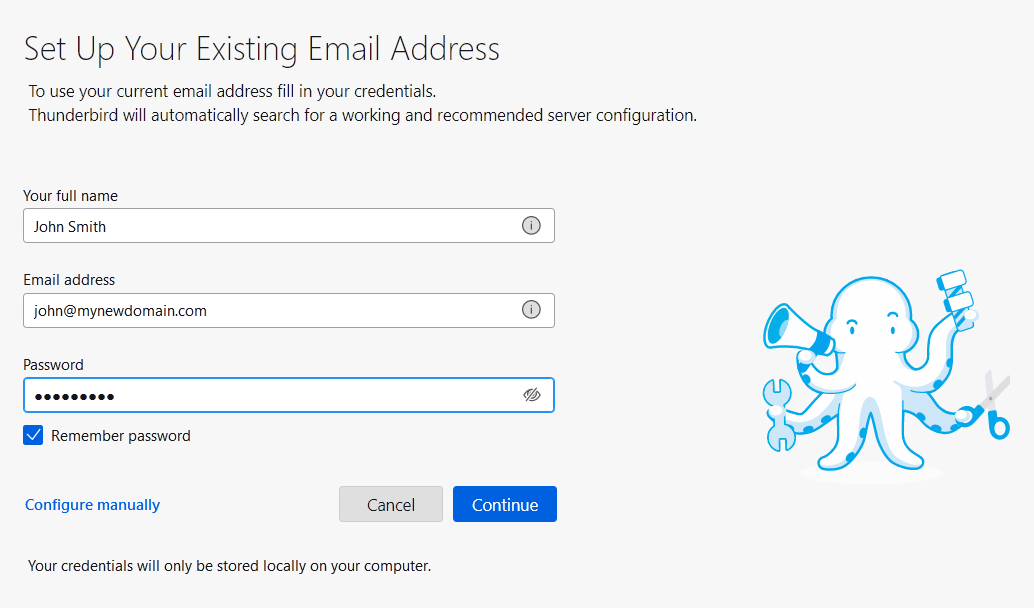
-
Enter Your Details: Fill in your full name, email address, and password. Keep Remember password checked.

-
Search for Settings: Click Continue. Thunderbird will automatically search for the recommended server configuration.
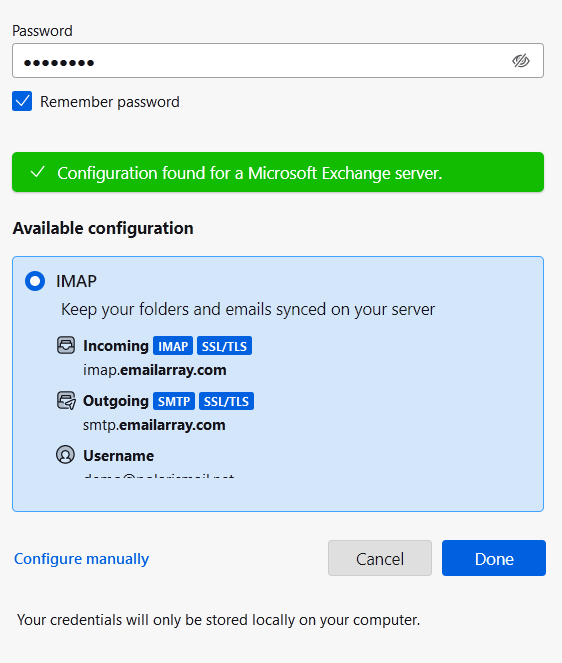
-
Confirm Configuration: Once the green "Configuration found" message appears, verify that IMAP is selected.

-
Finish Setup: Click Done.
Option 2: Manual Configuration
If Autoconfig is not available or you need to specify custom ports, follow these steps.
-
Enter Your Details: Input your name, email, and password, then click Configure manually at the bottom of the window.
-
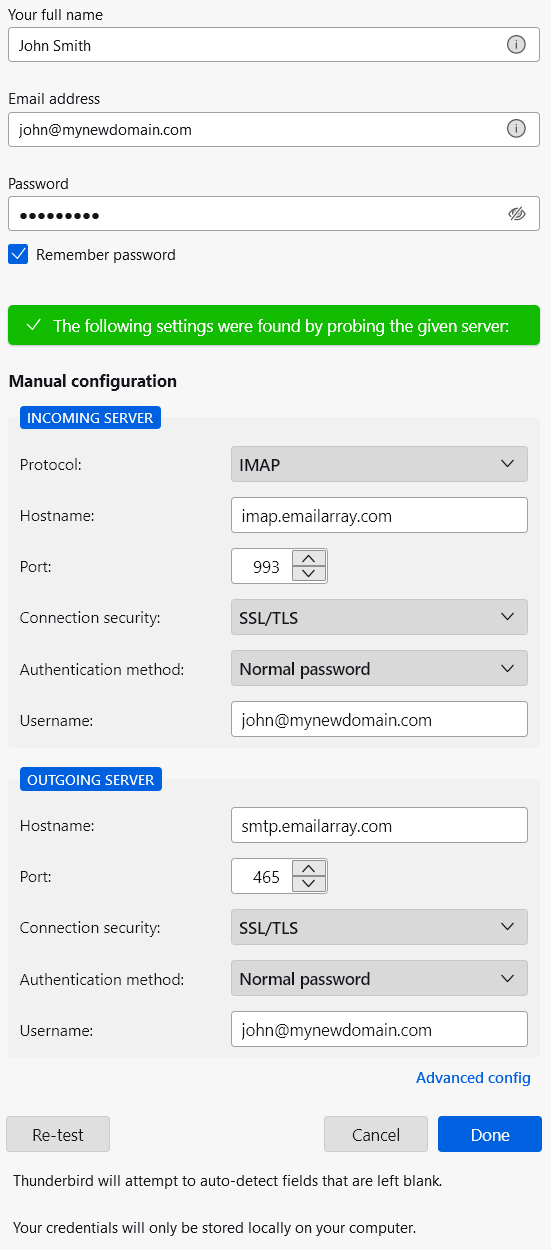
Enter Server Details: We recommend using IMAP with SSL/TLS to ensure your data remains private and your folders stay synchronized across all devices.
-
Incoming Server
-
Protocol: IMAP
-
Hostname: imap.emailarray.com
-
Port: 993
-
Connection Security: SSL/TLS
-
Authentication Method: Normal password
-
Username: Your full email address (e.g., name@yourdomain.com)
-
-
Outgoing Server
-
Protocol: SMTP
-
Hostname: smtp.emailarray.com
-
Port: 465
-
Connection Security: SSL/TLS
-
Authentication Method: Normal password
-
Username: Your full email address (e.g., name@yourdomain.com)
-
-
-
Test and Verify: Click Re-test. Thunderbird will verify the connection.
-
Finalize: Once the green success bar appears ("The following settings were found by probing the given server"), click Done.
Success!
Your account is now ready to use.
On the final screen, you can also:
-
Add a custom signature.
-
Enhanced mailbox? Connect a CardDAV address book or a remote calendar (CalDAV) to keep your contacts and schedule in sync.
-
Enable end-to-end encryption for extra security.
Click Finish to head to your inbox. Thunderbird will now begin synchronizing your folders.
Setup Email on Outlook (IMAP)
Find the step-by-step tutorial for your specific version of Outlook below. If you aren't sure which version you have, you can usually find this info under the Help menu or the About section within the app.
Large Mailboxes: Depending on your internet speed and the size of your mailbox (we support up to 200GB per account), the initial synchronization can take anywhere from a few hours to a few days to fully build your local data file.
Enhanced mailbox? Connect a CardDAV address book or a remote calendar (CalDAV) to keep your contacts and schedule in sync in Outlook.
Use the following settings or follow the Outlook 365 or Outlook 2013/2010 instructions below.
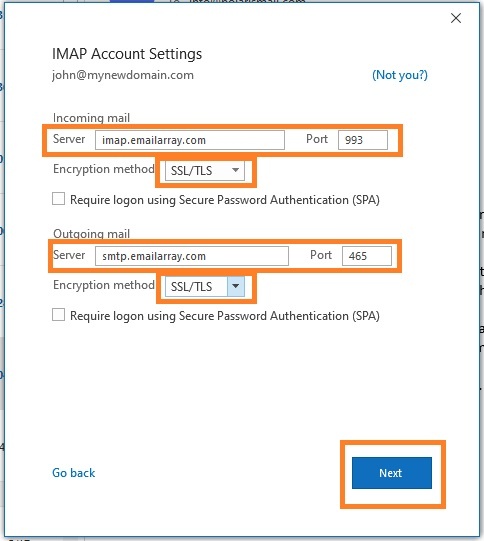
| Service | Server Address | Port (SSL/TLS) |
| Incoming (IMAP) | imap.emailarray.com | 993 |
| Outgoing (SMTP) | smtp.emailarray.com | 465 |
We recommend using IMAP with SSL/TLS to ensure your data remains private and your folders stay synchronized across all devices.
The New Outlook for Windows
Microsoft has recently introduced a "New Outlook" for Windows. Based on our testing and official Microsoft documentation, this version handles IMAP accounts differently than previous versions.
What you need to know
- Forced Cloud Sync: Unlike "Classic" Outlook, the "New Outlook" requires all IMAP accounts to sync through the Microsoft Cloud.
- Data Privacy: This means your emails, even though hosted securely with us, will be stored on Microsoft’s servers to enable this sync.
- Setup Failures: Because Microsoft forces this intermediary sync, many IMAP setups fail during the "Syncing to Microsoft" phase, even if your credentials and server settings are 100% correct.
Our Recommendation: Use "Classic" Outlook
To maintain a direct, private connection between your device and our servers, and to avoid setup errors, we recommend staying with Classic Outlook.
-
Open Outlook.
-
Locate the "Try the new Outlook" toggle in the upper-right corner.
-
Switch the toggle Off.
-
Restart Outlook and follow the Outlook 365 or Outlook 2013/2010 instructions below.
For a deeper dive into why Microsoft implemented this change, you can read the full discussion on the Microsoft Community page.
Outlook 365
Unfortunately, this version of Outlook doesn't support Autodiscover for IMAP accounts anymore.
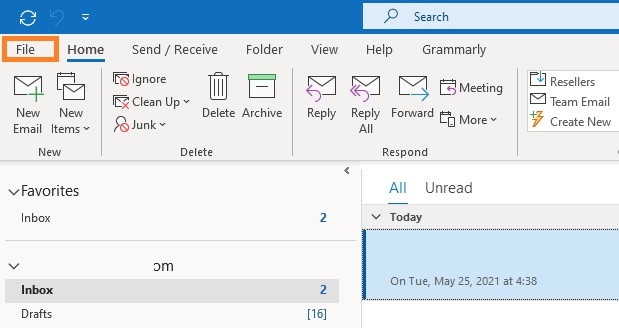
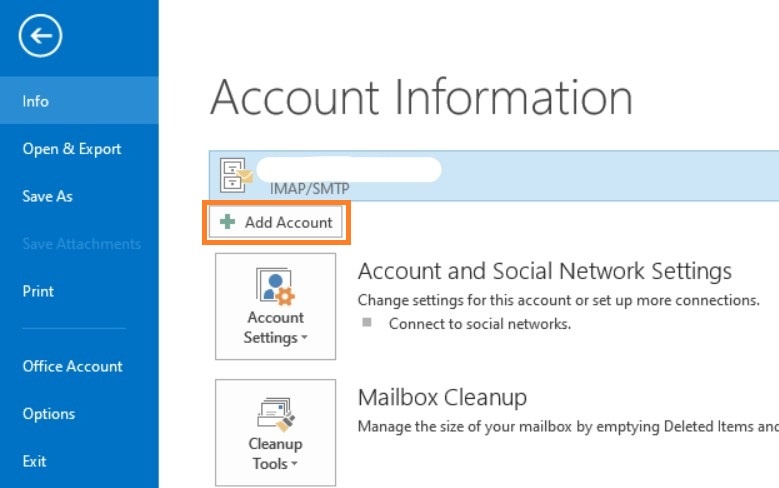
- Click on the File menu
- Click on + Add Account
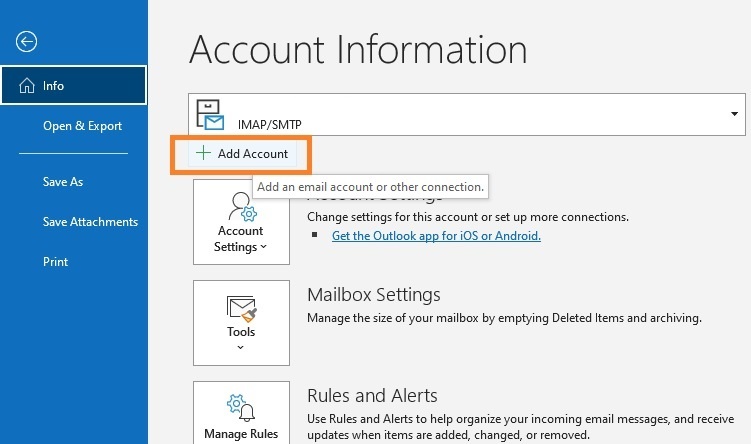
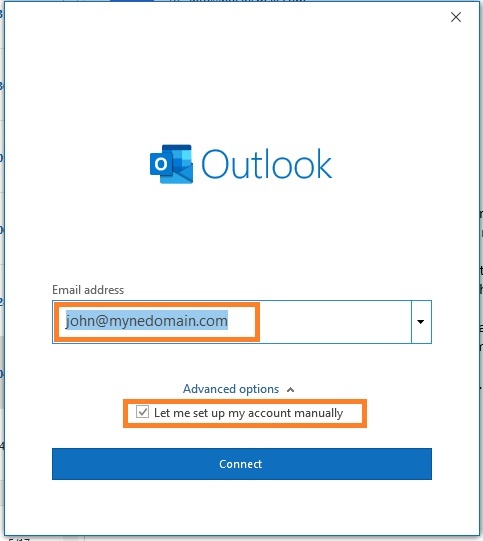
- Fill in your full email address and select the option Let me set up my account manually.
- Click on Next.
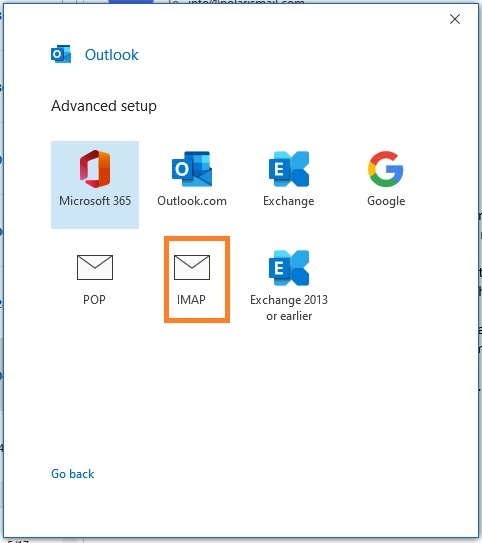
- Select IMAP from the list of account types.
- Fill in server information from the Server & Ports page
- Click on Next
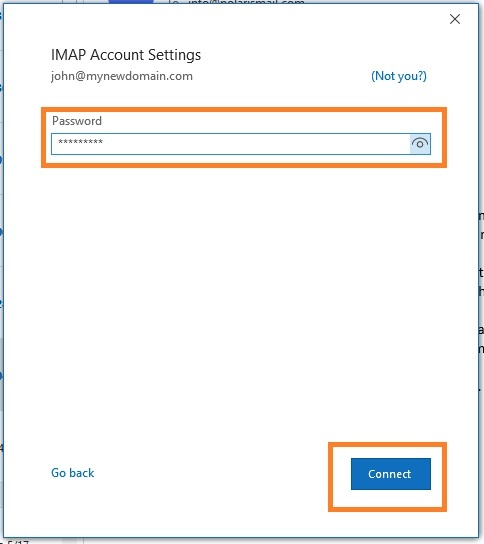
- Fill in your existing password for your email address and click on Connect
- The setup is completed. The message Account successfully added will show and Outlook will begin synchronizing the account.
Depending on the size of your mailbox and your Internet speed, Outlook might take from a few hours to a few days to synchronize the mailbox and build the local PST file.
Outlook 2013/2010:
- Click on the File menu
- Click on + Add Account
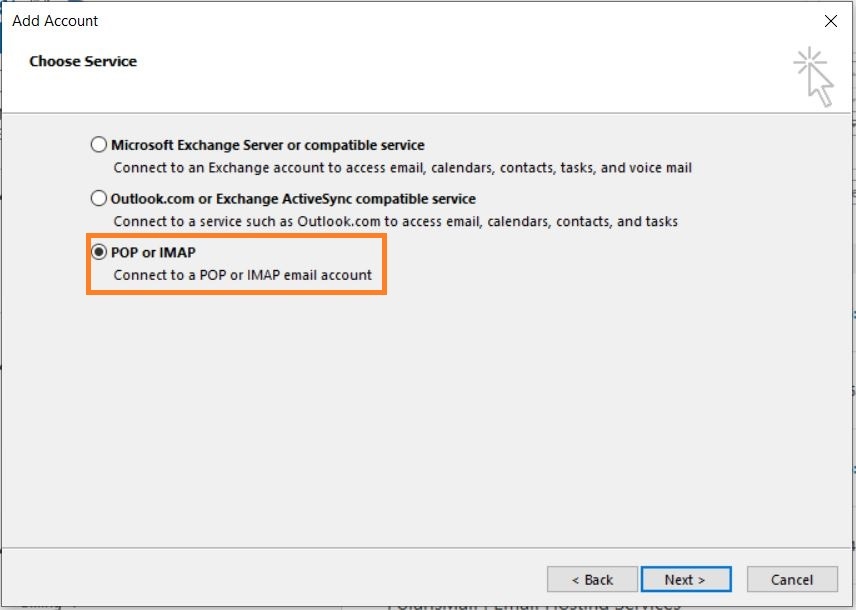
- Select POP or IMAP
- Option 1: this version of Outlook supports Autodiscover for IMAP accounts if you have setup Autodicover in your DNS.
- Type in your full name, e-mail address, and password and click on Next
- Click on Allow when asked about autodiscover.xml
- Click on Finish
- Option 2: If you don't have Autodicover
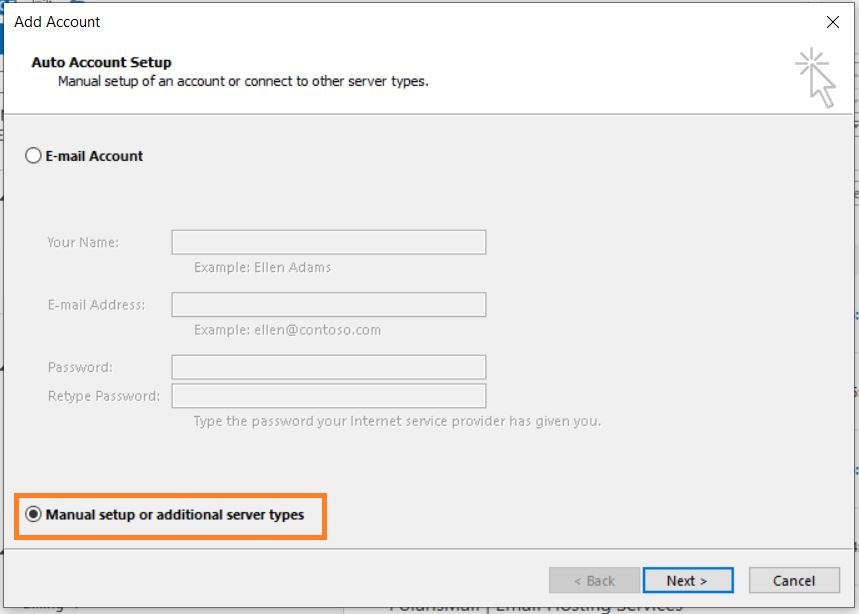
- select Manual setup and click on Next.
-
- Type in your full name, e-mail address, and password
- Fill in server information from the Server & Ports page

-
- Click on More Settings.
- Select My outgoing server (SMTP) requires authentication and Use same settings as my incoming mail server.

-
- Click on the Advanced tab
- Verify the ports are correct and SSL is selected.
-
- Click on OK. Click on Next to finish the setup.
Depending on the size of your mailbox and your Internet speed, Outlook might take from a few hours to a few days to synchronize the mailbox and build the local PST file.
Setup Email on iOS
If you have an Enhanced mailbox, you can use ActiveSync, to not only sync emails, but also contacts and calendars.
Automatic Email Setup for iOS
The easiest way to setup your mailbox on iOS is by downloading your iOS profile from the Webmail. The profile will include email, calendars and contacts if you have an Enhanced mailbox, or just the email if you have a Basic mailbox. Alternatively, you can use the steps for manual setup.
Here are the steps for automatic email setup on your iOS device:
- From your iOS device login to your Webmail.
- Click on your profile image and click on Download iOS Profile from the dropdown menu. This option will only appear if you are logged in from an iOS device.

- A pop-up message will appear with the message Configuration profile available - Continue downloading? Click on the Continue button or confirm the download.
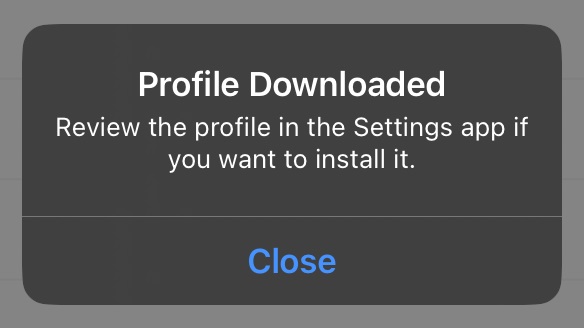
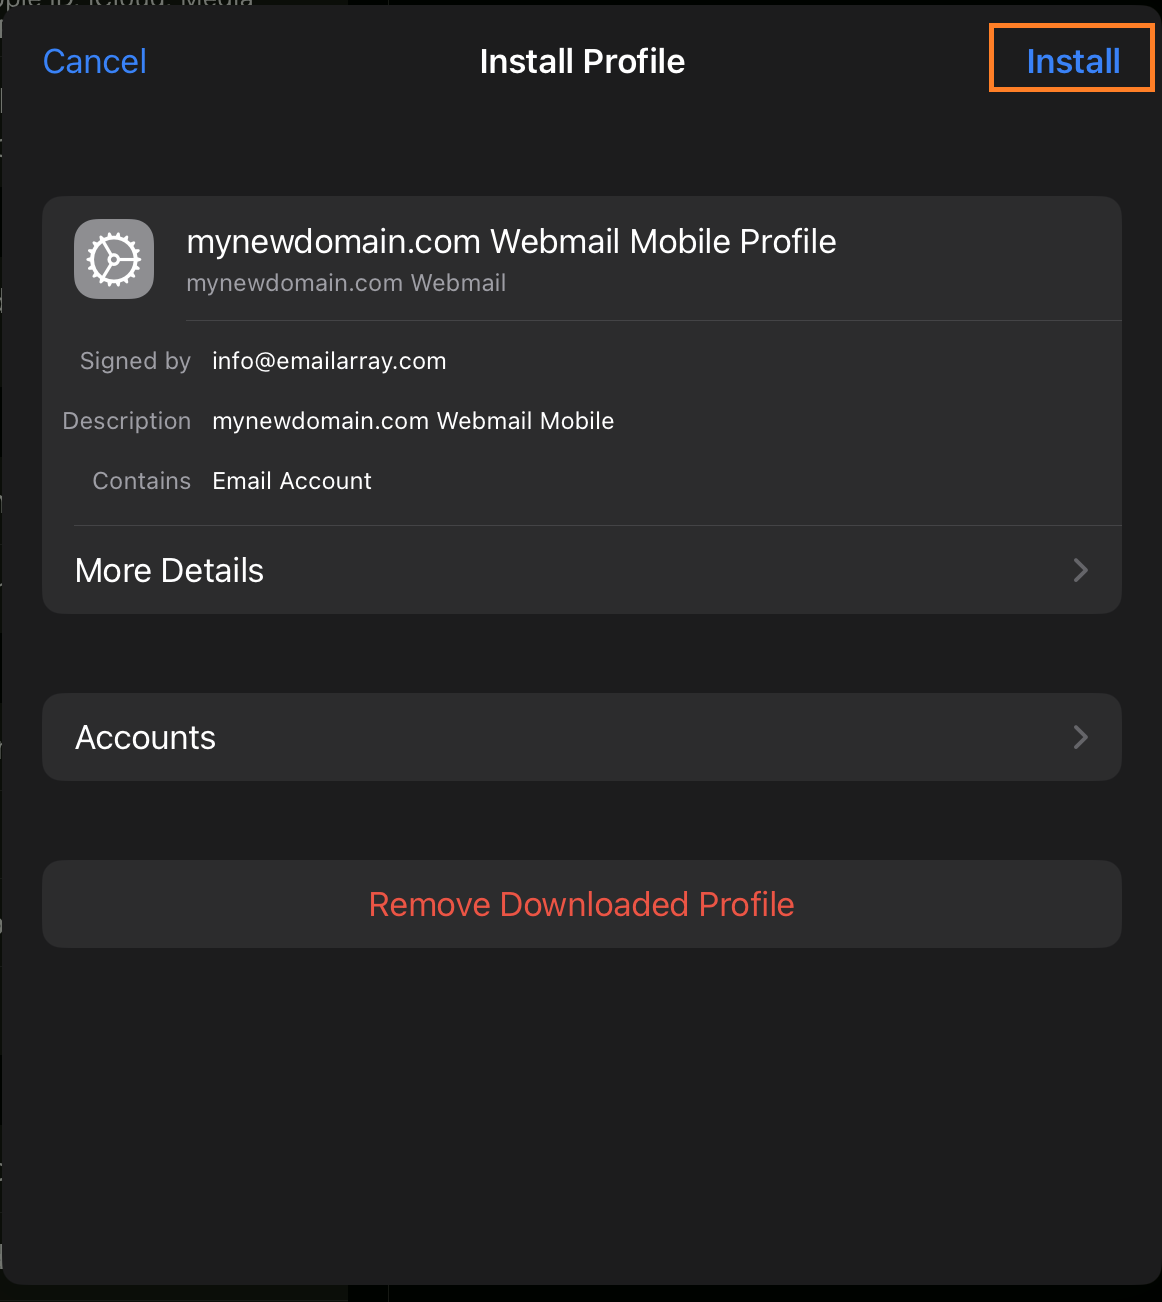
- After the profile is downloaded, a confirmation pop-up will show with the message Profile Downloaded - Review the profile in the Settings app if you want to install it.

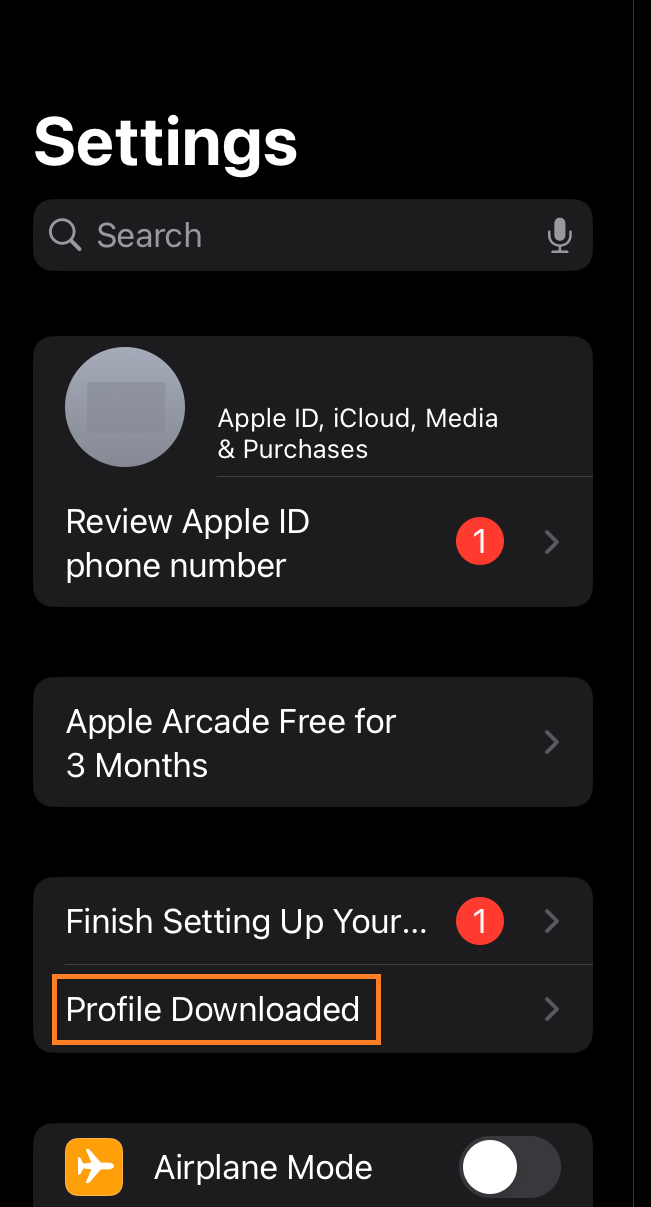
- Go to your iOS device Settings and you should see a new menu item on the left hand with the text Profile Downloaded. Click on it.

- A new window with Install Profile will show. Click on the Install button.

- Next, depending on your mailbox type, it will ask you to enter your mailbox password for Incoming Mail Server. Enter your mailbox password.
- And you're all done! The mailbox has been added to your iOS device and you can check the emails using the email app.
Manual IMAP Setup for iOS
Here's the step by step for setting up an IMAP account on iOS.
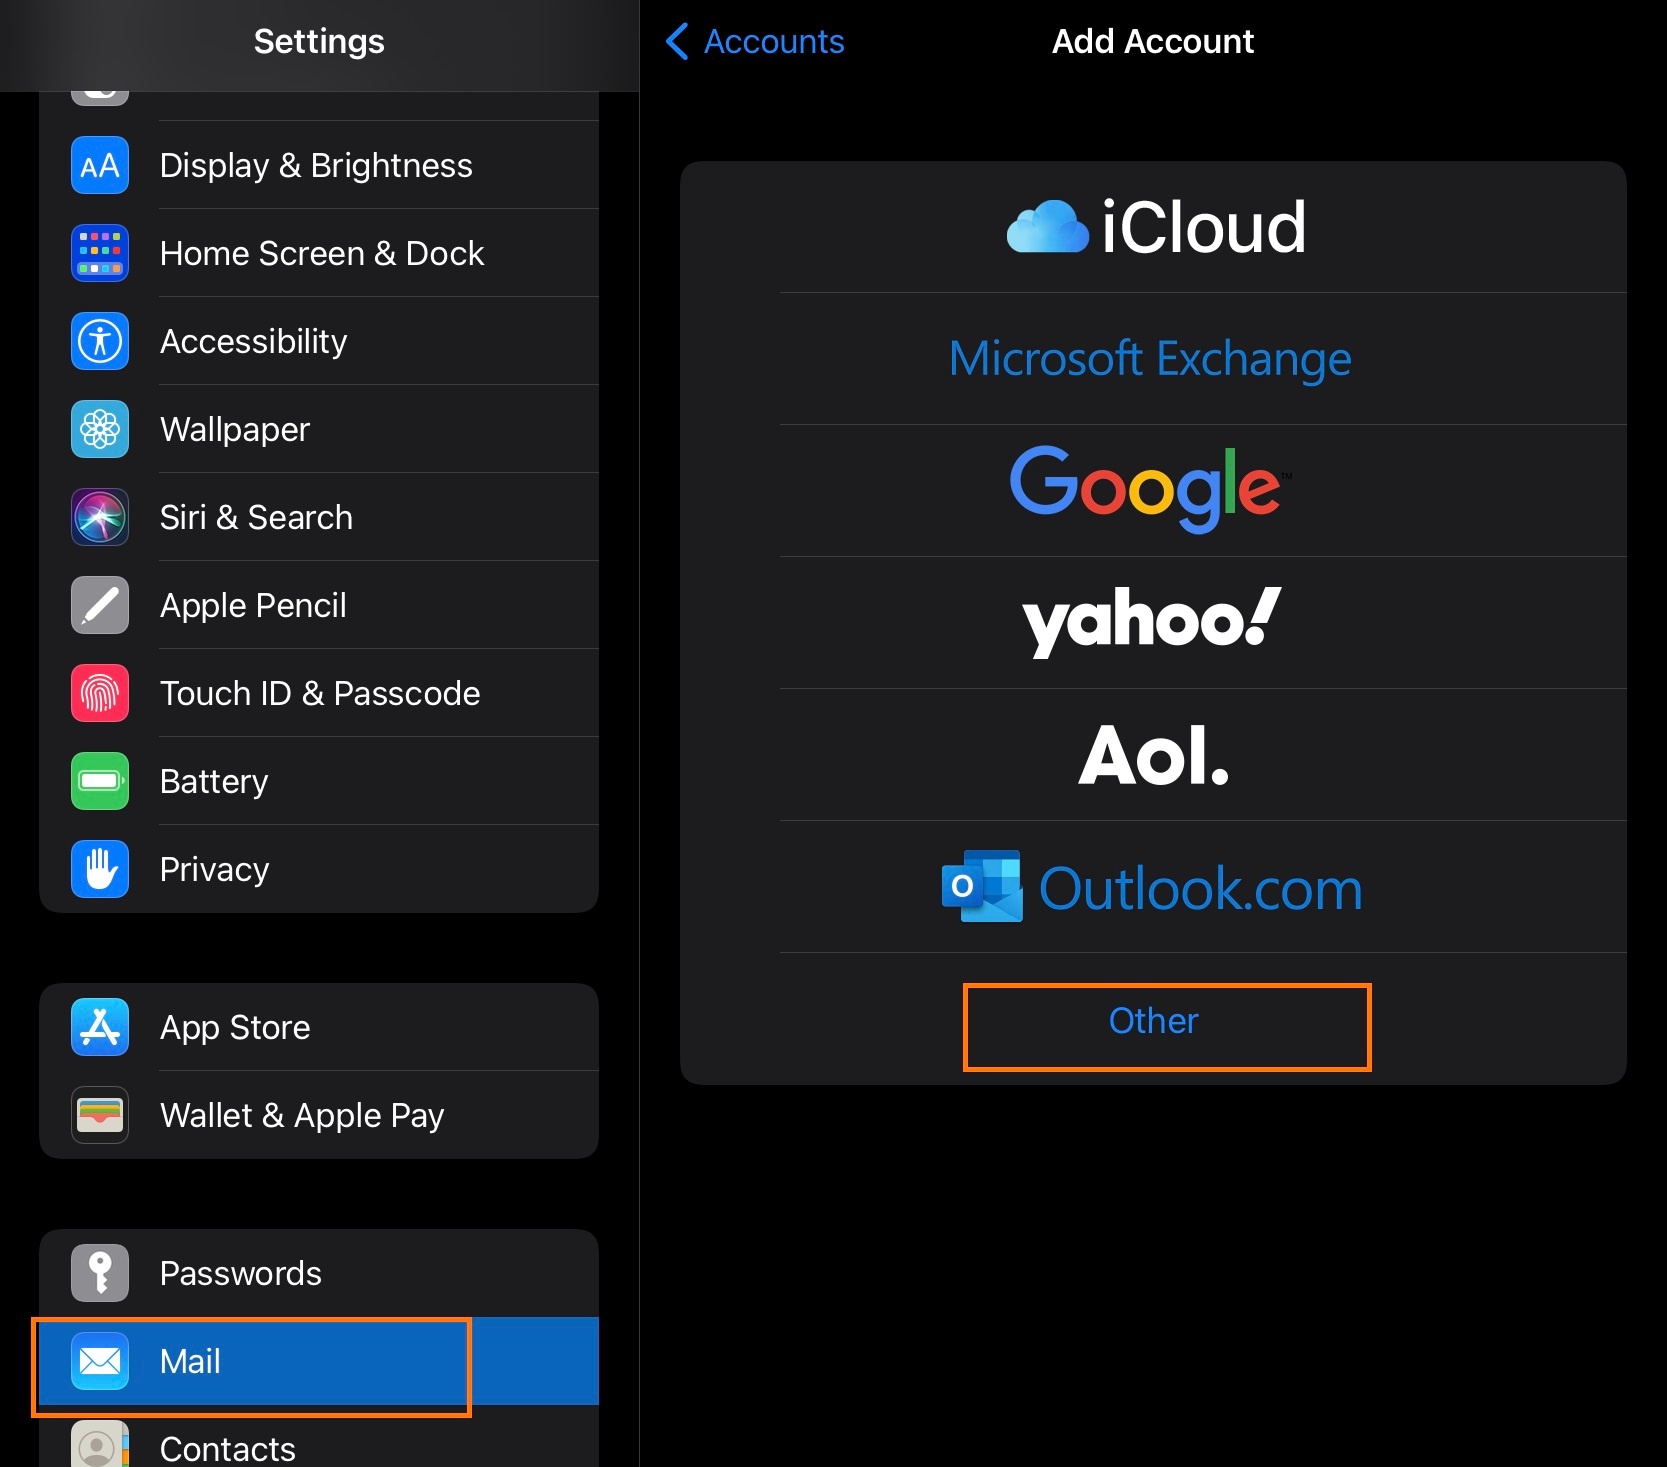
- Click on Settings
- Click on Mail, Contacts, Calendars
- Click on Add Account
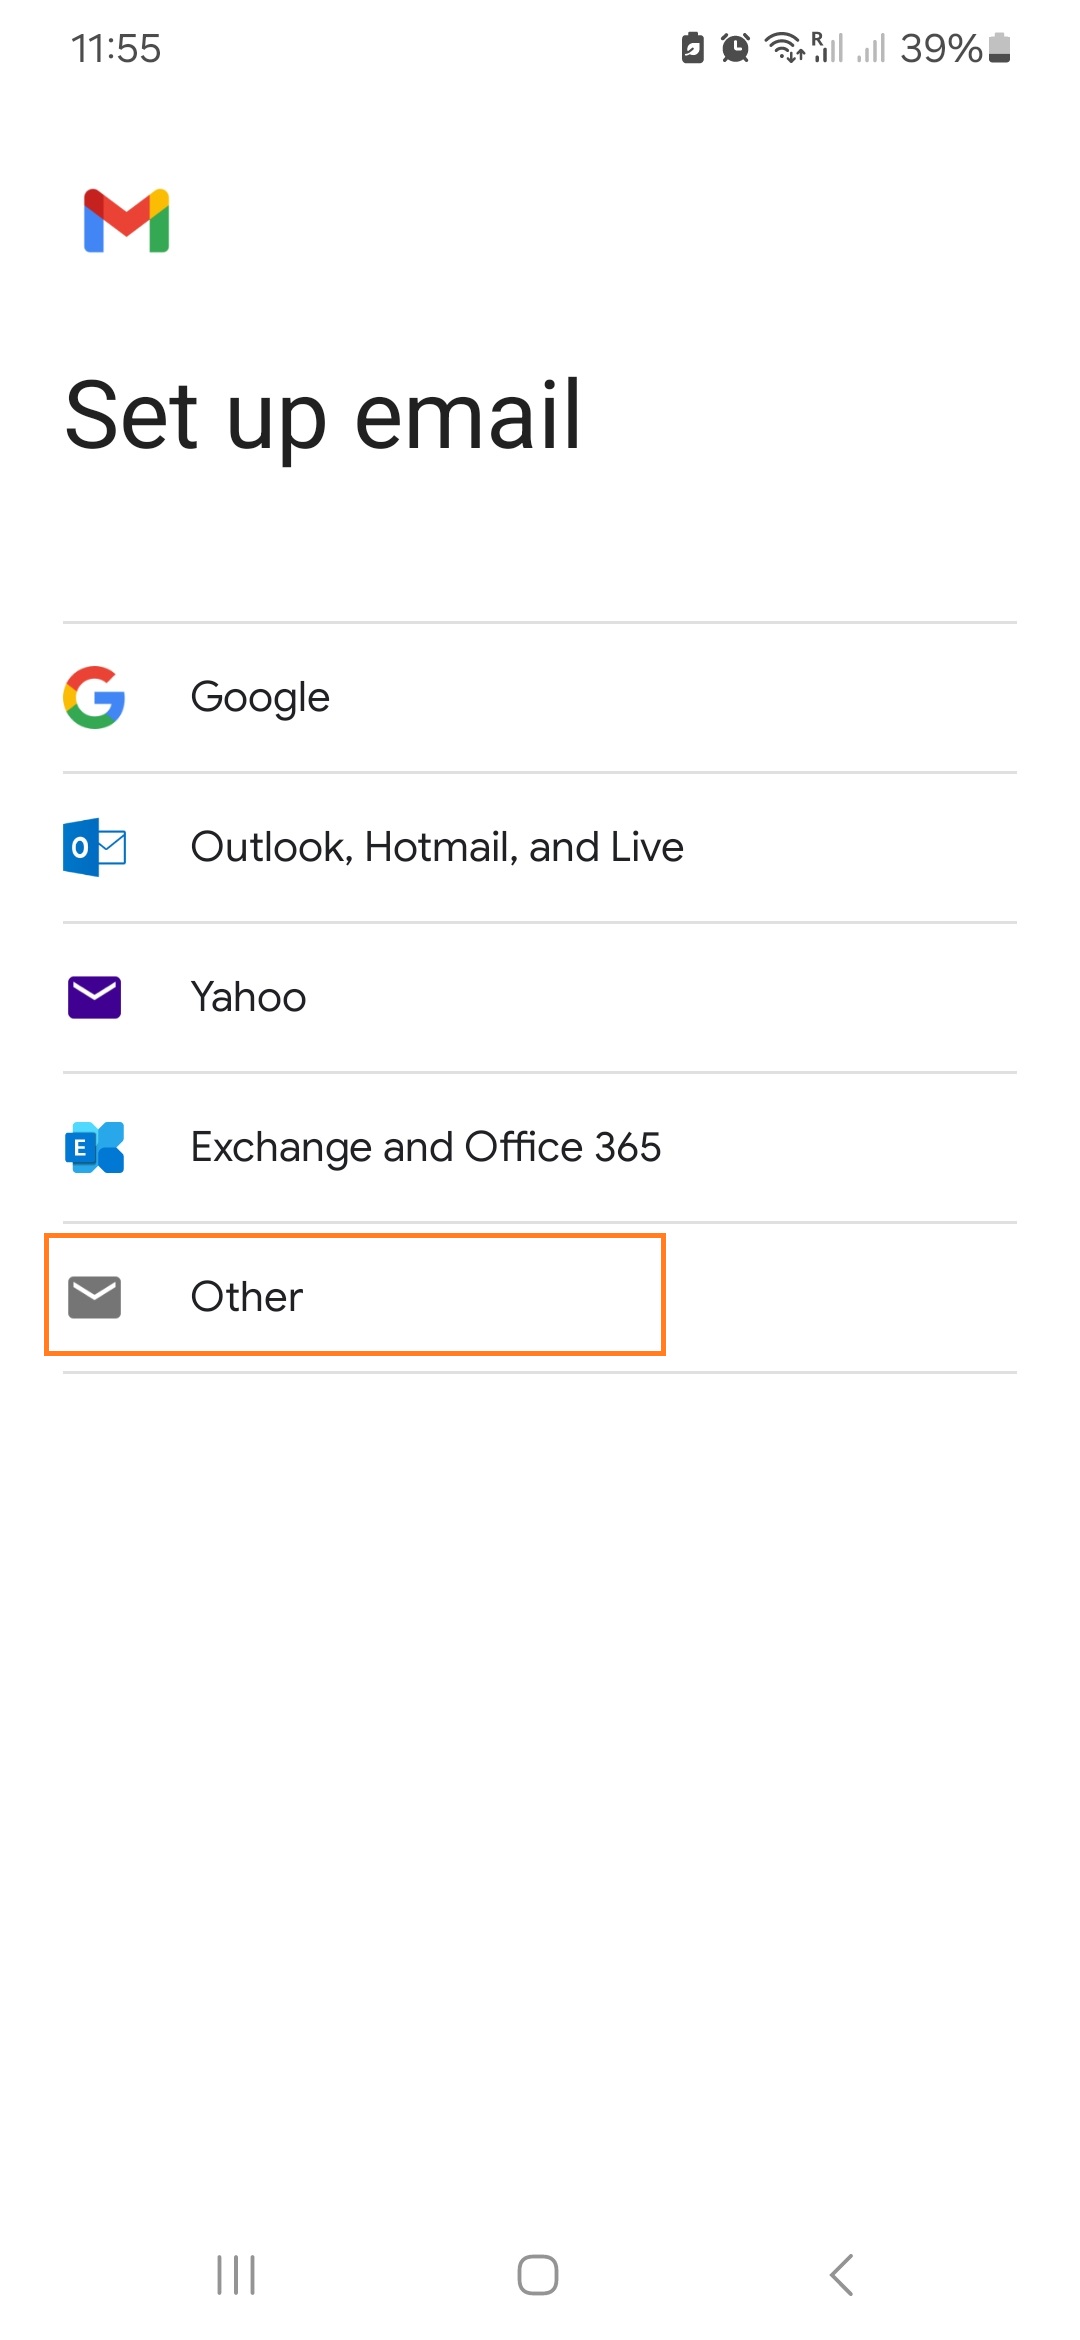
- Click on Other
- Click on Add Mail Account
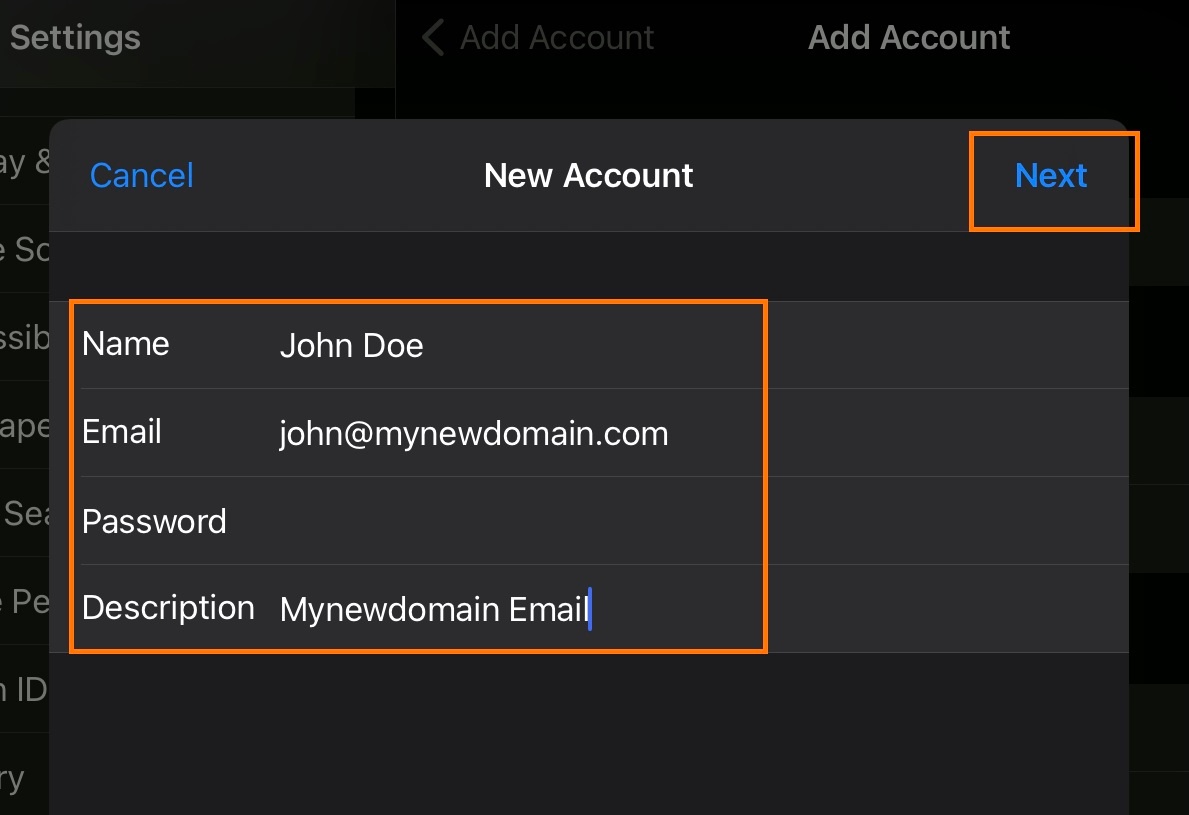
- Inform the following
- Name - The display name you want on your outgoing email
- Email - Your full email address
- Password - Your email password
- Description - A description for your account
- Click on Next
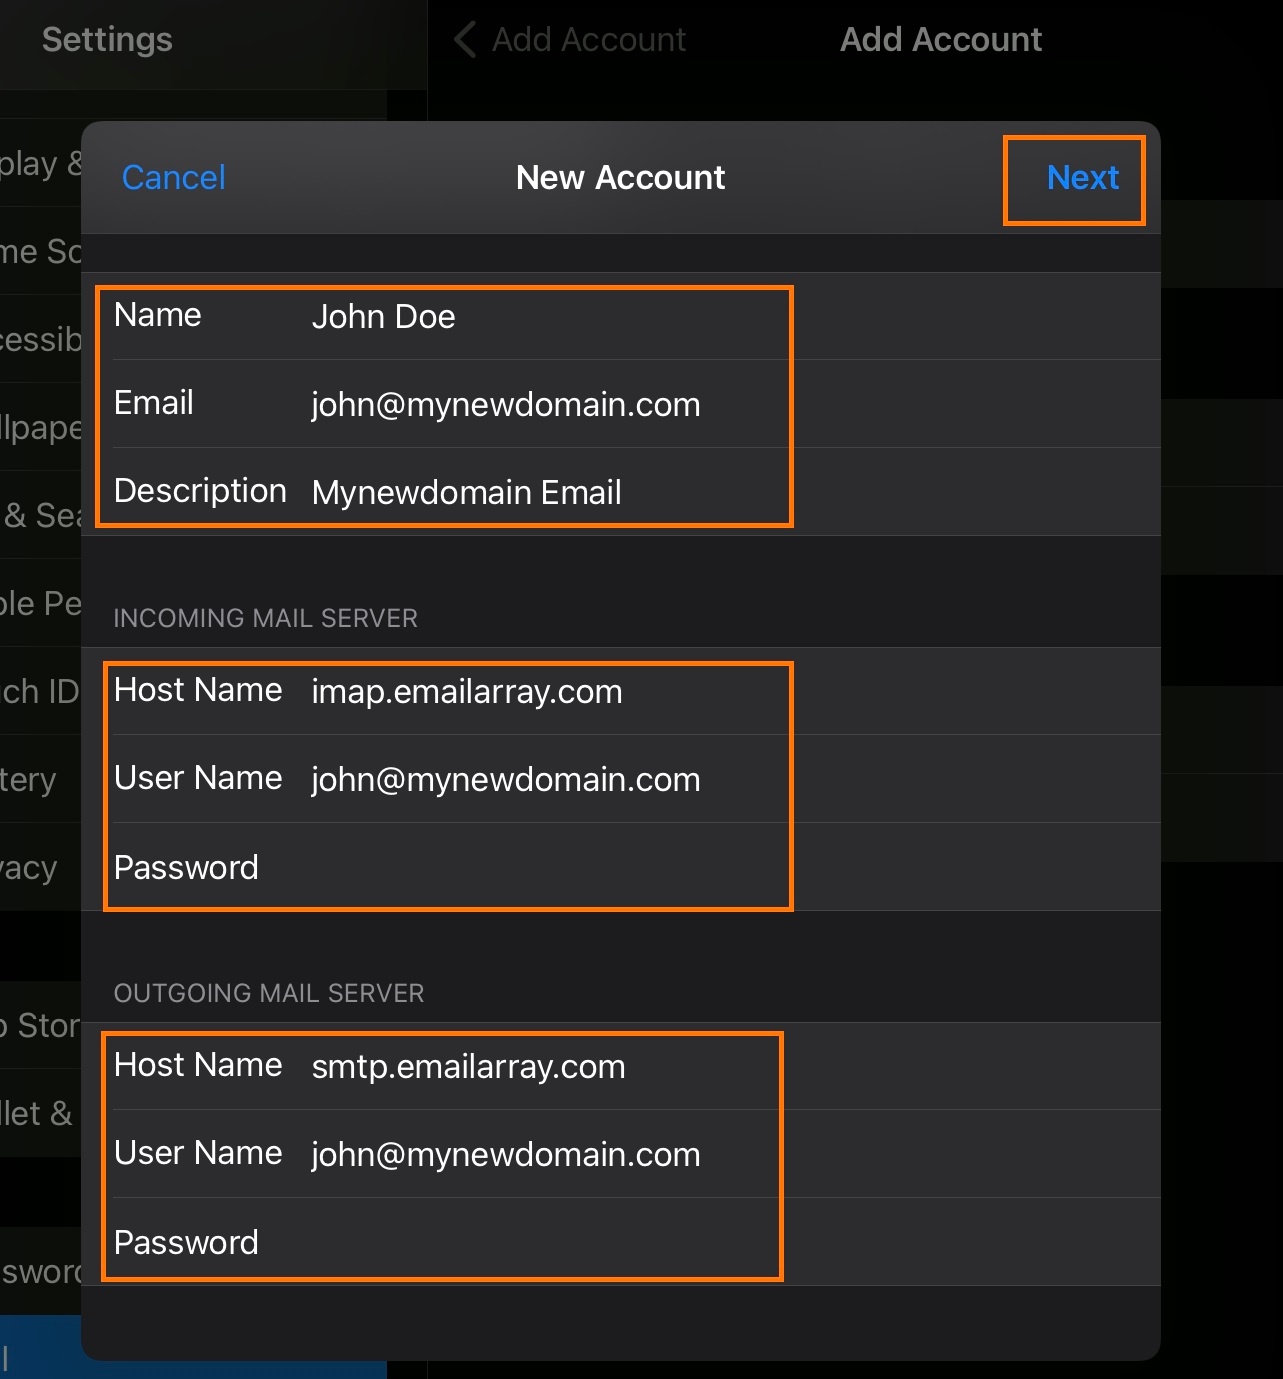
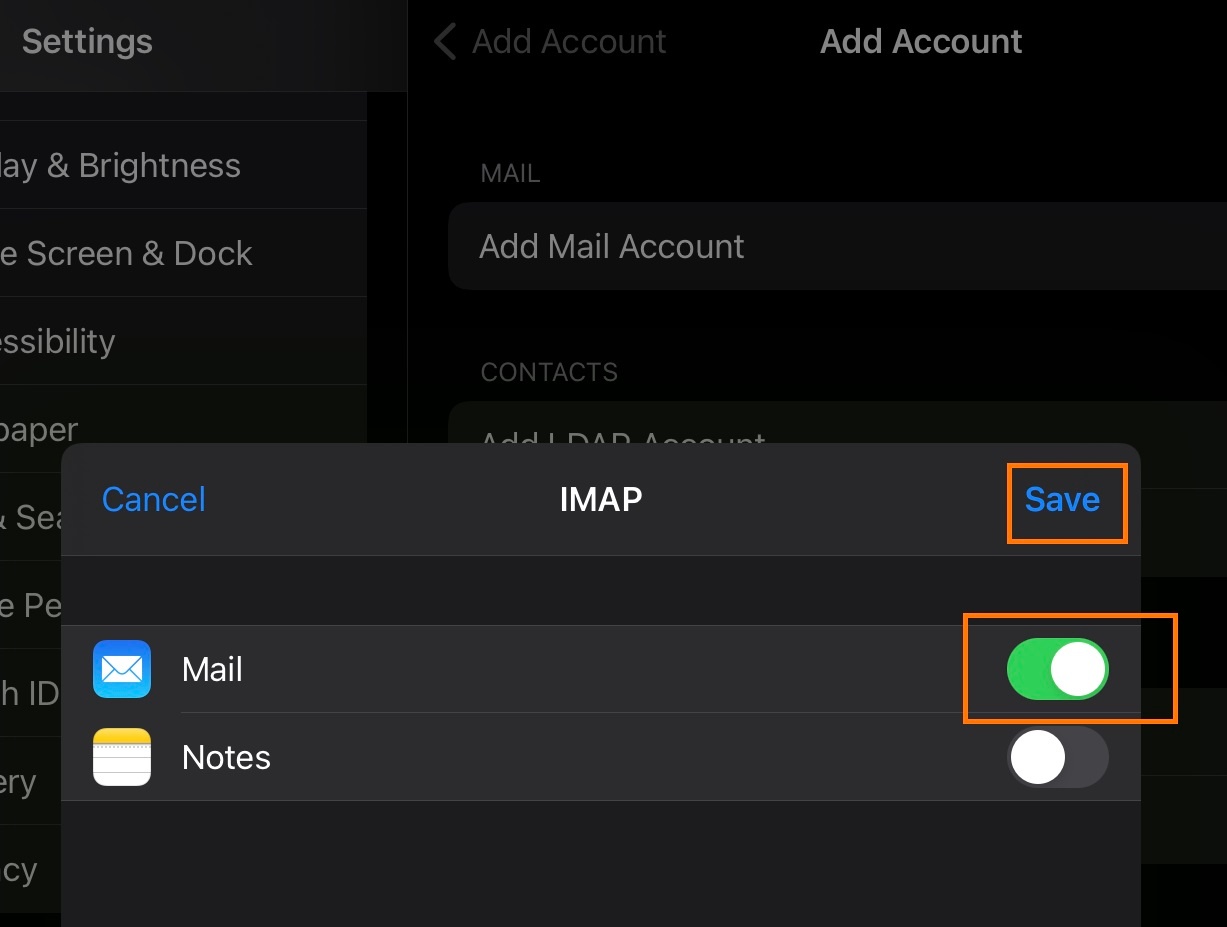
- IMAP is selected by default
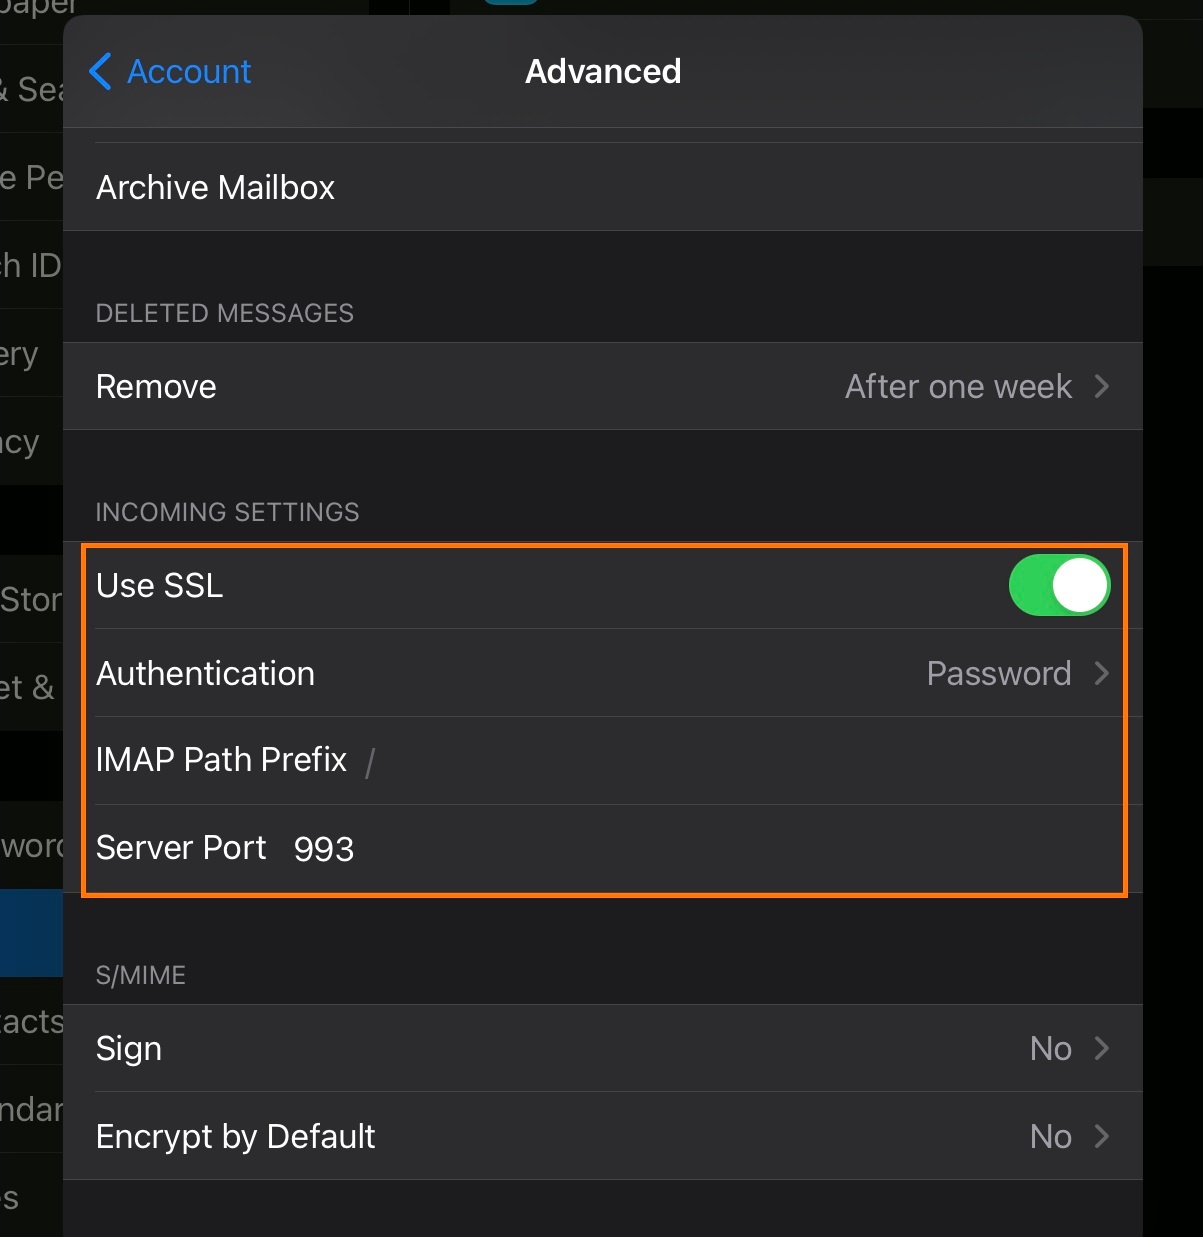
- Under Incoming Mail Server, enter as below:
- Host Name -
imap.emailarray.com - User Name - Your full e-mail address
- Password - Your password
- Host Name -
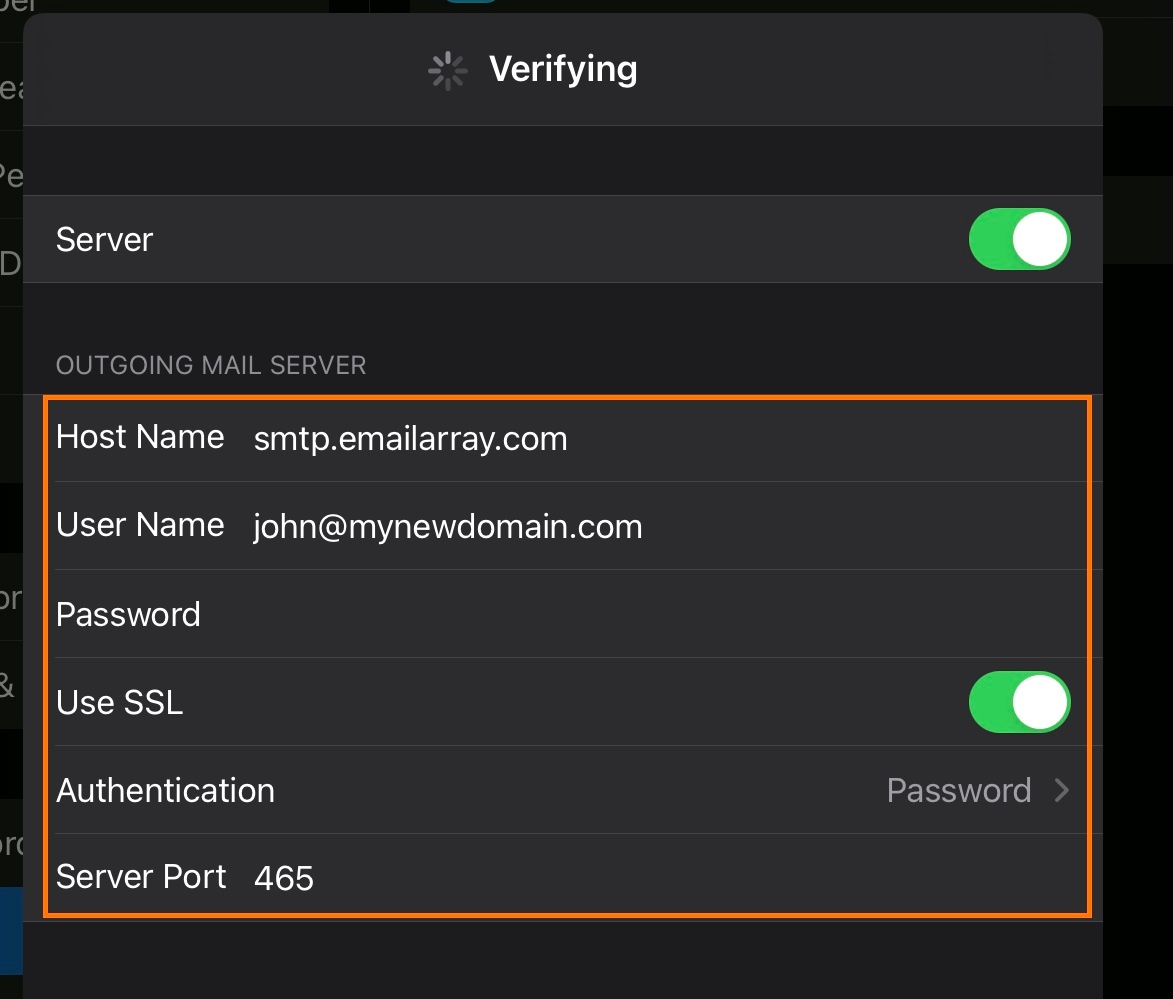
- Under Outgoing Mail Server, enter as below:
- Host Name -
smtp.emailarray.com - User Name - Your full e-mail address
- Password - Your password
- Host Name -
- Click on Next
- Click on Save
Note that IMAP is preferred over POP. If you want to set up the account as POP, you have to set it up manually. IMAP is a protocol made to support several devices accessing one same account, with all folders synced at our server, which also guarantees that our backups will be executed.
Example setup for iOS:
 |
 |
 |
 |
 |
 |
Setup Email on Android (IMAP)
Remember that, if you have an Enhanced account, you can use ActiveSync, to not only sync e-mails, but also contacts and events.
How to set up your email on an Android device
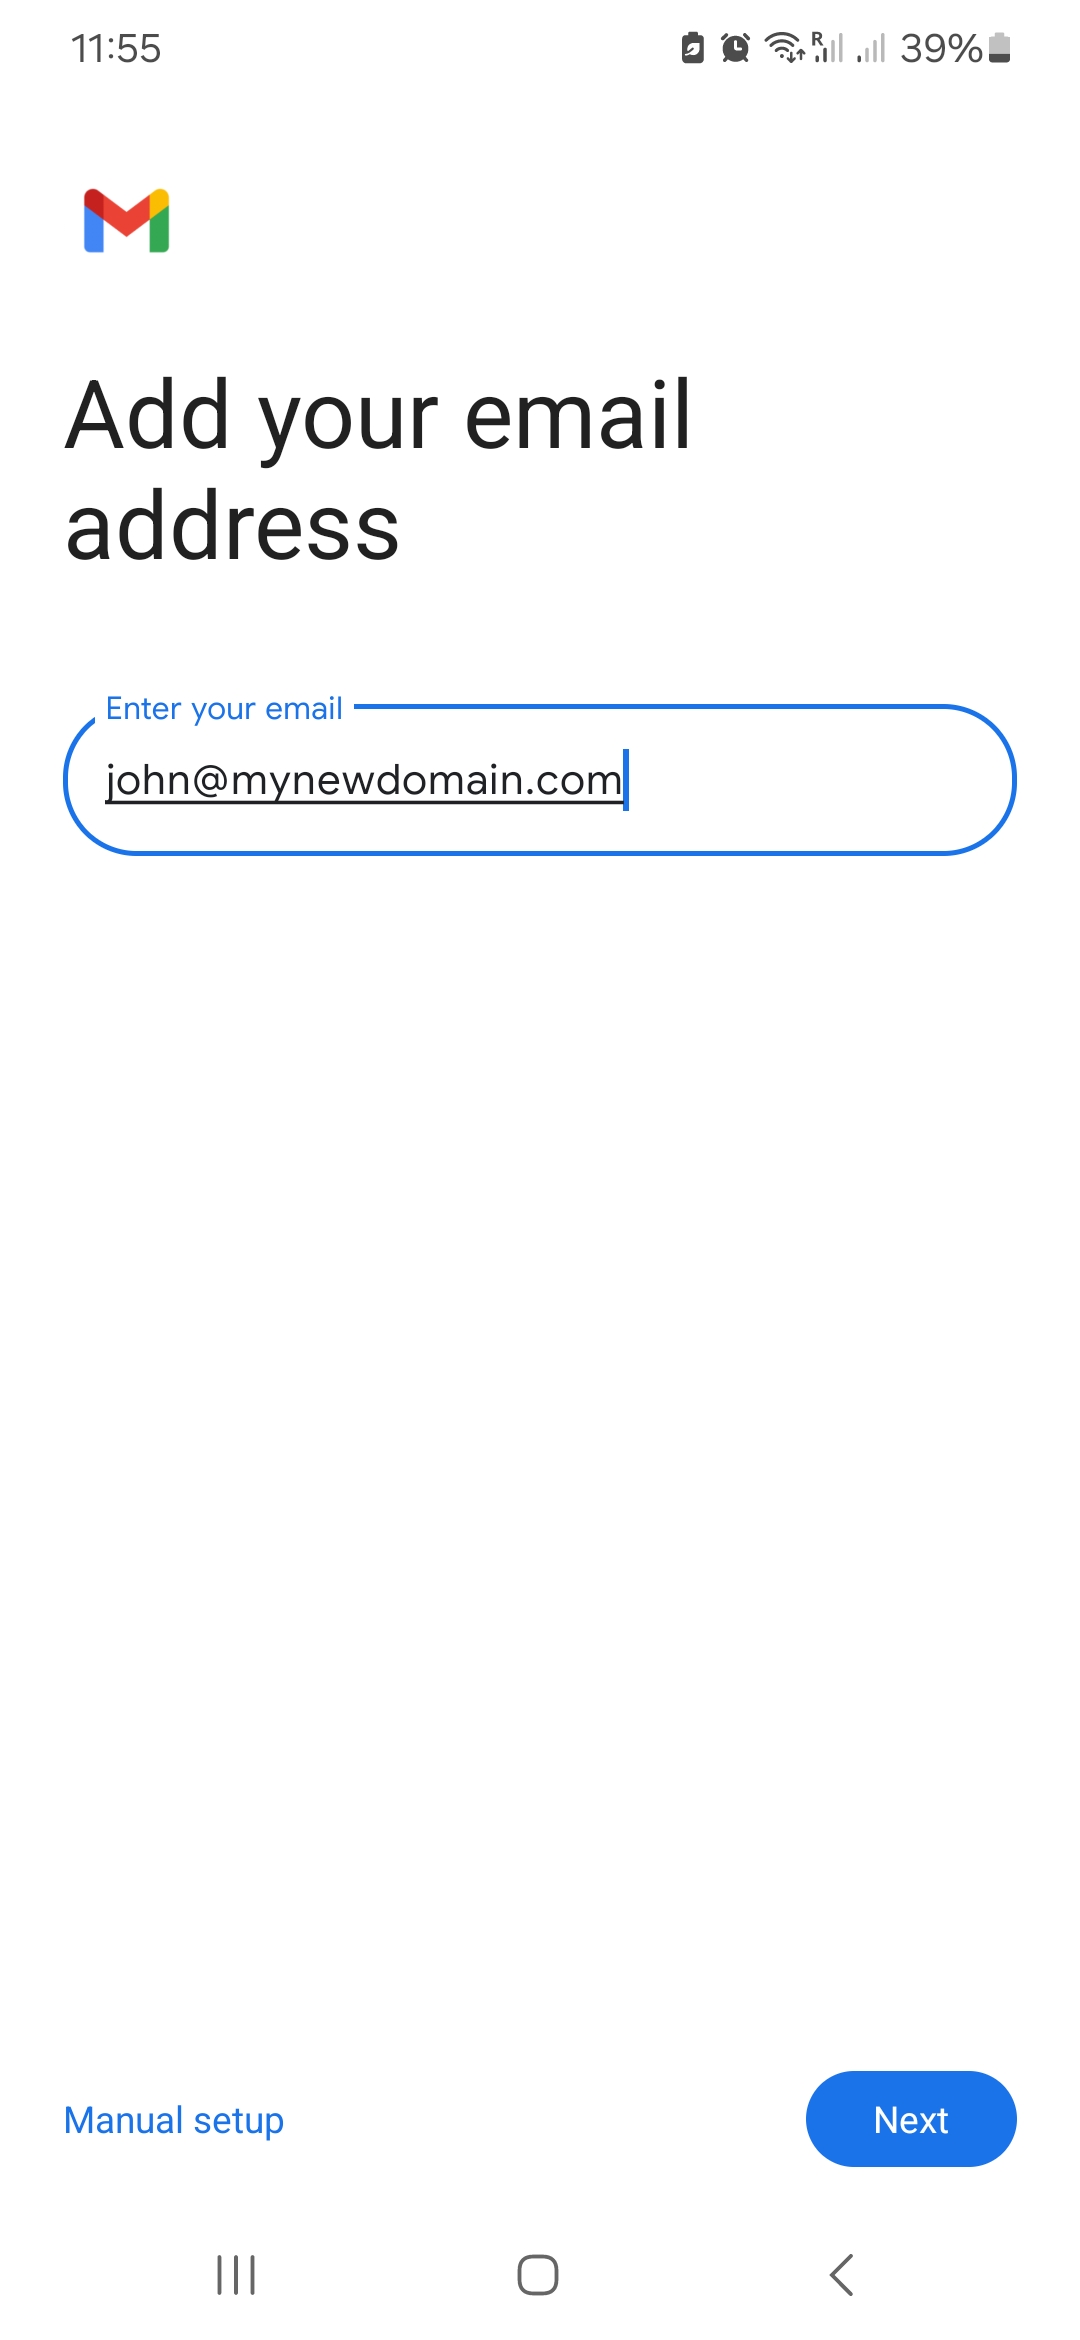
Here's the step by step for setting up an IMAP account on Android's native mail app.
- Press the device's Menu button.
- Tap Settings.
- Go to Manage Accounts
- Click on Add account.
- Click on Email / Personal (IMAP)
- Username: enter your full e-mail address
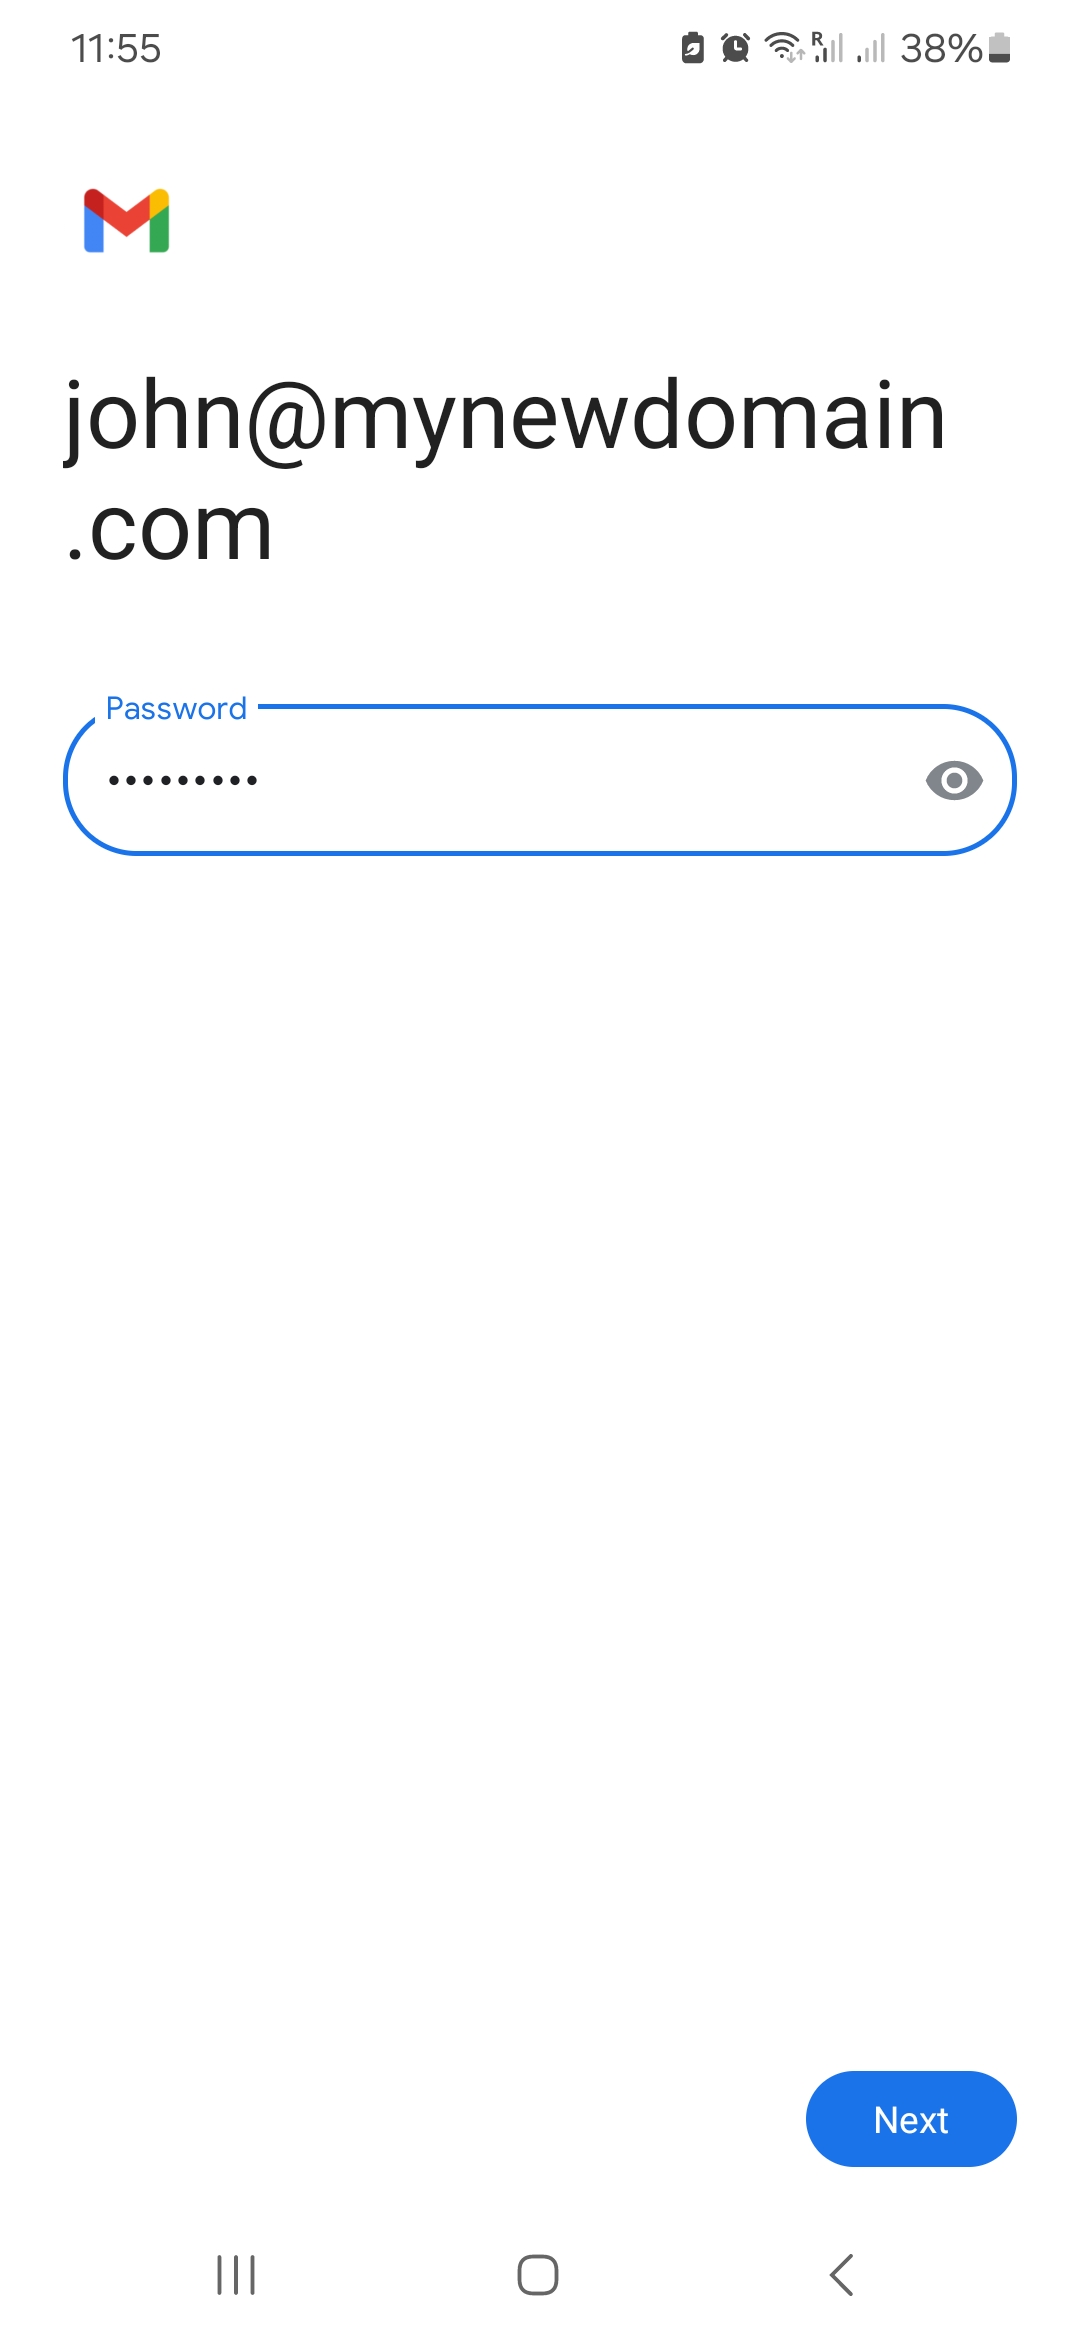
- If an account type is asked, choose IMAP account.
- Password: enter your email's password.
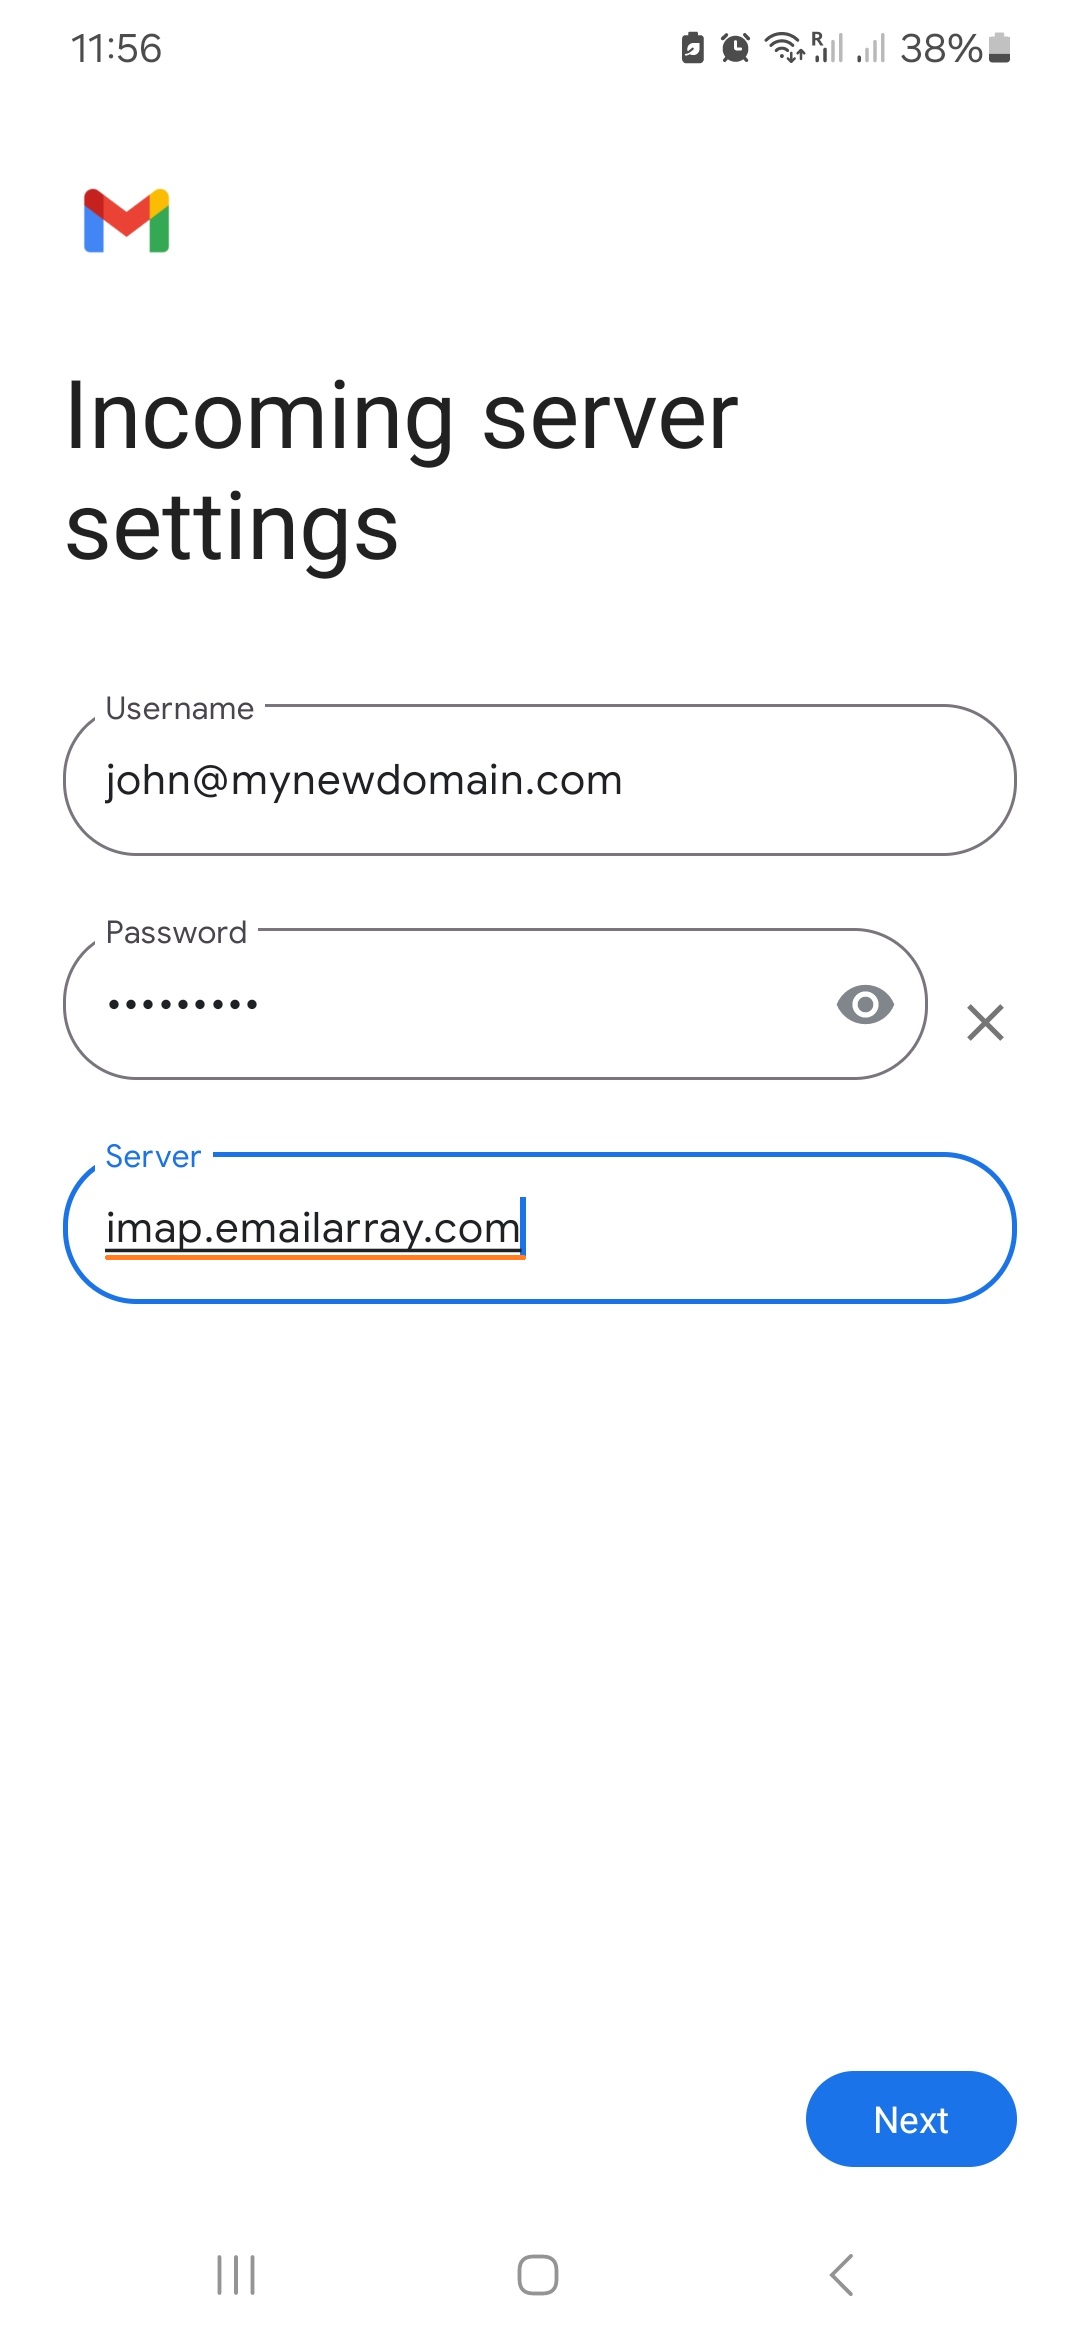
- Incoming server settings
- Username: your full email address
- Password: your email's password
- Server:
imap.emailarray.com. Android will automatically use yourdomain.com as host and you need to change it.
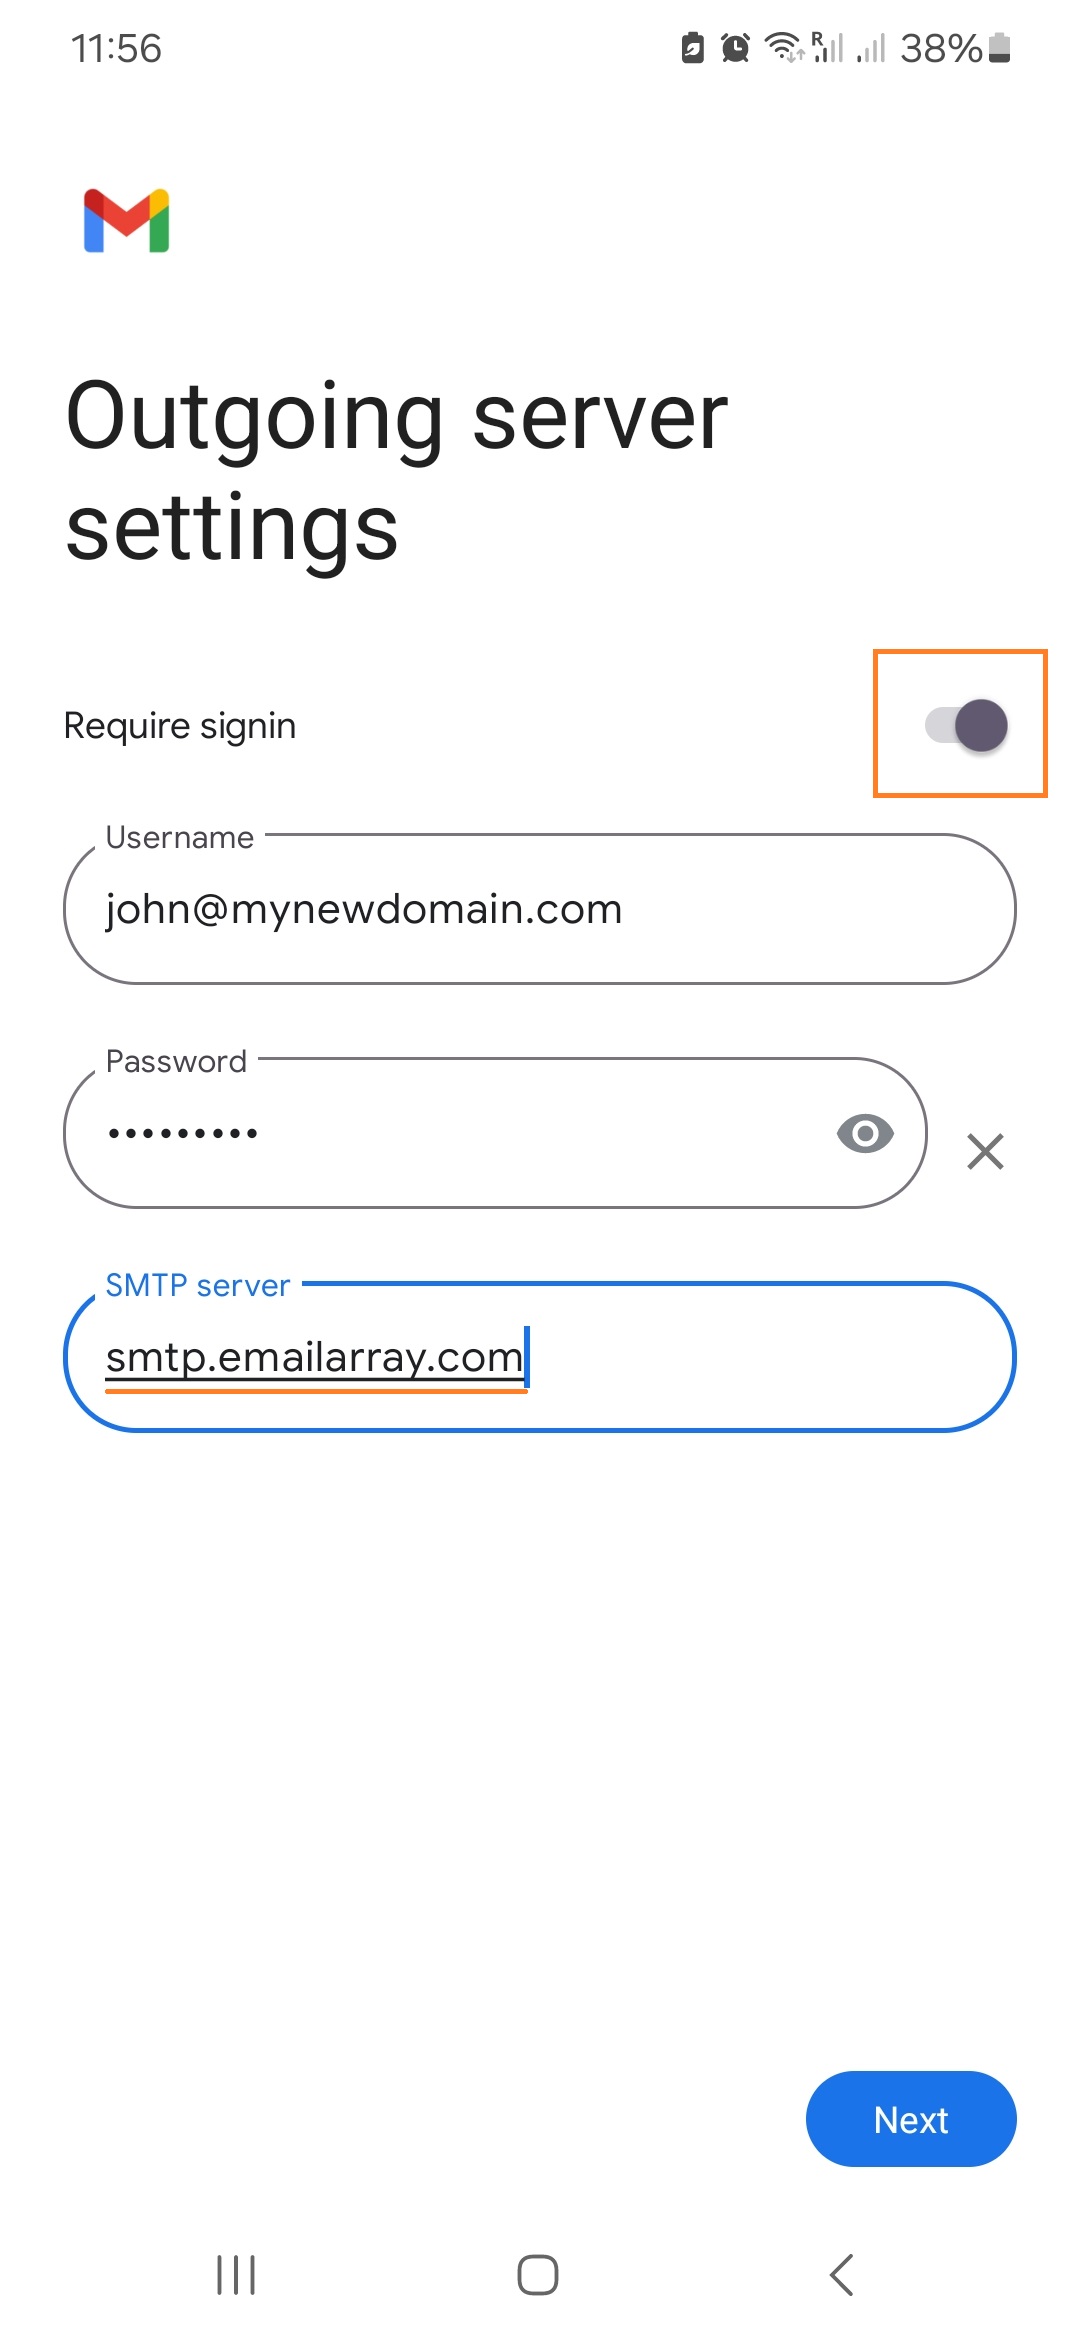
- Outgoing server settings
- Require signin: YES
- Username: your full email address
- Password: your email's password
- SMTP server:
smtp.emailarray.com. Android will automatically use yourdomain.com as host and you need to change it.
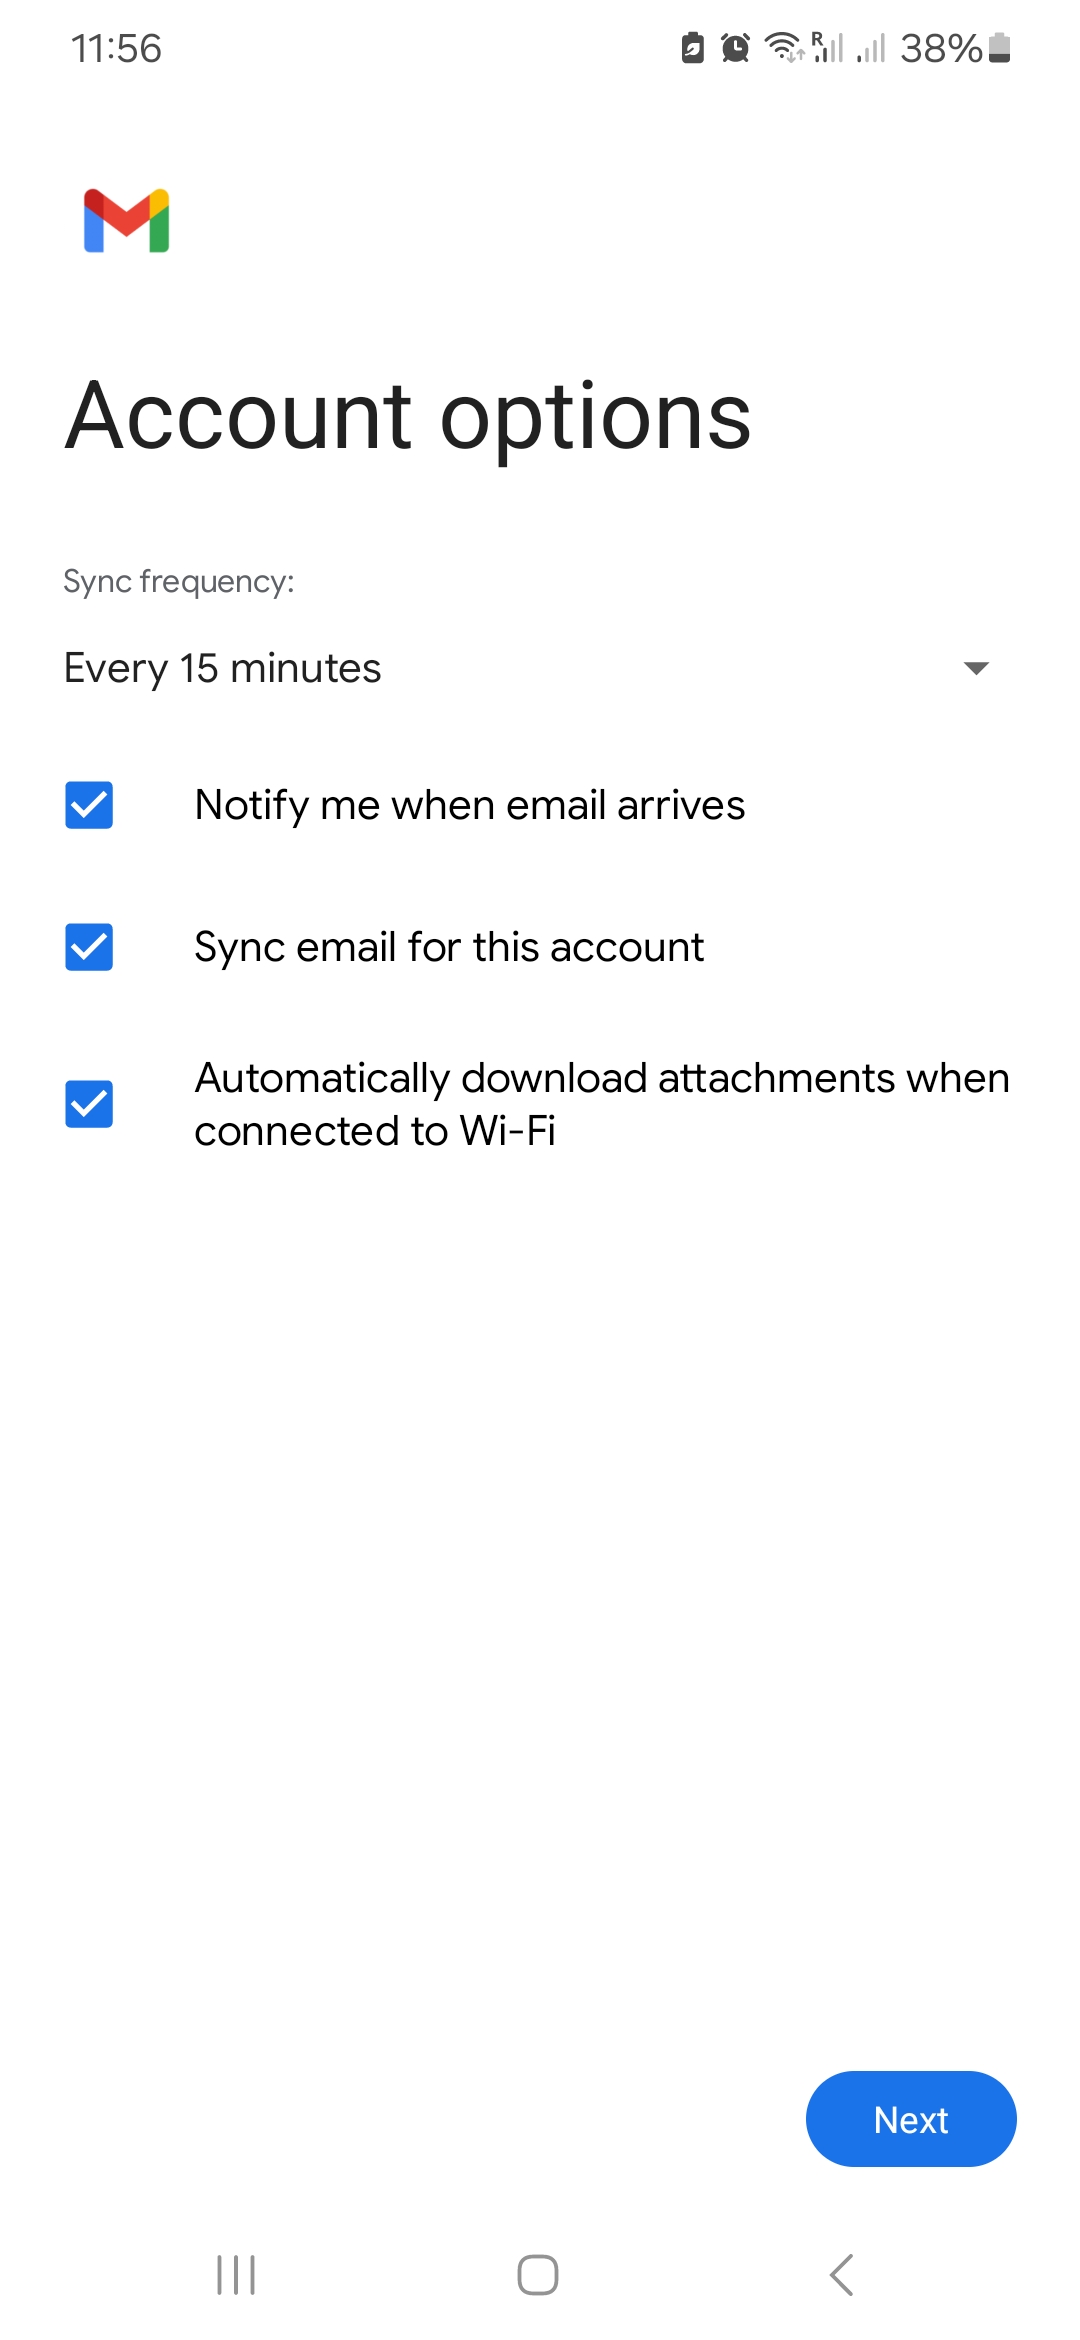
- Account options: Optionally, you can set up specific details such as interval for checking mail, if you want to be notified, etc.
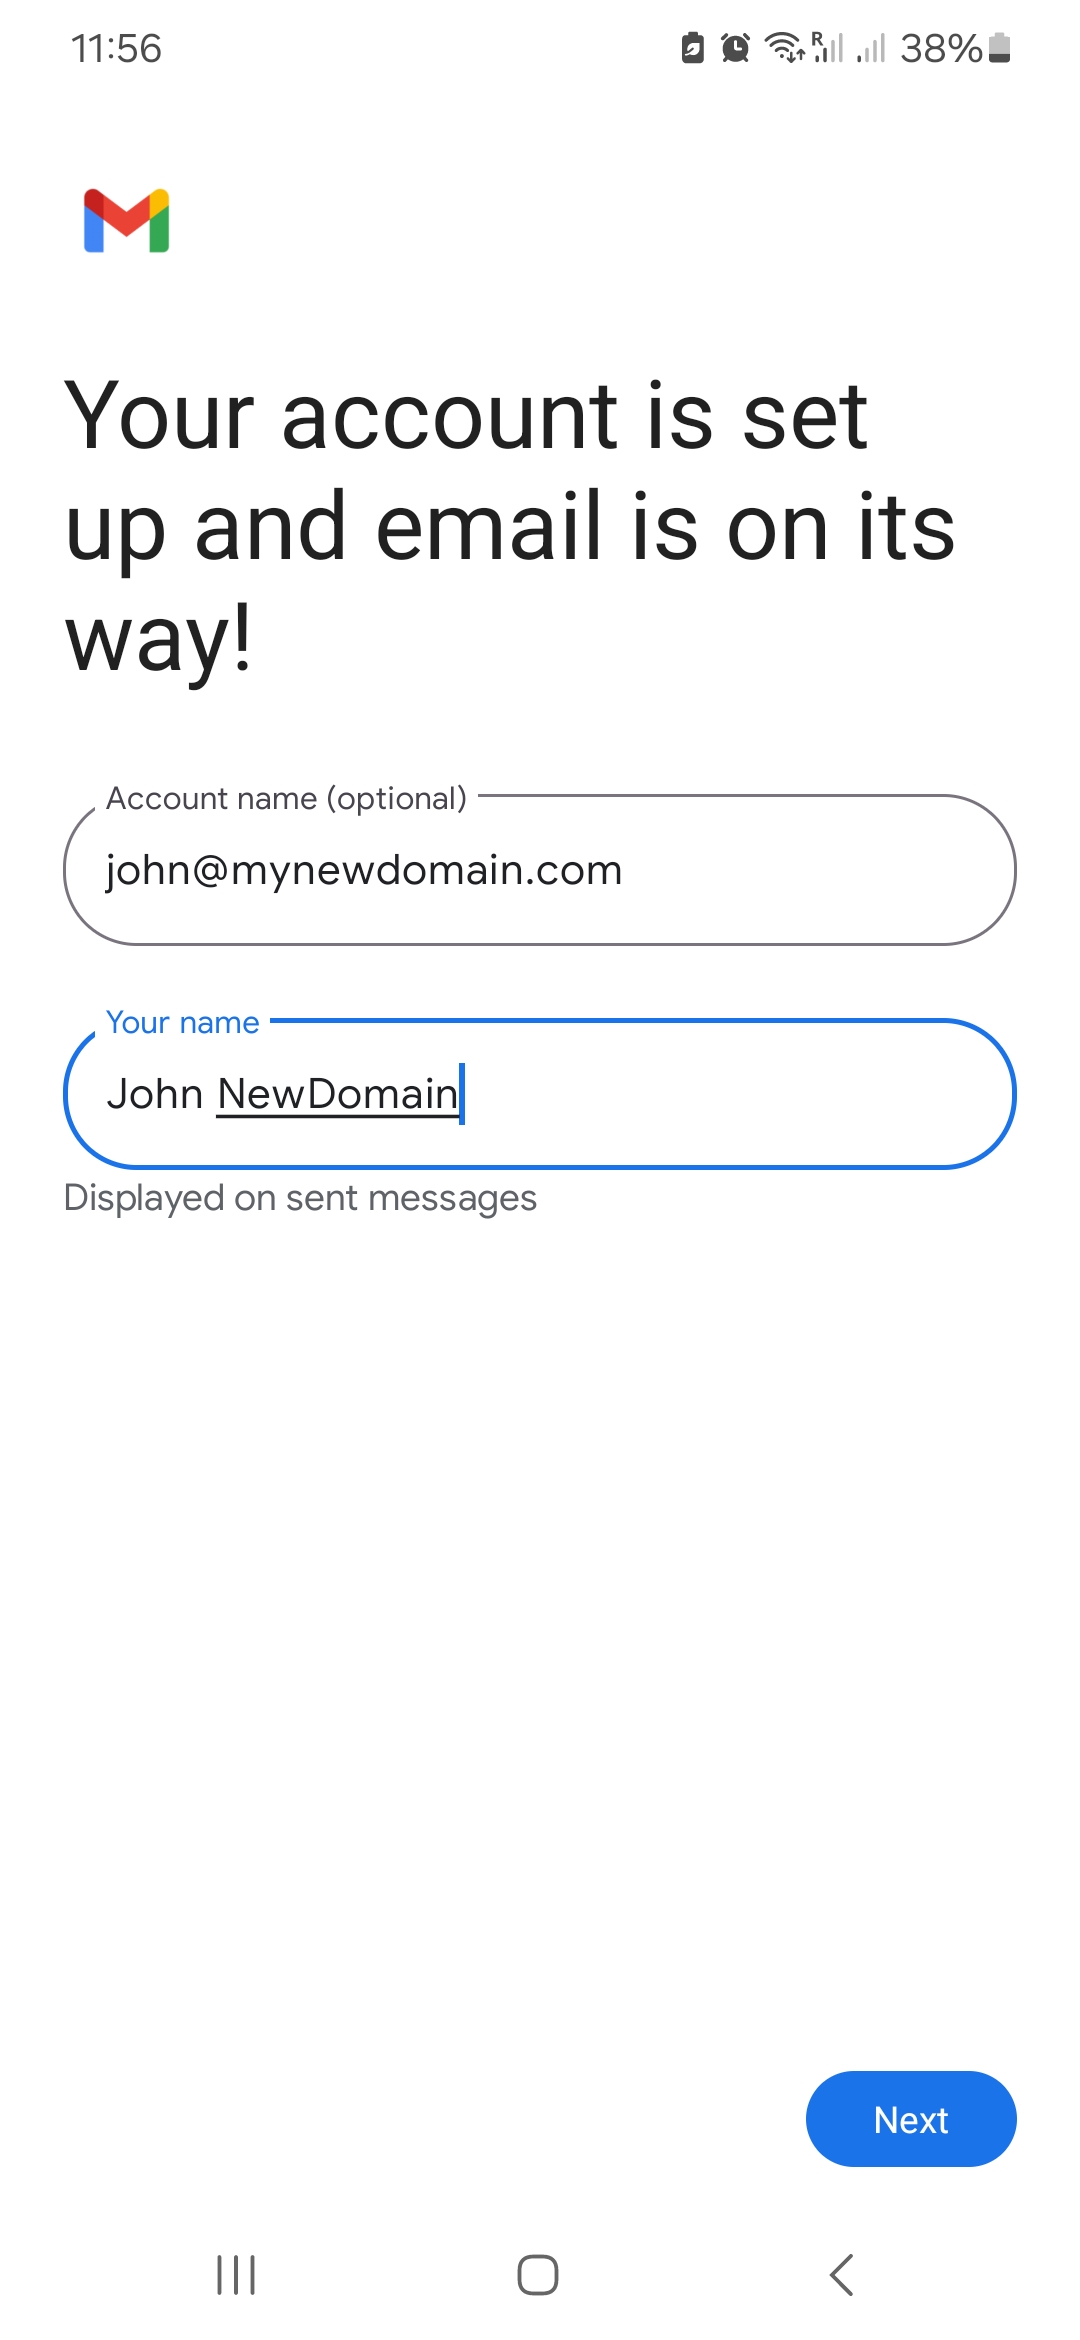
- On the last page, Android gives you the option to change the Account name (will appear in your list) and Your name (will appear to recipients).
- Click on Next to finalize the procedure.
| Note that IMAP is preferred over POP. If you want to set up the account as POP, you have to set it up manually. IMAP is a protocol made to support several devices accessing one same account, with all folders synced at our server, which also guarantees that our backups will be executed. |
Example Setup on Android Mail App

Setup Email on eM Client (IMAP)
eM Client provides a modern, intuitive interface for managing your communications. This guide will walk you through setting up your mailbox using Automatic Setup (recommended) or manual configuration.
As with our other desktop guides, we recommend using IMAP with SSL/TLS to ensure your data stays synchronized across all your devices and is protected by our professional backups.
Syncing Other Services: eM Client is a full groupware suite. If you have an Enhanced mailbox, you can also add your Calendar (CalDAV) and Contacts (CardDAV) directly through the setup wizard to keep your professional life in sync.
Option 1: Automatic Setup (Recommended)
If your DNS is configured with Autodiscover, eM Client can automatically detect your server settings in seconds.
-
Start the Wizard: Open eM Client and go to Menu > Accounts. Click on Add Account.
-
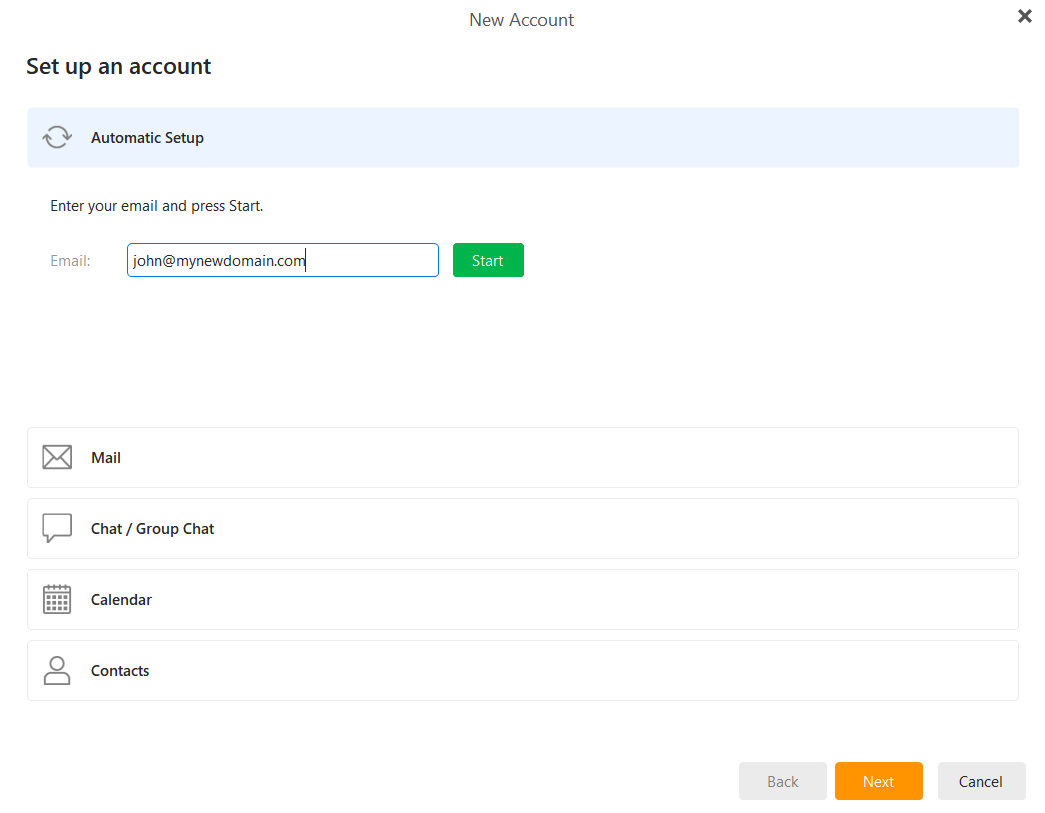
Enter Email: In the Automatic Setup section, enter your full email address and click Start.

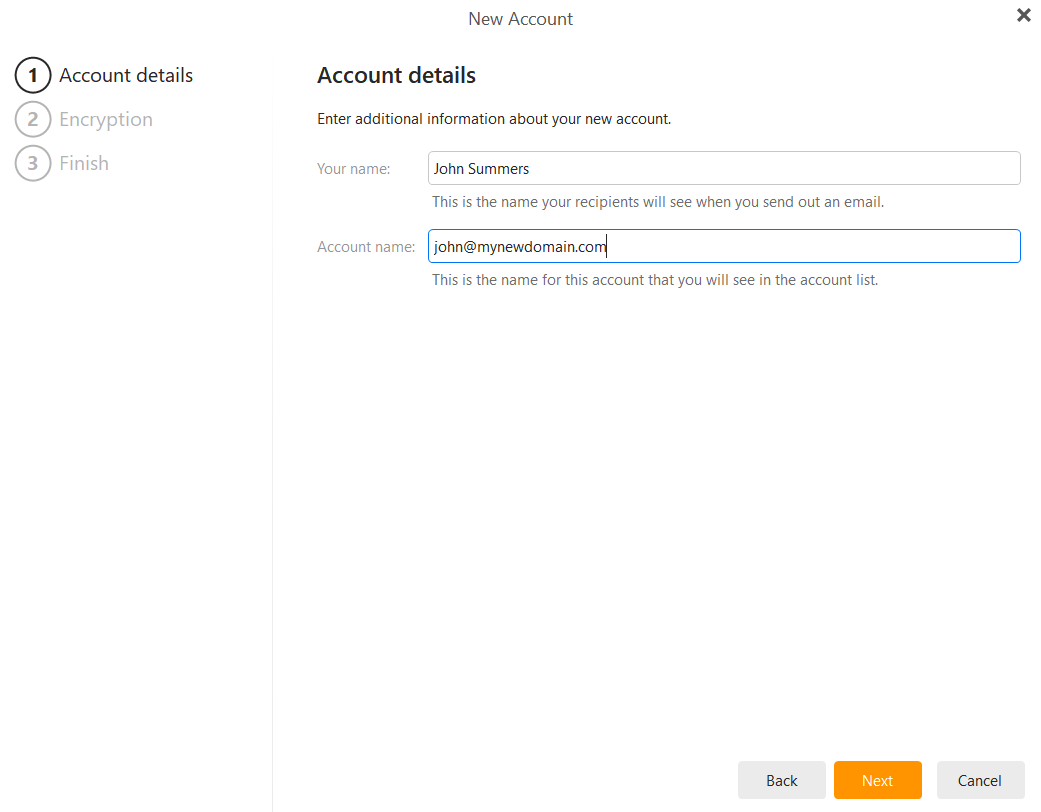
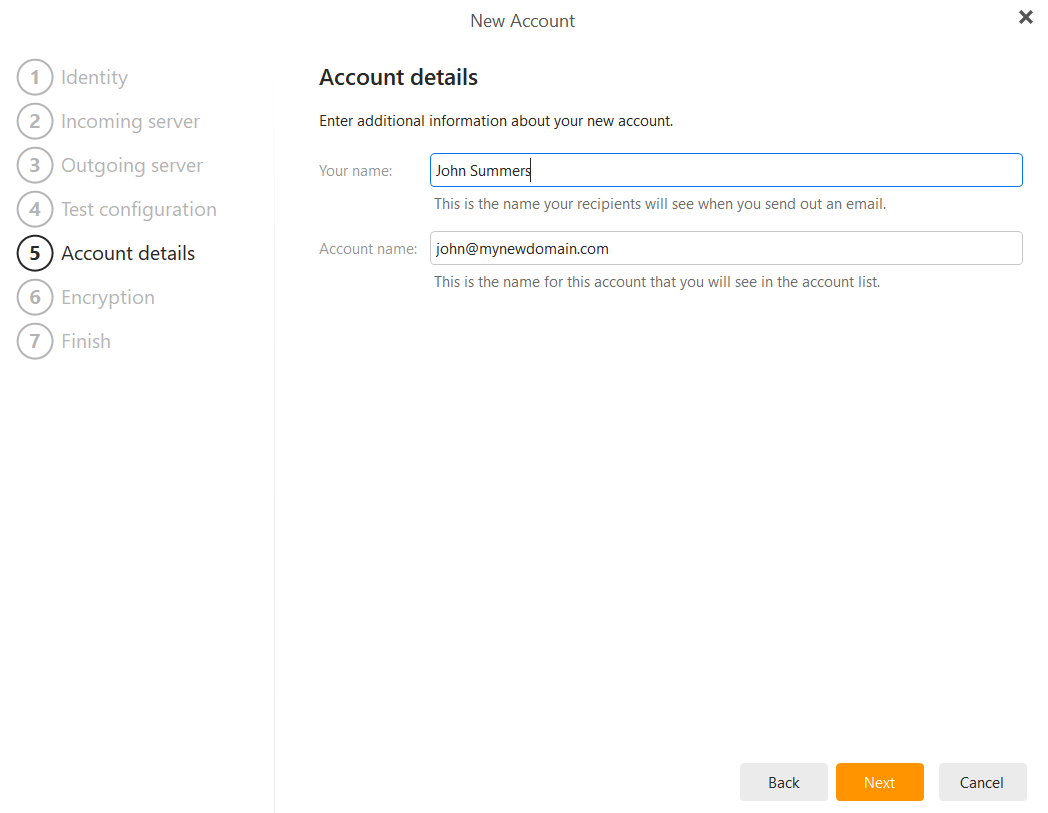
- Account Details: Enter the name you want recipients to see when you send an email (e.g., "John Smith") and an account name for your internal list. Click Next.

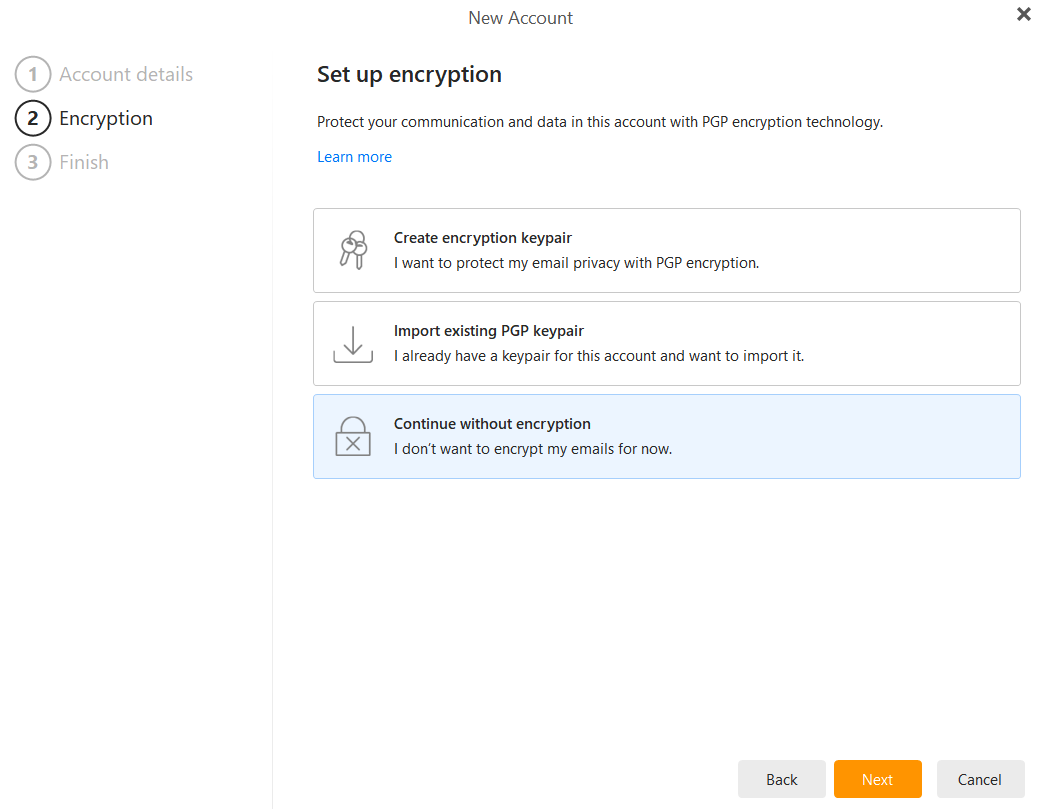
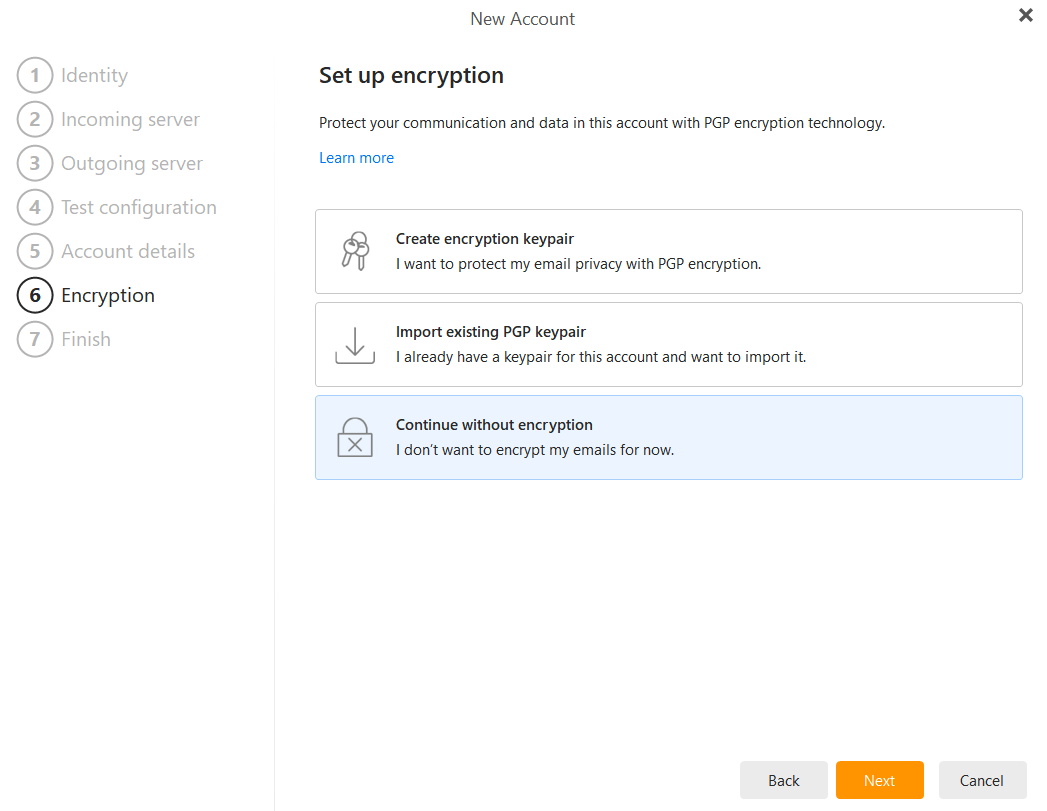
- Encryption: You will be asked about PGP encryption. For most users, we recommend selecting Continue without encryption unless you specifically require PGP technology. Click Next.

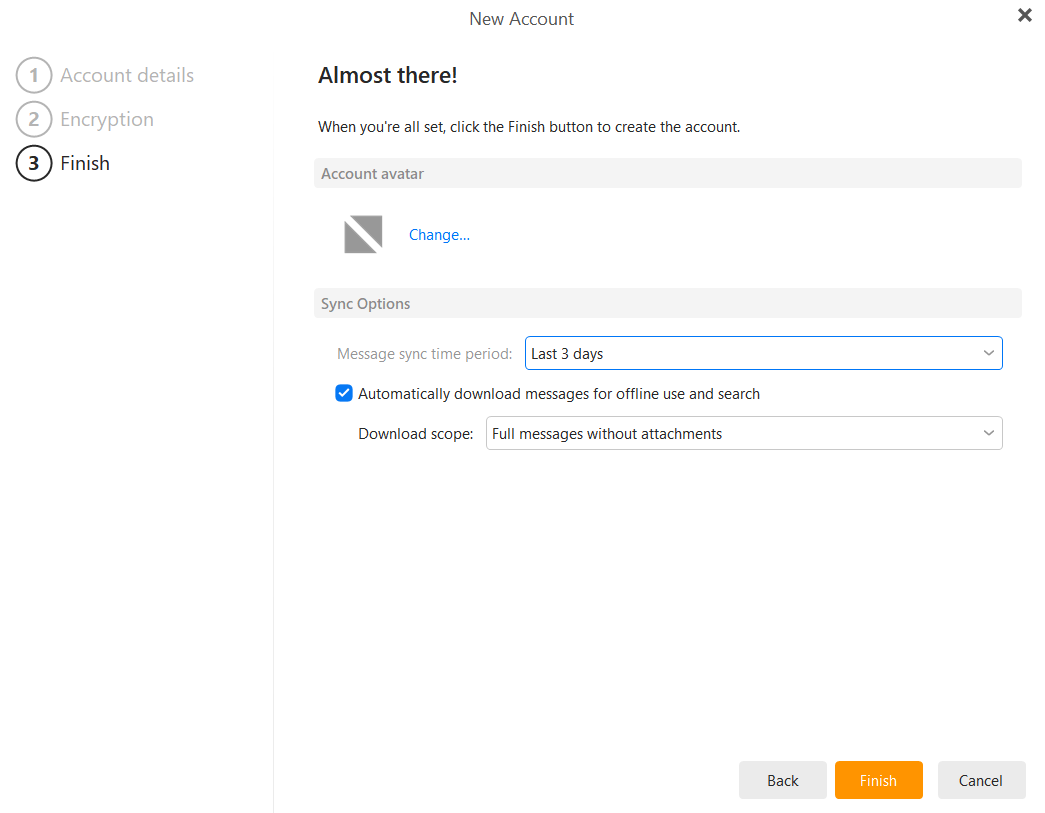
- Choose your synchronization options (e.g., "Last 3 days" for faster initial setup) and click Finish.

-
Authentication: A window will appear asking for your credentials. Enter your email password and click OK. Ensure "Save password" is checked to avoid repeated prompts.
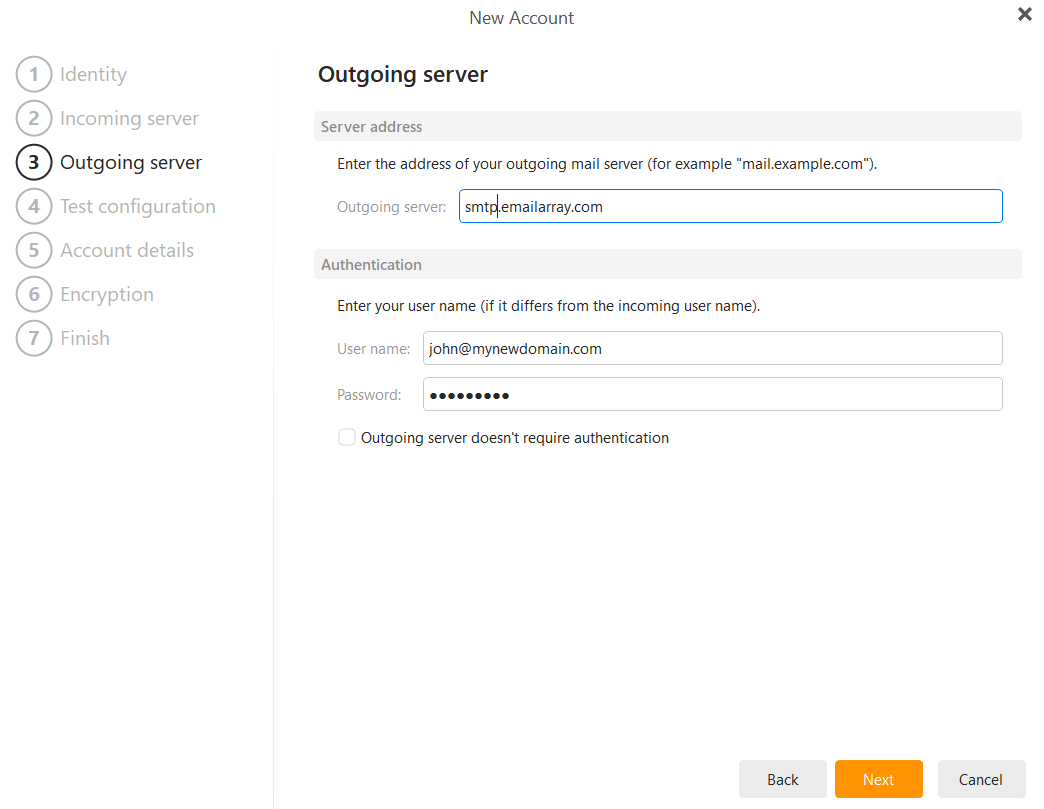
Option 2: Manual Configuration
If you need to enter settings manually or want to use specific ports, follow these steps:
-
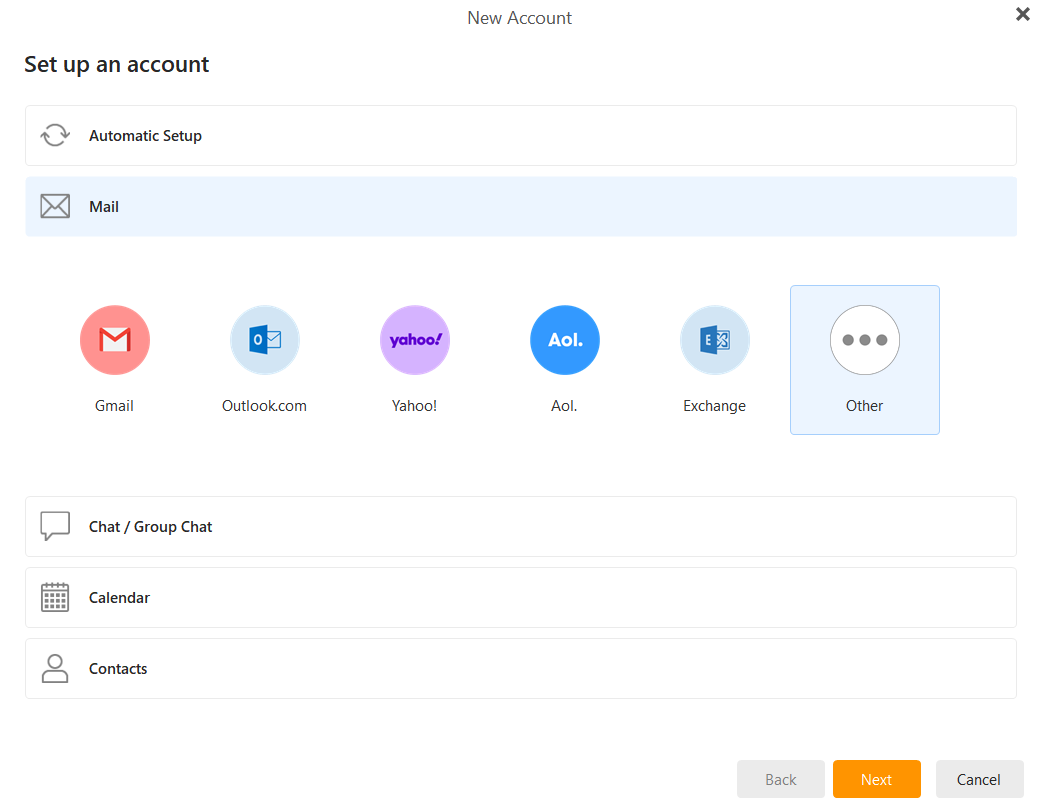
Select Mail: In the New Account window, instead of Automatic Setup, click the Mail tab and select Other. Click Next.

-
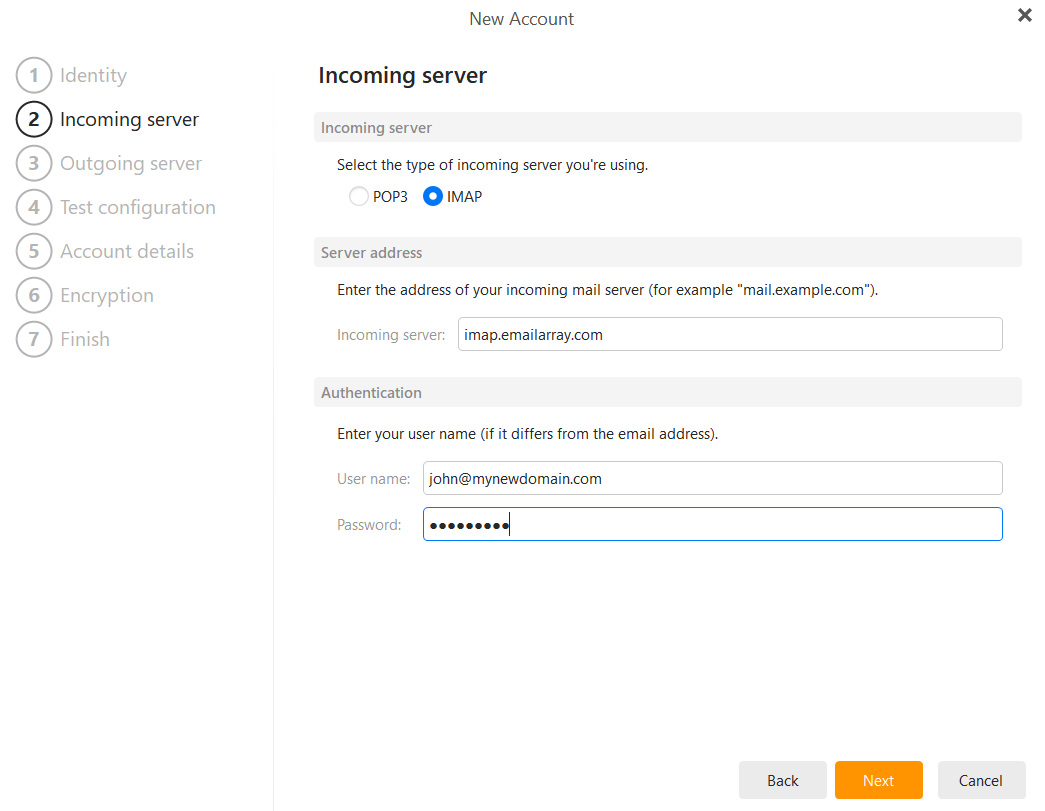
Incoming Server: Select IMAP
-
Hostname:
imap.emailarray.com -
User name: Your full email address.
-
Password: Your email account password.
-
Port: 993
-
Security: SSL/TLS

-
-
Outgoing Server:
-
Hostname:
smtp.emailarray.com -
User name: Your full email address.
-
Password: Your email account password.
-
Port: 465
-
Security: SSL/TLS

-
-
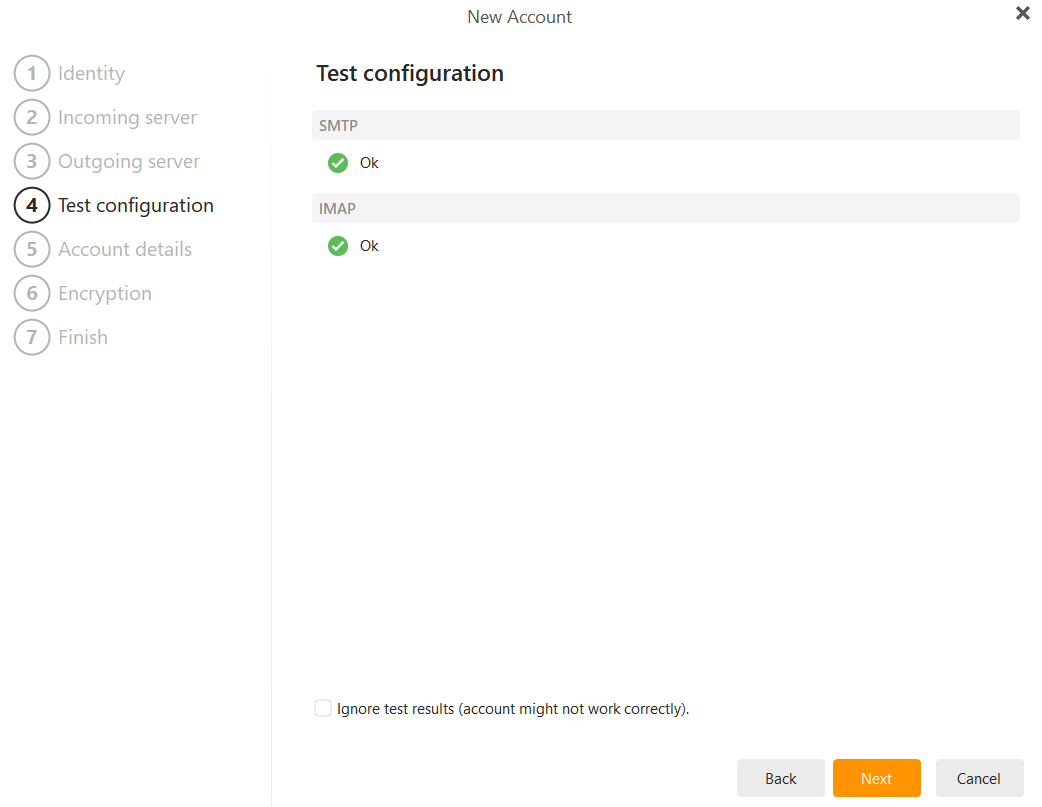
Test Configuration: eM Client will verify both the SMTP and IMAP connections. Once you see the green "Ok" status for both, click Next.

-
Account Details: Enter your name (as it should appear on sent mail) and an internal account name. Click Next.

-
Encryption: Select Continue without encryption and click Next.

-
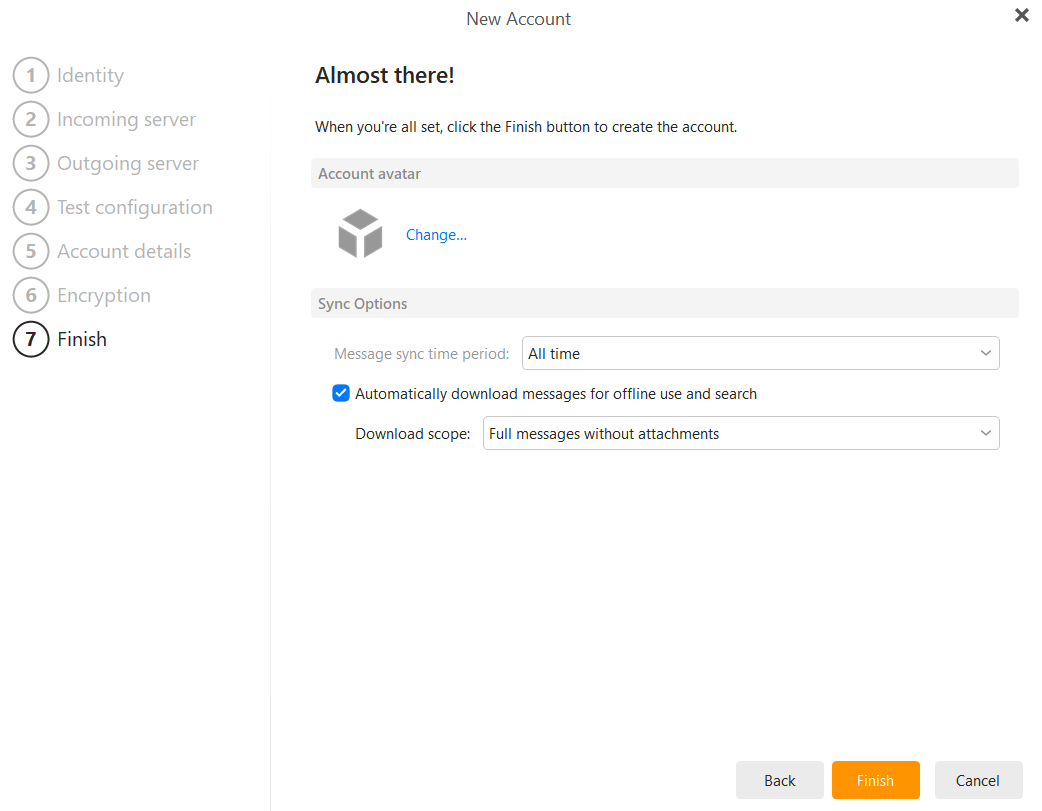
Finish: Choose your message sync time period (e.g., "All time") and click Finish.

ActiveSync / EAS - Sync Email, Calendars and Contacts
Sync your email, calendar, and contacts in real-time.
ActiveSync is the most powerful way to connect your mailbox to your mobile devices and desktop apps. Unlike standard email setups, ActiveSync provides a "push" connection that synchronizes your email, calendar, contacts, and notes instantly across all your devices. When you delete an email on your phone, it’s gone from your computer; when you add a meeting to your calendar, it appears everywhere.
Note: ActiveSync is a premium feature available for Enhanced mailboxes.
Pro Tip: If your configured Autodiscover in your domain’s DNS settings, you can often skip the manual server entry. Simply enter your email and password, and the device will find the correct server settings automatically.
Pre-requisites
Before starting, ensure you have the following details ready:
-
Your Full Email Address: (e.g., john@mydomain.com).
-
Your Password: The same password you use for webmail.
- You have added the Autodiscover DNS record for your domain to simplify the configuration. Otherwise, you can use the manual setup.
Step 1: Add a New Account
-
Open the Settings app on your smartphone or tablet.
-
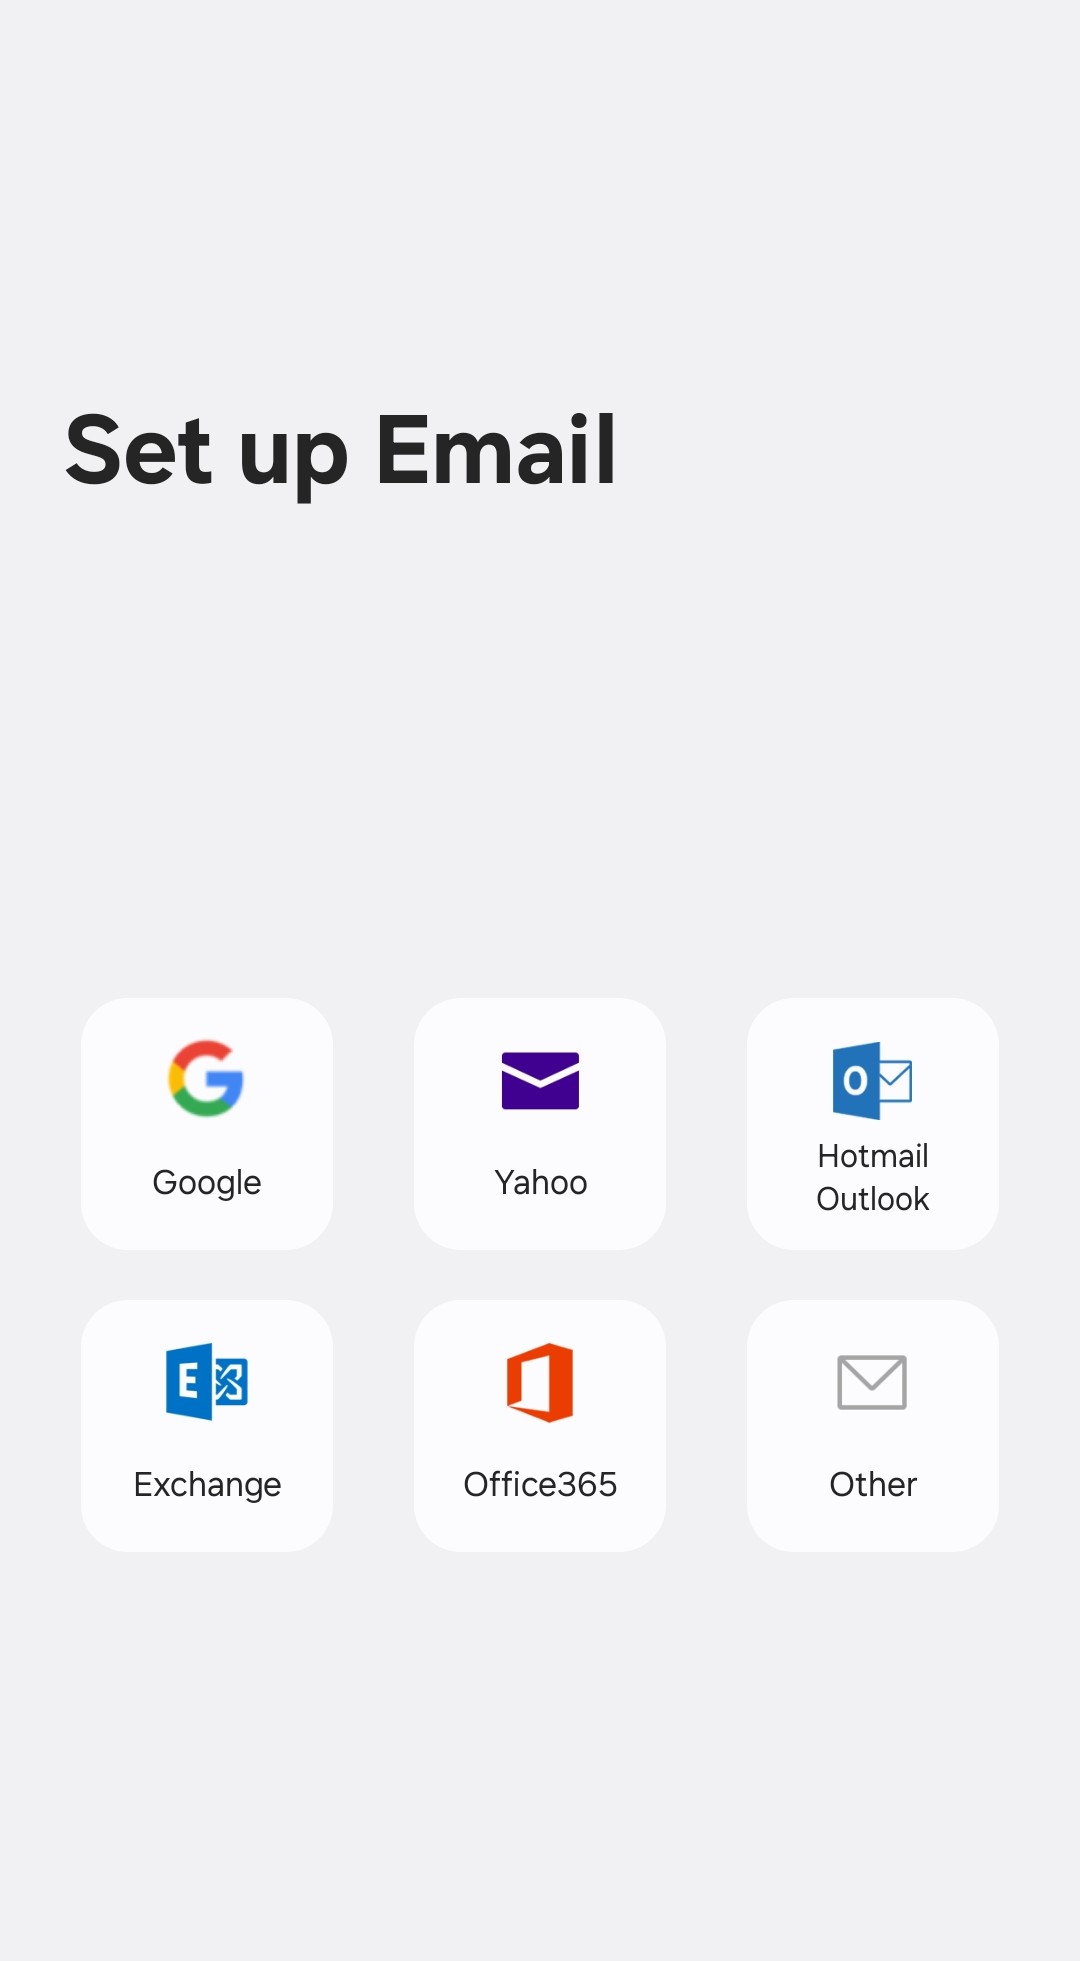
Navigate to Mail or Accounts and select Add Account.
-
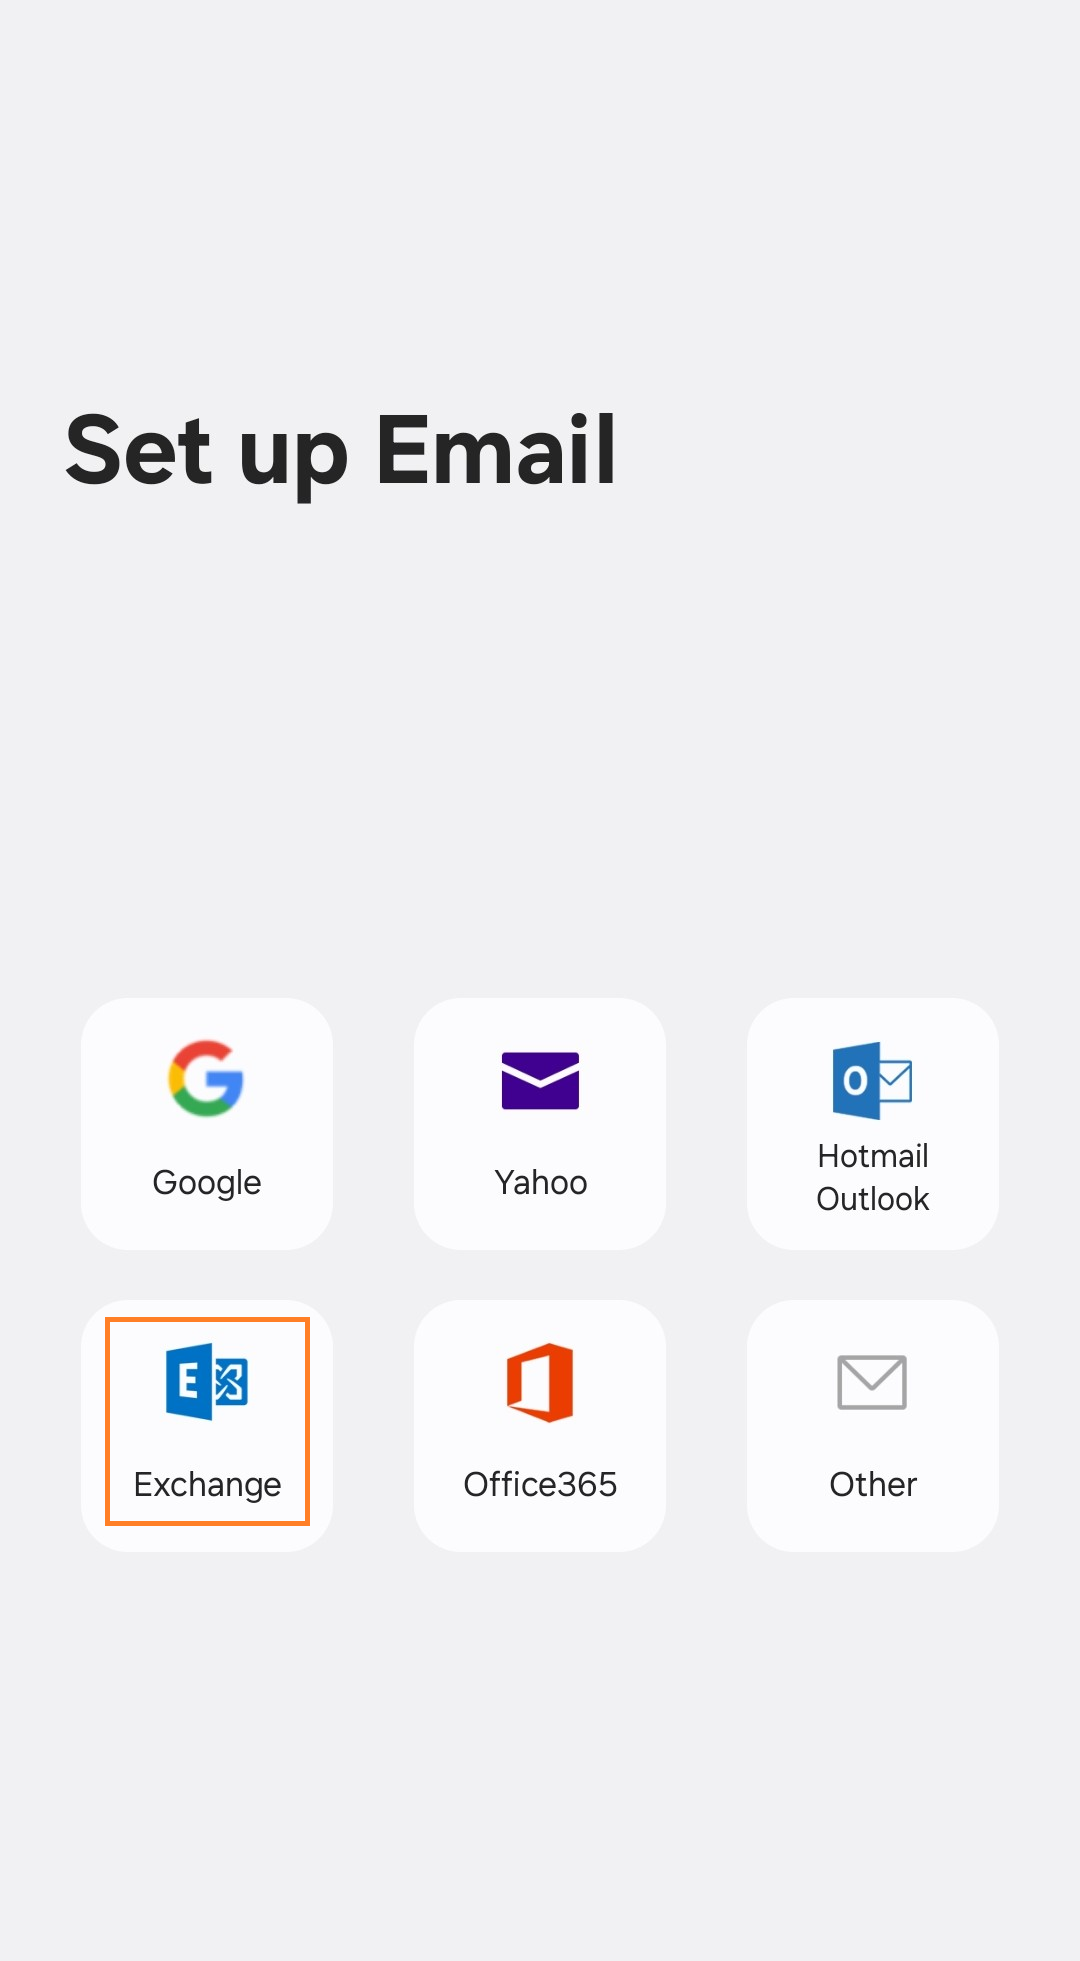
From the list of account types, select Exchange, Microsoft Exchange, or ActiveSync.
Step 2: Enter Account Details
Simply enter your email and password, and the device will find the correct server settings automatically. Click on Sign In or Finish.
Example setup on Android with Autodiscover:
 |
 |
Manual Setup
Step 1: Add a New Account
-
Open the Settings app on your smartphone or tablet.
-
Navigate to Mail or Accounts and select Add Account.
-
From the list of account types, select Exchange, Microsoft Exchange, or ActiveSync.
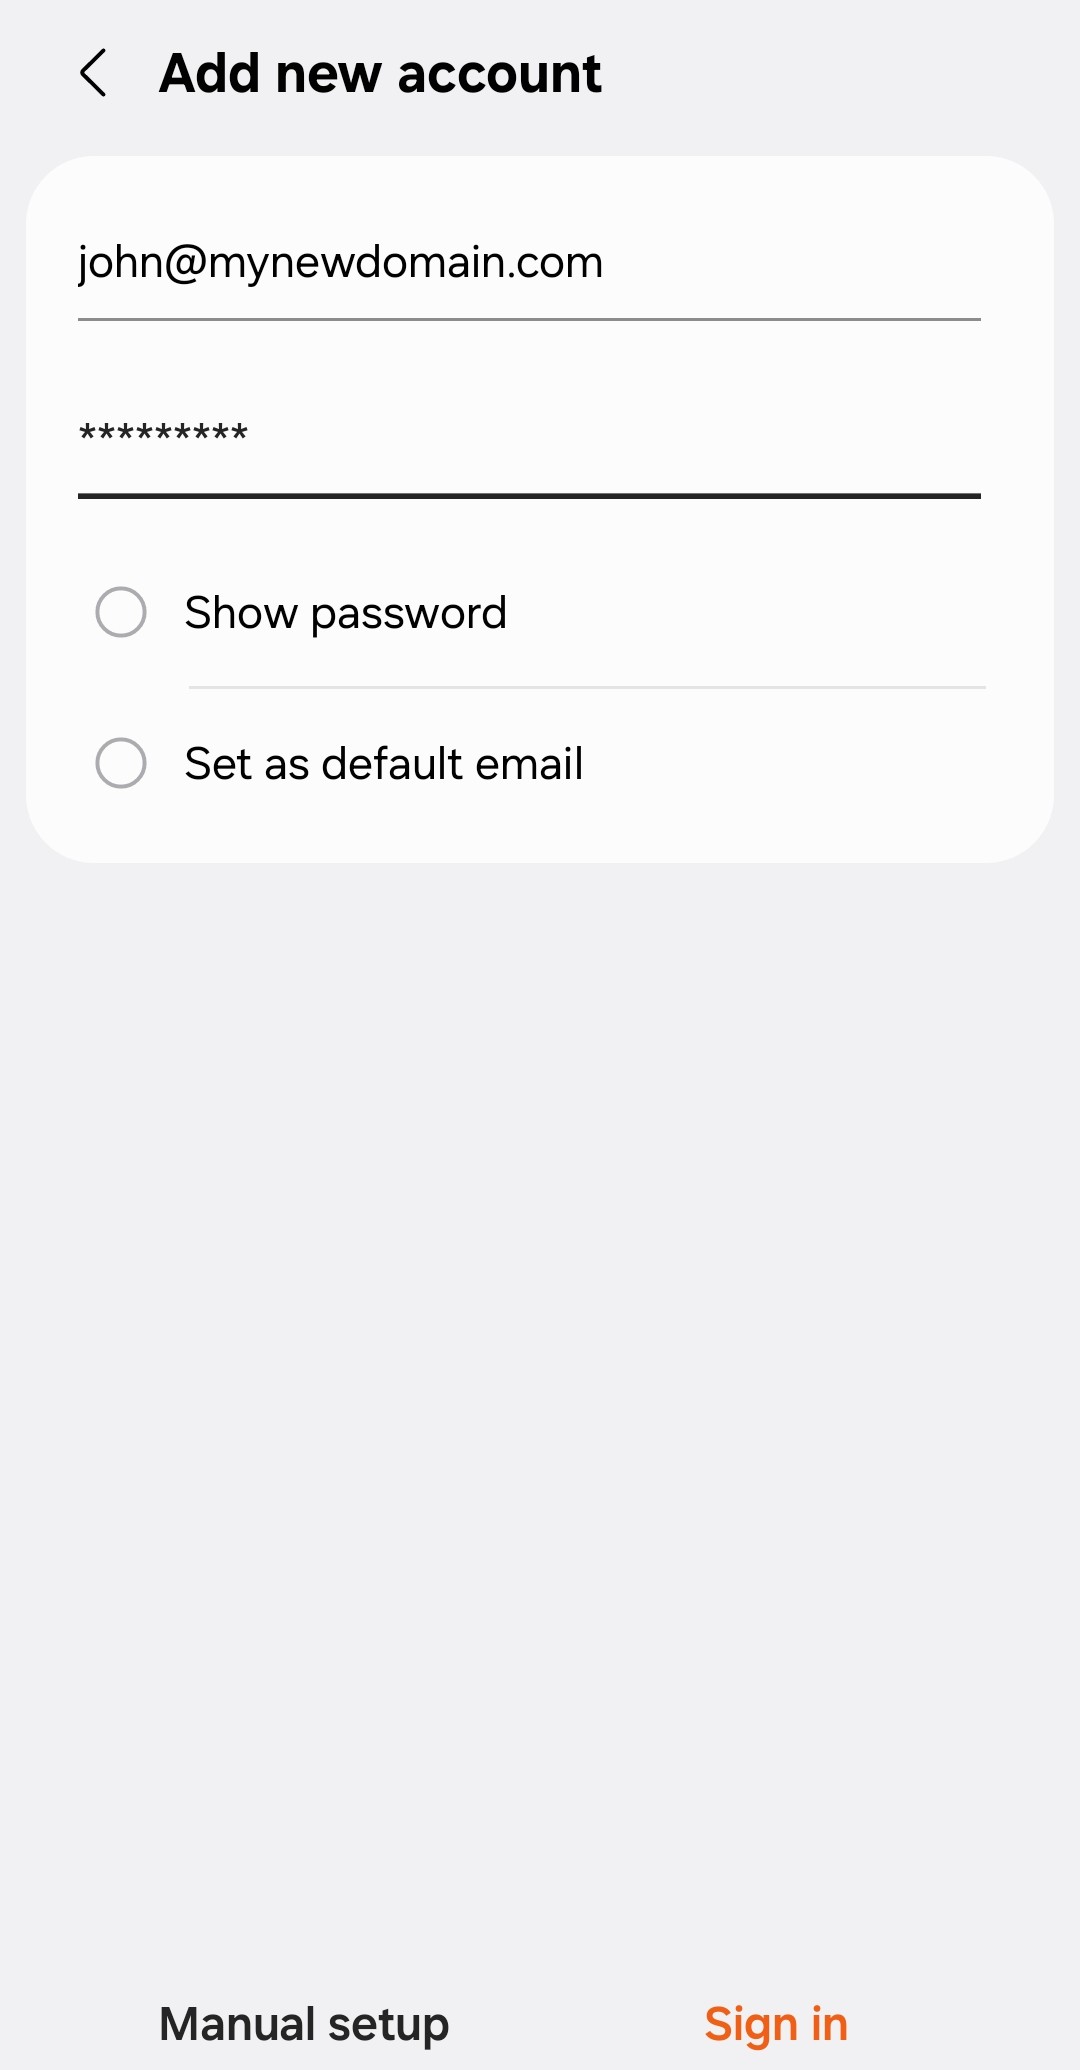
Step 2: Enter Account Details
Enter your email and password. Click on Manual Setup.
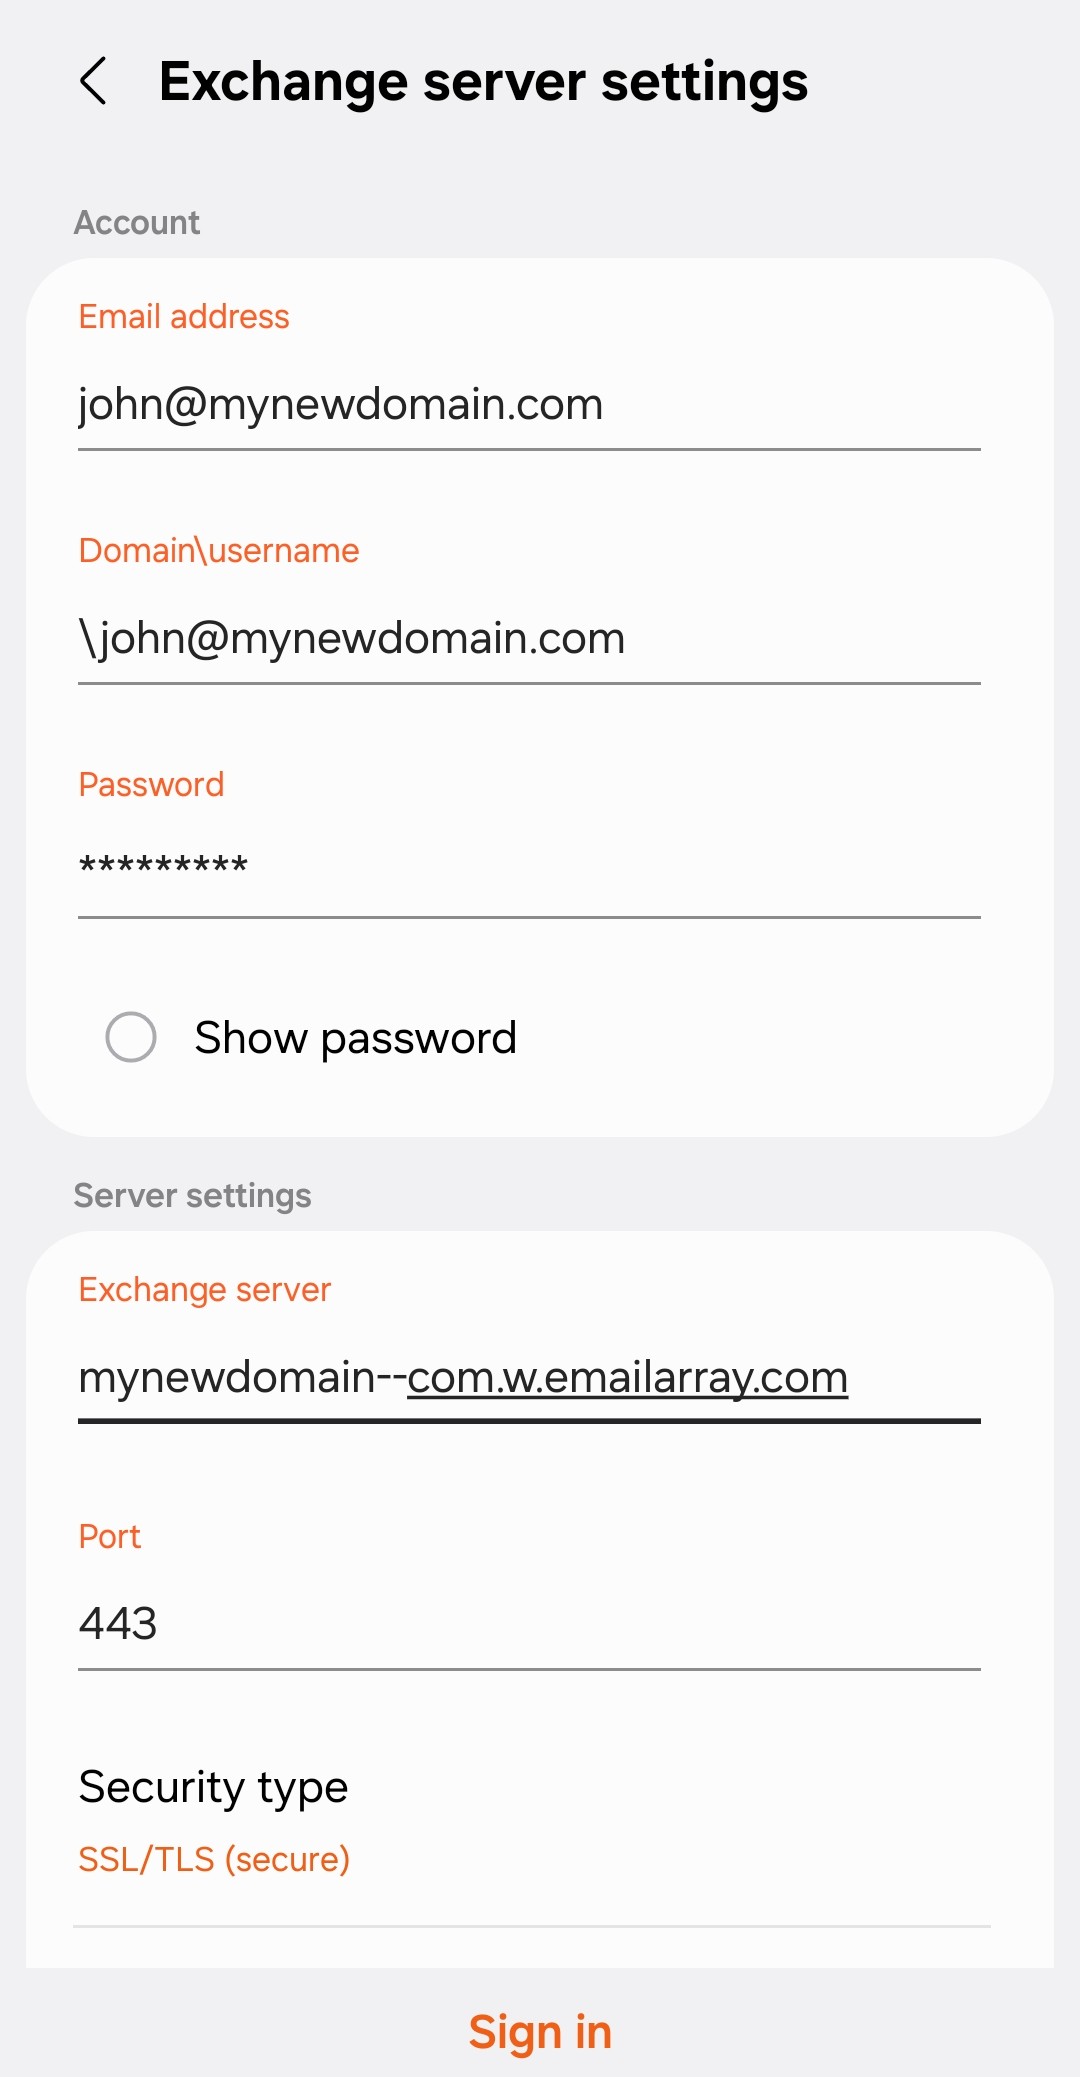
Step 3: Enter Server Settings
- Server: Use your domain name in this format:
yourdomain--com.w.emailarray.com.
Server Address Formula To create your server address, take your domain name and:-
Replace any dots (.) with two dashes (--).
-
Add .w.emailarray.com to the end.
Example: If your email is
john@my-company.com, your server is:my-company--com.w.emailarray.com. -
-
Domain: Leave this blank (unless your specific device requires it).
-
Username: Your full email address.
-
Password: Your email account password.
-
SSL: Ensure "Use SSL" is turned ON.
Click on Sign In, Continue or Finish.
Example Setup on Android for Manual Setup:
 |
|
 |
Creating a New Outlook Profile
When you switch email providers, it’s tempting to take the shortcut: simply going into your existing account settings and swapping out the IMAP server addresses. While this is technically faster, it’s a strategy that often leads to significant technical headaches.
The Risk of the "Quick Change"
Modifying the server records on an existing account frequently leads to .PST or .OST file corruption. Because Outlook is trying to map a new server structure onto an old data file, you might encounter missing emails, broken search functionality, or a complete "Send/Receive" failure.
In fact, Microsoft officially recommends against modifying existing account settings when moving to a new service. To ensure your data stays intact and your software remains stable, the best practice is to create a New Outlook Profile.
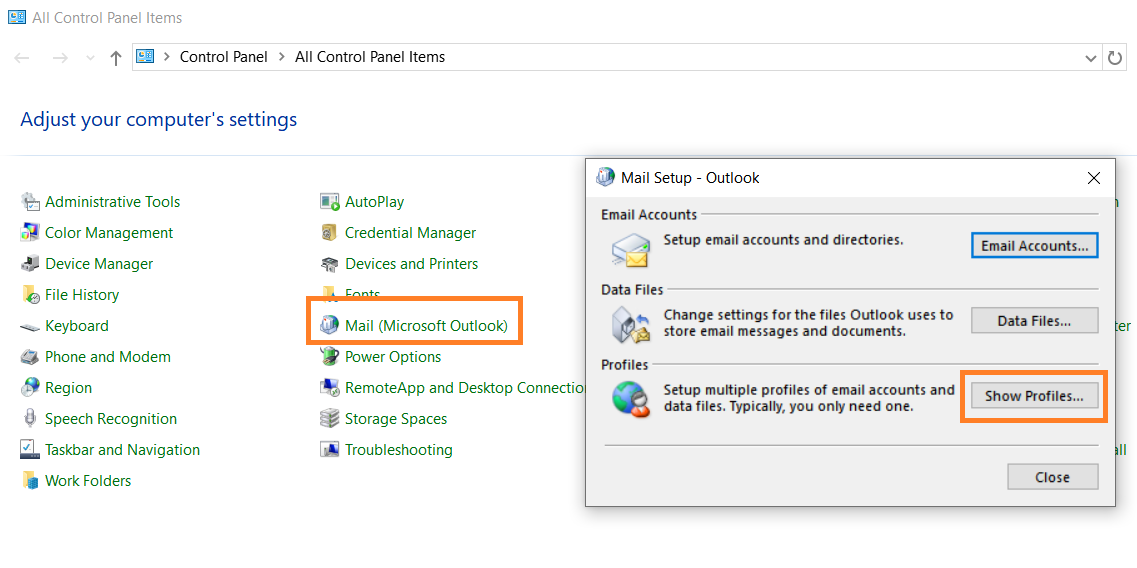
Step 1: Accessing the Mail Setup
Before opening Outlook, we need to go through the Windows Control Panel to manage your profiles.
-
Open the Control Panel on your Windows machine.
-
Search for and click on Mail (Microsoft Outlook).
-
In the window that appears, click the Show Profiles... button.
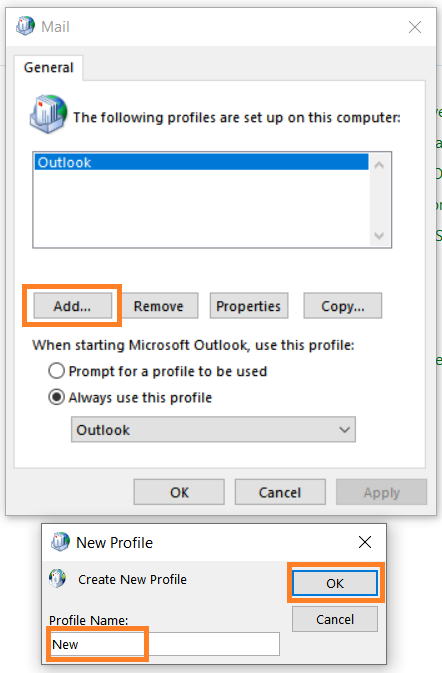
-
Click Add..., give your new profile a name (e.g., "Work Fresh"), and click OK.


Step 2: Adding Your Email Account
Once you’ve named your profile, Outlook will ask you how you want to connect your email. You have two main paths: Automatic and Manual.
Option A: Automatic Setup (Recommended)
This is the fastest method if you have set the Autodiscover DNS record. Outlook will try to "autodiscover" your server settings for you.
-
Enter your Name, Email Address, and Password.
-
Click Next.
-
Outlook will cycle through its configuration steps. Once you see three green checkmarks, you're all set!


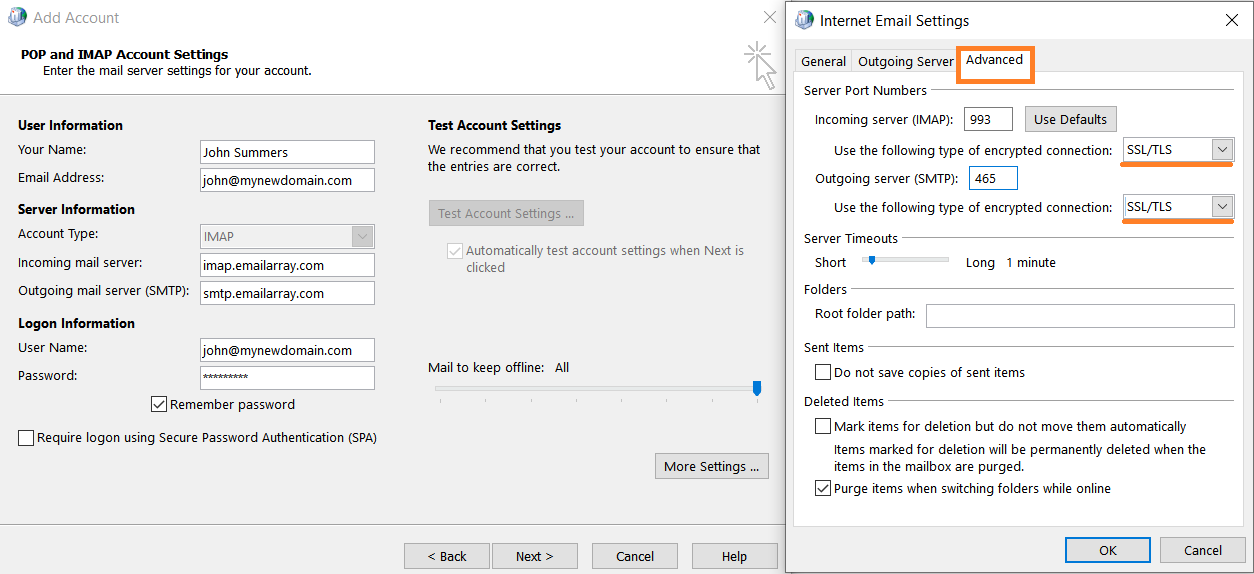
Option B: Manual Setup (IMAP)
If the automatic setup fails, or if you have specific server requirements from your provider, use the Manual path.
-
Select Manual setup or additional server types and click Next.
-
Choose POP or IMAP.
-
Enter your Server Information:
-
Account Type: IMAP
-
Incoming mail server: (Provided by your host)
-
Outgoing mail server (SMTP): (Provided by your host)
-
-
More Settings (Crucial Step): * Click the More Settings button.
-
Under the Outgoing Server tab, check the box: "My outgoing server (SMTP) requires authentication."
-
Under the Advanced tab, ensure you are using the correct port numbers (usually 993 for IMAP and 465 or 587 for SMTP) and select SSL/TLS for the encrypted connection.
-
-
Click OK, then Next to test the settings.


Step 3: Launching Your New Profile
Now that the profile is created, you need to tell Outlook to use it.
-
Back in the Mail window (where you clicked "Show Profiles"), look at the bottom section.
-
Select "Prompt for a profile to be used" if you want to choose between your old and new profile every time you open Outlook.
-
Alternatively, select "Always use this profile" and choose your new one from the dropdown to make it the default.
-
Click Apply and open Outlook.
Enjoy your clean, fresh inbox!
Setup Calendar and Contacts
Sync Contacts and Calendars using CalDAV and CardDAV
How to sync your calendar and contacts across all your devices.
With CalDAV and CardDAV, you can keep your schedule and address book perfectly in sync across smartphones, tablets, and desktop applications. These protocols allow you to use your favorite native apps (like the built-in calendar on iOS or Android) rather than being forced to use a specific web interface.
Note: Please ensure your email account is an Enhanced mailbox - which supports mobile synchronization features - before beginning.
Step 1: Get Your Server URLs
You will need a specific URL for your Calendar and another for your Contacts. You can find these directly in your webmail interface:
-
Log into your Webmail.
-
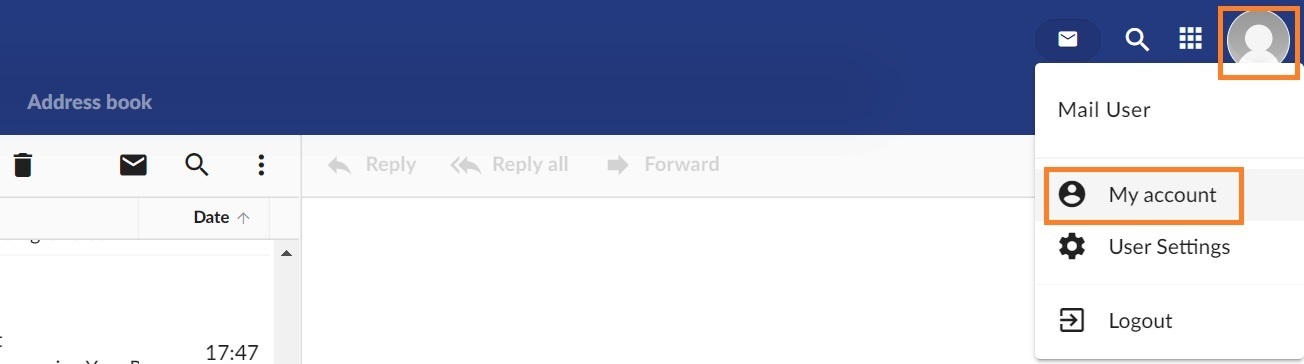
Click on your Profile Picture/Icon in the top corner.
-
Select My Account.
-
Navigate to the Synchronization tab on the left-hand menu.
-
Copy the unique links found under CalDAV URL and CardDAV URL.

The URLs generally follow this format:
-
CalDAV:
https://yourdomain--com.w.emailarray.com/caldav -
CardDAV:
https://yourdomain--com.w.emailarray.com/carddav
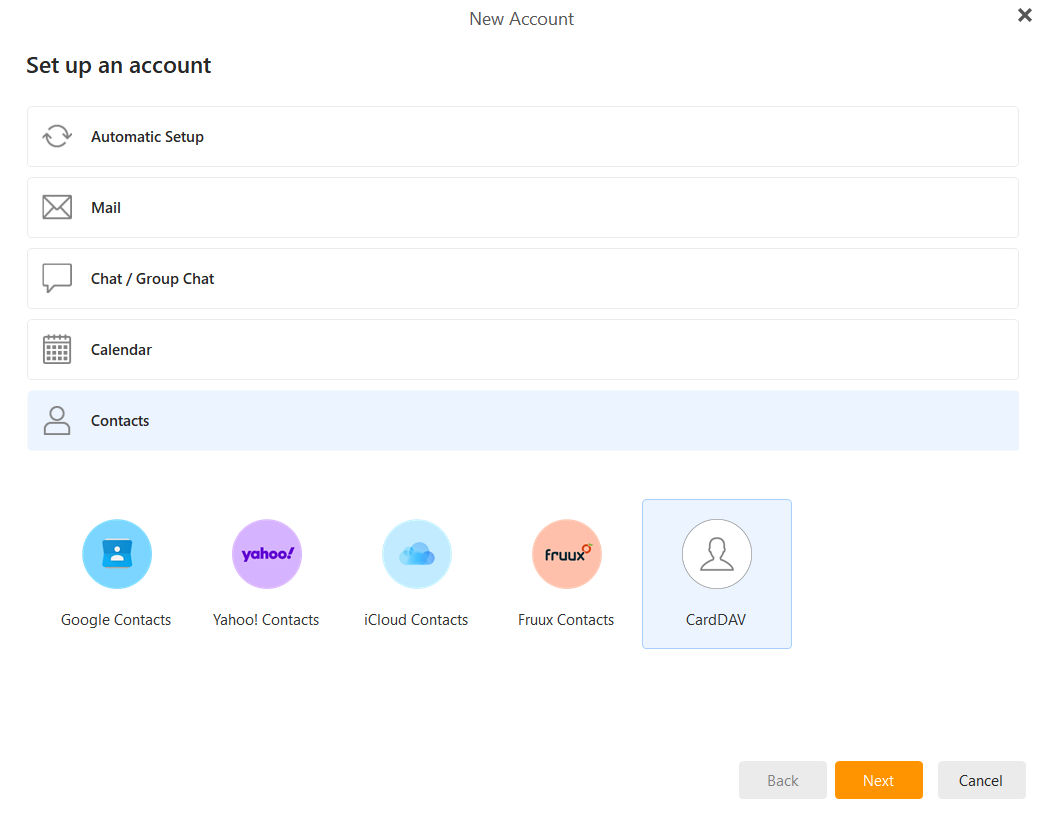
Step 2: Add a New Account to Your Device
The process is similar across most platforms (iOS, Android, macOS, or Thunderbird).
-
Open your device's Settings or your preferred Calendar/Contact app.
-
Find the option to Add Account.
-
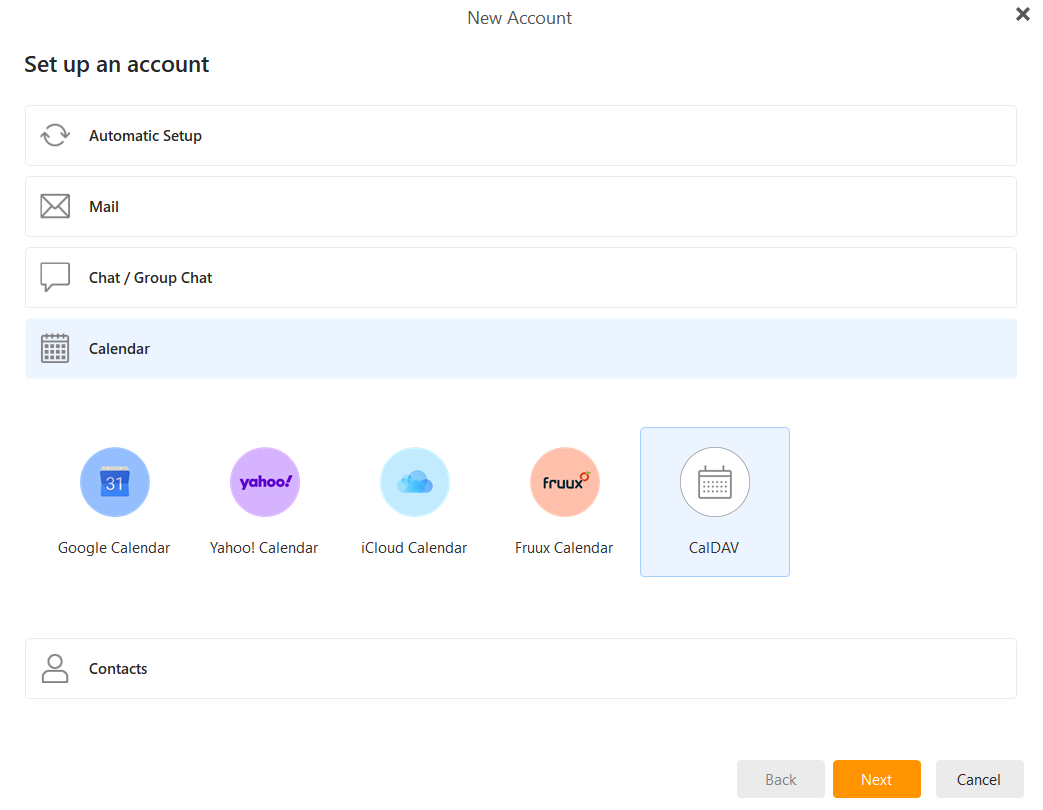
Select Other or Advanced Setup (do not select Google, Outlook.com, or iCloud).
-
Choose CalDAV (for Calendars) or CardDAV (for Contacts).
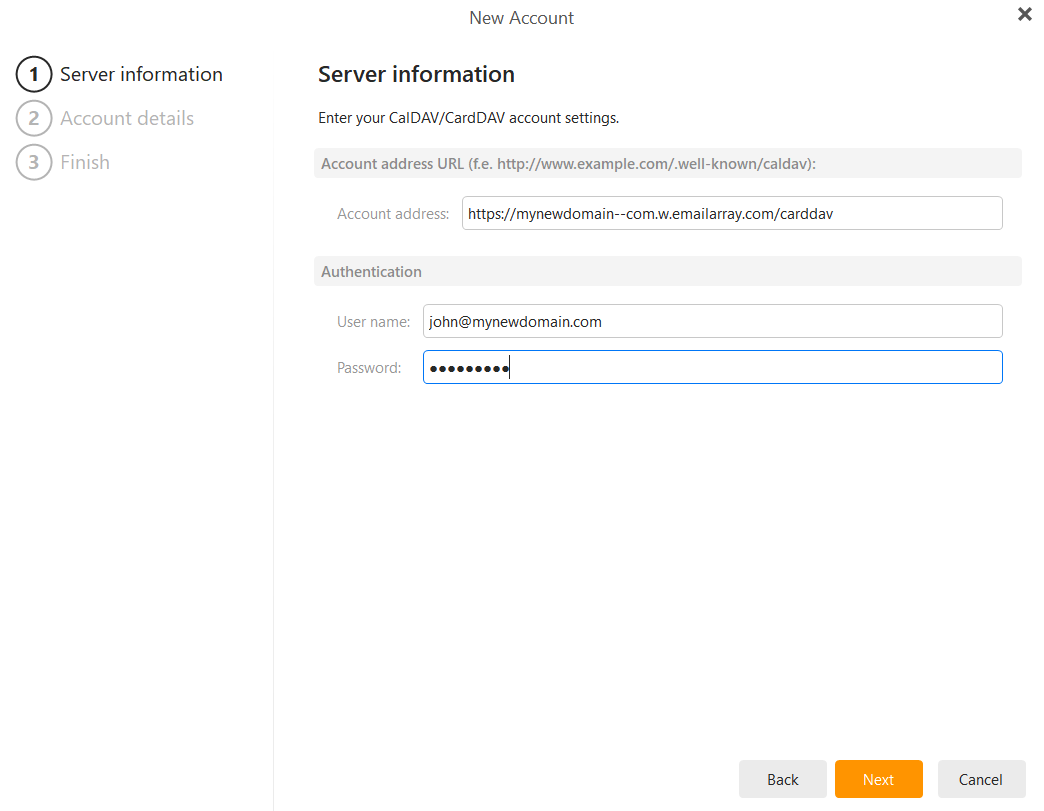
Step 3: Enter Connection Details
When prompted for account details, use the Manual or Advanced setup option:
-
Username: Your full email address (e.g., john@mydomain.com).
-
Password: Your email account password.
-
Server URL: Paste the specific URL you copied from your webmail in Step 1.
-
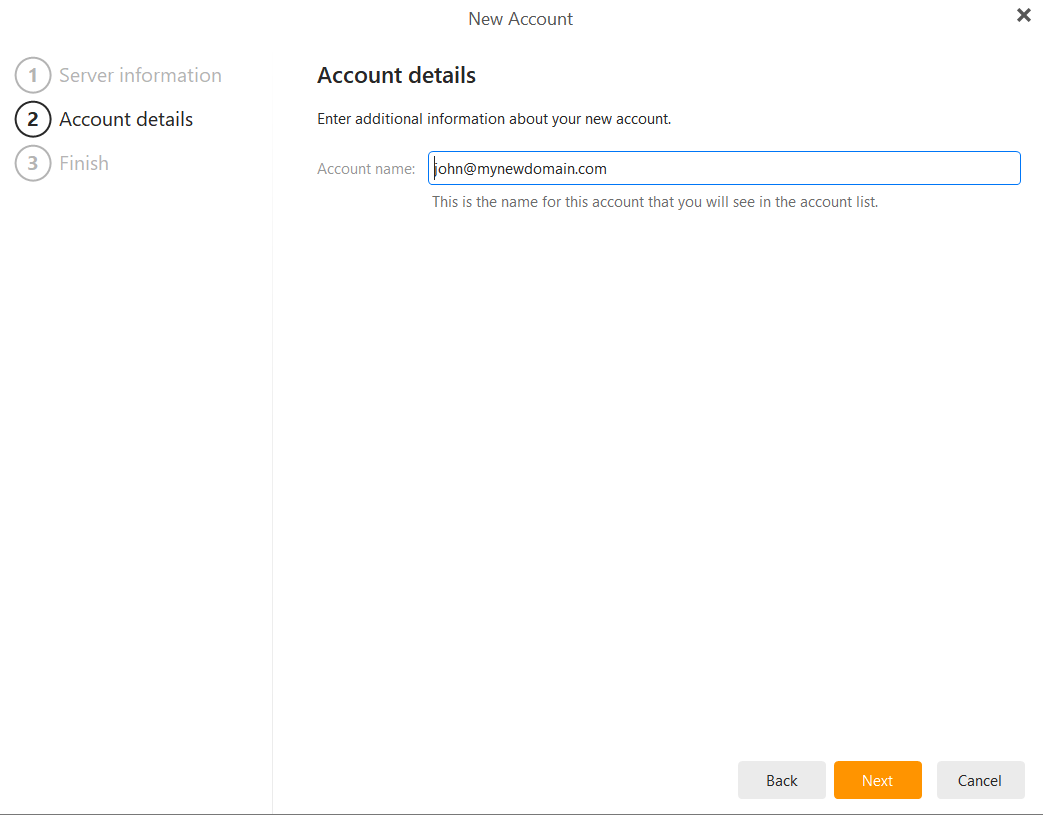
Description: Give the account a name, such as "Work Calendar" or "My Contacts."
Click Finish or Save to complete the setup. Your device will now begin the initial synchronization.
Outlook - CalDAV Synchronizer Setup
Enhanced mailbox only.
Enhanced mailboxes allow you to sync calendars (CalDAV) and contacts (CardDAV) across multiple devices with applications that support the CardDAV/CalDAV protocols.
In Outlook you can sync via CalDAV / CardDAV by installing the caldavsynchronizer - an Open Source plugin that you can install on your computer and use with your Outlook. This plugin supports Outlook 2007 to Outlook 2016 and is Free and Open-Source Software (FOSS), licensed under AGPL 3 and developed by Alexander Nimmervoll and Gerhard Zehetbauer. You can find the project on Github and SourceForge.
This is a step-by-step guide to installing and setting up the caldavsynchronizer plugin.
1. Download the caldavsynchronizer
You can download the caldavsynchronizer plugin from the project's website: https://caldavsynchronizer.org/.
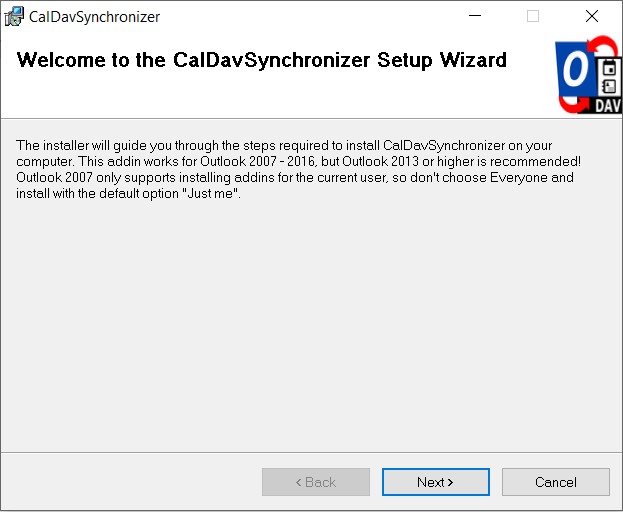
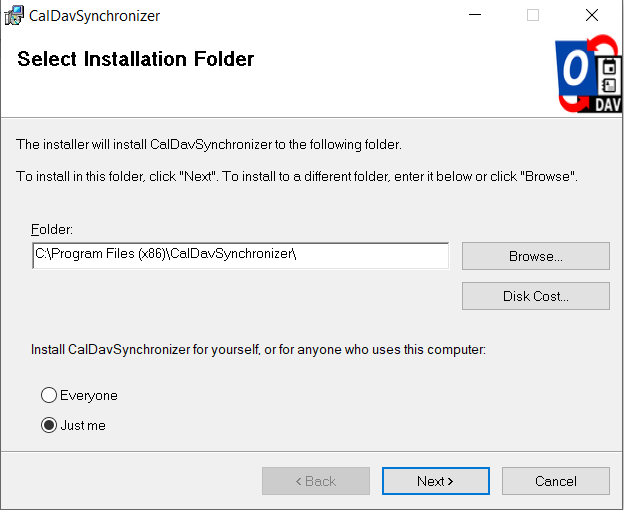
2. Install the caldavsynchronizer
Extract the downloaded .zip file and start the installation. Once the installation is complete, you will see a new ribbon called "CalDav Synchronizer" in your Outlook.
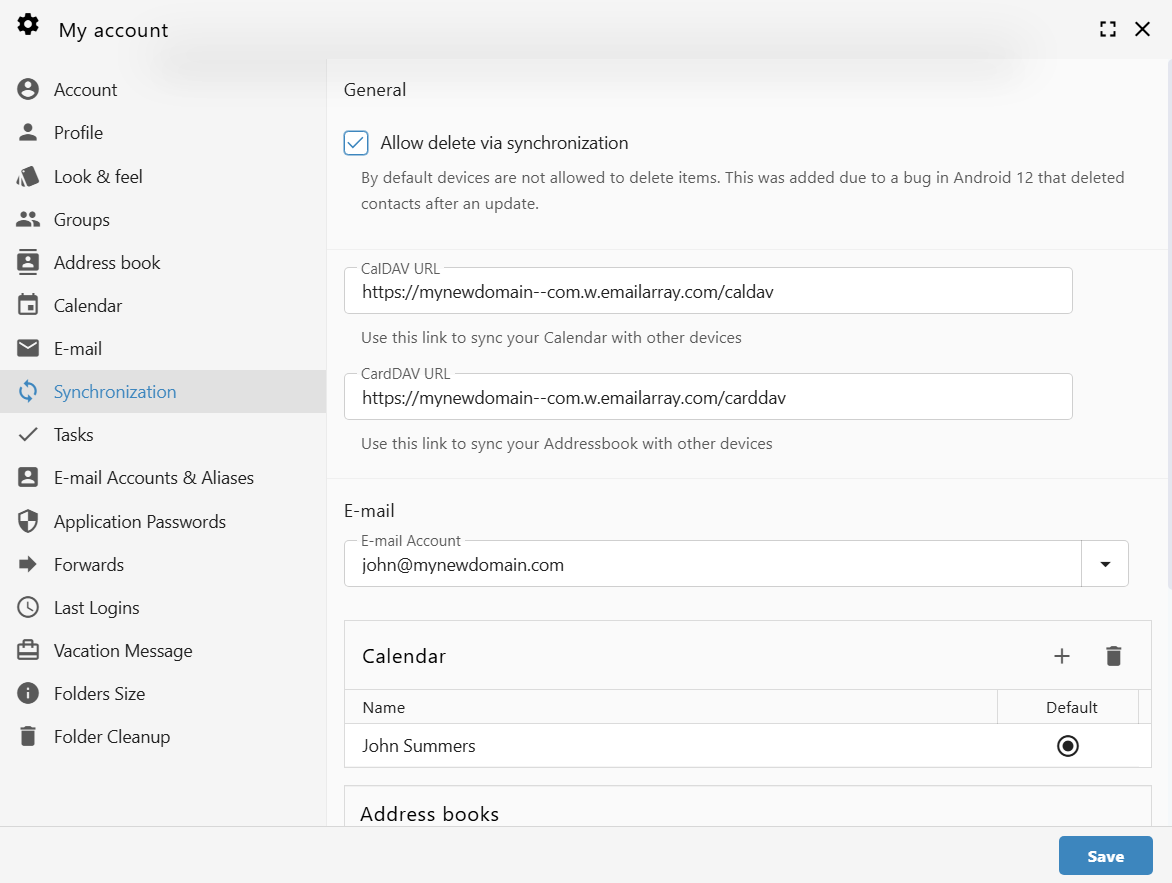
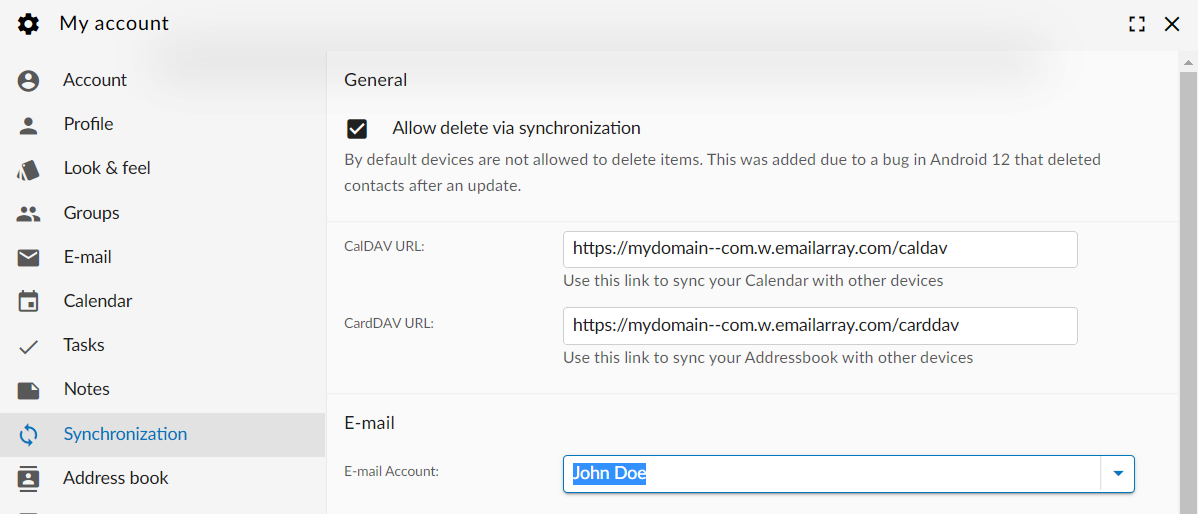
3. Get your CalDAV / CardDAV URLs
First, you need to obtain your CalDAV / CardDAV URLs. CalDAV is for Calendar synchronization, and CardDAV is for Contacts.
- Log into the Webmail using your full e-mail address and your current e-mail password
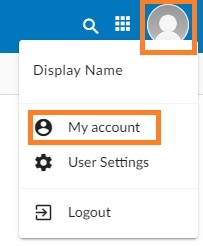
- Click on the User icon from the top right to activate the menu. Then click on My account

- In the Synchronization tab, find the CalDAV / CardDAV URL. You will need to copy and use these URLs with the caldavsynchronizer.
4. Set up the caldavsynchronizer
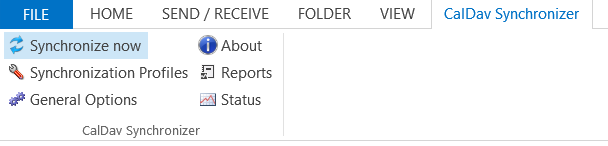
- Open Outlook on your computer.
- Go to the CalDav Synchronizer ribbon. Click on the Synchronization Profiles option.
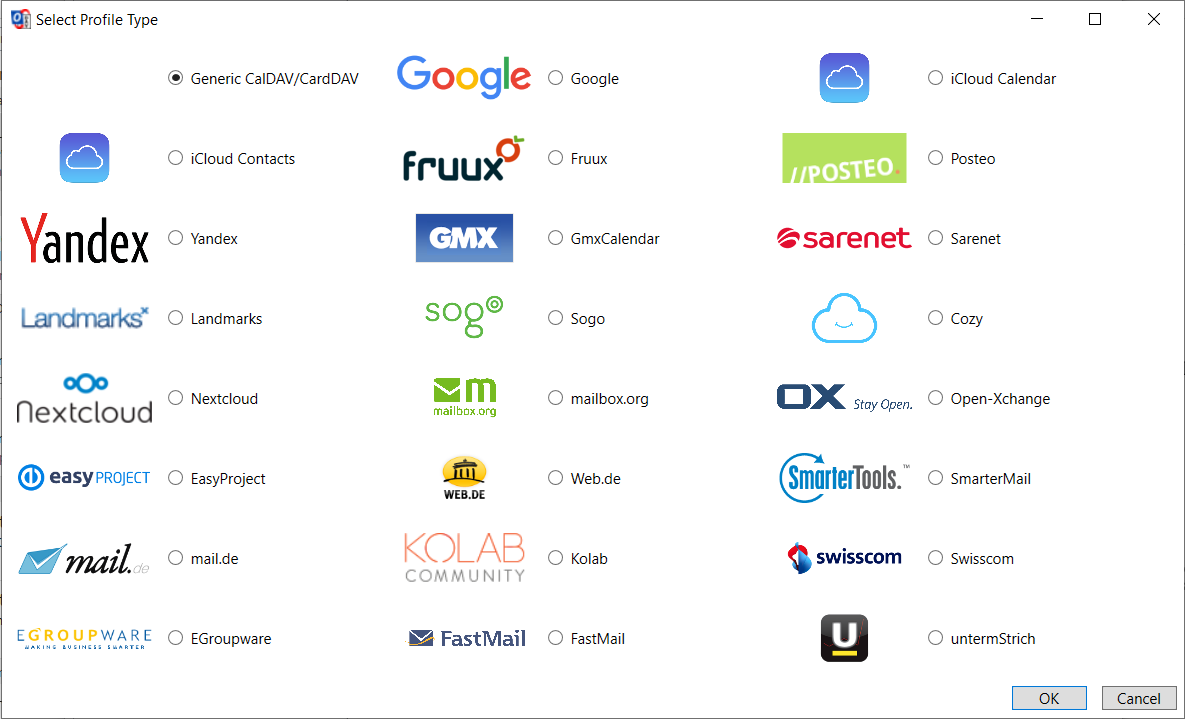
- Click on the Add button (plus sign) to set up a new Calendar or Addressbook to sync. Select the profile type Generic CalDAV/CardDAV.
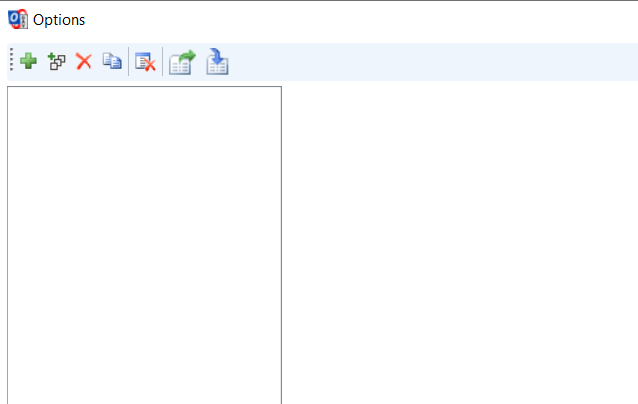
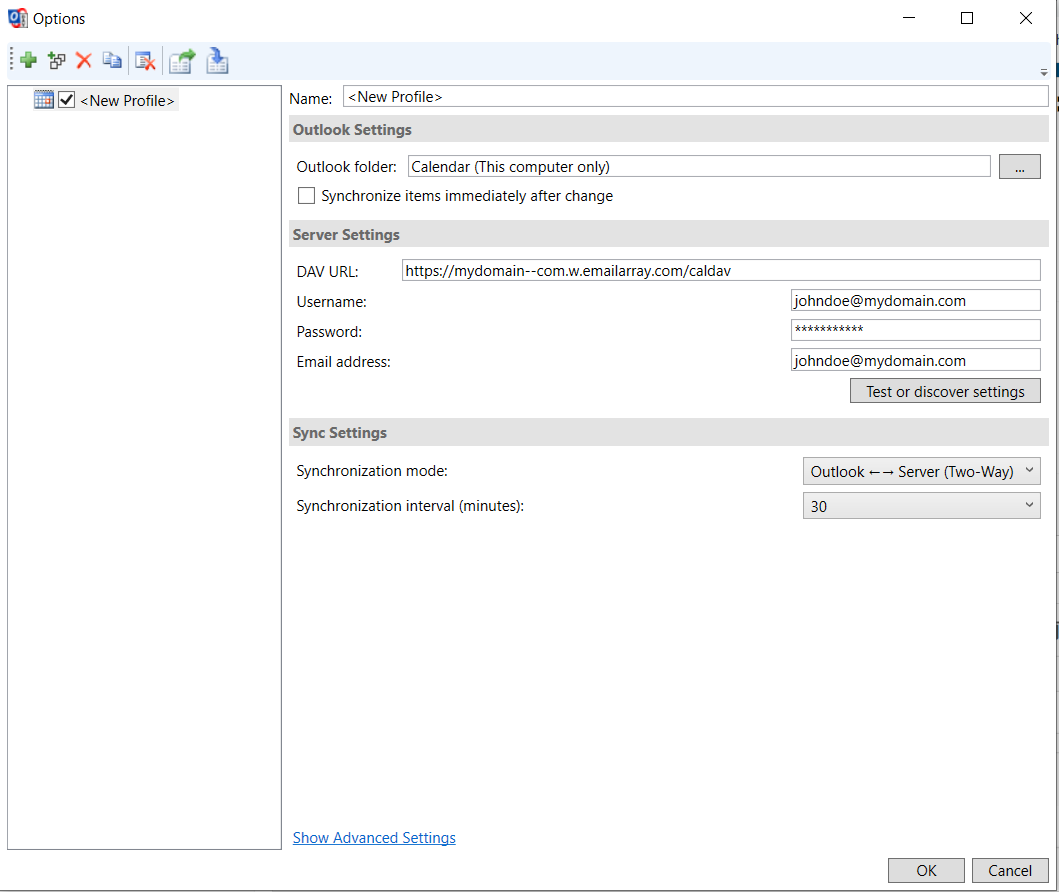
- A new profile window will show. Fill in the following details:
- Name: give a name to this profile. For example, Calendar - personal, or Calendar - work.
- Outlook folder: create a new folder in the Calendar Items or Contact Items category. You can also choose an existing Calendar or Contact folder.
- Server Settings: these are your CalDAV / CardDAV details:
- DAV URL: if you're adding a Calendar, use the CalDAV URL obtained from the Webmail at step 3. This URL should be in the form of https://mydomain–com.w.emailarray.com/caldav - be sure to replace mydomain--com with your own domain name. If you're adding a Contact list, use the CardDAV URL.
- Username: your full email address
- Password: your email password
- Email address: your full email address
- Click on the Test or discover settings button. If you have multiple Calendars (or Contact lists) you can choose which one of them to sync with this Profile.
- Sync Settings: choose how and how often to synchronize the Profile. We recommend the Outlook ↔ Server (Two-Way) synchronization mode.
- After you finish the setup, you can choose to synchronize items immediately after change by ticking the option in the Outlook Settings. Please note you can only activate this option after you have finished the above setup and clicked on the Test or discover settings.
- Click on the OK button to finish setup and save changes.
5. Synchronize your new Profile
If the synchronization didn't start automatically, you could manually sync by going to the CalDAV Synchronization ribbon in Outlook and clicking the Synchronize now option.
You can now set up a new Calendar or Contact list by adding a new Profile (step 4).
Thunderbird - Syncing Contacts and Calendars
Keep your schedule and address book in sync across all your devices using CalDAV and CardDAV protocols. This allows you to manage your data directly within Thunderbird rather than using a web interface.
Note: Please ensure your email account is an Enhanced mailbox, as these mailboxes support advanced synchronization features.
Step 1: Get Your Server URLs
You will need a specific URL for your Calendar and another for your Contacts. You can find these in your webmail:
-
Log into your Webmail.
-
Click on your Profile Picture/Icon in the top corner.
-
Select My Account.

-
Navigate to the Synchronization tab on the left-hand menu.
-
Copy the unique links found under CalDAV URL and CardDAV URL.
Example URL Formats:
-
CalDAV:
https://yourdomain--com.w.emailarray.com/caldav
Step 2: Set Up Your Calendar (CalDAV)
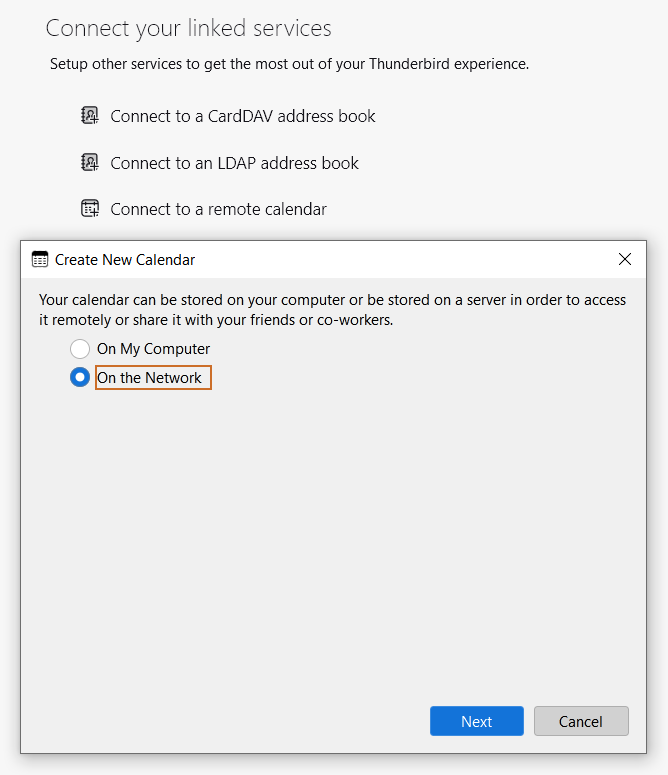
-
In Thunderbird, locate the Connect your linked services section and click Connect to a remote calendar.
-
In the "Create New Calendar" window, select On the Network and click Next.

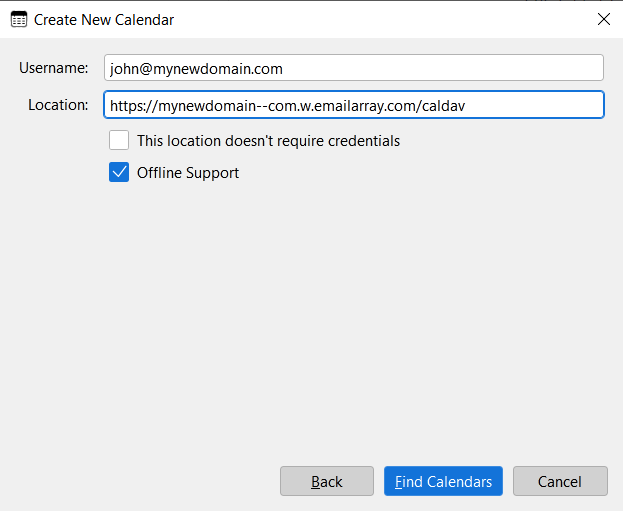
-
Enter Connection Details:
-
Username: Your full email address.
-
Location: Paste your unique CalDAV URL from Step 1.
-
Click Find Calendars.

-
-
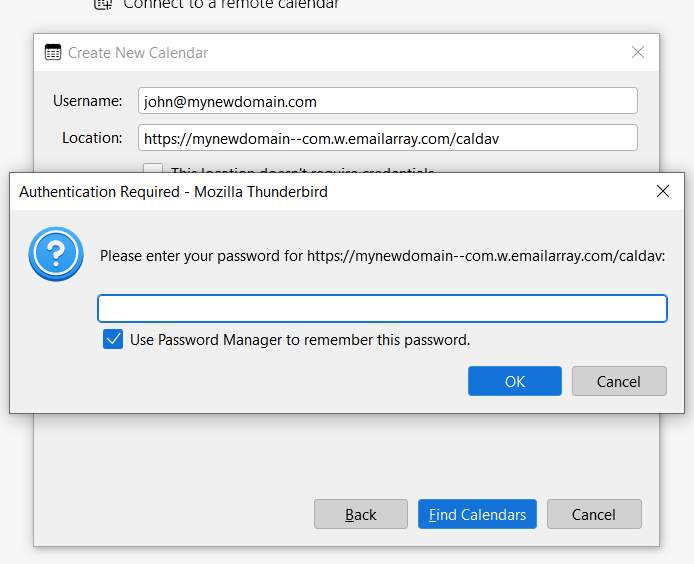
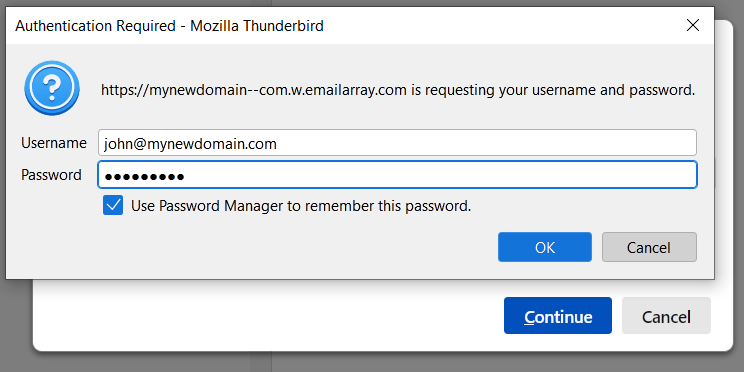
Authentication: A prompt will appear asking for your password. Enter your email password and check Use Password Manager to remember this password.

-
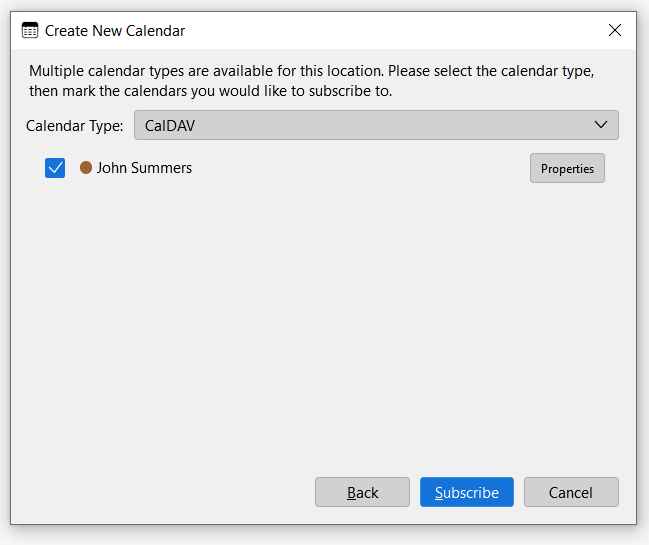
Finalize: Select the calendar(s) you wish to subscribe to and click Subscribe.

Step 3: Set Up Your Contacts (CardDAV)
-
In the Connect your linked services section, click Connect to a CardDAV address book.
-
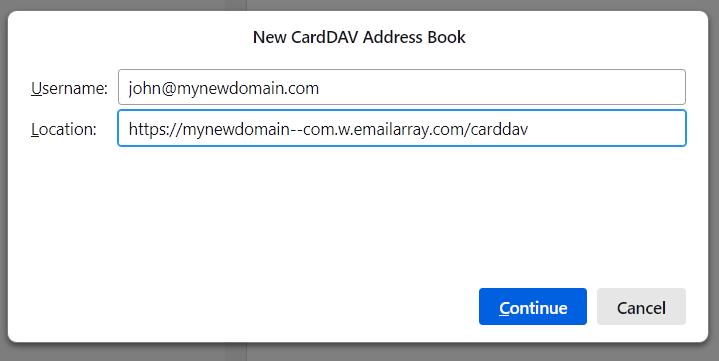
Enter Connection Details:
-
Username: Your full email address.
-
Location: Paste your unique CardDAV URL from Step 1.
-
Click Continue.

-
-
Authentication: When the "Authentication Required" window appears, verify your username and enter your email password. Check the box to remember the password and click OK.

-
Your address book will now synchronize with Thunderbird.
Troubleshooting Tips
Verify Your Plan: Basic mailboxes support email synchronization only. If you cannot see the Synchronization tab in webmail, you may need to upgrade to an Enhanced plan.
Check Your URL: Ensure there are no extra spaces at the beginning or end of the URL when pasting it into Thunderbird.
Direct Sync: Unlike standard IMAP which only syncs email, these steps ensure your Calendar, Contacts, and Tasks stay updated across your computer, phone, and tablet.
eM Client - Syncing Calendar and Contacts
eM Client is a powerful groupware tool that allows you to manage your professional life in one place. By connecting your Calendar (CalDAV) and Contacts (CardDAV), you can keep your schedule and address book perfectly synchronized between eM Client and your other devices.
Note: Please ensure your email account is an Enhanced mailbox, as these mailboxes support advanced synchronization features.
Step 1: Get Your Server URLs
You will need a specific URL for your Calendar and another for your Contacts. You can find these in your webmail:
-
Log into your Webmail.
-
Click on your Profile Picture/Icon in the top corner.
-
Select My Account.
-
Navigate to the Synchronization tab on the left-hand menu.
-
Copy the unique links found under CalDAV URL and CardDAV URL.
Example URL Formats:
-
CalDAV:
https://yourdomain--com.w.emailarray.com/caldav
Step 2: Set Up Your Calendar (CalDAV)
-
Open eM Client and go to Menu > Accounts > Add Account.
-
Select the Calendar tab and choose CalDAV. Click Next.

-
Enter Server Information:
-
Account address: Paste your unique CalDAV URL.
-
User name: Your full email address.
-
Password: Your email account password.
-
Click Next.

-
-
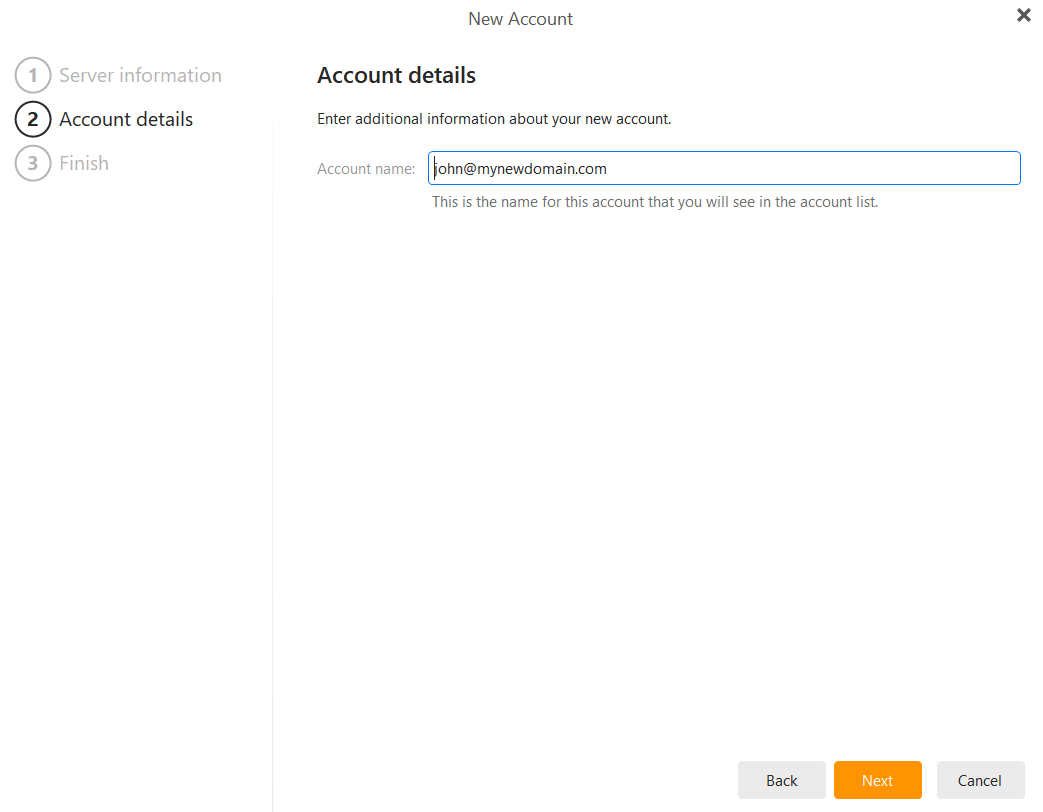
Account Details: Enter an Account name (e.g., "Work Calendar") so you can easily identify it in your list. Click Next.

-
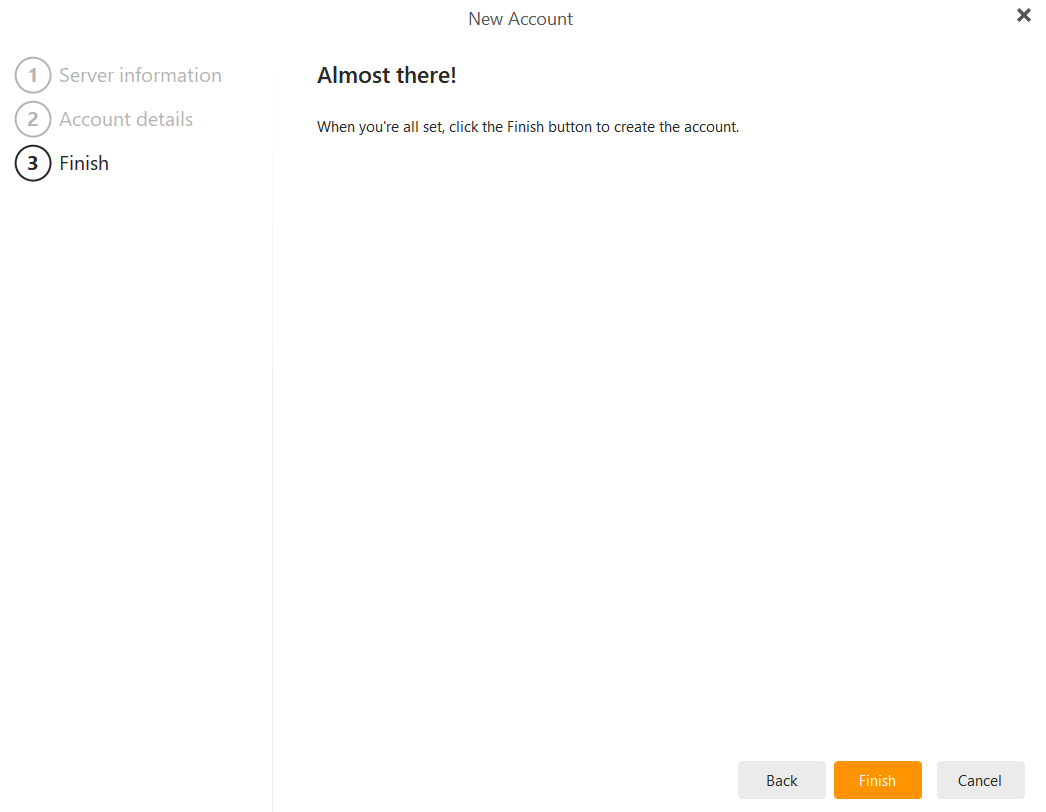
Finalize: Click Finish to complete the setup. Your events will now begin to sync.


Step 3: Set Up Your Contacts (CardDAV)
-
Go to Menu > Accounts > Add Account.
-
Select the Contacts tab and choose CardDAV. Click Next.

-
Enter Server Information:
-
Account address: Paste your unique CardDAV URL.
-
User name: Your full email address.
-
Password: Your email account password.
-
Click Next.

-
-
Account Details: Enter an Account name (e.g., "Company Contacts") and click Next.

-
Finalize: Click Finish. Your address book is now connected.
Troubleshooting & Tips
-
Authentication Errors: Ensure you are using your full email address as the username.
- Connection Security: eM Client automatically uses secure connections for these protocols.
- Dynamic Storage: Remember that your combined storage (including calendar attachments and contacts) is shared across your mailbox.
ActiveSync / EAS - Syncing Calendars and Contacts
Sync your email, calendar, and contacts in real-time.
ActiveSync is the most powerful way to connect your mailbox to your mobile devices and desktop apps. Unlike standard email setups, ActiveSync provides a real-time "push" connection that synchronizes your email, calendar, contacts, and notes instantly across all your devices. This ensures your data is always consistent, no matter where you are:
- Effortless Management: When you delete an email on your phone, it’s instantly removed from your computer, and when you add a meeting to your calendar, it appears everywhere.
- Contacts on the Go: If you save a new client's phone number on your smartphone while out of the office, that contact will be waiting for you in your webmail address book the moment you sit down at your desk.
- Real-time Updates: If you update a contact’s email address or job title in your desktop email app, your phone's native contacts list will reflect that change automatically without you having to lift a finger.
Click Here to see the ActiveSync setup
Cheat Sheet with all the details
Quick Setup Guide
Step 1: Add a new domain
- Log into Admin Panel (admin.emailarray.com) with signup credentials
- Domains → New → Enter domain (format:
mydomain.com- no http/www) - Click on the red checkmark to get a TXT record value for domain verification (shown in popup)
Step 2: Add the Required DNS Records
This configuration must be done at the domain's registrar or DNS hosting provider (e.g., Cloudflare, Namecheap, GoDaddy):
✅ TXT (Domain Verification)
Verifies your domain with us. Get the TXT details from Step 1 and add it to your DNS:
| Type | Name/Host | Value | TTL |
|---|---|---|---|
| TXT | mx-verification | Provided verification token | 3600 |
✅ MX (Mail Exchange)
Directs incoming email to us. You can wait to make this change after we complete the email migration.
Remove existing MX records first
| Type | Name / Host | Value | Priority | TTL |
|---|---|---|---|---|
| MX | @ or yourdomain.com | mx.emailarray.com | 5 | 3600 |
| MX | @ or yourdomain.com | mx2.emailarray.com | 10 | 3600 |
✅ SPF (Sender Policy Framework)
Authorizes us to send emails on your domain's behalf and prevents bad actors to send emails on your behalf.
If there's an existing SPF record: Add
include:emailarray.combefore-all
| Type | Name | Value | TTL |
|---|---|---|---|
| TXT | @ or yourdomain.com | v=spf1 include:emailarray.com ~all | 3600 |
✅ Webmail Access (Optional but Recommended)
| Type | Name | Value | TTL |
|---|---|---|---|
| CNAME | webmail | webredirect.emailarray.com | 3600 |
Lets users access Webmail via
webmail.yourdomain.com
✅ DKIM (DomainKeys Identified Mail)
| Type | Name (Host) | Value (TXT) | TTL |
|---|---|---|---|
| TXT | Provided Host by Admin Panel | Provided Key by Admin Panel | 3600 |
Improves email deliverability by authenticating the sender. DKIM helps protect against email spoofing and phishing attacks.
How to Enable DKIM:
- Go to the Admin Panel and log in
- Click Domains
- Click the DKIM icon next to your domain
- In the popup window, switch Enable to Yes
- Copy the Host and Key values
- Add a TXT record in your DNS using:
- Host as the name
- Key as the TXT value
- Wait for DNS propagation
✅ Autodiscover & Autoconfig (Optional but Recommended)
| Type | Name | Value | TTL |
|---|---|---|---|
| A | autodiscover.yourdomain.com | 69.28.212.195 | 3600 |
| A | autoconfig.yourdomain.com | 69.28.212.195 | 3600 |
Don't forget to replace yourdomain.com with your own domain name
Enables automatic configuration for email clients such as Outlook, Thunderbird, eM Client, etc.
Step 3: Verification
- Log into Admin Panel (admin.emailarray.com) with signup credentials and go to the Domains tab.
- Click on the Health button to check your domain health. Wait 5-60 minutes for DNS propagation. SSL records might take an additional 30 minutes to update.
- Click Verify again. When all records show green your domain is completely configured.
Step 4: Create Email Account
- Log into Admin Panel (admin.emailarray.com) with signup credentials
- Users → Select domain → New
- Configure:
- Account Type: Basic/Enhanced/OEX
- Username: desired prefix (letters, numbers, dots only)
- Password: 8+ chars (upper, lower, number, symbol)
- Quota: 0.1-50 GB (Basic) / 0.1-200 GB (Enhanced)
- Other optional settings: Language, Timezone or Localization and Date format.
Step 5: Access Webmail
- Option 1:
webmail.yourdomain.com(if CNAME configured) - Option 2: Click envelope icon in Admin Panel Users page and bookmark the generated URL (such as httsp://yourdomain--com.w.emailarray.com)
- Option3: Go to
https://login.emailarray.com/and login.
Additional Setup - Email Client Configuration
IMAP (Recommended)
- Incoming Server:
imap.emailarray.com - SSL: Port 993
- Authentication: Required
SMTP (Outgoing)
- Server:
smtp.emailarray.com - SSL: Port 465
- Authentication: Required
ActiveSync (Enhanced accounts only)
- For Enhanced mailboxes, you can add the new account as ActiveSync / Exchange in your email app. Syncs email, calendar, contacts across mobile devices.
Sync Calendar and Contacts with CalDAV and CardDAV (Enhanced accounts only)
The URLs generally follow this format, please make sure you replace yourdomain--com with your own domain name (full setup here):
-
CalDAV:
https://yourdomain--com.w.emailarray.com/caldav -
CardDAV:
https://yourdomain--com.w.emailarray.com/carddav
Troubleshooting
- DNS changes can take up to 24 hours to propagate
- Red "Fail" status is normal until DNS propagates
- Use domain health popup for detailed record status
- No incoming emails: Check MX records using mxtoolbox.com
- Emails going to Spam: Ensure SPF and DKIM records are properly configured with the domain's DNS provider (check with mxtoolbox.com). Add DMARC records to DNS provider.